
User's Guide for Windows
Page 3
Contents Finding information about the printer 11 Finding information about the printer 11 Setting up the printer 13 Checking the box contents 13 Installing another language control panel 14 Getting the printer ready to fax 14 Connecting directly to a telephone wall jack 15 Connecting to a telephone 16 ...Connecting to an answering machine 17 Connecting to a computer with a modem 18 Learning about the printer 21 Understanding the parts of the printer 21 Using the control panel...23 Customizing copy settings using the control panel 26 Using the Copy Mode menu...26...
Contents Finding information about the printer 11 Finding information about the printer 11 Setting up the printer 13 Checking the box contents 13 Installing another language control panel 14 Getting the printer ready to fax 14 Connecting directly to a telephone wall jack 15 Connecting to a telephone 16 ...Connecting to an answering machine 17 Connecting to a computer with a modem 18 Learning about the printer 21 Understanding the parts of the printer 21 Using the control panel...23 Customizing copy settings using the control panel 26 Using the Copy Mode menu...26...
User's Guide for Windows
Page 7
...fax settings 89 Networking the printer 90 Installing network printers 90 Shared printing...90 Direct IP printing...91 Tips for installing a network printer 92 Assigning an IP address...92 Finding your MAC address...92 Configuring a network printer manually 92 Finding a printer/print server located on ... contacts 98 Improving print quality...98 Preserving the print cartridges 99 Cleaning the scanner glass 99 Ordering supplies...100 Recycling Lexmark products 100 Troubleshooting 101 Setup troubleshooting...101 Incorrect language appears on the display 101 Power button is not lit...102 ...
...fax settings 89 Networking the printer 90 Installing network printers 90 Shared printing...90 Direct IP printing...91 Tips for installing a network printer 92 Assigning an IP address...92 Finding your MAC address...92 Configuring a network printer manually 92 Finding a printer/print server located on ... contacts 98 Improving print quality...98 Preserving the print cartridges 99 Cleaning the scanner glass 99 Ordering supplies...100 Recycling Lexmark products 100 Troubleshooting 101 Setup troubleshooting...101 Incorrect language appears on the display 101 Power button is not lit...102 ...
User's Guide for Windows
Page 8
... 104 Print troubleshooting...104 Improving print quality...104 Poor text and graphic quality...105 Poor quality at the edges of the page 106 Printer does not print or respond 106 Print speed is slow...106 Partial document or photo prints 107 Copy troubleshooting...107 Copier does not ...network 110 Fax troubleshooting...110 Cannot send or receive a fax...110 Can send but not receive faxes 112 Can receive but not send faxes 113 Printer receives a blank fax...114 Received fax has poor print quality 114 Error message: Fax error...115 Error message: Fax mode unsupported 115 Network ...
... 104 Print troubleshooting...104 Improving print quality...104 Poor text and graphic quality...105 Poor quality at the edges of the page 106 Printer does not print or respond 106 Print speed is slow...106 Partial document or photo prints 107 Copy troubleshooting...107 Copier does not ...network 110 Fax troubleshooting...110 Cannot send or receive a fax...110 Can send but not receive faxes 112 Can receive but not send faxes 113 Printer receives a blank fax...114 Received fax has poor print quality 114 Error message: Fax error...115 Error message: Fax mode unsupported 115 Network ...
User's Guide for Windows
Page 9
Printer does not feed paper, envelopes, or specialty media 119 Banner paper jams...119 Memory card troubleshooting 120 Memory card cannot be inserted 120 Nothing happens ...
Printer does not feed paper, envelopes, or specialty media 119 Banner paper jams...119 Memory card troubleshooting 120 Memory card cannot be inserted 120 Nothing happens ...
User's Guide for Windows
Page 11
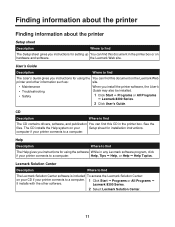
... CD in the printer box or on hardware and software. Lexmark Solution Center Description Where to find The Lexmark Solution Center software is included To access the Lexmark Solution Center: on the Lexmark Web printer and other software. Lexmark 8300 Series. 2 Select Lexmark Solution Center. 11...site. • Maintenance • Troubleshooting • Safety When you install the printer software, the User's Guide may also be installed. 1 Click Start Œ Programs or All Programs Œ Lexmark 8300 Series. 2 Click User's Guide. computer if your Setup sheet for ...
... CD in the printer box or on hardware and software. Lexmark Solution Center Description Where to find The Lexmark Solution Center software is included To access the Lexmark Solution Center: on the Lexmark Web printer and other software. Lexmark 8300 Series. 2 Select Lexmark Solution Center. 11...site. • Maintenance • Troubleshooting • Safety When you install the printer software, the User's Guide may also be installed. 1 Click Start Œ Programs or All Programs Œ Lexmark 8300 Series. 2 Click User's Guide. computer if your Setup sheet for ...
User's Guide for Windows
Page 12
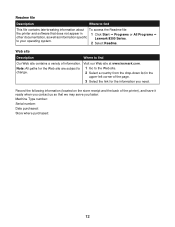
... specific to your operating system. 1 Click Start ΠPrograms or All Programs ΠLexmark 8300 Series. 2 Select Readme. Record the following information (located on the store receipt and the back of the printer), and have it ready when you contact us so that does not appear in the upper...-left corner of information. Visit our Web site at www.lexmark.com. Web site Description Where to find This file contains late-breaking information about To access the Readme file: the printer and software that we may serve you need. Readme file Description Where to ...
... specific to your operating system. 1 Click Start ΠPrograms or All Programs ΠLexmark 8300 Series. 2 Select Readme. Record the following information (located on the store receipt and the back of the printer), and have it ready when you contact us so that does not appear in the upper...-left corner of information. Visit our Web site at www.lexmark.com. Web site Description Where to find This file contains late-breaking information about To access the Readme file: the printer and software that we may serve you need. Readme file Description Where to ...
User's Guide for Windows
Page 13
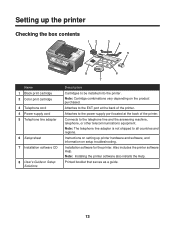
... combinations vary depending on setup troubleshooting. Connects to the power supply port located at the back of the printer. Instructions on setting up the printer Checking the box contents 12 3 4 5 x Name 1 Black print cartridge 2 Color print cartridge 3 Telephone cord 4 Power supply cord 5 Telephone line adapter 6 Setup sheet 7 Installation software CD 8 User's Guide or...
... combinations vary depending on setup troubleshooting. Connects to the power supply port located at the back of the printer. Instructions on setting up the printer Checking the box contents 12 3 4 5 x Name 1 Black print cartridge 2 Color print cartridge 3 Telephone cord 4 Power supply cord 5 Telephone line adapter 6 Setup sheet 7 Installation software CD 8 User's Guide or...
User's Guide for Windows
Page 14
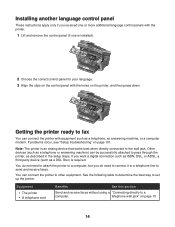
... determine the best way to a computer. x 2 Choose the correct control panel for your language. 3 Align the clips on the control panel with the printer. 1 Lift and remove the control panel (if one is required. If problems occur, see "Setup troubleshooting" on page 15 14 x Getting the... another language control panel These instructions apply only if you received one or more additional language control panels with the holes on the printer, and then press down. If you want a digital connection such as ISDN, DSL, or ADSL, a third-party device (such as a DSL filter) is installed...
... determine the best way to a computer. x 2 Choose the correct control panel for your language. 3 Align the clips on the control panel with the printer. 1 Lift and remove the control panel (if one is required. If problems occur, see "Setup troubleshooting" on page 15 14 x Getting the... another language control panel These instructions apply only if you received one or more additional language control panels with the holes on the printer, and then press down. If you want a digital connection such as ISDN, DSL, or ADSL, a third-party device (such as a DSL filter) is installed...
User's Guide for Windows
Page 15
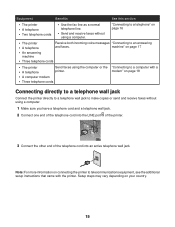
... of the telephone cord into the LINE port of the telephone cord into an active telephone wall jack. Equipment Benefits See this section • The printer • A telephone • Two telephone cords • Use the fax line as a normal telephone line. • Send and receive faxes without using a ... an answering and faxes. Setup steps may vary depending on page 18 Connecting directly to a telephone wall jack Connect the printer directly to a telephone wall jack to make copies or send and receive faxes without using a computer. 1 Make sure you have a telephone cord ...
... of the telephone cord into the LINE port of the telephone cord into an active telephone wall jack. Equipment Benefits See this section • The printer • A telephone • Two telephone cords • Use the fax line as a normal telephone line. • Send and receive faxes without using a ... an answering and faxes. Setup steps may vary depending on page 18 Connecting directly to a telephone wall jack Connect the printer directly to a telephone wall jack to make copies or send and receive faxes without using a computer. 1 Make sure you have a telephone cord ...
User's Guide for Windows
Page 16
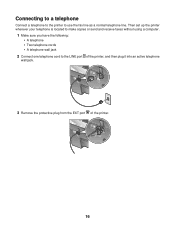
LINE EXT LINE EXT 16 Then set up the printer wherever your telephone is located to make copies or send and receive faxes without using a computer. 1 Make sure you have the following: • A telephone • Two telephone cords • A telephone wall jack 2 Connect one telephone cord to use the fax line as a normal telephone line. LINE EXT LINE EXT 3 Remove the protective plug from the EXT port of the printer, and then plug it into an active telephone wall jack. Connecting to a telephone Connect a telephone to the printer to the LINE port of the printer.
LINE EXT LINE EXT 16 Then set up the printer wherever your telephone is located to make copies or send and receive faxes without using a computer. 1 Make sure you have the following: • A telephone • Two telephone cords • A telephone wall jack 2 Connect one telephone cord to use the fax line as a normal telephone line. LINE EXT LINE EXT 3 Remove the protective plug from the EXT port of the printer, and then plug it into an active telephone wall jack. Connecting to a telephone Connect a telephone to the printer to the LINE port of the printer.
User's Guide for Windows
Page 17
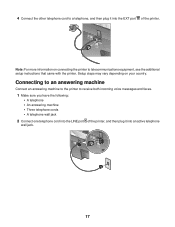
4 Connect the other telephone cord to a telephone, and then plug it into the EXT port of the printer, and then plug it into the LINE port of the printer. Setup steps may vary depending on connecting the printer to receive both incoming voice messages and faxes. 1 Make sure you have the following: • A telephone... one telephone cord into an active telephone wall jack. LINE EXT LINE EXT 17 Connecting to an answering machine Connect an answering machine to the printer to telecommunications equipment, see the additional setup instructions that came with the...
4 Connect the other telephone cord to a telephone, and then plug it into the EXT port of the printer, and then plug it into the LINE port of the printer. Setup steps may vary depending on connecting the printer to receive both incoming voice messages and faxes. 1 Make sure you have the following: • A telephone... one telephone cord into an active telephone wall jack. LINE EXT LINE EXT 17 Connecting to an answering machine Connect an answering machine to the printer to telecommunications equipment, see the additional setup instructions that came with the...

User's Guide for Windows
Page 18
... to the answering machine. 5 Connect a third telephone cord from the answering machine to send faxes from the EXT port of the printer. Setup steps may vary depending on connecting the printer to telecommunications equipment, see the additional setup instructions that came with a modem • Three telephone cords • A telephone wall jack 18...
... to the answering machine. 5 Connect a third telephone cord from the answering machine to send faxes from the EXT port of the printer. Setup steps may vary depending on connecting the printer to telecommunications equipment, see the additional setup instructions that came with a modem • Three telephone cords • A telephone wall jack 18...
User's Guide for Windows
Page 19
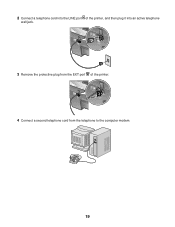
2 Connect a telephone cord into an active telephone wall jack. LINE EXT LINE EXT 3 Remove the protective plug from the telephone to the computer modem. 19 LINE EXT LINE EXT 4 Connect a second telephone cord from the EXT port of the printer, and then plug it into the LINE port of the printer.
2 Connect a telephone cord into an active telephone wall jack. LINE EXT LINE EXT 3 Remove the protective plug from the telephone to the computer modem. 19 LINE EXT LINE EXT 4 Connect a second telephone cord from the EXT port of the printer, and then plug it into the LINE port of the printer.

User's Guide for Windows
Page 20
5 Connect a third telephone cord from the computer modem to telecommunications equipment, see the additional setup instructions that came with the printer. Setup steps may vary depending on connecting the printer to the EXT port of the printer. LINE EXT LINE EXT Note: For more information on your country. 20
5 Connect a third telephone cord from the computer modem to telecommunications equipment, see the additional setup instructions that came with the printer. Setup steps may vary depending on connecting the printer to the EXT port of the printer. LINE EXT LINE EXT Note: For more information on your country. 20

User's Guide for Windows
Page 21
...: The scanner glass is recommended for scanning, copying, or faxing multiple-page documents. Access the scanner glass. Load paper. Learning about the printer Understanding the parts of the printer 2 1 10 9 8 Use the 1 Automatic Document Feeder (ADF) 2 ADF input tray 3 ADF exit tray 4 Top cover 5 Memory card slots 6 PictBridge port 7 Paper tray 8 Paper...
...: The scanner glass is recommended for scanning, copying, or faxing multiple-page documents. Access the scanner glass. Load paper. Learning about the printer Understanding the parts of the printer 2 1 10 9 8 Use the 1 Automatic Document Feeder (ADF) 2 ADF input tray 3 ADF exit tray 4 Top cover 5 Memory card slots 6 PictBridge port 7 Paper tray 8 Paper...
User's Guide for Windows
Page 22
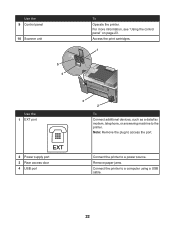
For more information, see "Using the control panel" on page 23. Connect the printer to access the port. Note: Remove the plug to a power source. Remove paper jams. Connect the printer to the printer. Access the print cartridges. 1 LINE EXT Use the 1 EXT port EXT 2 Power supply port 3 Rear access door 4 USB port 3 2 To Connect additional devices, such as a data/fax modem, telephone, or answering machine to a computer using a USB cable. 22 Use the 9 Control panel 10 Scanner unit LINE EXT 5 4 To Operate the printer.
For more information, see "Using the control panel" on page 23. Connect the printer to access the port. Note: Remove the plug to a power source. Remove paper jams. Connect the printer to the printer. Access the print cartridges. 1 LINE EXT Use the 1 EXT port EXT 2 Power supply port 3 Rear access door 4 USB port 3 2 To Connect additional devices, such as a data/fax modem, telephone, or answering machine to a computer using a USB cable. 22 Use the 9 Control panel 10 Scanner unit LINE EXT 5 4 To Operate the printer.

User's Guide for Windows
Page 23
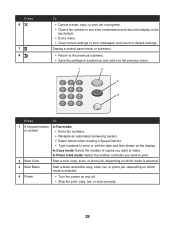
Note: The mode is selected when the button light is on . 5 Photo Card Access the photo card menus. The printer must be connected to this telephone line to the printer. 1 2 3 4 5 87 6 Press To 1 Quick Dial buttons Access any of the five programmed Speed Dial numbers. (1-5) 2 Copy Mode Access the ... the 5 LINE port LINE Using the control panel The display shows: • All-In-One status • Messages • Menus To Connect the printer to an active telephone line to send and receive faxes. You can preview photos stored on . 4 Fax Mode Access the fax menus and send faxes....
Note: The mode is selected when the button light is on . 5 Photo Card Access the photo card menus. The printer must be connected to this telephone line to the printer. 1 2 3 4 5 87 6 Press To 1 Quick Dial buttons Access any of the five programmed Speed Dial numbers. (1-5) 2 Copy Mode Access the ... the 5 LINE port LINE Using the control panel The display shows: • All-In-One status • Messages • Menus To Connect the printer to an active telephone line to send and receive faxes. You can preview photos stored on . 4 Fax Mode Access the fax menus and send faxes....
User's Guide for Windows
Page 25
... Copy mode: Select the number of photos you want to make. In Photo Card mode: Select the number of copies you want to print. 2 Start Color Start a color copy, scan, or photo job, depending on which mode is selected. 3 Start Black Start a black-and-white copy, scan, fax, or photo job, depending...
... Copy mode: Select the number of photos you want to make. In Photo Card mode: Select the number of copies you want to print. 2 Start Color Start a color copy, scan, or photo job, depending on which mode is selected. 3 Start Black Start a black-and-white copy, scan, fax, or photo job, depending...

User's Guide for Windows
Page 28
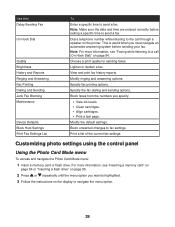
Customize printer settings. Customizing fax settings using the control panel Using the Fax Mode menu To access and navigate the Fax Mode menu: 1 From the control panel, ...
Customize printer settings. Customizing fax settings using the control panel Using the Fax Mode menu To access and navigate the Fax Mode menu: 1 From the control panel, ...
User's Guide for Windows
Page 29
... a test page. Print a list of the current fax settings. For more information, see "Inserting a memory card" on page 54 or "Inserting a flash drive" on the printer. Note: Make sure the date and time are entered correctly before sending your fax. Note: For more information, see "Faxing while listening to send a fax...
... a test page. Print a list of the current fax settings. For more information, see "Inserting a memory card" on page 54 or "Inserting a flash drive" on the printer. Note: Make sure the date and time are entered correctly before sending your fax. Note: For more information, see "Faxing while listening to send a fax...


