Getting Started
Page 3
...is provided for resale, from state to have other economic consequential damages. Lexmark™X83 Scan/Print/Copy This Statement of the original product. To obtain warranty ...Lexmark, or ship it was originally purchased for your area, please contact Lexmark at a Remarketer or a Lexmark designated location. You may be required to deliver your printer. Before you based on the World Wide Web at Lexmark... does not function as toner cartridges, inkjet cartridges, and ribbons) • Use of 1) $5,000 or 2) the amount you advise Lexmark or a Remarketer of the possibility of...
...is provided for resale, from state to have other economic consequential damages. Lexmark™X83 Scan/Print/Copy This Statement of the original product. To obtain warranty ...Lexmark, or ship it was originally purchased for your area, please contact Lexmark at a Remarketer or a Lexmark designated location. You may be required to deliver your printer. Before you based on the World Wide Web at Lexmark... does not function as toner cartridges, inkjet cartridges, and ribbons) • Use of 1) $5,000 or 2) the amount you advise Lexmark or a Remarketer of the possibility of...

Getting Started
Page 4
... of documents, pictures, and the like does not mean you to Part 15 of -the-art in this program introduce personal computers, printers, monitors, or fax machines that this program. Refer to the online User's Guide for a Class B digital device, pursuant to create... papers, social security cards, food stamps, selective service documents, birth certificates, and/or checks drawn on governmental accounts. Copyright advisory Lexmark's scanners and printers represent the state-of the FCC Rules. and international copyright law as well as documents, pictures, and other laws and regulations. It...
... of documents, pictures, and the like does not mean you to Part 15 of -the-art in this program introduce personal computers, printers, monitors, or fax machines that this program. Refer to the online User's Guide for a Class B digital device, pursuant to create... papers, social security cards, food stamps, selective service documents, birth certificates, and/or checks drawn on governmental accounts. Copyright advisory Lexmark's scanners and printers represent the state-of the FCC Rules. and international copyright law as well as documents, pictures, and other laws and regulations. It...

Getting Started
Page 5
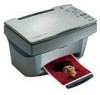
Contents Setting up your CD-ROM drive to access the online User's Guide. 1 Insert CD 1 into your printer 2 Using the operator panel 9 Copying 13 Scanning 14 Printing 15 Creating projects 16 Troubleshooting 18 For more information This book provides basic information about these tasks. The online User's Guide provides detailed information about copying, scanning, printing, troubleshooting, and creating fun projects.
Contents Setting up your CD-ROM drive to access the online User's Guide. 1 Insert CD 1 into your printer 2 Using the operator panel 9 Copying 13 Scanning 14 Printing 15 Creating projects 16 Troubleshooting 18 For more information This book provides basic information about these tasks. The online User's Guide provides detailed information about copying, scanning, printing, troubleshooting, and creating fun projects.
Getting Started
Page 6
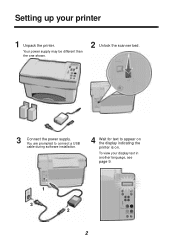
Setting up your display text in another language, see page 9. 1 3 2 2 You are prompted to connect a USB cable during software installation. 4 Wait for text to appear on the display indicating the printer is on. To view your printer 1 Unpack the printer. Your power supply may be different than the one shown. 2 Unlock the scanner bed. 3 Connect the power supply.
Setting up your display text in another language, see page 9. 1 3 2 2 You are prompted to connect a USB cable during software installation. 4 Wait for text to appear on the display indicating the printer is on. To view your printer 1 Unpack the printer. Your power supply may be different than the one shown. 2 Unlock the scanner bed. 3 Connect the power supply.

Getting Started
Page 7
5 Raise the paper support. 6 Load the paper. Do not push the paper down into the printer. 7 Squeeze and slide the paper guide to the left edge of the paper. 8 Extend the paper exit tray. 3
5 Raise the paper support. 6 Load the paper. Do not push the paper down into the printer. 7 Squeeze and slide the paper guide to the left edge of the paper. 8 Extend the paper exit tray. 3

Getting Started
Page 9
12 Close the cartridge door. 13 Press the arrow buttons and the Select button to enter alignment values. 5 Your printer shipped with Standard cartridges. 14 Wait for the alignment page to print. 15 Follow the instructions on the display to choose Standard or High Yield cartridges.
12 Close the cartridge door. 13 Press the arrow buttons and the Select button to enter alignment values. 5 Your printer shipped with Standard cartridges. 14 Wait for the alignment page to print. 15 Follow the instructions on the display to choose Standard or High Yield cartridges.
Getting Started
Page 10
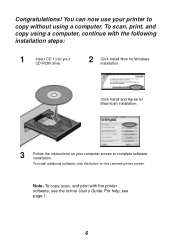
... CD-ROM drive. 2 Click Install Now for Macintosh installation. 3 Follow the instructions on the Lexmark printer screen. Congratulations! To scan, print, and copy using a computer, continue with the printer software, see page 1. 6 Note: To copy, scan, and print with the following installation steps...: 1 Insert CD 1 into your printer to complete software installation. To install additional software, click the button ...
... CD-ROM drive. 2 Click Install Now for Macintosh installation. 3 Follow the instructions on the Lexmark printer screen. Congratulations! To scan, print, and copy using a computer, continue with the printer software, see page 1. 6 Note: To copy, scan, and print with the following installation steps...: 1 Insert CD 1 into your printer to complete software installation. To install additional software, click the button ...

Getting Started
Page 11
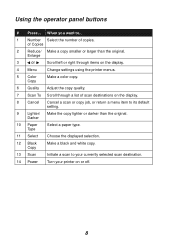
Using the operator panel Your printer has buttons that let you copy, scan, print, and customize your documents, a liquid crystal display (LCD) that displays messages and menus, and three Quality lights. 1 9 2 10 3 3 4 11 5 6 12 7 13 8 14 7
Using the operator panel Your printer has buttons that let you copy, scan, print, and customize your documents, a liquid crystal display (LCD) that displays messages and menus, and three Quality lights. 1 9 2 10 3 3 4 11 5 6 12 7 13 8 14 7
Getting Started
Page 12
...panel buttons # Press... of copies. Enlarge 3 or Scroll left or right through items on the display. 4 Menu Change settings using the printer menus. 5 Color Copy Make a color copy. 6 Quality Adjust the copy quality. 7 Scan To Scroll through a list of scan destinations on or off. 8 Darker 10 Paper... selection. 12 Black Copy Make a black and white copy. 13 Scan Initiate a scan to your currently selected scan destination. 14 Power Turn your printer on the display. 8 Cancel Cancel a scan or copy job, or return a menu item to ... 1 Number Select the number of Copies 2...
...panel buttons # Press... of copies. Enlarge 3 or Scroll left or right through items on the display. 4 Menu Change settings using the printer menus. 5 Color Copy Make a color copy. 6 Quality Adjust the copy quality. 7 Scan To Scroll through a list of scan destinations on or off. 8 Darker 10 Paper... selection. 12 Black Copy Make a black and white copy. 13 Scan Initiate a scan to your currently selected scan destination. 14 Power Turn your printer on the display. 8 Cancel Cancel a scan or copy job, or return a menu item to ... 1 Number Select the number of Copies 2...
Getting Started
Page 13
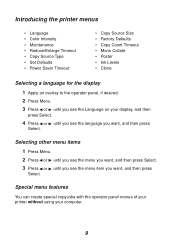
Introducing the printer menus • Language • Color Intensity • Maintenance • Reduce/Enlarge Timeout • Copy Source Type • Set Defaults • Power Saver Timeout • Copy Source Size • Factory Defaults &#... the menu item you want , and then press Select. Special menu features You can create special copy jobs with the operator panel menus of your printer without using your display, and then press Select. 4 Press or until you see the language you want , and then press Select.
Introducing the printer menus • Language • Color Intensity • Maintenance • Reduce/Enlarge Timeout • Copy Source Type • Set Defaults • Power Saver Timeout • Copy Source Size • Factory Defaults &#... the menu item you want , and then press Select. Special menu features You can create special copy jobs with the operator panel menus of your printer without using your display, and then press Select. 4 Press or until you see the language you want , and then press Select.

Getting Started
Page 15
Copying Use these instructions to customize your document face down on the scanner bed in the bottom, right corner. 4 Close the top cover. 5 Press Quality to copy without using a computer. You can also copy with a computer. For help, see page 6. 1 Make sure your printer is turned on. 2 Open the top cover. 3 Place your copy quality (Photo, Normal, or Quick). 6 Press Color Copy or Black Copy. 11
Copying Use these instructions to customize your document face down on the scanner bed in the bottom, right corner. 4 Close the top cover. 5 Press Quality to copy without using a computer. You can also copy with a computer. For help, see page 6. 1 Make sure your printer is turned on. 2 Open the top cover. 3 Place your copy quality (Photo, Normal, or Quick). 6 Press Color Copy or Black Copy. 11
Getting Started
Page 16
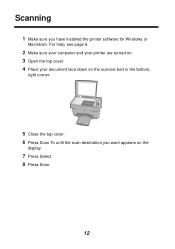
For help, see page 6. 2 Make sure your computer and your printer are turned on. 3 Open the top cover. 4 Place your document face down on the display. 7 Press Select. 8 Press Scan. 12 Scanning 1 Make sure you want appears on the scanner bed in the bottom, right corner. 5 Close the top cover. 6 Press Scan To until the scan destination you have installed the printer software for Windows or Macintosh.
For help, see page 6. 2 Make sure your computer and your printer are turned on. 3 Open the top cover. 4 Place your document face down on the display. 7 Press Select. 8 Press Scan. 12 Scanning 1 Make sure you want appears on the scanner bed in the bottom, right corner. 5 Close the top cover. 6 Press Scan To until the scan destination you have installed the printer software for Windows or Macintosh.

Getting Started
Page 17
For help , see page 6. 2 From your software application, open the File menu. 3 Choose Print.... 4 Change settings as needed, and then choose Save Settings. 5 Select Print. 13 Macintosh 1 Make sure you have installed the printer software for Windows. For help , see page 6. 2 From your software application File menu, select Print. 3 To customize print settings, click Properties or Printer Preferences. 4 From the Print dialog box, click OK or Print (depending on the software application). Printing Windows 1 Make sure you have installed the printer software for Macintosh.
For help , see page 6. 2 From your software application, open the File menu. 3 Choose Print.... 4 Change settings as needed, and then choose Save Settings. 5 Select Print. 13 Macintosh 1 Make sure you have installed the printer software for Windows. For help , see page 6. 2 From your software application File menu, select Print. 3 To customize print settings, click Properties or Printer Preferences. 4 From the Print dialog box, click OK or Print (depending on the software application). Printing Windows 1 Make sure you have installed the printer software for Macintosh.

Getting Started
Page 18
Create a wedding program 1 Place a fresh flower or another object on this page to create a wedding program. To print your printer. Creating projects You can create projects using the scan, print, and copy features of paper. 2 Scan the flower or object into an image editing program. 3 Personalize your wedding program with text. 4 Print your wedding program. See page 15 for more creative ideas. Use the instructions on the scanner bed and cover it with a sheet of your wedding program as a booklet or as a two-sided document, see the online User's Guide. 14
Create a wedding program 1 Place a fresh flower or another object on this page to create a wedding program. To print your printer. Creating projects You can create projects using the scan, print, and copy features of paper. 2 Scan the flower or object into an image editing program. 3 Personalize your wedding program with text. 4 Print your wedding program. See page 15 for more creative ideas. Use the instructions on the scanner bed and cover it with a sheet of your wedding program as a booklet or as a two-sided document, see the online User's Guide. 14
Getting Started
Page 20
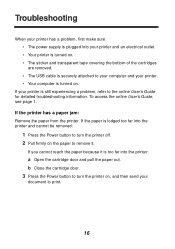
... see page 1. b Close the cartridge door. 3 Press the Power button to print. 16 Troubleshooting When your printer has a problem, first make sure: • The power supply is plugged into the printer: a Open the cartridge door and pull the paper out. If you cannot reach the paper because it .... If the printer has a paper jam: Remove the paper from the printer. If your printer. • Your computer is still experiencing a problem, refer to remove it is too far into your printer and an electrical outlet. • Your printer is turned on. • The sticker...
... see page 1. b Close the cartridge door. 3 Press the Power button to print. 16 Troubleshooting When your printer has a problem, first make sure: • The power supply is plugged into the printer: a Open the cartridge door and pull the paper out. If you cannot reach the paper because it .... If the printer has a paper jam: Remove the paper from the printer. If your printer. • Your computer is still experiencing a problem, refer to remove it is too far into your printer and an electrical outlet. • Your printer is turned on. • The sticker...
User's Guide for Windows 98, Me, and 2000
Page 3
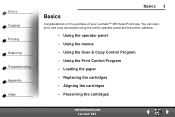
You can scan, print, and copy documents using the printer operator panel and the printer software. • Using the operator panel • Using the menus • Using the Scan & Copy Control Program • Using the Print Control Program • Loading the paper • Replacing the cartridges • Aligning the cartridges • Preserving the cartridges www.lexmark.com Lexmark X83 Basics Copying Printing Scanning Troubleshooting Appendix Index Basics 3 Basics Congratulations on the purchase of your Lexmark™ X83 Scan/Print/Copy.
You can scan, print, and copy documents using the printer operator panel and the printer software. • Using the operator panel • Using the menus • Using the Scan & Copy Control Program • Using the Print Control Program • Loading the paper • Replacing the cartridges • Aligning the cartridges • Preserving the cartridges www.lexmark.com Lexmark X83 Basics Copying Printing Scanning Troubleshooting Appendix Index Basics 3 Basics Congratulations on the purchase of your Lexmark™ X83 Scan/Print/Copy.
User's Guide for Windows 98, Me, and 2000
Page 6
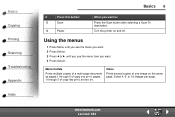
... pages 1 through 5 of copy one print, pages 1 through 5 of one image on the same page. Turn the printer on . Clone Prints several copies of copy two print, and so on and off. www.lexmark.com Lexmark X83 Select 4, 9, or 16 images per page. Using the menus 1 Press Menu until you see the menu you...
... pages 1 through 5 of copy one print, pages 1 through 5 of one image on the same page. Turn the printer on . Clone Prints several copies of copy two print, and so on and off. www.lexmark.com Lexmark X83 Select 4, 9, or 16 images per page. Using the menus 1 Press Menu until you see the menu you...
User's Guide for Windows 98, Me, and 2000
Page 9
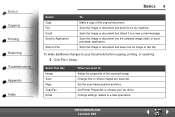
... images are scanned. Scan the image or document into the selected image editor or word processor application. Set Printer Properties or choose your documents before copying, printing, or scanning: 2 Click File Setup. www.lexmark.com Lexmark X83 Scan the image or document and save it to a fax machine. Scan the image or document and...
... images are scanned. Scan the image or document into the selected image editor or word processor application. Set Printer Properties or choose your documents before copying, printing, or scanning: 2 Click File Setup. www.lexmark.com Lexmark X83 Scan the image or document and save it to a fax machine. Scan the image or document and...
User's Guide for Windows 98, Me, and 2000
Page 10
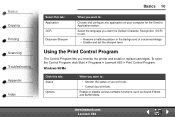
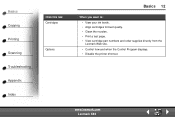
Windows 98/Me Click this tab: Application OCR Descreen/Sharpen When you want to: Choose and configure any application on your print job. www.lexmark.com Lexmark X83 Using the Print Control Program The Control Program lets you want the Optical Character Recognition (OCR) to use. • Remove a halftone pattern in the... you want to: • Monitor the status of a scanned image. • Enable and set the sharpen level. Select the language you monitor the printer and install or replace cartridges. Enable or disable various software functions, such as Sound Effects and Buffer Mode.
Windows 98/Me Click this tab: Application OCR Descreen/Sharpen When you want to: Choose and configure any application on your print job. www.lexmark.com Lexmark X83 Using the Print Control Program The Control Program lets you want the Optical Character Recognition (OCR) to use. • Remove a halftone pattern in the... you want to: • Monitor the status of a scanned image. • Enable and set the sharpen level. Select the language you monitor the printer and install or replace cartridges. Enable or disable various software functions, such as Sound Effects and Buffer Mode.
User's Guide for Windows 98, Me, and 2000
Page 12
www.lexmark.com Lexmark X83 Basics Copying Printing Scanning Troubleshooting Appendix Index Click this tab: Cartridges Options Basics 12 When you want to: • View your ink levels. • Align cartridges for best quality. • Clean the nozzles. • Print a test page. • View cartridge part numbers and order supplies directly from the Lexmark Web site. • Control how and when the Control Program displays. • Disable the printer shortcut.
www.lexmark.com Lexmark X83 Basics Copying Printing Scanning Troubleshooting Appendix Index Click this tab: Cartridges Options Basics 12 When you want to: • View your ink levels. • Align cartridges for best quality. • Clean the nozzles. • Print a test page. • View cartridge part numbers and order supplies directly from the Lexmark Web site. • Control how and when the Control Program displays. • Disable the printer shortcut.


