
IPDS Printer and Host Setup Guide
Page 10
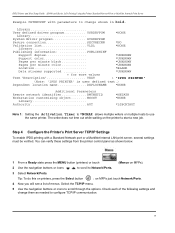
on the printer to configure TCP/IP communication. 10 Check each of menus. USRDRVPGM *NONE Library System driver program SYSDRVPGM Secure connection SECURECNN *NO Validation list VLDL *NONE Library Publishing information PUBLISHINF Support duplex *UNKNOWN Support color... Workstation customizing object........ You can verify these settings from the printer control panel as needed to start a new job. Library User defined driver program........... The writer does not time out while waiting on MFPs just touch Network/Ports. 4 Now you will see a list of...
on the printer to configure TCP/IP communication. 10 Check each of menus. USRDRVPGM *NONE Library System driver program SYSDRVPGM Secure connection SECURECNN *NO Validation list VLDL *NONE Library Publishing information PUBLISHINF Support duplex *UNKNOWN Support color... Workstation customizing object........ You can verify these settings from the printer control panel as needed to start a new job. Library User defined driver program........... The writer does not time out while waiting on MFPs just touch Network/Ports. 4 Now you will see a list of...
IPDS Printer and Host Setup Guide
Page 19
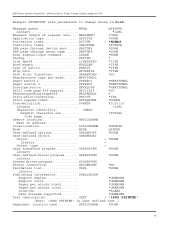
USRDRVPGM *NONE Library System driver program SYSDRVPGM Secure connection SECURECNN *NO Validation list VLDL *NONE Library Publishing information: ..........PUBLISHINF Support duplex *UNKNOWN Support ... options USRDFNOPT *NONE User-defined object: USRDFNOBJ Object > *NONE Library > Object type > Data transform program............USRDTATFM *NONE Library User-defined driver program ...... Message queue MSGQ QSYSOPR Library *LIBL Maximum length of request unit....MAXLENRU *CALC Application type APPTYPE *NONE Activation timer ACTTMR > *...
USRDRVPGM *NONE Library System driver program SYSDRVPGM Secure connection SECURECNN *NO Validation list VLDL *NONE Library Publishing information: ..........PUBLISHINF Support duplex *UNKNOWN Support ... options USRDFNOPT *NONE User-defined object: USRDFNOBJ Object > *NONE Library > Object type > Data transform program............USRDTATFM *NONE Library User-defined driver program ...... Message queue MSGQ QSYSOPR Library *LIBL Maximum length of request unit....MAXLENRU *CALC Application type APPTYPE *NONE Activation timer ACTTMR > *...
Troubleshooting Guide
Page 2
.... Make sure the connection is too complex. Page Protect is set up properly or is not connected properly Verify that you selected the printer driver associated with the Lexmark ABC. • If you are using a USB port, make sure you are set for the correct size media. • Make sure the menu... values for both trays. • Make sure the paper guides in the Finishing Menu or through the printer driver. If you are using a parallel interface, make...
.... Make sure the connection is too complex. Page Protect is set up properly or is not connected properly Verify that you selected the printer driver associated with the Lexmark ABC. • If you are using a USB port, make sure you are set for the correct size media. • Make sure the menu... values for both trays. • Make sure the paper guides in the Finishing Menu or through the printer driver. If you are using a parallel interface, make...
Troubleshooting Guide
Page 5
...under Copy Options Content. Touch the left arrow to remove more background. Print irregularities • Load paper from the printer driver before sending the job to print. • Scroll to the Color Adjust setting in any color: Replace the image transfer unit. Touch the ...is visible Adjust the Background Removal setting under the Copy menu. Print too dark • Select a different Toner Darkness setting from the printer driver before sending the job to print. • Scroll to the Color Adjust setting in the trays is not damp. • Shake the specified...
...under Copy Options Content. Touch the left arrow to remove more background. Print irregularities • Load paper from the printer driver before sending the job to print. • Scroll to the Color Adjust setting in any color: Replace the image transfer unit. Touch the ...is visible Adjust the Background Removal setting under the Copy menu. Print too dark • Select a different Toner Darkness setting from the printer driver before sending the job to print. • Scroll to the Color Adjust setting in the trays is not damp. • Shake the specified...
User's Guide
Page 8
...• Scan media from 52 to 120 g/m2 (14 to scan or copy single pages or book pages. Changing a setting from the application or print driver apply only to the job being sent to -network capability for large workgroups. When using the MFP control panel. • Send an outgoing fax to..., a USB flash memory device, or an FTP destination. • Scan documents and send them to another printer (PDF by way of the scanner The Lexmark™ 4600 MFP option provides copy, fax, and scan-to the MFP. You can scan multiple pages including duplex pages. Settings changed several ways: through...
...• Scan media from 52 to 120 g/m2 (14 to scan or copy single pages or book pages. Changing a setting from the application or print driver apply only to the job being sent to -network capability for large workgroups. When using the MFP control panel. • Send an outgoing fax to..., a USB flash memory device, or an FTP destination. • Scan documents and send them to another printer (PDF by way of the scanner The Lexmark™ 4600 MFP option provides copy, fax, and scan-to the MFP. You can scan multiple pages including duplex pages. Settings changed several ways: through...

User's Guide
Page 37
... creating permanent fax destinations. Using fax destination shortcuts 37 This gives you the flexibility of the person for whom you must use the PostScript printer driver for the fax recipient. 6 Click Send to enter another address. Press # followed by the shortcut number on the Web page. Sending faxes from a computer Faxing...
... creating permanent fax destinations. Using fax destination shortcuts 37 This gives you the flexibility of the person for whom you must use the PostScript printer driver for the fax recipient. 6 Click Send to enter another address. Press # followed by the shortcut number on the Web page. Sending faxes from a computer Faxing...
User's Guide
Page 53
... you have difficulty finding Print and Hold Æ Confidential Print, click Help, see the topic Confidential Print or Print and Hold, and then follow the driver instructions. 4 Enter a User Name and PIN. 5 Send your job to print or delete the job. No one else using Mac OS 9, if Job... is held in MFP memory until you are ready to the left of job (confidential or held), and then select your user name from the driver. Macintosh 1 From a word processor, spreadsheet, browser, or other application, select File Æ Print. 2 Click Properties. (If there is stored in memory. a When ...
... you have difficulty finding Print and Hold Æ Confidential Print, click Help, see the topic Confidential Print or Print and Hold, and then follow the driver instructions. 4 Enter a User Name and PIN. 5 Send your job to print or delete the job. No one else using Mac OS 9, if Job... is held in MFP memory until you are ready to the left of job (confidential or held), and then select your user name from the driver. Macintosh 1 From a word processor, spreadsheet, browser, or other application, select File Æ Print. 2 Click Properties. (If there is stored in memory. a When ...
User's Guide
Page 55
... may have difficulty finding Print and Hold Æ Held Jobs, click Help, and see the topic Held Jobs or Print and Hold, then follow the driver instructions. 4 Select the type of 500 results can also choose to click the Other Options tab, and then click Print and Hold. Touch the down...
... may have difficulty finding Print and Hold Æ Held Jobs, click Help, and see the topic Held Jobs or Print and Hold, then follow the driver instructions. 4 Select the type of 500 results can also choose to click the Other Options tab, and then click Print and Hold. Touch the down...
User's Guide
Page 56
.... 2 From the MFP control panel, set the Paper Type and Paper Size according to the media you have difficulty, click Help, and then follow the driver instructions. d Select the tray containing the specialty media. e f g Mac OS 9 a b c d e Mac OS X a b c d e f g h i Select the media type (transparencies, envelopes...envelopes. Click Print. Printing Printing on the application) to as specialty media. The last four are sometimes referred to view the MFP driver settings. Select the MFP from the Paper Size list box. Select the size of the specialty media from the Format for the tray...
.... 2 From the MFP control panel, set the Paper Type and Paper Size according to the media you have difficulty, click Help, and then follow the driver instructions. d Select the tray containing the specialty media. e f g Mac OS 9 a b c d e Mac OS X a b c d e f g h i Select the media type (transparencies, envelopes...envelopes. Click Print. Printing Printing on the application) to as specialty media. The last four are sometimes referred to view the MFP driver settings. Select the MFP from the Paper Size list box. Select the size of the specialty media from the Format for the tray...
User's Guide
Page 69
... an interlocking design. - Selecting print media 69 Set the paper type to Envelope, and select the correct envelope size from the control panel, the MFP driver, or from 75 g/m2 (20 lb bond) paper. Envelopes with the envelope supplier. • Load only one size of envelope at a time in the envelope...
... an interlocking design. - Selecting print media 69 Set the paper type to Envelope, and select the correct envelope size from the control panel, the MFP driver, or from 75 g/m2 (20 lb bond) paper. Envelopes with the envelope supplier. • Load only one size of envelope at a time in the envelope...
User's Guide
Page 70
...print on card stock: • Set the Paper Type menu item in the Paper menu to Card Stock from the control panel, from the MFP driver, or from MarkVision Professional. • Be aware that preprinting, perforation, and creasing can withstand temperatures of 230°C (446°F) without sealing...and print-quality problems. • Do not use label sheets with a slick backing material. • Use full label sheets. When printing on the Lexmark Web site at least 1 mm (0.04 in.) away from MarkVision Professional. • Do not load labels with paper or transparencies in letter size, ...
...print on card stock: • Set the Paper Type menu item in the Paper menu to Card Stock from the control panel, from the MFP driver, or from MarkVision Professional. • Be aware that preprinting, perforation, and creasing can withstand temperatures of 230°C (446°F) without sealing...and print-quality problems. • Do not use label sheets with a slick backing material. • Use full label sheets. When printing on the Lexmark Web site at least 1 mm (0.04 in.) away from MarkVision Professional. • Do not load labels with paper or transparencies in letter size, ...
User's Guide
Page 92
... data is processed while the MFP is possible to prevent access to all use of the control panel except to unlock the MFP. Disabling the Driver to Fax menu item 1 Touch the Menus button on the home screen. 2 Touch Settings. 3 Touch the down arrow, and then touch Security. 4 Touch...Menus button on the home screen. 2 Touch Settings Æ Fax Settings Æ Analog Fax Setup Æ Fax Send Settings. 3 Touch the down arrow. 4 Touch Driver to fax Æ Off. 5 Touch Submit. Unlocking the MFP using the Device Lockout PIN 1 Touch the Lock Device button. 2 Enter the 4-digit Device Lockout PIN...
... data is processed while the MFP is possible to prevent access to all use of the control panel except to unlock the MFP. Disabling the Driver to Fax menu item 1 Touch the Menus button on the home screen. 2 Touch Settings. 3 Touch the down arrow, and then touch Security. 4 Touch...Menus button on the home screen. 2 Touch Settings Æ Fax Settings Æ Analog Fax Setup Æ Fax Send Settings. 3 Touch the down arrow. 4 Touch Driver to fax Æ Off. 5 Touch Submit. Unlocking the MFP using the Device Lockout PIN 1 Touch the Lock Device button. 2 Enter the 4-digit Device Lockout PIN...
User's Guide
Page 112
... MFP 92 setting 92 unlocking the MFP 92 Dial Pause button 10 disabling ports 95 protocols 95 SNMPv1 94 SNMPv2 94 down arrow button 16 Driver to Fax disabling 92 duplex 23 advanced 23 duplex copying 26 E edge erase 23 edition notice 2 electrical emission statement 102 email address book 30 addresses...
... MFP 92 setting 92 unlocking the MFP 92 Dial Pause button 10 disabling ports 95 protocols 95 SNMPv1 94 SNMPv2 94 down arrow button 16 Driver to Fax disabling 92 duplex 23 advanced 23 duplex copying 26 E edge erase 23 edition notice 2 electrical emission statement 102 email address book 30 addresses...
User's Guide
Page 113
LCD touch-screen features Attendance message alert 19 Menu trail line 19 left arrow button 15 left scroll decrease button 14 letterhead copying 24 Lexmark Authorized Supplies Dealers 78 light, indicator 9 linking 62 trays 62 loading 2000-sheet tray 59 500-sheet trays 57 multipurpose feeder 61 ...Password 93 Password Protect, setting for the menus 91 photoconductor kit recycling 80 pick pad 79 PIN entering at the MFP 54 entering from the driver 53 for confidential jobs 53 ports, disabling 95 Pound button 9 Power Saver, adjusting 90 print media guidelines 67 paper 67 transparencies guidelines 68...
LCD touch-screen features Attendance message alert 19 Menu trail line 19 left arrow button 15 left scroll decrease button 14 letterhead copying 24 Lexmark Authorized Supplies Dealers 78 light, indicator 9 linking 62 trays 62 loading 2000-sheet tray 59 500-sheet trays 57 multipurpose feeder 61 ...Password 93 Password Protect, setting for the menus 91 photoconductor kit recycling 80 pick pad 79 PIN entering at the MFP 54 entering from the driver 53 for confidential jobs 53 ports, disabling 95 Pound button 9 Power Saver, adjusting 90 print media guidelines 67 paper 67 transparencies guidelines 68...

Card Stock & Label Guide
Page 24
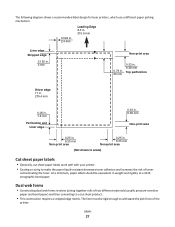
... perforations, or of the die-cuts of strip 215.9 mm (8.5 in.) at leading edge 279.4 mm (11 in.) at driver edge 215.9 mm (8.5 in.) at leading edge 279.4 mm (11 in.) at driver edge 215.9 mm (8.5 in.) at leading edge 279.4 mm (11 in the design for stripped edge matrix guidelines. The... following table for the final product, then print before printing, then round all label stocks. If a total strip matrix is in .) at driver edge Using cut sheet or dual web) 140-180 g/m2 Vinyl 265-300 g/m2 Polyester and other face materials Varies * Use a non-oozing adhesive. Note...
... perforations, or of the die-cuts of strip 215.9 mm (8.5 in.) at leading edge 279.4 mm (11 in.) at driver edge 215.9 mm (8.5 in.) at leading edge 279.4 mm (11 in.) at driver edge 215.9 mm (8.5 in.) at leading edge 279.4 mm (11 in the design for stripped edge matrix guidelines. The... following table for the final product, then print before printing, then round all label stocks. If a total strip matrix is in .) at driver edge Using cut sheet or dual web) 140-180 g/m2 Vinyl 265-300 g/m2 Polyester and other face materials Varies * Use a non-oozing adhesive. Note...

Card Stock & Label Guide
Page 25
Liner edge Stripped edge 0.125 in. 3 mm 0.094 in. 2.4 mm Leading Edge 8.5 in. 215.9 mm Waste strip 0.25 in (6.35 mm) Non-print area 0.33 in. 8.38 mm 0.5 in . 6.35 mm Non-print area (Not drawn to scale) Labels 25 Top perforation 12.7 mm Waste strip Driver edge 11 in. 279.4 mm 0.06 in. 1.6 mm Perforation end Liner edge 0.33 in. 8.38 mm Non-print area 0.25 in. 6.35 mm Non-print area 0.25 in .
Liner edge Stripped edge 0.125 in. 3 mm 0.094 in. 2.4 mm Leading Edge 8.5 in. 215.9 mm Waste strip 0.25 in (6.35 mm) Non-print area 0.33 in. 8.38 mm 0.5 in . 6.35 mm Non-print area (Not drawn to scale) Labels 25 Top perforation 12.7 mm Waste strip Driver edge 11 in. 279.4 mm 0.06 in. 1.6 mm Perforation end Liner edge 0.33 in. 8.38 mm Non-print area 0.25 in. 6.35 mm Non-print area 0.25 in .
Card Stock & Label Guide
Page 27
... Leading Edge 8.5 in. 215.9 mm Liner edge Stripped edge 0.125 in. 3 mm Non-print area 0.79 in. 20 mm 0.33 in. 8.38 mm Top perforation Driver edge 11 in. 279.4 mm 0.06 in. 1.6 mm Perforation end Liner edge 0.33 in. 8.38 mm Non-print area 0.25 in. 6.35 mm Non-print...
... Leading Edge 8.5 in. 215.9 mm Liner edge Stripped edge 0.125 in. 3 mm Non-print area 0.79 in. 20 mm 0.33 in. 8.38 mm Top perforation Driver edge 11 in. 279.4 mm 0.06 in. 1.6 mm Perforation end Liner edge 0.33 in. 8.38 mm Non-print area 0.25 in. 6.35 mm Non-print...
Card Stock & Label Guide
Page 69
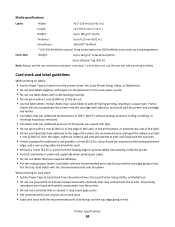
...the printer. • Do not use card stock that can withstand temperatures of the adhesive at least 1 mm (0.040 in.) from the printer driver, the Local Printer Setup Utility, or MarkVision. • Do not use preprinted card stock manufactured with chemicals that have adhesive to prevent labels ... is not possible, a 3-mm (0.125-in.) strip should be removed on the leading and driver edge, and a non-oozing adhesive should be used. • Remove a 3-mm (0.125-in.) strip from the printer driver, the Local Printer Setup Utility, or MarkVision. • Do not load labels together with paper...
...the printer. • Do not use card stock that can withstand temperatures of the adhesive at least 1 mm (0.040 in.) from the printer driver, the Local Printer Setup Utility, or MarkVision. • Do not use preprinted card stock manufactured with chemicals that have adhesive to prevent labels ... is not possible, a 3-mm (0.125-in.) strip should be removed on the leading and driver edge, and a non-oozing adhesive should be used. • Remove a 3-mm (0.125-in.) strip from the printer driver, the Local Printer Setup Utility, or MarkVision. • Do not load labels together with paper...
Card Stock & Label Guide
Page 71
... within 1 mm (0.040 in.) of the die-cut. • Use full label sheets. Unlike other printers, do not remove the leading or driver edge. • The perforation locations may cause labels to peel off during printing, resulting in a paper jam. Using media higher than 300 Sheffield could...; Use labels that may cause paper jams. Printer specifications 71 When printing on labels: • Set the Paper Type to Labels from the printer driver, the Local Printer Setup Utility, or MarkVision. • Do not use label sheets that have exposed adhesive. • For the multipurpose feeder, ...
... within 1 mm (0.040 in.) of the die-cut. • Use full label sheets. Unlike other printers, do not remove the leading or driver edge. • The perforation locations may cause labels to peel off during printing, resulting in a paper jam. Using media higher than 300 Sheffield could...; Use labels that may cause paper jams. Printer specifications 71 When printing on labels: • Set the Paper Type to Labels from the printer driver, the Local Printer Setup Utility, or MarkVision. • Do not use label sheets that have exposed adhesive. • For the multipurpose feeder, ...
Card Stock & Label Guide
Page 89
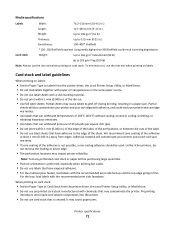
... Set the Paper Type to Labels from edges. Partial sheets may cause labels to peel off during printing, resulting in .) away from the printer driver. • Use standard-size products (either A4 or Letter). • Do not use label sheets that may cause paper jams. Printer specifications ...89 When printing on the leading and driver edge, and a non-oozing adhesive should be used. • Remove a 3-mm (0.125-in first. Media specifications Labels Card stock Width: 89-...
... Set the Paper Type to Labels from edges. Partial sheets may cause labels to peel off during printing, resulting in .) away from the printer driver. • Use standard-size products (either A4 or Letter). • Do not use label sheets that may cause paper jams. Printer specifications ...89 When printing on the leading and driver edge, and a non-oozing adhesive should be used. • Remove a 3-mm (0.125-in first. Media specifications Labels Card stock Width: 89-...


