
Embedded Web Server Administrator's Guide
Page 14
... not be able to access protected device functions in the event of a user's password across a network in clear text. Notes: • Entering manual settings automatically disables use of NTP. • Choosing "(UTC+user) Custom" from the Time Zone drop-down list. Setting date and time Because ...each session by the Kerberos server. 1 From the Embedded Web Server Home screen, browse to a single NT domain. An administrator can be updated manually, or set to use the "Install auth keys" link to browse to the file containing the NTP authentication credentials. 7 Click Submit to save ...
... not be able to access protected device functions in the event of a user's password across a network in clear text. Notes: • Entering manual settings automatically disables use of NTP. • Choosing "(UTC+user) Custom" from the Time Zone drop-down list. Setting date and time Because ...each session by the Kerberos server. 1 From the Embedded Web Server Home screen, browse to a single NT domain. An administrator can be updated manually, or set to use the "Install auth keys" link to browse to the file containing the NTP authentication credentials. 7 Click Submit to save ...

Embedded Web Server Administrator's Guide
Page 23
... 4 Use Schedules to enable or disable use of USB devices on a scheduled basis. Disk wiping On certain devices, administrators can be performed manually, automatically, or on certain days or during certain hours. Disk wiping can be accomplished with a single pass-for a quick wipe-or with ... you must again select Disk Wiping to make further configuration changes. Notes: • The Scheduled Disk Wiping option will not appear until Manual mode has been selected and submitted. • Clicking Submit after choosing a Wiping Mode will remain in the print queue before being automatically ...
... 4 Use Schedules to enable or disable use of USB devices on a scheduled basis. Disk wiping On certain devices, administrators can be performed manually, automatically, or on certain days or during certain hours. Disk wiping can be accomplished with a single pass-for a quick wipe-or with ... you must again select Disk Wiping to make further configuration changes. Notes: • The Scheduled Disk Wiping option will not appear until Manual mode has been selected and submitted. • Clicking Submit after choosing a Wiping Mode will remain in the print queue before being automatically ...

Embedded Web Server Administrator's Guide
Page 24
...printer-or its hard disk-is in Configuration mode by locating the Exit Configuration button in the lower right corner of disk wiping (Automatic, Manual, and Scheduled). 6 Click Submit to finalize changes. When finished, use the browser Back button to return to the Disk Wiping setup screen,...an existing Start value (the scheduled time and day will indicate the progress of the hard disk. 7 A message will appear asking you have enabled Manual mode and wish to set up , the printer touch screen should occur, and then click Add. Encryption takes approximately two minutes, and a status ...
...printer-or its hard disk-is in Configuration mode by locating the Exit Configuration button in the lower right corner of disk wiping (Automatic, Manual, and Scheduled). 6 Click Submit to finalize changes. When finished, use the browser Back button to return to the Disk Wiping setup screen,...an existing Start value (the scheduled time and day will indicate the progress of the hard disk. 7 A message will appear asking you have enabled Manual mode and wish to set up , the printer touch screen should occur, and then click Add. Encryption takes approximately two minutes, and a status ...
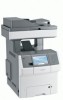
Sending a fax using the computer
Page 2
... site at www.lexmark.com. Sending a fax using the computer 2 Updating available options in the printer driver Once the printer software and any options are installed, it may be necessary to manually add the options in the printer driver to accept the licensing agreement. 6 From the Drivers...follow the instructions on the screen. Note: If you cannot locate the Software and Documentation CD, you can download the driver from the Lexmark Web site at www.lexmark.com. 2 From the Drivers & Downloads menu, click Driver Finder. 3 Select your printer, select your operating system, and then select...
... site at www.lexmark.com. Sending a fax using the computer 2 Updating available options in the printer driver Once the printer software and any options are installed, it may be necessary to manually add the options in the printer driver to accept the licensing agreement. 6 From the Drivers...follow the instructions on the screen. Note: If you cannot locate the Software and Documentation CD, you can download the driver from the Lexmark Web site at www.lexmark.com. 2 From the Drivers & Downloads menu, click Driver Finder. 3 Select your printer, select your operating system, and then select...

User's Guide
Page 16
... scanning, copying, faxing, and printing options as well as status and error messages. In the Fax Destination List, press to the left of a number entered manually. You can also press to cause a two- In the Fax To field, a Dial Pause is deleted. In the E-mail Destination List, press to delete the...
... scanning, copying, faxing, and printing options as well as status and error messages. In the Fax Destination List, press to the left of a number entered manually. You can also press to cause a two- In the Fax To field, a Dial Pause is deleted. In the E-mail Destination List, press to delete the...

User's Guide
Page 45
... options in the printer driver Once the printer software and any options are installed, it may be necessary to manually add the options in the printer driver to the Lexmark Web site at www.lexmark.com. 2 From the Drivers & Downloads menu, click Driver Finder. 3 Select your printer, and then select your operating system...
... options in the printer driver Once the printer software and any options are installed, it may be necessary to manually add the options in the printer driver to the Lexmark Web site at www.lexmark.com. 2 From the Drivers & Downloads menu, click Driver Finder. 3 Select your printer, and then select your operating system...
User's Guide
Page 65
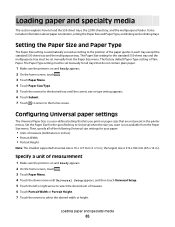
...includes information about paper orientation, setting the Paper Size and Paper Type, and linking and unlinking trays. The Paper Type setting must be set manually from the Paper Size menu. Specify a unit of the paper guides in .). The factory default Paper Type setting is on and Ready appears....000-sheet tray, and the multipurpose feeder. The Paper Size setting for the standard 550-sheet tray and the multipurpose tray must be set manually for all of the following Universal size settings for the desired tray until Universal Setup appears, and then touch Universal Setup. 5 Touch ...
...includes information about paper orientation, setting the Paper Size and Paper Type, and linking and unlinking trays. The Paper Type setting must be set manually from the Paper Size menu. Specify a unit of the paper guides in .). The factory default Paper Type setting is on and Ready appears....000-sheet tray, and the multipurpose feeder. The Paper Size setting for the standard 550-sheet tray and the multipurpose tray must be set manually for all of the following Universal size settings for the desired tray until Universal Setup appears, and then touch Universal Setup. 5 Touch ...
User's Guide
Page 74
... to the position of any other tray: • Paper Type (for large print jobs or multiple copies. If the name that they must be set manually from the Paper Size/Type menu. Loading paper and specialty media 74 The Paper Size setting for the Standard 550-sheet tray and the multipurpose... the media you have settings that does not accurately describe the type of any trays, the trays are not automatic; Paper may not be set manually from the Paper Type menu. they do not match the settings of paper loaded in each tray except the Standard 550-sheet tray and the...
... to the position of any other tray: • Paper Type (for large print jobs or multiple copies. If the name that they must be set manually from the Paper Size/Type menu. Loading paper and specialty media 74 The Paper Size setting for the Standard 550-sheet tray and the multipurpose... the media you have settings that does not accurately describe the type of any trays, the trays are not automatic; Paper may not be set manually from the Paper Type menu. they do not match the settings of paper loaded in each tray except the Standard 550-sheet tray and the...
User's Guide
Page 93
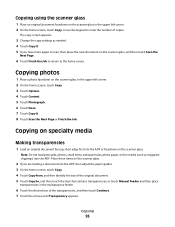
.... 4 Touch Copy from, and then identify the size of the original document. 5 Touch Copy to, and then touch the tray that contains transparencies, or touch Manual Feeder and then place transparencies in the upper left corner. 2 On the home screen, touch Copy, or use the keypad to the home screen. Place...
.... 4 Touch Copy from, and then identify the size of the original document. 5 Touch Copy to, and then touch the tray that contains transparencies, or touch Manual Feeder and then place transparencies in the upper left corner. 2 On the home screen, touch Copy, or use the keypad to the home screen. Place...

User's Guide
Page 94
... guides. 3 On the home screen, touch Copy. 4 Touch Copy from , and then identify the size of the original document. 5 Touch Copy to, and then touch Manual Feeder and place letterhead face up, top edge first in the multipurpose feeder. 6 Touch the desired size of the original document. 5 Touch Copy to, and...
... guides. 3 On the home screen, touch Copy. 4 Touch Copy from , and then identify the size of the original document. 5 Touch Copy to, and then touch Manual Feeder and place letterhead face up, top edge first in the multipurpose feeder. 6 Touch the desired size of the original document. 5 Touch Copy to, and...
User's Guide
Page 95
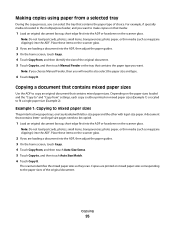
... tray During the copy process, you can select the tray that contains the paper type of the original document. 5 Touch Copy to, and then touch Manual Feeder or the tray that contains the paper type you want to be copied. 1 Load an original document faceup, short edge first into the ADF..., then adjust the paper guides. 3 On the home screen, touch Copy. 4 Touch Copy from, and then identify the size of choice. Note: If you choose Manual Feeder, then you are loading a document into the ADF. Place these items on mixed paper sizes (Example 1) or scaled to also select the paper size...
... tray During the copy process, you can select the tray that contains the paper type of the original document. 5 Touch Copy to, and then touch Manual Feeder or the tray that contains the paper type you want to be copied. 1 Load an original document faceup, short edge first into the ADF..., then adjust the paper guides. 3 On the home screen, touch Copy. 4 Touch Copy from, and then identify the size of choice. Note: If you choose Manual Feeder, then you are loading a document into the ADF. Place these items on mixed paper sizes (Example 1) or scaled to also select the paper size...

User's Guide
Page 97
... items, transparencies, photo paper, or thin media (such as magazine clippings) into the ADF or facedown on a laser printer, or pages from " after setting Scale manually changes the scale value back to " or "Copy from a magazine or newspaper that are mostly text or line art • Text/Photo-Used when the...
... items, transparencies, photo paper, or thin media (such as magazine clippings) into the ADF or facedown on a laser printer, or pages from " after setting Scale manually changes the scale value back to " or "Copy from a magazine or newspaper that are mostly text or line art • Text/Photo-Used when the...

User's Guide
Page 102
... to make a continuous increment change. • Hold your copy that you want to copy onto is not loaded in one of the trays, touch Manual Feeder, and manually send the paper through the multipurpose feeder. • When "Copy to" is not in relation to graphics and pictures. Copying 102 touch the right...
... to make a continuous increment change. • Hold your copy that you want to copy onto is not loaded in one of the trays, touch Manual Feeder, and manually send the paper through the multipurpose feeder. • When "Copy to" is not in relation to graphics and pictures. Copying 102 touch the right...
User's Guide
Page 134
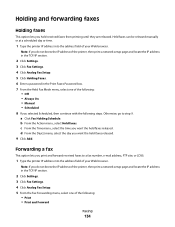
... and Forward Faxing 134 d From the Day(s) menu, select the day you selected Scheduled, then continue with the following : • Off • Always On • Manual • Scheduled 8 If you want the held faxes released. 9 Click Add. b From the Action menu, select Hold faxes. c From the Time menu, select the time... Held Fax Mode menu, select one of the following steps. Note: If you print and forward received faxes to step 9. Held faxes can be released manually or at a scheduled day or time. 1 Type the printer IP address into the address field of your Web browser.
... and Forward Faxing 134 d From the Day(s) menu, select the day you selected Scheduled, then continue with the following : • Off • Always On • Manual • Scheduled 8 If you want the held faxes released. 9 Click Add. b From the Action menu, select Hold faxes. c From the Time menu, select the time... Held Fax Mode menu, select one of the following steps. Note: If you print and forward received faxes to step 9. Held faxes can be released manually or at a scheduled day or time. 1 Type the printer IP address into the address field of your Web browser.

User's Guide
Page 147
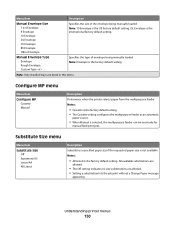
... is empty, the job prints using the linked tray. Understanding printer menus 147 Paper menu Default Source menu Menu item Default Source Tray MP feeder Manual paper Manual envelope Description Sets a default paper source for all print jobs Notes: • From the Paper menu, Configure MP feeder must be set to Cassette...
... is empty, the job prints using the linked tray. Understanding printer menus 147 Paper menu Default Source menu Menu item Default Source Tray MP feeder Manual paper Manual envelope Description Sets a default paper source for all print jobs Notes: • From the Paper menu, Configure MP feeder must be set to Cassette...
User's Guide
Page 149
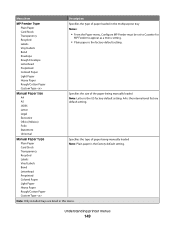
... the factory default setting. A4 is the factory default setting. Understanding printer menus 149 Specifies the size of the paper being manually loaded Note: Plain paper is the US factory default setting. Menu item MP Feeder Type Plain Paper Card Stock Transparency Recycled ...Envelope Letterhead Preprinted Colored Paper Light Paper Heavy Paper Rough/Cotton Paper Custom Type Manual Paper Size A4 A5 JIS B5 Letter Legal Executive Oficio (México) Folio Statement Universal Manual Paper Type Plain Paper Card Stock Transparency Recycled Labels Vinyl Labels Bond Letterhead Preprinted...
... the factory default setting. A4 is the factory default setting. Understanding printer menus 149 Specifies the size of the paper being manually loaded Note: Plain paper is the US factory default setting. Menu item MP Feeder Type Plain Paper Card Stock Transparency Recycled ...Envelope Letterhead Preprinted Colored Paper Light Paper Heavy Paper Rough/Cotton Paper Custom Type Manual Paper Size A4 A5 JIS B5 Letter Legal Executive Oficio (México) Folio Statement Universal Manual Paper Type Plain Paper Card Stock Transparency Recycled Labels Vinyl Labels Bond Letterhead Preprinted...
User's Guide
Page 150
...feeder as an automatic paper source. • When Manual is the factory default setting. Specifies the type of the envelope being manually loaded Note: Envelope is selected, the multipurpose feeder can be used only for manual feed print jobs. Understanding printer menus 150 DL ...• The Off setting indicates no size substitutions are listed in this menu. Menu item Manual Envelope Size 7 3/4 Envelope 9 Envelope 10 Envelope DL Envelope C5 Envelope B5 Envelope Other Envelope Manual Envelope Type Envelope Rough Envelope Custom Type Description Specifies the size of envelope being...
...feeder as an automatic paper source. • When Manual is the factory default setting. Specifies the type of the envelope being manually loaded Note: Envelope is selected, the multipurpose feeder can be used only for manual feed print jobs. Understanding printer menus 150 DL ...• The Off setting indicates no size substitutions are listed in this menu. Menu item Manual Envelope Size 7 3/4 Envelope 9 Envelope 10 Envelope DL Envelope C5 Envelope B5 Envelope Other Envelope Manual Envelope Type Envelope Rough Envelope Custom Type Description Specifies the size of envelope being...
User's Guide
Page 163
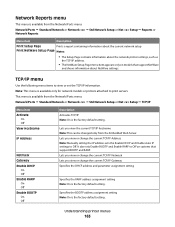
... BOOTP On Off Description Activates TCP/IP Note: On is the factory default setting. Lets you view or change the current TCP/IP Address Note: Manually setting the IP address sets the Enable DHCP and Enable Auto IP settings to print servers. It also sets Enable BOOTP and Enable RARP to...
... BOOTP On Off Description Activates TCP/IP Note: On is the factory default setting. Lets you view or change the current TCP/IP Address Note: Manually setting the IP address sets the Enable DHCP and Enable Auto IP settings to print servers. It also sets Enable BOOTP and Enable RARP to...
User's Guide
Page 175
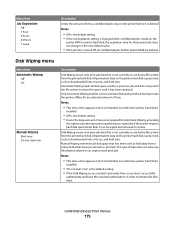
... been used to reuse this option may decrease printer performance, especially if the printer requires hard disk space faster than it has been sanitized. Manual Wiping overwrites all confidential jobs held in printer RAM are deleted. This type of wipe does not erase any information related to initiate the disk... the printer is not currently in use by the file system from the printer hard disk. Disk Wiping menu Menu item Automatic Wiping Off On Manual Wiping Start now Do not start now" is the default setting. • If the Disk Wiping access control is activated, then a user must ...
... been used to reuse this option may decrease printer performance, especially if the printer requires hard disk space faster than it has been sanitized. Manual Wiping overwrites all confidential jobs held in printer RAM are deleted. This type of wipe does not erase any information related to initiate the disk... the printer is not currently in use by the file system from the printer hard disk. Disk Wiping menu Menu item Automatic Wiping Off On Manual Wiping Start now Do not start now" is the default setting. • If the Disk Wiping access control is activated, then a user must ...
User's Guide
Page 176
...reuse marked disk space without displaying a user warning or confirmation message. Both manual and scheduled wiping allow the file system to a computer. Menu item Automatic Method Single pass Multiple pass Manual Method Single pass Multiple pass Scheduled Method Single pass Multiple pass Description Disk... should be wiped using the Multiple Pass method only. • Scheduled wipes are initiated without first having to wipe it . Both manual and scheduled wiping allow the file system to reuse marked disk space without first having to wipe it . Notes: • This menu...
...reuse marked disk space without displaying a user warning or confirmation message. Both manual and scheduled wiping allow the file system to a computer. Menu item Automatic Method Single pass Multiple pass Manual Method Single pass Multiple pass Scheduled Method Single pass Multiple pass Description Disk... should be wiped using the Multiple Pass method only. • Scheduled wipes are initiated without first having to wipe it . Both manual and scheduled wiping allow the file system to reuse marked disk space without first having to wipe it . Notes: • This menu...


