Embedded Web Server Administrator's Guide
Page 2
... inaccuracies or typographical errors. All rights reserved. Some states do not imply that the manufacturer intends to you. For Lexmark technical support, visit support.lexmark.com. For information on supplies and downloads, visit www.lexmark.com. UNITED STATES GOVERNMENT RIGHTS This software and any accompanying documentation provided under this statement may be made to...
... inaccuracies or typographical errors. All rights reserved. Some states do not imply that the manufacturer intends to you. For Lexmark technical support, visit support.lexmark.com. For information on supplies and downloads, visit www.lexmark.com. UNITED STATES GOVERNMENT RIGHTS This software and any accompanying documentation provided under this statement may be made to...

Embedded Web Server Administrator's Guide
Page 31
Function Access Control Supplies Menu at the Device Supplies Menu Remotely User Profiles Web Import/Export Settings What it does Protects access to the Supplies menu from the printer control panel Protects access to the Supplies menu from the Embedded Web Server Controls access to Profiles, such as scanning shortcuts, workflows, or eSF applications Controls the ability to import and export printer settings files (UCF files) from the Embedded Web Server Appendix 31
Function Access Control Supplies Menu at the Device Supplies Menu Remotely User Profiles Web Import/Export Settings What it does Protects access to the Supplies menu from the printer control panel Protects access to the Supplies menu from the Embedded Web Server Controls access to Profiles, such as scanning shortcuts, workflows, or eSF applications Controls the ability to import and export printer settings files (UCF files) from the Embedded Web Server Appendix 31
User's Guide
Page 4
... Scanning to a computer...141 Scanning to a flash drive...142 Understanding scan profile options...142 Improving scan quality...144 Understanding printer menus 145 Menus list...145 Supplies menu...146 Paper menu...147 Reports menu...158 Network/Ports menu...160 Security menu...174 Settings menu...178 Help menu...228 Maintaining the printer 229...
... Scanning to a computer...141 Scanning to a flash drive...142 Understanding scan profile options...142 Improving scan quality...144 Understanding printer menus 145 Menus list...145 Supplies menu...146 Paper menu...147 Reports menu...158 Network/Ports menu...160 Security menu...174 Settings menu...178 Help menu...228 Maintaining the printer 229...
User's Guide
Page 5
Cleaning the printhead lenses...234 Adjusting scanner registration...235 Storing supplies...236 Checking the status of supplies...237 Ordering supplies...237 Replacing Supplies...239 Moving the printer to another location...253 Shipping the printer...253 Administrative support 254 Finding advanced networking and administrator information 254 Using the Embedded ...
Cleaning the printhead lenses...234 Adjusting scanner registration...235 Storing supplies...236 Checking the status of supplies...237 Ordering supplies...237 Replacing Supplies...239 Moving the printer to another location...253 Shipping the printer...253 Administrative support 254 Finding advanced networking and administrator information 254 Using the Embedded ...
User's Guide
Page 18
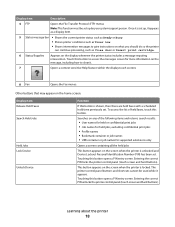
... intervention messages to give instructions on what you should do so the printer can continue processing, such as Close door or Insert print cartridge. 6 Status/Supplies Appears on the message, including how to access the messages screen for supported extensions only Opens a screen containing all the held faxes with a scheduled hold...
... intervention messages to give instructions on what you should do so the printer can continue processing, such as Close door or Insert print cartridge. 6 Status/Supplies Appears on the message, including how to access the messages screen for supported extensions only Opens a screen containing all the held faxes with a scheduled hold...
User's Guide
Page 46
... users In Mac OS X version 10.5 or later 1 From the Apple menu, choose System Preferences. 2 Click Print & Fax. 3 Select the printer, and then click Options & Supplies. 4 Click Driver, and then add any installed hardware options. 8 Click Apply. In Mac OS X version 10.4 and earlier 1 From the Finder desktop, choose Go > Applications...
... users In Mac OS X version 10.5 or later 1 From the Apple menu, choose System Preferences. 2 Click Print & Fax. 3 Select the printer, and then click Options & Supplies. 4 Click Driver, and then add any installed hardware options. 8 Click Apply. In Mac OS X version 10.4 and earlier 1 From the Finder desktop, choose Go > Applications...

User's Guide
Page 58
... on one or two sides of the paper for use when printing, copying, or receiving faxes. Minimizing your printer's environmental impact Lexmark is committed to environmental sustainability and is related to 16 consecutive pages of a multiple-page document onto one printer setting, see "...your printer's environmental impact 58 Conserving supplies There are a number of ways you can control whether print appears on one side of a single sheet of the Lexmark Web site at www.lexmark.com/environment • The Lexmark recycling program at www.lexmark.com/recycle By selecting certain printer ...
... on one or two sides of the paper for use when printing, copying, or receiving faxes. Minimizing your printer's environmental impact Lexmark is committed to environmental sustainability and is related to 16 consecutive pages of a multiple-page document onto one printer setting, see "...your printer's environmental impact 58 Conserving supplies There are a number of ways you can control whether print appears on one side of a single sheet of the Lexmark Web site at www.lexmark.com/environment • The Lexmark recycling program at www.lexmark.com/recycle By selecting certain printer ...

User's Guide
Page 99
... Copy. 4 Touch Options. 5 Touch Custom Job. 6 Touch On. 7 Touch Done. 8 Touch Copy It. Otherwise, touch Finish the job. Each set may be scanned using the supplied parameters, and then it scans the next set of the copies. 9 Touch Done. 10 Touch Copy It. When the end of a set is enabled, the...
... Copy. 4 Touch Options. 5 Touch Custom Job. 6 Touch On. 7 Touch Done. 8 Touch Copy It. Otherwise, touch Finish the job. Each set may be scanned using the supplied parameters, and then it scans the next set of the copies. 9 Touch Done. 10 Touch Copy It. When the end of a set is enabled, the...
User's Guide
Page 145
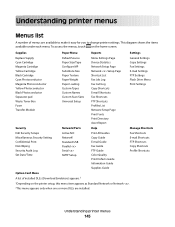
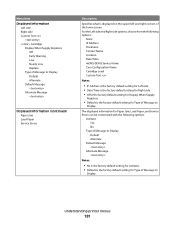
...make it easy for you to change printer settings. This diagram shows the items available under each menu. Supplies Paper Menu Reports Settings Replace Supply Cyan Cartridge Magenta Cartridge Yellow Cartridge Black Cartridge Cyan Photoconductor Magenta Photoconductor Yellow Photoconductor Black Photoconductor Separator pad ... Setup Print All Guides Copy Guide E-mail Guide Fax Guide FTP Guide Color Quality Print Defects Guide Information Guide Supplies Guide Fax Shortcuts E-mail Shortcuts FTP Shortcuts Copy Shortcuts Profile Shortcuts Option Card Menu A list of menus are installed. Understanding...
...make it easy for you to change printer settings. This diagram shows the items available under each menu. Supplies Paper Menu Reports Settings Replace Supply Cyan Cartridge Magenta Cartridge Yellow Cartridge Black Cartridge Cyan Photoconductor Magenta Photoconductor Yellow Photoconductor Black Photoconductor Separator pad ... Setup Print All Guides Copy Guide E-mail Guide Fax Guide FTP Guide Color Quality Print Defects Guide Information Guide Supplies Guide Fax Shortcuts E-mail Shortcuts FTP Shortcuts Copy Shortcuts Profile Shortcuts Option Card Menu A list of menus are installed. Understanding...
User's Guide
Page 146
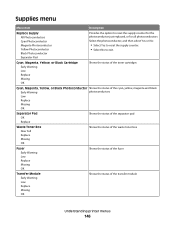
... Missing OK Understanding printer menus 146 Yellow Photoconductor Black Photoconductor • Select No to reset the supply counter. Supplies menu Menu item Description Replace Supply All Photoconductors Cyan Photoconductor Magenta Photoconductor Provides the option to reset the supply counter for the photoconductor just replaced, or for all photoconductors Select the photoconductor, and then select...
... Missing OK Understanding printer menus 146 Yellow Photoconductor Black Photoconductor • Select No to reset the supply counter. Supplies menu Menu item Description Replace Supply All Photoconductors Cyan Photoconductor Magenta Photoconductor Provides the option to reset the supply counter for the photoconductor just replaced, or for all photoconductors Select the photoconductor, and then select...

User's Guide
Page 158
... total page count, alarms, timeouts, the printer control panel language, the TCP/IP address, the status of supplies, the status of the network connection, and other information Prints a report containing printer statistics such as supply information and details about printed pages Prints a report containing information about the network printer settings, such as...
... total page count, alarms, timeouts, the printer control panel language, the TCP/IP address, the status of supplies, the status of the network connection, and other information Prints a report containing printer statistics such as supply information and details about printed pages Prints a report containing information about the network printer settings, such as...
User's Guide
Page 181
Menu item Displayed Information Left side Right side Custom Text Cartridge Display When Supply Registers Off Early Warning Low Nearly Low Replace Type of Message to Display Default Alternate Default Message Alternate Message Displayed Information (continued) Paper Jam Load ... setting for Left side. • Date/Time is the factory default setting for Right side. • Off is the factory default setting for Display When Supply Registers. • Default is the factory default setting for Type of Message to Display. Understanding printer menus 181
Menu item Displayed Information Left side Right side Custom Text Cartridge Display When Supply Registers Off Early Warning Low Nearly Low Replace Type of Message to Display Default Alternate Default Message Alternate Message Displayed Information (continued) Paper Jam Load ... setting for Left side. • Date/Time is the factory default setting for Right side. • Off is the factory default setting for Display When Supply Registers. • Default is the factory default setting for Type of Message to Display. Understanding printer menus 181
User's Guide
Page 196
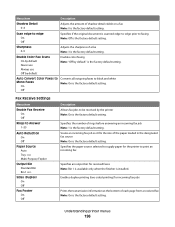
... prior to print an incoming fax Specifies an output bin for the printer to faxing Note: Off is installed. Specifies the paper source selected to supply paper for received faxes Note: Bin 1 is available only when the finisher is the factory default setting.
... prior to print an incoming fax Specifies an output bin for the printer to faxing Note: Off is installed. Specifies the paper source selected to supply paper for received faxes Note: Bin 1 is available only when the finisher is the factory default setting.

User's Guide
Page 228
XPS menu Menu item Print Error Pages Off On Description Prints a page containing information on the Lexmark Web site at www.lexmark.com. They contain information about using an FTP address, shortcut numbers, or the address book, and about scanning documents ...about changing settings Provides help in locating additional information Provides help in resolving repeating defects in copies or prints Provides part numbers for ordering supplies Understanding printer menus 228 English, French, German, and Spanish translations are available on errors, including XML markup errors Note: Off is...
XPS menu Menu item Print Error Pages Off On Description Prints a page containing information on the Lexmark Web site at www.lexmark.com. They contain information about using an FTP address, shortcut numbers, or the address book, and about scanning documents ...about changing settings Provides help in locating additional information Provides help in resolving repeating defects in copies or prints Provides part numbers for ordering supplies Understanding printer menus 228 English, French, German, and Spanish translations are available on errors, including XML markup errors Note: Off is...
User's Guide
Page 236
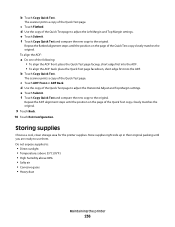
... • Corrosive gases • Heavy dust Maintaining the printer 236 The scanner prints a copy of the Quick Test copy closely matches the original. Store supplies right side up in their original packing until the position on the page of the Quick Test page. e Touch Submit. d Use the copy of the... the ADF back: place the Quick Test page facedown, short edge first into the ADF. b Touch Copy Quick Test. e Touch Submit. Do not expose supplies to use them. To align the ADF: a Do one of the Quick Test page to adjust the Horizontal Adjust and Top Margin settings. d Use the...
... • Corrosive gases • Heavy dust Maintaining the printer 236 The scanner prints a copy of the Quick Test copy closely matches the original. Store supplies right side up in their original packing until the position on the page of the Quick Test page. e Touch Submit. d Use the copy of the... the ADF back: place the Quick Test page facedown, short edge first into the ADF. b Touch Copy Quick Test. e Touch Submit. Do not expose supplies to use them. To align the ADF: a Do one of the Quick Test page to adjust the Horizontal Adjust and Top Margin settings. d Use the...
User's Guide
Page 237
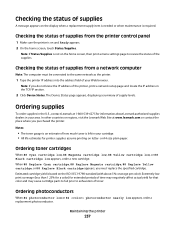
... menu settings page to review the status of your area. or A4-size plain paper. Note: If Status/Supplies is on the ISO / IEC 19798 standard (with about Lexmark authorized supplies dealers in the TCP/IP section. 2 Click Device Status. When 88 Replace Cyan cartridge, 88 Replace Magenta... low, or 88 Black cartridge low appears, order a new cartridge. Checking the status of supply levels. Estimated cartridge yield is required. In other countries or regions, visit the Lexmark Web Site at 1-800-539-6275 for that color and may negatively affect actual yield for information...
... menu settings page to review the status of your area. or A4-size plain paper. Note: If Status/Supplies is on the ISO / IEC 19798 standard (with about Lexmark authorized supplies dealers in the TCP/IP section. 2 Click Device Status. When 88 Replace Cyan cartridge, 88 Replace Magenta... low, or 88 Black cartridge low appears, order a new cartridge. Checking the status of supply levels. Estimated cartridge yield is required. In other countries or regions, visit the Lexmark Web Site at 1-800-539-6275 for that color and may negatively affect actual yield for information...
User's Guide
Page 239
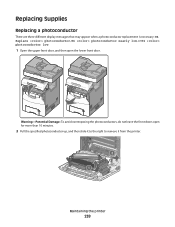
Warning-Potential Damage: To avoid overexposing the photoconductors, do not leave the front doors open the lower front door. Replacing Supplies Replacing a photoconductor There are three different display messages that may appear when a photoconductor replacement is necessary: 84 Replace photoconductor, 84 photoconductor nearly low, or 84 photoconductor low. 1 Open the upper front door, and then open for more than 10 minutes. 2 Pull the specified photoconductor up, and then slide it to the right to remove it from the printer. 2 1 Maintaining the printer 239
Warning-Potential Damage: To avoid overexposing the photoconductors, do not leave the front doors open the lower front door. Replacing Supplies Replacing a photoconductor There are three different display messages that may appear when a photoconductor replacement is necessary: 84 Replace photoconductor, 84 photoconductor nearly low, or 84 photoconductor low. 1 Open the upper front door, and then open for more than 10 minutes. 2 Pull the specified photoconductor up, and then slide it to the right to remove it from the printer. 2 1 Maintaining the printer 239
User's Guide
Page 241
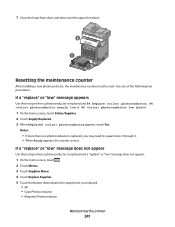
...replace" or "low" message does not appear: 1 On the home screen, touch . 2 Touch Menus. 3 Touch Supplies Menu. 4 Touch Replace Supplies. 5 Touch the button that indicates the supply item you may need to repeat steps 1 through 3. • When Ready appears, the counter is replaced and 84 Replace... photoconductor, 84 photoconductor nearly low, or 84 photoconductor low appears: 1 On the home screen, touch Status/Supplies. 2 Touch Supply Replaced. 3 When Replaced photoconductor appears, touch Yes. 7 Close the lower front door, and then close the upper front door. 2...
...replace" or "low" message does not appear: 1 On the home screen, touch . 2 Touch Menus. 3 Touch Supplies Menu. 4 Touch Replace Supplies. 5 Touch the button that indicates the supply item you may need to repeat steps 1 through 3. • When Ready appears, the counter is replaced and 84 Replace... photoconductor, 84 photoconductor nearly low, or 84 photoconductor low appears: 1 On the home screen, touch Status/Supplies. 2 Touch Supply Replaced. 3 When Replaced photoconductor appears, touch Yes. 7 Close the lower front door, and then close the upper front door. 2...
User's Guide
Page 254
...Software and Documentation CD and the Embedded Web Server Administrator's Guide on the Lexmark Web site at www.lexmark.com. Checking the device status Using the Embedded Web Server, you an e-mail when the supplies are getting low or when the paper needs to be changed, added, or... for a range of functions including: • Viewing a virtual display of the printer control panel • Checking the status of the printer supplies • Configuring printer settings • Configuring network settings • Viewing reports To access the Embedded Web Server, type the printer IP address ...
...Software and Documentation CD and the Embedded Web Server Administrator's Guide on the Lexmark Web site at www.lexmark.com. Checking the device status Using the Embedded Web Server, you an e-mail when the supplies are getting low or when the paper needs to be changed, added, or... for a range of functions including: • Viewing a virtual display of the printer control panel • Checking the status of the printer supplies • Configuring printer settings • Configuring network settings • Viewing reports To access the Embedded Web Server, type the printer IP address ...
User's Guide
Page 255
... TCP/IP section. 2 Click Settings. 3 Under Other Settings, click E-mail Alert Setup. 4 Select the items for assessing the status of the printer, the network, and supplies. To set up e-mail alerts: 1 Type the printer IP address into the address field of your Web browser. Note: If you want to set up...
... TCP/IP section. 2 Click Settings. 3 Under Other Settings, click E-mail Alert Setup. 4 Select the items for assessing the status of the printer, the network, and supplies. To set up e-mail alerts: 1 Type the printer IP address into the address field of your Web browser. Note: If you want to set up...

