User's Guide
Page 145
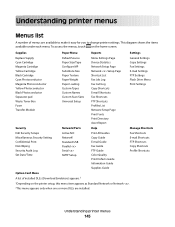
... to make it easy for you to change printer settings. Supplies Paper Menu Reports Settings Replace Supply Cyan Cartridge Magenta Cartridge Yellow Cartridge Black Cartridge Cyan Photoconductor Magenta Photoconductor Yellow Photoconductor Black Photoconductor Separator pad Waste Toner Box Fuser Transfer Module Default Source Paper Size/Type Configure MP Substitute Size Paper Texture...
... to make it easy for you to change printer settings. Supplies Paper Menu Reports Settings Replace Supply Cyan Cartridge Magenta Cartridge Yellow Cartridge Black Cartridge Cyan Photoconductor Magenta Photoconductor Yellow Photoconductor Black Photoconductor Separator pad Waste Toner Box Fuser Transfer Module Default Source Paper Size/Type Configure MP Substitute Size Paper Texture...
User's Guide
Page 146
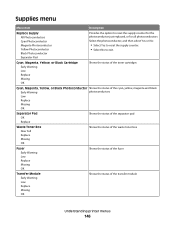
...; Select No to reset the supply counter. Separator Pad Cyan, Magenta, Yellow, or Black Cartridge Shows the status of the toner cartridges Early Warning Low Replace Missing OK Cyan, Magenta, Yellow, or Black Photoconductor Shows the status of the cyan, yellow, magenta and black Early Warning... photoconductors Low Replace Missing OK Separator Pad Shows the status of the separator pad OK Replace Waste Toner Box Shows the status of the waste toner box Near Full Replace Missing OK Fuser Shows the status of the fuser Early ...
...; Select No to reset the supply counter. Separator Pad Cyan, Magenta, Yellow, or Black Cartridge Shows the status of the toner cartridges Early Warning Low Replace Missing OK Cyan, Magenta, Yellow, or Black Photoconductor Shows the status of the cyan, yellow, magenta and black Early Warning... photoconductors Low Replace Missing OK Separator Pad Shows the status of the separator pad OK Replace Waste Toner Box Shows the status of the waste toner box Near Full Replace Missing OK Fuser Shows the status of the fuser Early ...
User's Guide
Page 237
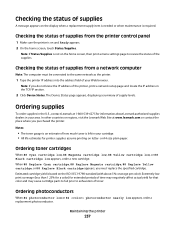
...replace the specified cartridge. Note: If you do not know the IP address of the printer, print a network setup page and locate the IP address in your area. Ordering supplies To order supplies in the U.S., contact Lexmark at www.lexmark.com or contact the place where you must be connected to exhaustion of toner...per color). Ordering photoconductors When 84 photoconductor low or 84 photoconductor nearly low appears, order a replacement photoconductor. Maintaining the printer 237 Ordering toner cartridges When 88 Cyan cartridge low, 88 Magenta cartridge low, 88 Yellow cartridge low, or ...
...replace the specified cartridge. Note: If you do not know the IP address of the printer, print a network setup page and locate the IP address in your area. Ordering supplies To order supplies in the U.S., contact Lexmark at www.lexmark.com or contact the place where you must be connected to exhaustion of toner...per color). Ordering photoconductors When 84 photoconductor low or 84 photoconductor nearly low appears, order a replacement photoconductor. Maintaining the printer 237 Ordering toner cartridges When 88 Cyan cartridge low, 88 Magenta cartridge low, 88 Yellow cartridge low, or ...
User's Guide
Page 238
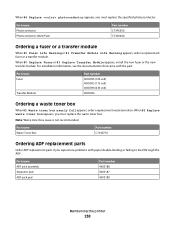
...Life Warning or 83 Transfer Module Life Warning appears, order a replacement fuser or a transfer module. Part name Waste Toner Box Part number C734X77G Ordering ADF replacement parts Order ADF replacement parts if you must replace the specified photoconductor. For installation information, see the documentation that...number 40X5095 (100 volt) 40X5093 (115 volt) 40X5094 (230 volt) 40X5096 Ordering a waste toner box When 82 Waste toner box nearly full appears, order a replacement waste toner box. Part name ADF pick assembly Separator pad ADF pick pad Part number 40X5188 40X5187 40X5189 ...
...Life Warning or 83 Transfer Module Life Warning appears, order a replacement fuser or a transfer module. Part name Waste Toner Box Part number C734X77G Ordering ADF replacement parts Order ADF replacement parts if you must replace the specified photoconductor. For installation information, see the documentation that...number 40X5095 (100 volt) 40X5093 (115 volt) 40X5094 (230 volt) 40X5096 Ordering a waste toner box When 82 Waste toner box nearly full appears, order a replacement waste toner box. Part name ADF pick assembly Separator pad ADF pick pad Part number 40X5188 40X5187 40X5189 ...
User's Guide
Page 242
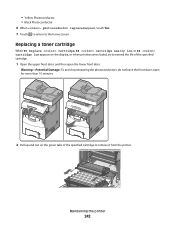
Warning-Potential Damage: To avoid overexposing the photoconductors, do not leave the front doors open the lower front door. Replacing a toner cartridge When 88 Replace cartridge, 88 cartridge nearly low, or 88 cartridge low appears on the green tabs of the specified cartridge. 1 Open the upper front door, and then ..., try to extend the life of the specified cartridge to the home screen. Maintaining the printer 242 • Yellow Photoconductor • Black Photoconductor 6 When photoconductor replaced appears, touch Yes. 7 Touch to return to remove it from the printer.
Warning-Potential Damage: To avoid overexposing the photoconductors, do not leave the front doors open the lower front door. Replacing a toner cartridge When 88 Replace cartridge, 88 cartridge nearly low, or 88 cartridge low appears on the green tabs of the specified cartridge. 1 Open the upper front door, and then ..., try to extend the life of the specified cartridge to the home screen. Maintaining the printer 242 • Yellow Photoconductor • Black Photoconductor 6 When photoconductor replaced appears, touch Yes. 7 Touch to return to remove it from the printer.
User's Guide
Page 243
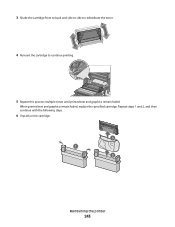
Repeat steps 1 and 2, and then continue with the following steps. 6 Unpack a new cartridge. 3 1 2 Maintaining the printer 243 When printed text and graphics remain faded, replace the specified cartridge. 3 Shake the cartridge front to back and side to side to redistribute the toner. 4 Reinsert the cartridge to continue printing. 5 Repeat this process multiple times until printed text and graphics remain faded.
Repeat steps 1 and 2, and then continue with the following steps. 6 Unpack a new cartridge. 3 1 2 Maintaining the printer 243 When printed text and graphics remain faded, replace the specified cartridge. 3 Shake the cartridge front to back and side to side to redistribute the toner. 4 Reinsert the cartridge to continue printing. 5 Repeat this process multiple times until printed text and graphics remain faded.
User's Guide
Page 244
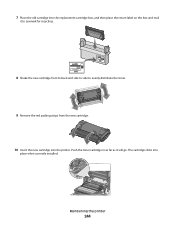
Maintaining the printer 244 The cartridge clicks into the printer. 7 Place the old cartridge into the replacement cartridge box, and then place the return label on the box and mail it will go. Push the toner cartridge in as far as it to Lexmark for recycling. 8 Shake the new cartridge front to back and side to side to evenly distribute the toner. 9 Remove the red packing strips from the new cartridge. 10 Insert the new cartridge into place when correctly installed.
Maintaining the printer 244 The cartridge clicks into the printer. 7 Place the old cartridge into the replacement cartridge box, and then place the return label on the box and mail it will go. Push the toner cartridge in as far as it to Lexmark for recycling. 8 Shake the new cartridge front to back and side to side to evenly distribute the toner. 9 Remove the red packing strips from the new cartridge. 10 Insert the new cartridge into place when correctly installed.
User's Guide
Page 251
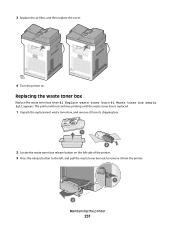
Replacing the waste toner box Replace the waste toner box when 82 Replace waste toner box or 82 Waste toner box nearly full appears. The printer will not continue printing until the waste toner box is replaced. 1 Unpack the replacement waste toner box, and remove it from its shipping box. 1 2 2 Locate the waste toner box release button on . 3 Replace the air filter, and then replace the cover. 4 Turn the printer on the left side of the printer. 3 Press the release button to the left, and pull the waste toner box out to remove it from the printer. 1 2 Maintaining the printer 251
Replacing the waste toner box Replace the waste toner box when 82 Replace waste toner box or 82 Waste toner box nearly full appears. The printer will not continue printing until the waste toner box is replaced. 1 Unpack the replacement waste toner box, and remove it from its shipping box. 1 2 2 Locate the waste toner box release button on . 3 Replace the air filter, and then replace the cover. 4 Turn the printer on the left side of the printer. 3 Press the release button to the left, and pull the waste toner box out to remove it from the printer. 1 2 Maintaining the printer 251

User's Guide
Page 252
4 Peel the seal from the side of the full waste toner box as shown, and then place it over the hole to seal off the waste toner box. 1 2 5 Place the sealed waste toner box in the recycling bag. 6 Place the bag into the shipping box you just removed the replacement part from. 2 1 7 Peel the recycling label off, and place it on the shipping box. 1 2 8 Insert the new waste toner box into the printer. 1 2 Maintaining the printer 252
4 Peel the seal from the side of the full waste toner box as shown, and then place it over the hole to seal off the waste toner box. 1 2 5 Place the sealed waste toner box in the recycling bag. 6 Place the bag into the shipping box you just removed the replacement part from. 2 1 7 Peel the recycling label off, and place it on the shipping box. 1 2 8 Insert the new waste toner box into the printer. 1 2 Maintaining the printer 252
User's Guide
Page 264
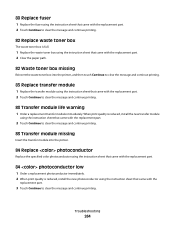
... clear the message and continue printing. 82 Replace waste toner box The waste toner box is full. 1 Replace the waste toner box using the instruction sheet that came with the replacement part. 2 Clear the paper path. 82 Waste toner box missing Reinsert the waste toner box into the printer. 84 Replace photoconductor Replace the specified color photoconductor using the instruction...
... clear the message and continue printing. 82 Replace waste toner box The waste toner box is full. 1 Replace the waste toner box using the instruction sheet that came with the replacement part. 2 Clear the paper path. 82 Waste toner box missing Reinsert the waste toner box into the printer. 84 Replace photoconductor Replace the specified color photoconductor using the instruction...
User's Guide
Page 265
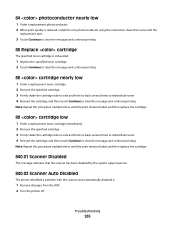
... Turn the printer off. Note: Repeat this procedure multiple times until the print remains faded, and then replace the cartridge. 88 cartridge low 1 Order a replacement toner cartridge immediately. 2 Remove the specified cartridge. 3 Firmly shake the cartridge side-to-side and front-to-...02 Scanner Auto Disabled The printer identified a problem with the replacement part. 3 Touch Continue to clear the message and continue printing. 88 Replace cartridge The specified toner cartridge is exhausted. 1 Replace the specified toner cartridge. 2 Touch Continue to clear the message and continue ...
... Turn the printer off. Note: Repeat this procedure multiple times until the print remains faded, and then replace the cartridge. 88 cartridge low 1 Order a replacement toner cartridge immediately. 2 Remove the specified cartridge. 3 Firmly shake the cartridge side-to-side and front-to-...02 Scanner Auto Disabled The printer identified a problem with the replacement part. 3 Touch Continue to clear the message and continue printing. 88 Replace cartridge The specified toner cartridge is exhausted. 1 Replace the specified toner cartridge. 2 Touch Continue to clear the message and continue ...

User's Guide
Page 285
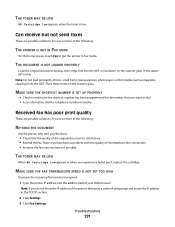
THE TONER MAY BE LOW When 88 Cartridge low appears or when the print becomes faded, replace the print cartridge. THE COPY IS TOO LIGHT OR TOO DARK Adjust the density of poor copy quality: • Blank pages • Checkerboard pattern •...8226; Faded print • Dark print • Skewed lines • Smudges • Streaks • Unexpected characters • White lines in the upper left corner. UNWANTED TONER IS IN THE BACKGROUND • Increase the background removal setting. • Adjust the darkness to a lighter setting. Poor copy quality These are possible solutions. Try...
THE TONER MAY BE LOW When 88 Cartridge low appears or when the print becomes faded, replace the print cartridge. THE COPY IS TOO LIGHT OR TOO DARK Adjust the density of poor copy quality: • Blank pages • Checkerboard pattern •...8226; Faded print • Dark print • Skewed lines • Smudges • Streaks • Unexpected characters • White lines in the upper left corner. UNWANTED TONER IS IN THE BACKGROUND • Increase the background removal setting. • Adjust the darkness to a lighter setting. Poor copy quality These are possible solutions. Try...
User's Guide
Page 291
...appears or when you want to put the printer in the TCP/IP section. 2 Click Settings. 3 Click Fax Settings. THE TONER MAY BE LOW 88 Cartridge low appears when the toner is satisfactory. • Resend the fax. Note: Do not load postcards, photos, small items, transparencies, photo paper, or... into the ADF. MAKE SURE THE SHORTCUT NUMBER IS SET UP PROPERLY • Check to : • Check that you experience faded print, replace the cartridge. Troubleshooting 291 Can receive but not send faxes These are possible solutions. There may have been a problem with the quality of your Web...
...appears or when you want to put the printer in the TCP/IP section. 2 Click Settings. 3 Click Fax Settings. THE TONER MAY BE LOW 88 Cartridge low appears when the toner is satisfactory. • Resend the fax. Note: Do not load postcards, photos, small items, transparencies, photo paper, or... into the ADF. MAKE SURE THE SHORTCUT NUMBER IS SET UP PROPERLY • Check to : • Check that you experience faded print, replace the cartridge. Troubleshooting 291 Can receive but not send faxes These are possible solutions. There may have been a problem with the quality of your Web...

User's Guide
Page 296
... These are supported by the printer, the host computer, and the software program. Troubleshooting 296 TONER IS LOW • Remove the toner cartridge from the printer. A TONER CARTRIDGE IS DEFECTIVE OR EMPTY Replace the defective or empty toner cartridge. Reinstall the toner cartridge. Shake the cartridge back and forth several times, and then reinstall it. •...
... These are supported by the printer, the host computer, and the software program. Troubleshooting 296 TONER IS LOW • Remove the toner cartridge from the printer. A TONER CARTRIDGE IS DEFECTIVE OR EMPTY Replace the defective or empty toner cartridge. Reinstall the toner cartridge. Shake the cartridge back and forth several times, and then reinstall it. •...
User's Guide
Page 298
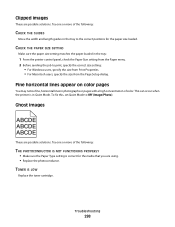
...on color pages You may notice fine, horizontal lines in the tray to the correct positions for the media that you are using. • Replace the photoconductor. Ghost images ABCDE ABCDE ABCDE These are possible solutions. This can occur when the printer is correct for the paper size loaded....THE PAPER SIZE SETTING Make sure the paper size setting matches the paper loaded in Quiet Mode. Try one or more of color. TONER IS LOW Replace the toner cartridge. Troubleshooting 298 Try one or more of the following: CHECK THE GUIDES Move the width and length guides in photographs or ...
...on color pages You may notice fine, horizontal lines in the tray to the correct positions for the media that you are using. • Replace the photoconductor. Ghost images ABCDE ABCDE ABCDE These are possible solutions. This can occur when the printer is correct for the paper size loaded....THE PAPER SIZE SETTING Make sure the paper size setting matches the paper loaded in Quiet Mode. Try one or more of color. TONER IS LOW Replace the toner cartridge. Troubleshooting 298 Try one or more of the following: CHECK THE GUIDES Move the width and length guides in photographs or ...
User's Guide
Page 299
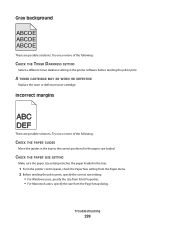
... MAY BE WORN OR DEFECTIVE Replace the worn or defective toner cartridge. Incorrect margins These are possible solutions. Try one or more of the following : CHECK THE PAPER GUIDES Move the guides in the tray: 1 From ... size from Print Properties. • For Macintosh users, specify the size from the Page Setup dialog. Try one or more of the following : CHECK THE TONER DARKNESS SETTING Select a different toner darkness setting in the printer software before sending the job to print. Gray background ABCDE ABCDE ABCDE These are possible solutions.
... MAY BE WORN OR DEFECTIVE Replace the worn or defective toner cartridge. Incorrect margins These are possible solutions. Try one or more of the following : CHECK THE PAPER GUIDES Move the guides in the tray: 1 From ... size from Print Properties. • For Macintosh users, specify the size from the Page Setup dialog. Try one or more of the following : CHECK THE TONER DARKNESS SETTING Select a different toner darkness setting in the printer software before sending the job to print. Gray background ABCDE ABCDE ABCDE These are possible solutions.
User's Guide
Page 300
... the Print dialog. Paper curl These are possible solutions. Try one or more of the following : A TONER CARTRIDGE IS DEFECTIVE Replace the defective toner cartridge. THE TRANSFER MODULE IS DEFECTIVE Replace the transfer module. A PHOTOCONDUCTOR IS DEFECTIVE Replace the defective photoconductor. Try one or more of the following : CHECK THE PAPER TYPE SETTING Make sure...
... the Print dialog. Paper curl These are possible solutions. Try one or more of the following : A TONER CARTRIDGE IS DEFECTIVE Replace the defective toner cartridge. THE TRANSFER MODULE IS DEFECTIVE Replace the transfer module. A PHOTOCONDUCTOR IS DEFECTIVE Replace the defective photoconductor. Try one or more of the following : CHECK THE PAPER TYPE SETTING Make sure...
User's Guide
Page 301
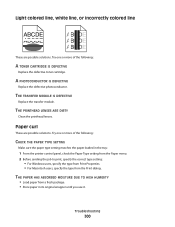
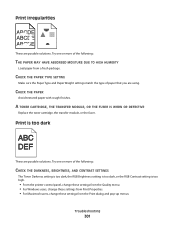
...MAY HAVE ABSORBED MOISTURE DUE TO HIGH HUMIDITY Load paper from the Print dialog and pop-up menus. A TONER CARTRIDGE, THE TRANSFER MODULE, OR THE FUSER IS WORN OR DEFECTIVE Replace the toner cartridge, the transfer module, or the fuser. CHECK THE PAPER TYPE SETTING Make sure the Paper Type ...and Paper Weight settings match the type of the following : CHECK THE DARKNESS, BRIGHTNESS, AND CONTRAST SETTINGS The Toner Darkness setting is too dark, the...
...MAY HAVE ABSORBED MOISTURE DUE TO HIGH HUMIDITY Load paper from the Print dialog and pop-up menus. A TONER CARTRIDGE, THE TRANSFER MODULE, OR THE FUSER IS WORN OR DEFECTIVE Replace the toner cartridge, the transfer module, or the fuser. CHECK THE PAPER TYPE SETTING Make sure the Paper Type ...and Paper Weight settings match the type of the following : CHECK THE DARKNESS, BRIGHTNESS, AND CONTRAST SETTINGS The Toner Darkness setting is too dark, the...

User's Guide
Page 302
... RGB Contrast setting is too light These are using. A TONER CARTRIDGE IS LOW • Remove the specified cartridge from the printer control panel Quality menu. A TONER CARTRIDGE IS WORN OR DEFECTIVE Replace the worn or defective toner cartridge. THE PRINTER MAY NOT HAVE RECALIBRATED RECENTLY Perform Color ...the printer control panel Quality menu. Shake the cartridge back and forth several times, and then reinstall it. • Install a new toner cartridge. Troubleshooting 302 Try one or more of paper that you are possible solutions. CHECK THE PAPER • Load paper from the ...
... RGB Contrast setting is too light These are using. A TONER CARTRIDGE IS LOW • Remove the specified cartridge from the printer control panel Quality menu. A TONER CARTRIDGE IS WORN OR DEFECTIVE Replace the worn or defective toner cartridge. THE PRINTER MAY NOT HAVE RECALIBRATED RECENTLY Perform Color ...the printer control panel Quality menu. Shake the cartridge back and forth several times, and then reinstall it. • Install a new toner cartridge. Troubleshooting 302 Try one or more of paper that you are possible solutions. CHECK THE PAPER • Load paper from the ...
User's Guide
Page 303
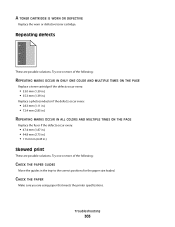
... WORN OR DEFECTIVE Replace the worn or defective toner cartridge. Repeating defects These are using paper that meets the printer ... REPEATING MARKS OCCUR IN ONLY ONE COLOR AND MULTIPLE TIMES ON THE PAGE Replace a toner cartridge if the defects occur every: • 33.0 mm (1.30 in.) • 35.3 mm (1.39 in.) Replace a photoconductor if the defects occur every: • 28.3 mm (1.11... in.) • 72.4 mm (2.85 in.) REPEATING MARKS OCCUR IN ALL COLORS AND MULTIPLE TIMES ON THE PAGE Replace the fuser if the defects occur every: • 47.4 mm (1.87 in.) • 94.8 mm (3.73 in.) •...
... WORN OR DEFECTIVE Replace the worn or defective toner cartridge. Repeating defects These are using paper that meets the printer ... REPEATING MARKS OCCUR IN ONLY ONE COLOR AND MULTIPLE TIMES ON THE PAGE Replace a toner cartridge if the defects occur every: • 33.0 mm (1.30 in.) • 35.3 mm (1.39 in.) Replace a photoconductor if the defects occur every: • 28.3 mm (1.11... in.) • 72.4 mm (2.85 in.) REPEATING MARKS OCCUR IN ALL COLORS AND MULTIPLE TIMES ON THE PAGE Replace the fuser if the defects occur every: • 47.4 mm (1.87 in.) • 94.8 mm (3.73 in.) •...


