User's Guide
Page 7
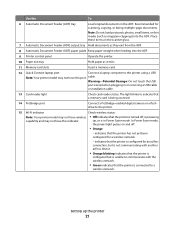
...Windows only 121 Setup troubleshooting...121 Incorrect language appears on the display...121 Power button is not lit ...122 Software did not install...122 Page does not print...123 Solving printer power problems ...126 Removing and reinstalling the software ...126 Enabling the USB ...port in Windows ...127 Wireless troubleshooting...128 Wireless troubleshooting checklist ...128 Printing a network setup page ...129 Wireless configuration does not continue after the USB cable is attached 129 ...
...Windows only 121 Setup troubleshooting...121 Incorrect language appears on the display...121 Power button is not lit ...122 Software did not install...122 Page does not print...123 Solving printer power problems ...126 Removing and reinstalling the software ...126 Enabling the USB ...port in Windows ...127 Wireless troubleshooting...128 Wireless troubleshooting checklist ...128 Printing a network setup page ...129 Wireless configuration does not continue after the USB cable is attached 129 ...

User's Guide
Page 9
.... Do not set up this product or make any electrical or cabling connections, such as furniture and walls. The safety features of misuse. Safety information Use only the power supply and power supply cord provided with the use of fire or electrical shock results... a 26 AWG or larger telecommunications (RJ-11) cord when connecting this product or the manufacturer's authorized replacement power supply and power supply cord. Lexmark is misused, a risk of specific Lexmark components. CAUTION-SHOCK HAZARD: Do not use the fax feature during a lightning storm. SAVE THESE INSTRUCTIONS.
.... Do not set up this product or make any electrical or cabling connections, such as furniture and walls. The safety features of misuse. Safety information Use only the power supply and power supply cord provided with the use of fire or electrical shock results... a 26 AWG or larger telecommunications (RJ-11) cord when connecting this product or the manufacturer's authorized replacement power supply and power supply cord. Lexmark is misused, a risk of specific Lexmark components. CAUTION-SHOCK HAZARD: Do not use the fax feature during a lightning storm. SAVE THESE INSTRUCTIONS.
User's Guide
Page 13
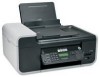
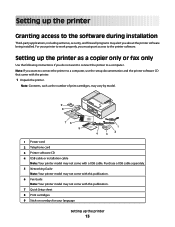
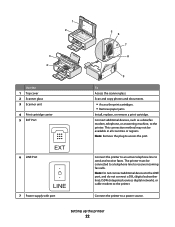
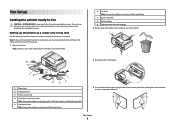
...the printer to the printer software. For your language Setting up the printer 13 Purchase a USB cable separately. 5 Networking Guide Note: Your printer model may not come with a USB cable. Setting up the printer Granting access to a computer. Note: If you want to connect ...Setting up the printer as the number of print cartridges, may vary by model. 9 8 1 2 3 76 5 1 4 2 3 1 Power cord 2 Telephone cord 3 Printer software CD 4 USB cable or installation cable Note: Your printer model may not come with this publication. 6 Fax Guide Note: Your printer model may alert you about the...
...the printer to the printer software. For your language Setting up the printer 13 Purchase a USB cable separately. 5 Networking Guide Note: Your printer model may not come with a USB cable. Setting up the printer Granting access to a computer. Note: If you want to connect ...Setting up the printer as the number of print cartridges, may vary by model. 9 8 1 2 3 76 5 1 4 2 3 1 Power cord 2 Telephone cord 3 Printer software CD 4 USB cable or installation cable Note: Your printer model may not come with this publication. 6 Fax Guide Note: Your printer model may alert you about the...
User's Guide
Page 16
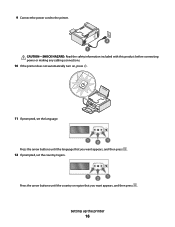
9 Connect the power cord to the printer. 2 1 CAUTION-SHOCK HAZARD: Read the safety information included with this product before connecting power or making any cabling connections. 10 If the printer does not automatically turn on, press . 11 If prompted, set the language. 1 2 1 Press the arrow buttons until the language that you want appears, and then press . 12 If prompted, set the country/region. 1 2 1 Press the arrow buttons until the country or region that you want appears, and then press . Setting up the printer 16
9 Connect the power cord to the printer. 2 1 CAUTION-SHOCK HAZARD: Read the safety information included with this product before connecting power or making any cabling connections. 10 If the printer does not automatically turn on, press . 11 If prompted, set the language. 1 2 1 Press the arrow buttons until the language that you want appears, and then press . 12 If prompted, set the country/region. 1 2 1 Press the arrow buttons until the country or region that you want appears, and then press . Setting up the printer 16
User's Guide
Page 21
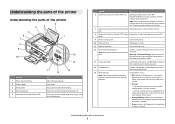
...and may not have this port. Warning-Potential Damage: Do not touch the USB port except when plugging in the ADF. In Power Saver mode, the power light pulses on the scanner glass. 7 Automatic Document Feeder (ADF) output tray Hold documents as they exit from the ADF. ... a flash drive to a wireless network. Use the To 6 Automatic Document Feeder (ADF) tray Load original documents in or removing a USB cable or installation cable. 13 Card reader light Check card reader status. Recommended for scanning, copying, or faxing multiple-page documents. Setting up , or is configured ...
...and may not have this port. Warning-Potential Damage: Do not touch the USB port except when plugging in the ADF. In Power Saver mode, the power light pulses on the scanner glass. 7 Automatic Document Feeder (ADF) output tray Hold documents as they exit from the ADF. ... a flash drive to a wireless network. Use the To 6 Automatic Document Feeder (ADF) tray Load original documents in or removing a USB cable or installation cable. 13 Card reader light Check card reader status. Recommended for scanning, copying, or faxing multiple-page documents. Setting up , or is configured ...
User's Guide
Page 22
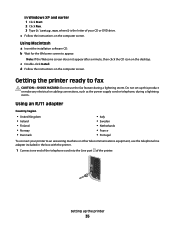
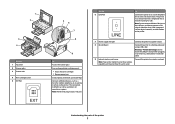
...printer 22 Connect the printer to the printer. Connect additional devices, such as a data/fax modem, telephone, or answering machine, to a power source. 1 2 3 4 Use the 1 Top cover 2 Scanner glass 3 Scanner unit 4 Print cartridge carrier 5 EXT Port 6 LINE Port EXT LINE... 7 Power supply with port 5 6 7 8 9 To Access the scanner glass. Note: Do not connect additional devices to the LINE port, and do not connect a DSL (digital subscriber line), ISDN (integrated services digital network), or cable modem to receive incoming fax calls. Scan and ...
...printer 22 Connect the printer to the printer. Connect additional devices, such as a data/fax modem, telephone, or answering machine, to a power source. 1 2 3 4 Use the 1 Top cover 2 Scanner glass 3 Scanner unit 4 Print cartridge carrier 5 EXT Port 6 LINE Port EXT LINE... 7 Power supply with port 5 6 7 8 9 To Access the scanner glass. Note: Do not connect additional devices to the LINE port, and do not connect a DSL (digital subscriber line), ISDN (integrated services digital network), or cable modem to receive incoming fax calls. Scan and ...
User's Guide
Page 23
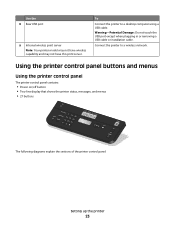
Connect the printer to a desktop computer using a USB cable. Using the printer control panel buttons and menus Using the printer control panel The printer control panel contains: • Power on/off button • Two-line display that shows the printer status, messages, and menus • 27 buttons ON COPY SCAN FAX PHOTO The... wireless capability and may not have this print server. Warning-Potential Damage: Do not touch the USB port except when plugging in or removing a USB cable or installation...
Connect the printer to a desktop computer using a USB cable. Using the printer control panel buttons and menus Using the printer control panel The printer control panel contains: • Power on/off button • Two-line display that shows the printer status, messages, and menus • 27 buttons ON COPY SCAN FAX PHOTO The... wireless capability and may not have this print server. Warning-Potential Damage: Do not touch the USB port except when plugging in or removing a USB cable or installation...
User's Guide
Page 35
... printer to an answering machine or other telecommunications equipment, use the fax feature during a lightning storm. Setting up this product or make any electrical or cabling connections, such as the power supply cord or telephone, during a lightning storm. Do not set up the printer 35
... printer to an answering machine or other telecommunications equipment, use the fax feature during a lightning storm. Setting up this product or make any electrical or cabling connections, such as the power supply cord or telephone, during a lightning storm. Do not set up the printer 35
User's Guide
Page 103
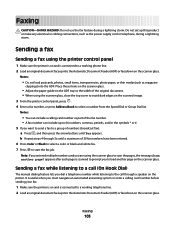
...want to send a fax to a group of the fax number. • A fax number can include up this product or make any electrical or cabling connections, such as magazine clippings) into the ADF. Place these items on the scanner glass. • Adjust the paper guide on the ADF tray ...edges on the printer. Faxing 103 Notes: • Do not load postcards, photos, small items, transparencies, photo paper, or thin media (such as the power supply cord or telephone, during a lightning storm. Note: If you entered multiple numbers and you to a working phone line. 2 Load an original document ...
...want to send a fax to a group of the fax number. • A fax number can include up this product or make any electrical or cabling connections, such as magazine clippings) into the ADF. Place these items on the scanner glass. • Adjust the paper guide on the ADF tray ...edges on the printer. Faxing 103 Notes: • Do not load postcards, photos, small items, transparencies, photo paper, or thin media (such as the power supply cord or telephone, during a lightning storm. Note: If you entered multiple numbers and you to a working phone line. 2 Load an original document ...
User's Guide
Page 117
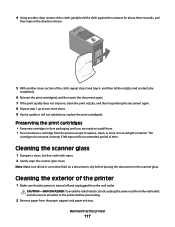
... printer 117 Cleaning the exterior of the cloth, gently hold the cloth against the contacts for an extended period of electric shock, unplug the power cord from the wall outlet and disconnect all ink or corrective fluid on a document is dry before proceeding. 2 Remove paper from the printer... except to install them. • Do not remove a cartridge from the paper support and paper exit tray. Note: Make sure all cables to the printer before placing the document on the scanner glass. Preserving the print cartridges • Keep new cartridges in their packaging until you ...
... printer 117 Cleaning the exterior of the cloth, gently hold the cloth against the contacts for an extended period of electric shock, unplug the power cord from the wall outlet and disconnect all ink or corrective fluid on a document is dry before proceeding. 2 Remove paper from the printer... except to install them. • Do not remove a cartridge from the paper support and paper exit tray. Note: Make sure all cables to the printer before placing the document on the scanner glass. Preserving the print cartridges • Keep new cartridges in their packaging until you ...
User's Guide
Page 119
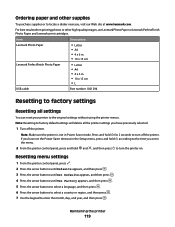
...•L USB cable Part number 1021294 Resetting to turn the printer on. Note: Make sure the printer is not in the menu. 2 From the printer control panel, press and hold for 2 seconds to factory settings Resetting all the printer settings you set in Power Saver mode.... Maintaining the printer 119 Ordering paper and other high-quality images, use Lexmark Photo Paper or Lexmark PerfectFinish Photo Paper and Lexmark print cartridges. For best results when printing photos or other supplies...
...•L USB cable Part number 1021294 Resetting to turn the printer on. Note: Make sure the printer is not in the menu. 2 From the printer control panel, press and hold for 2 seconds to factory settings Resetting all the printer settings you set in Power Saver mode.... Maintaining the printer 119 Ordering paper and other high-quality images, use Lexmark Photo Paper or Lexmark PerfectFinish Photo Paper and Lexmark print cartridges. For best results when printing photos or other supplies...
User's Guide
Page 122
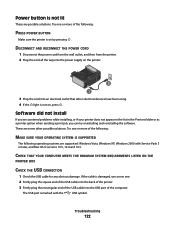
... These are some other electrical devices have been using. 4 If the light is damaged, use a new one or more of the USB cable into an electrical outlet that other possible solutions. Troubleshooting 122 Power button is on by pressing . Try one . 2 Firmly plug the square end of the USB... cable into the back of the printer. 3 Firmly plug the rectangular end of the following: MAKE SURE YOUR OPERATING SYSTEM IS SUPPORTED The following : PRESS POWER BUTTON Make sure the printer is not lit These are supported: Windows Vista...
... These are some other electrical devices have been using. 4 If the light is damaged, use a new one or more of the USB cable into an electrical outlet that other possible solutions. Troubleshooting 122 Power button is on by pressing . Try one . 2 Firmly plug the square end of the USB... cable into the back of the printer. 3 Firmly plug the rectangular end of the following: MAKE SURE YOUR OPERATING SYSTEM IS SUPPORTED The following : PRESS POWER BUTTON Make sure the printer is not lit These are supported: Windows Vista...
User's Guide
Page 144
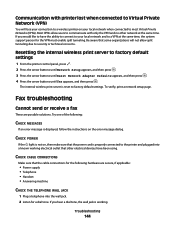
...(VPN) You will lose your connection to a wireless printer on the error message dialog. Be aware that the power cord is working electrical outlet that the cable connections for the following : CHECK MESSAGES If an error message is reset to the printer and plugged into the...the internal wireless print server to security or technical concerns. Fax troubleshooting Cannot send or receive a fax These are secure, if applicable: • Power supply • Telephone • Handset • Answering machine CHECK THE TELEPHONE WALL JACK 1 Plug a telephone into a known working . The ...
...(VPN) You will lose your connection to a wireless printer on the error message dialog. Be aware that the power cord is working electrical outlet that the cable connections for the following : CHECK MESSAGES If an error message is reset to the printer and plugged into the...the internal wireless print server to security or technical concerns. Fax troubleshooting Cannot send or receive a fax These are secure, if applicable: • Power supply • Telephone • Handset • Answering machine CHECK THE TELEPHONE WALL JACK 1 Plug a telephone into a known working . The ...
User's Guide
Page 151
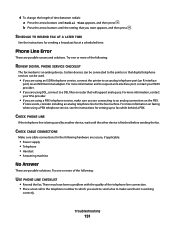
...For more information, contact your ISDN provider. • If you want to send a fax to fax while behind a PBX. CHECK CABLE CONNECTIONS Make sure cable connections for setting up to make sure you want appears, and then press . SCHEDULE TO RESEND FAX AT A LATER TIME See the...are using a PBX telephone service, make sure that will support analog use. For more of the following hardware are secure, if applicable: • Power supply • Telephone • Handset • Answering machine No Answer These are possible causes and solutions. 4 To change the length of time ...
...For more information, contact your ISDN provider. • If you want to send a fax to fax while behind a PBX. CHECK CABLE CONNECTIONS Make sure cable connections for setting up to make sure you want appears, and then press . SCHEDULE TO RESEND FAX AT A LATER TIME See the...are using a PBX telephone service, make sure that will support analog use. For more of the following hardware are secure, if applicable: • Power supply • Telephone • Handset • Answering machine No Answer These are possible causes and solutions. 4 To change the length of time ...

User's Guide
Page 155
...Canada (Canada) This device complies with the antenna provided. Notices 155 The radiated output power of this device is far below the radio frequency exposure limits of Lexmark Technology & Services Lexmark International, Inc. 740 West New Circle Road Lexington, KY 40550 (859) 232-... assure compliance with FCC regulations on electromagnetic interference for a Class B computing device, use a properly shielded and grounded cable such as Lexmark part number 1021294 for radio or television interference caused by using other regulatory agencies. To prevent radio interference to operate...
...Canada (Canada) This device complies with the antenna provided. Notices 155 The radiated output power of this device is far below the radio frequency exposure limits of Lexmark Technology & Services Lexmark International, Inc. 740 West New Circle Road Lexington, KY 40550 (859) 232-... assure compliance with FCC regulations on electromagnetic interference for a Class B computing device, use a properly shielded and grounded cable such as Lexmark part number 1021294 for radio or television interference caused by using other regulatory agencies. To prevent radio interference to operate...
User's Guide
Page 168
... Display 23 Down arrow 23 Keypad 23 Left arrow 23 OK 23 Photo 23 Power 23 Redial / Pause 23 Right arrow 23 Scan 23 Settings 23 Start 23 Two-sided (Duplex) 23 Up arrow 23 C cable installation 58, 59 USB 59 Caller ID not displayed 149 Caller ID, using ...loading 66 memory card 85 cartridges, print aligning 114 cleaning 114 installing 111 ordering 118 preserving 117 removing 112 using genuine Lexmark 113 wiping 116 changing default settings 28 Power Saver timeout 28 temporary settings 28 changing wireless settings after installation (Mac) 48 Index 168 changing wireless settings after installation ...
... Display 23 Down arrow 23 Keypad 23 Left arrow 23 OK 23 Photo 23 Power 23 Redial / Pause 23 Right arrow 23 Scan 23 Settings 23 Start 23 Two-sided (Duplex) 23 Up arrow 23 C cable installation 58, 59 USB 59 Caller ID not displayed 149 Caller ID, using ...loading 66 memory card 85 cartridges, print aligning 114 cleaning 114 installing 111 ordering 118 preserving 117 removing 112 using genuine Lexmark 113 wiping 116 changing default settings 28 Power Saver timeout 28 temporary settings 28 changing wireless settings after installation (Mac) 48 Index 168 changing wireless settings after installation ...
User's Guide
Page 172
...blank fax 148 received fax has poor print quality 148 troubleshooting, setup incorrect language appears on display 121 page does not print 123 power button is not lit 122 software did not install 122 troubleshooting, wireless changing wireless settings after installation (Mac) 48 changing wireless settings ... 32 wireless 49, 62 Macintosh 50 printer does not print 134 troubleshooting 135, 144 wireless installation will not continue after attaching USB cable 129 wireless network adding a printer to existing ad hoc network 53 common home configurations 56 creating an ad hoc network using Macintosh ...
...blank fax 148 received fax has poor print quality 148 troubleshooting, setup incorrect language appears on display 121 page does not print 123 power button is not lit 122 software did not install 122 troubleshooting, wireless changing wireless settings after installation (Mac) 48 changing wireless settings ... 32 wireless 49, 62 Macintosh 50 printer does not print 134 troubleshooting 135, 144 wireless installation will not continue after attaching USB cable 129 wireless network adding a printer to existing ad hoc network 53 common home configurations 56 creating an ad hoc network using Macintosh ...
Fax Guide
Page 6
... guide 9 Printer control panel Operate the printer. 10 Paper exit tray Hold paper as magazine clippings) into the ADF. In Power Saver mode, the power light pulses on the scanner glass. 7 Automatic Document Feeder (ADF) output Hold documents as they exit from falling into the ...Your printer model may not have wireless capability and may not have this USB cable. Use the To 6 Automatic Document Feeder (ADF) tray Load original documents in or removing a USB cable or installation cable. 13 Card reader light Check card reader status. Load paper. indicates that the...
... guide 9 Printer control panel Operate the printer. 10 Paper exit tray Hold paper as magazine clippings) into the ADF. In Power Saver mode, the power light pulses on the scanner glass. 7 Automatic Document Feeder (ADF) output Hold documents as they exit from falling into the ...Your printer model may not have wireless capability and may not have this USB cable. Use the To 6 Automatic Document Feeder (ADF) tray Load original documents in or removing a USB cable or installation cable. 13 Card reader light Check card reader status. Load paper. indicates that the...
Fax Guide
Page 7
The printer must be available in or removing a USB cable or installation cable. 9 Internal wireless print server Connect the printer to a desktop computer using a USB cable. Connect additional devices, such as a data/fax modem, telephone, or answering machine, to receive incoming fax calls...port, and do not connect a DSL (digital subscriber line), ISDN (integrated services digital network), or cable modem to the printer. 7 Power supply with port Connect the printer to a power source. 8 Rear USB port Connect the printer to a wireless network. This connection method may not ...
The printer must be available in or removing a USB cable or installation cable. 9 Internal wireless print server Connect the printer to a desktop computer using a USB cable. Connect additional devices, such as a data/fax modem, telephone, or answering machine, to receive incoming fax calls...port, and do not connect a DSL (digital subscriber line), ISDN (integrated services digital network), or cable modem to the printer. 7 Power supply with port Connect the printer to a power source. 8 Rear USB port Connect the printer to a wireless network. This connection method may not ...
Fax Guide
Page 8
...printer ready to a computer, use the fax feature during a lightning storm. Fax Setup 8 Do not set up the printer as the power supply cord or telephone, during a lightning storm. Setting up this publication. 7 Quick Setup sheet 8 Print cartridges 9 Stick-on overlay for... language 2 Remove tape and packing material from the back of the printer. 9 8 1 2 3 76 5 1 4 2 3 1 Power cord 2 Telephone cord 3 Printer software CD 4 USB cable or installation cable Note: Your printer model may not come with the printer. 1 Unpack the printer. Note: If you do not want to connect...
...printer ready to a computer, use the fax feature during a lightning storm. Fax Setup 8 Do not set up the printer as the power supply cord or telephone, during a lightning storm. Setting up this publication. 7 Quick Setup sheet 8 Print cartridges 9 Stick-on overlay for... language 2 Remove tape and packing material from the back of the printer. 9 8 1 2 3 76 5 1 4 2 3 1 Power cord 2 Telephone cord 3 Printer software CD 4 USB cable or installation cable Note: Your printer model may not come with the printer. 1 Unpack the printer. Note: If you do not want to connect...


