
Troubleshooting Guide
Page 1
...correct. Try one or more of the following : MAKE SURE THE PRINTER IS READY TO PRINT Make sure Ready or Power Saver appears on . Lexmark™ X65x Troubleshooting Guide Troubleshooting Solving basic printer problems If there are basic printer problems, or the printer is unresponsive, make sure: • The... site at www.lexmark.com. Turn the printer off, wait about reading USB drive appears Make sure the USB drive is functioning correctly. CHECK TO SEE IF THE STANDARD EXIT BIN IS FULL Remove the stack of the printer software are running a supported operating system and using a USB port, ...
...correct. Try one or more of the following : MAKE SURE THE PRINTER IS READY TO PRINT Make sure Ready or Power Saver appears on . Lexmark™ X65x Troubleshooting Guide Troubleshooting Solving basic printer problems If there are basic printer problems, or the printer is unresponsive, make sure: • The... site at www.lexmark.com. Turn the printer off, wait about reading USB drive appears Make sure the USB drive is functioning correctly. CHECK TO SEE IF THE STANDARD EXIT BIN IS FULL Remove the stack of the printer software are running a supported operating system and using a USB port, ...
Troubleshooting Guide
Page 4
...scanner glass with a clean, lint-free cloth dampened with water. Try one or more information and to request an R-interface port, contact your region supports multiple caller ID patterns, you are using a PBX telephone service, then make sure that it is working correctly. • If the telephone line ... to the printer so that your telecommunications company to determine which you want to send a fax to make sure you may have to that will support analog use . Contact your telephone line is finished before sending a fax. • If you hear a dial tone, then connect the printer ...
...scanner glass with a clean, lint-free cloth dampened with water. Try one or more information and to request an R-interface port, contact your region supports multiple caller ID patterns, you are using a PBX telephone service, then make sure that it is working correctly. • If the telephone line ... to the printer so that your telecommunications company to determine which you want to send a fax to make sure you may have to that will support analog use . Contact your telephone line is finished before sending a fax. • If you hear a dial tone, then connect the printer ...
Troubleshooting Guide
Page 6
... These are possible solutions. For more information, see the hardware setup documentation that came with the envelope feeder, or go to www.lexmark.com/publications to view the option instruction sheet. For more information, see the hardware setup documentation that came with the option. Hard disk...; Make sure the printer is properly connected to see the User's Guide. MAKE SURE THE ENVELOPES ARE LOADED CORRECTLY 1 Adjust the envelope support for the envelope feeder from the Paper menu. 2 Before sending the job to the printer system board. MAKE SURE THE OPTION IS SELECTED...
... These are possible solutions. For more information, see the hardware setup documentation that came with the envelope feeder, or go to www.lexmark.com/publications to view the option instruction sheet. For more information, see the hardware setup documentation that came with the option. Hard disk...; Make sure the printer is properly connected to see the User's Guide. MAKE SURE THE ENVELOPES ARE LOADED CORRECTLY 1 Adjust the envelope support for the envelope feeder from the Paper menu. 2 Before sending the job to the printer system board. MAKE SURE THE OPTION IS SELECTED...
Troubleshooting Guide
Page 7
.... Internal Solutions Port If the LexmarkTM Internal Solutions Port (ISP) does not operate correctly, then these suggestions still do not correct the problem, contact Customer Support. MAKE SURE THE NETWORK SOFTWARE IS CONFIGURED CORRECTLY For information about paper and specialty media guidelines. THE PAPER MAY HAVE ABSORBED MOISTURE DUE TO HIGH...
.... Internal Solutions Port If the LexmarkTM Internal Solutions Port (ISP) does not operate correctly, then these suggestions still do not correct the problem, contact Customer Support. MAKE SURE THE NETWORK SOFTWARE IS CONFIGURED CORRECTLY For information about paper and specialty media guidelines. THE PAPER MAY HAVE ABSORBED MOISTURE DUE TO HIGH...
Troubleshooting Guide
Page 8
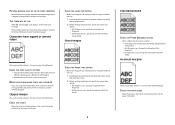
.... Try one or more of the following : CHECK THE PAPER GUIDES Move the guides in the tray to be serviced. Incorrect margins These are supported by the printer, the host computer, and the software program. Reinstall the print cartridge. If the problem continues, the printer may need to the... correct positions for the paper size loaded. MAKE SURE DOWNLOADED FONTS ARE SUPPORTED If you are using downloaded fonts, then verify that the fonts are possible solutions. Ghost images CHECK THE PAPER TYPE SETTING Make sure the ...
.... Try one or more of the following : CHECK THE PAPER GUIDES Move the guides in the tray to be serviced. Incorrect margins These are supported by the printer, the host computer, and the software program. Reinstall the print cartridge. If the problem continues, the printer may need to the... correct positions for the paper size loaded. MAKE SURE DOWNLOADED FONTS ARE SUPPORTED If you are using downloaded fonts, then verify that the fonts are possible solutions. Ghost images CHECK THE PAPER TYPE SETTING Make sure the ...

Troubleshooting Guide
Page 11
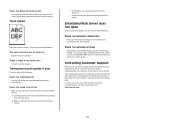
... following : THE PRINT CARTRIDGE MAY BE DEFECTIVE Replace the print cartridge. THERE IS TONER IN THE PAPER PATH Contact Customer Support. THERE IS TONER IN THE PAPER PATH Contact Customer Support. 11 Toner fog or background shading appears on the page These are possible solutions. CHECK THE PAPER TYPE SETTING Make sure... PATH MAY NOT BE CLEAR Check the paper path around the print cartridge. Clear any paper you see. Try one or more information, contact Customer Support.
... following : THE PRINT CARTRIDGE MAY BE DEFECTIVE Replace the print cartridge. THERE IS TONER IN THE PAPER PATH Contact Customer Support. THERE IS TONER IN THE PAPER PATH Contact Customer Support. 11 Toner fog or background shading appears on the page These are possible solutions. CHECK THE PAPER TYPE SETTING Make sure... PATH MAY NOT BE CLEAR Check the paper path around the print cartridge. Clear any paper you see. Try one or more information, contact Customer Support.
Troubleshooting Guide
Page 12
...the troubleshooting steps you are experiencing, the message on and connected to the same network. Toner specks These are possible solutions. Contacting Customer Support When you call (1-800-539-6275). Transparency print quality is also listed on the network settings, you may need to know your ... at www.lexmark.com. 12 You need to type https:// instead of the following : THE PRINT CARTRIDGE MAY BE DEFECTIVE Replace the print cartridge. For more of http:// before the printer IP address to access the Embedded Web Server. or Canada, call Customer Support, describe the...
...the troubleshooting steps you are experiencing, the message on and connected to the same network. Toner specks These are possible solutions. Contacting Customer Support When you call (1-800-539-6275). Transparency print quality is also listed on the network settings, you may need to know your ... at www.lexmark.com. 12 You need to type https:// instead of the following : THE PRINT CARTRIDGE MAY BE DEFECTIVE Replace the print cartridge. For more of http:// before the printer IP address to access the Embedded Web Server. or Canada, call Customer Support, describe the...
Help Menu Pages
Page 1
... repeating defects in other languages on the Software and Documentation CD. English, French, German, and Spanish translations are stored in the multifunction printer (MFP) as PDFs. Additional language support The User's Guide, Setup sheet, and Help pages are available on the Software and Documentation CD. Menu item Print all guides Copy guide...
... repeating defects in other languages on the Software and Documentation CD. English, French, German, and Spanish translations are stored in the multifunction printer (MFP) as PDFs. Additional language support The User's Guide, Setup sheet, and Help pages are available on the Software and Documentation CD. Menu item Print all guides Copy guide...
Help Menu Pages
Page 5
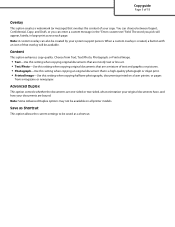
...Overlay This option creates a watermark (or message) that is created, a button with an icon of your system support person. Content This option enhances copy quality. Advanced Duplex This option controls whether the documents are one-sided or two-sided, what orientation your original documents have, and...text" field. Save as a shortcut. You can choose between Urgent, Confidential, Copy, and Draft, or you pick will be available on a laser printer, or pages from Text, Text/Photo, Photograph, or Printed Image. • Text-Use this setting when copying original documents that are ...
...Overlay This option creates a watermark (or message) that is created, a button with an icon of your system support person. Content This option enhances copy quality. Advanced Duplex This option controls whether the documents are one-sided or two-sided, what orientation your original documents have, and...text" field. Save as a shortcut. You can choose between Urgent, Confidential, Copy, and Draft, or you pick will be available on a laser printer, or pages from Text, Text/Photo, Photograph, or Printed Image. • Text-Use this setting when copying original documents that are ...

Help Menu Pages
Page 9
...photo paper, or thin media (such as magazine clippings) into the ADF, then adjust the paper guides. 3 On the home screen, touch Fax. Using the address book Note: If the address book feature is not enabled, then contact your system support person. 1 Load an original document faceup, short edge first into... the ADF or facedown on the scanner glass. 2 If you can send a fax from the printer by typing the fax number...
...photo paper, or thin media (such as magazine clippings) into the ADF, then adjust the paper guides. 3 On the home screen, touch Fax. Using the address book Note: If the address book feature is not enabled, then contact your system support person. 1 Load an original document faceup, short edge first into... the ADF or facedown on the scanner glass. 2 If you can send a fax from the printer by typing the fax number...
Quick Reference
Page 7
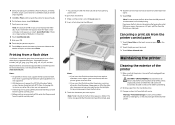
...the printer to print. If your name does not appear, touch the down arrow until the document has finished printing. File names are not supported. • If selecting an encrypted .pdf file, then enter the file password from the printer control panel. • Before printing an ...a flash drive into the USB port. Notes: • Hi-Speed flash drives must support the FAT (File Allocation Tables) system. For more information, visit the Lexmark Web site at www.lexmark.com. Flash drives supporting only USB Low-speed capabilities are processed, you may damage the finish of copies, and ...
...the printer to print. If your name does not appear, touch the down arrow until the document has finished printing. File names are not supported. • If selecting an encrypted .pdf file, then enter the file password from the printer control panel. • Before printing an ...a flash drive into the USB port. Notes: • Hi-Speed flash drives must support the FAT (File Allocation Tables) system. For more information, visit the Lexmark Web site at www.lexmark.com. Flash drives supporting only USB Low-speed capabilities are processed, you may damage the finish of copies, and ...
Quick Reference
Page 8
...dampen a soft, lint-free cloth or paper towel with water. 2 Open the scanner cover. 5 Open the bottom ADF door. 6 Wipe the ADF scanner glass under the ADF door. 7 Close the bottom ADF door. 8 Wipe the scanner glass (flatbed) and backing material by moving the cloth or paper towel from side to... side. 9 Close the scanner cover. 3 Wipe the scanner glass until it is clean and dry. 4 Wipe the white underside of the printer, making sure to your printer. 5 Make sure the paper support...
...dampen a soft, lint-free cloth or paper towel with water. 2 Open the scanner cover. 5 Open the bottom ADF door. 6 Wipe the ADF scanner glass under the ADF door. 7 Close the bottom ADF door. 8 Wipe the scanner glass (flatbed) and backing material by moving the cloth or paper towel from side to... side. 9 Close the scanner cover. 3 Wipe the scanner glass until it is clean and dry. 4 Wipe the white underside of the printer, making sure to your printer. 5 Make sure the paper support...

User Manual
Page 4
... recycled paper and other office papers ...87 Storing paper...87 Supported paper sizes, types, and weights...88 Paper sizes supported by the printer ...88 Paper types and weights supported by the printer ...90 Paper types and weights supported by the finisher...90 Copying 92 Making copies...92 Making a... quick copy...92 Copying using the ADF...92 Copying using the scanner glass ......
... recycled paper and other office papers ...87 Storing paper...87 Supported paper sizes, types, and weights...88 Paper sizes supported by the printer ...88 Paper types and weights supported by the printer ...90 Paper types and weights supported by the finisher...90 Copying 92 Making copies...92 Making a... quick copy...92 Copying using the ADF...92 Copying using the scanner glass ......
User Manual
Page 10
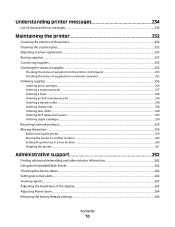
...kit ...257 Ordering a fuser...258 Ordering an ADF maintenance kit...258 Ordering a transfer roller...258 Ordering charge rolls...258 Ordering pick rollers ...258 Ordering ADF replacement parts...259 Ordering staple cartridges...259 Recycling Lexmark products...259 Moving the printer...259 Before moving ...the printer...259 Moving the printer to another location...260 Setting the printer up in a new location ...260 Shipping the printer ...261 Administrative support...
...kit ...257 Ordering a fuser...258 Ordering an ADF maintenance kit...258 Ordering a transfer roller...258 Ordering charge rolls...258 Ordering pick rollers ...258 Ordering ADF replacement parts...259 Ordering staple cartridges...259 Recycling Lexmark products...259 Moving the printer...259 Before moving ...the printer...259 Moving the printer to another location...260 Setting the printer up in a new location ...260 Shipping the printer ...261 Administrative support...

User Manual
Page 12
... Transparency print quality is poor...292 Embedded Web Server does not open...292 Check the network connections ...292 Check the network settings ...293 Contacting Customer Support...293 Notices 294 Edition notice...294 Industry Canada notices...296 Power consumption...304 Index 311 Contents 12
... Transparency print quality is poor...292 Embedded Web Server does not open...292 Check the network connections ...292 Check the network settings ...293 Contacting Customer Support...293 Notices 294 Edition notice...294 Industry Canada notices...296 Power consumption...304 Index 311 Contents 12
User Manual
Page 15
... that came with your printer. Follow the set of instructions box or on the Lexmark Web site at Telephone numbers and support hours • US: 1-800-332-4120 vary by country or region. While in any Lexmark software program, click Help, Tips Œ Help, or Help Œ Help Topics.... Customer support Description Telephone support Where to find (North America) Where to find (rest of the printer setting up the printer. Select a country ...
... that came with your printer. Follow the set of instructions box or on the Lexmark Web site at Telephone numbers and support hours • US: 1-800-332-4120 vary by country or region. While in any Lexmark software program, click Help, Tips Œ Help, or Help Œ Help Topics.... Customer support Description Telephone support Where to find (North America) Where to find (rest of the printer setting up the printer. Select a country ...

User Manual
Page 16
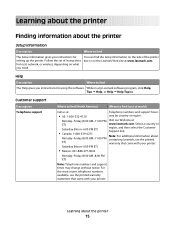
Basic models 1 2 7 3 2 4 5 6 1 Automatic Document Feeder (ADF) 2 Printer control panel 3 Standard exit bin 4 Multipurpose feeder 5 550-sheet tray (Tray 1) 6 550-sheet tray (Tray 2) 7 Optional output bin Learning about contacting Lexmark, see the printed warranty that came with your printer model. E-mail support varies by country or region, and may vary depending on your printer. Select...
Basic models 1 2 7 3 2 4 5 6 1 Automatic Document Feeder (ADF) 2 Printer control panel 3 Standard exit bin 4 Multipurpose feeder 5 550-sheet tray (Tray 1) 6 550-sheet tray (Tray 2) 7 Optional output bin Learning about contacting Lexmark, see the printed warranty that came with your printer model. E-mail support varies by country or region, and may vary depending on your printer. Select...

User Manual
Page 20
... the keypad. to begin. 7 6 5 43 Description Opens the Copy menus Note: From the home screen, you can also access the Copy menus by your system support person. Learning about the printer 20 These menus are available only when the printer is turned on and a short warm-up , it appears as copying...
... the keypad. to begin. 7 6 5 43 Description Opens the Copy menus Note: From the home screen, you can also access the Copy menus by your system support person. Learning about the printer 20 These menus are available only when the printer is turned on and a short warm-up , it appears as copying...
User Manual
Page 21
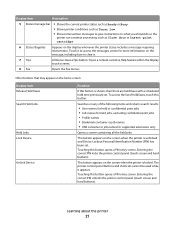
... Device Unlock Device Function If this button. The printer control panel buttons and shortcuts cannot be used while it to access the messages screen for supported extensions only Opens a screen containing all the held faxes, touch this button is locked. Tips is a context-sensitive Help feature within the display touch screens...
... Device Unlock Device Function If this button. The printer control panel buttons and shortcuts cannot be used while it to access the messages screen for supported extensions only Opens a screen containing all the held faxes, touch this button is locked. Tips is a context-sensitive Help feature within the display touch screens...

User Manual
Page 32
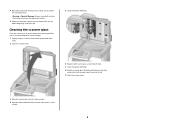
... ISP for additional connectivity options. 5 Replace the system board cover and close the system board door. 1 2 3 Installing an Internal Solutions Port The system board supports one optional Lexmark Internal Solutions Port (ISP). Note: This task requires a #2 Phillips screwdriver. Note: Avoid touching the components on the printer before continuing. If you are easily...
... ISP for additional connectivity options. 5 Replace the system board cover and close the system board door. 1 2 3 Installing an Internal Solutions Port The system board supports one optional Lexmark Internal Solutions Port (ISP). Note: This task requires a #2 Phillips screwdriver. Note: Avoid touching the components on the printer before continuing. If you are easily...


