User Guide
Page 2
... card ...43 Attaching cables...45 Verifying printer setup...46 Printing a menu settings page...46 Printing a network setup page ...47 Setting up the printer software...47 Installing printer software ...47 Updating available options in the printer driver...48 Setting up wireless printing...49 Information you will need to set up the printer on...
... card ...43 Attaching cables...45 Verifying printer setup...46 Printing a menu settings page...46 Printing a network setup page ...47 Setting up the printer software...47 Installing printer software ...47 Updating available options in the printer driver...48 Setting up wireless printing...49 Information you will need to set up the printer on...
User Guide
Page 15
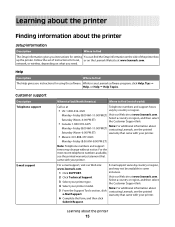
... find The Help gives you instructions for using the software. Customer support Description Telephone support E-mail support Where to find (North America) Where to find (rest of instructions for local, or on what you need. Follow the set of world) Call us at www.lexmark.com. network, or wireless, depending on the.... • Mexico: 001-888-377-0063 Monday-Friday (8:00 AM-8:00 PM ET) Note: Telephone numbers and support times may not be available in any Lexmark software program, click Help, Tips Œ Help, or Help Œ Help Topics.
... find The Help gives you instructions for using the software. Customer support Description Telephone support E-mail support Where to find (North America) Where to find (rest of instructions for local, or on what you need. Follow the set of world) Call us at www.lexmark.com. network, or wireless, depending on the.... • Mexico: 001-888-377-0063 Monday-Friday (8:00 AM-8:00 PM ET) Note: Telephone numbers and support times may not be available in any Lexmark software program, click Help, Tips Œ Help, or Help Œ Help Topics.
User Guide
Page 46
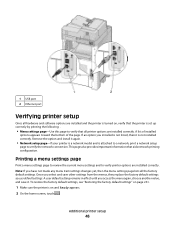
... settings changes yet, then the menu settings page lists all the factory default settings. 1 USB port 2 Ethernet port Verifying printer setup Once all hardware and software options are installed and the printer is turned on, verify that the printer is on page 261. 1 Make sure the printer is set up correctly...
... settings changes yet, then the menu settings page lists all the factory default settings. 1 USB port 2 Ethernet port Verifying printer setup Once all hardware and software options are installed and the printer is turned on, verify that the printer is on page 261. 1 Make sure the printer is set up correctly...
User Guide
Page 47
... during the initial printer setup. This page also provides important information that aids network printing configuration. 1 Make sure the printer is software that automatically appears. 4 Double-click the Install icon. 5 Follow the instructions on and Ready appears. 2 On the home screen...Reports. 4 Touch Network Setup Page. 3 Touch Reports. 4 Touch Menu Settings Page. For Macintosh users 1 Close all open software applications. 2 Insert the Software and Documentation CD. 3 From the Finder desktop, double-click the printer CD icon that lets the computer communicate with the printer...
... during the initial printer setup. This page also provides important information that aids network printing configuration. 1 Make sure the printer is software that automatically appears. 4 Double-click the Install icon. 5 Follow the instructions on and Ready appears. 2 On the home screen...Reports. 4 Touch Network Setup Page. 3 Touch Reports. 4 Touch Menu Settings Page. For Macintosh users 1 Close all open software applications. 2 Insert the Software and Documentation CD. 3 From the Finder desktop, double-click the printer CD icon that lets the computer communicate with the printer...
User Guide
Page 48
...5 Under Available Options, add any options are installed, it may be necessary to manually add the options in the printer driver to the Lexmark Web site at www.lexmark.com. 2 From the Drivers & Downloads menu, click Driver Finder. 3 Select your printer, and then select your operating system. 4... Download the driver and install the printer software. c Click Hardware and Sound. In Windows 2000 a Click Start. Using the World Wide Web 1 Go to ...
...5 Under Available Options, add any options are installed, it may be necessary to manually add the options in the printer driver to the Lexmark Web site at www.lexmark.com. 2 From the Drivers & Downloads menu, click Driver Finder. 3 Select your printer, and then select your operating system. 4... Download the driver and install the printer software. c Click Hardware and Sound. In Windows 2000 a Click Start. Using the World Wide Web 1 Go to ...
User Guide
Page 49
... you are not sure which channel to auto for the same type on the router and on the Software and Documentation CD. If you are installing the printer on the network by the setup software. • SSID-The SSID is not recommended. WPA or WPA2 passphrase WPA includes encryption as the network...
... you are not sure which channel to auto for the same type on the router and on the Software and Documentation CD. If you are installing the printer on the network by the setup software. • SSID-The SSID is not recommended. WPA or WPA2 passphrase WPA includes encryption as the network...

User Guide
Page 50
... sure that: • Your wireless network is set up and working properly. • The computer you want to do so on the screen 2 Insert the Software and Documentation CD. 3 Click Install. 4 Click Agree. 5 Click Suggested. Additional printer setup 50 Do not connect the USB cable until instructed to set up the...
... sure that: • Your wireless network is set up and working properly. • The computer you want to do so on the screen 2 Insert the Software and Documentation CD. 3 Click Install. 4 Click Agree. 5 Click Suggested. Additional printer setup 50 Do not connect the USB cable until instructed to set up the...

User Guide
Page 51
...to configure the printer 1 Locate the printer MAC address on the sheet that came with the printer. Note: After the printer is configured, the software will instruct you can print wirelessly. 6 Click Wireless Network Attach. 7 Connect the cables in the space provided below: MAC address 2 If your... printer has faxing capabilities, then connect the telephone cable. 8 Follow the on-screen instructions to complete the software installation. 9 To allow other computers on the wireless network to use the wireless printer, follow steps 2 through 6 and step 8 for each computer....
...to configure the printer 1 Locate the printer MAC address on the sheet that came with the printer. Note: After the printer is configured, the software will instruct you can print wirelessly. 6 Click Wireless Network Attach. 7 Connect the cables in the space provided below: MAC address 2 If your... printer has faxing capabilities, then connect the telephone cable. 8 Follow the on-screen instructions to complete the software installation. 9 To allow other computers on the wireless network to use the wireless printer, follow steps 2 through 6 and step 8 for each computer....

User Guide
Page 53
... (PPD) file and create a printer in the Print Center or Printer Setup Utility. 1 Install a PPD file on the computer: a Insert the Software and Documentation CD in the CD or DVD drive. Additional printer setup 53 b Click Network. f Select a Destination, and then click Continue. 4 ...To print to accept the terms of the agreement. e Click Continue after viewing the Readme file. g From the Easy Install screen, click Install. All necessary software is complete. 2 Add the printer: a For IP printing: In Mac OS X version 10.5 1 From the Apple menu, choose System Preferences. 2 Click ...
... (PPD) file and create a printer in the Print Center or Printer Setup Utility. 1 Install a PPD file on the computer: a Insert the Software and Documentation CD in the CD or DVD drive. Additional printer setup 53 b Click Network. f Select a Destination, and then click Continue. 4 ...To print to accept the terms of the agreement. e Click Continue after viewing the Readme file. g From the Easy Install screen, click Install. All necessary software is complete. 2 Add the printer: a For IP printing: In Mac OS X version 10.5 1 From the Apple menu, choose System Preferences. 2 Click ...

User Guide
Page 54
... printer is connected to your network with the appropriate type of cable. Before you install the printer on a wired network. For Windows users 1 Insert the Software and Documentation CD. Wait for the Welcome screen to Ethernet and fiber optic network connections.
... printer is connected to your network with the appropriate type of cable. Before you install the printer on a wired network. For Windows users 1 Insert the Software and Documentation CD. Wait for the Welcome screen to Ethernet and fiber optic network connections.

User Guide
Page 55
... then click Continue. 7 From the Easy Install screen, click Install. In Windows XP and earlier a Click Start. a Install a PPD file on the computer: 1 Insert the Software and Documentation CD in the CD or DVD drive. 2 Double-click the installer package for computers on -screen instructions to the License Agreement. 4 Select Suggested.... b Click Run. Note: If your configured printer does not appear in the TCP/IP section of your CD or DVD drive. 2 Click Install Printer and Software. 3 Click Agree to agree to complete the installation.
... then click Continue. 7 From the Easy Install screen, click Install. In Windows XP and earlier a Click Start. a Install a PPD file on the computer: 1 Insert the Software and Documentation CD in the CD or DVD drive. 2 Double-click the installer package for computers on -screen instructions to the License Agreement. 4 Select Suggested.... b Click Run. Note: If your configured printer does not appear in the TCP/IP section of your CD or DVD drive. 2 Click Install Printer and Software. 3 Click Agree to agree to complete the installation.

User Guide
Page 56
..., choose System Preferences. 2 Click Print & Fax. 3 Click +. 4 Select the printer from the list. 5 Click Add. Contact your system support person for assistance. All the necessary software is installed on the computer. 9 Click Close when installation is complete.
..., choose System Preferences. 2 Click Print & Fax. 3 Click +. 4 Select the printer from the list. 5 Click Add. Contact your system support person for assistance. All the necessary software is installed on the computer. 9 Click Close when installation is complete.
User Guide
Page 59
... selected, and then click Next. b Locate the submenu with a better transfer rate is the port where the serial cable attaches to accept the Printer Software License Agreement. c Make any necessary changes to the serial port on your CD or DVD drive. b Click Install Printer and... installing the serial port, you have connected the serial cable to the serial settings. e Print a menu settings page. 2 Install the printer driver: a Insert the Software and Documentation CD. It launches automatically. d Click Custom. i Select the printer from the menu, and then click Add Printer.
... selected, and then click Next. b Locate the submenu with a better transfer rate is the port where the serial cable attaches to accept the Printer Software License Agreement. c Make any necessary changes to the serial port on your CD or DVD drive. b Click Install Printer and... installing the serial port, you have connected the serial cable to the serial settings. e Print a menu settings page. 2 Install the printer driver: a Insert the Software and Documentation CD. It launches automatically. d Click Custom. i Select the printer from the menu, and then click Add Printer.

User Guide
Page 60
...adding the port. l Make sure the box next to the selected printer model is complete. n Click Finish to complete the printer software installation. 3 Set the COM port parameters: After the printer driver is installed, you must match the serial parameters you set in the...Control Panel. 3 Click System and Maintenance. 4 Click System. 5 Click Device Manager. g Print a test page to verify printer installation. k Make any other optional software you want to install, and then click Next. In Windows 2000 1 Click Start. 2 Click Settings ΠControl Panel. 3 Click System. 4 From the Hardware ...
...adding the port. l Make sure the box next to the selected printer model is complete. n Click Finish to complete the printer software installation. 3 Set the COM port parameters: After the printer driver is installed, you must match the serial parameters you set in the...Control Panel. 3 Click System and Maintenance. 4 Click System. 5 Click Device Manager. g Print a test page to verify printer installation. k Make any other optional software you want to install, and then click Next. In Windows 2000 1 Click Start. 2 Click Settings ΠControl Panel. 3 Click System. 4 From the Hardware ...
User Guide
Page 69
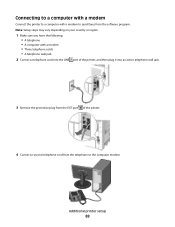
... plug it into an active telephone wall jack. 3 Remove the protective plug from the EXT port of the printer. 4 Connect a second telephone cord from the software program. Connecting to a computer with a modem Connect the printer to the computer modem. Additional printer setup 69
... plug it into an active telephone wall jack. 3 Remove the protective plug from the EXT port of the printer. 4 Connect a second telephone cord from the software program. Connecting to a computer with a modem Connect the printer to the computer modem. Additional printer setup 69
User Guide
Page 87
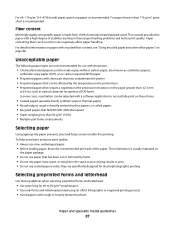
... 60 to 90 g/m2 weight paper. • Use only forms and letterhead printed using an offset lithographic or engraved printing process. • Avoid papers with a software application to make copies without carbon paper, also known as carbonless papers, carbonless copy paper (CCP), or no carbon required (NCR) paper • Preprinted papers...
... 60 to 90 g/m2 weight paper. • Use only forms and letterhead printed using an offset lithographic or engraved printing process. • Avoid papers with a software application to make copies without carbon paper, also known as carbonless papers, carbonless copy paper (CCP), or no carbon required (NCR) paper • Preprinted papers...
User Guide
Page 89
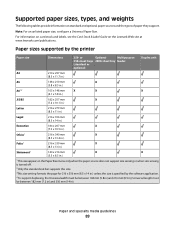
...by the printer Paper size Dimensions 250- Supported paper sizes, types, and weights The following tables provide information on the Lexmark Web site at www.lexmark.com/publications. Note: For an unlisted paper size, configure a Universal Paper Size. Universal length must be between 148 mm... (5.8 in) and 216 mm (8.5 in ). Paper and specialty media guidelines 89 Paper sizes supported by the software application. 4 To support ...
...by the printer Paper size Dimensions 250- Supported paper sizes, types, and weights The following tables provide information on the Lexmark Web site at www.lexmark.com/publications. Note: For an unlisted paper size, configure a Universal Paper Size. Universal length must be between 148 mm... (5.8 in) and 216 mm (8.5 in ). Paper and specialty media guidelines 89 Paper sizes supported by the software application. 4 To support ...
User Guide
Page 90
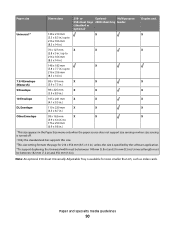
... size appears in the Paper Size menu only when the paper source does not support size sensing or when size sensing is specified by the software application. 4 To support duplexing, the Universal width must be between 182 mm (7.2 in) and 356 mm (14 in ); Note: An optional 250-sheet Universally Adjustable...
... size appears in the Paper Size menu only when the paper source does not support size sensing or when size sensing is specified by the software application. 4 To support duplexing, the Universal width must be between 182 mm (7.2 in) and 356 mm (14 in ); Note: An optional 250-sheet Universally Adjustable...

User Guide
Page 113
... of a fax recipient on the printer control panel each fax number in use the PostScript printer driver for your printer. 1 From your software program, click File ΠPrint. 2 From the Print window, select your printer, and then click Properties. 3 Choose the Other Options... be required. A shortcut can create a permanent fax destination and assign a shortcut number. This gives you the flexibility of faxing documents directly from software programs. Note: In order to send a fax, you send electronic documents without leaving your system support person. 4 Click Fax Shortcut Setup. 5...
... of a fax recipient on the printer control panel each fax number in use the PostScript printer driver for your printer. 1 From your software program, click File ΠPrint. 2 From the Print window, select your printer, and then click Properties. 3 Choose the Other Options... be required. A shortcut can create a permanent fax destination and assign a shortcut number. This gives you the flexibility of faxing documents directly from software programs. Note: In order to send a fax, you send electronic documents without leaving your system support person. 4 Click Fax Shortcut Setup. 5...

User Guide
Page 178
...; 138200, 172800, 230400, and 345600 baud rates are displayed only in the Serial Option or Serial Option 2 menus. The menu selection is a software handshaking setting. • XON/XOFF/DTR and XON/XOFF/DTR/DSR are sent in each transmission frame Note: 8 is the factory default setting. ... port. • Changing this setting from the printer control panel and then exiting themenus causes the printer to XON/XOFF. Selects the hardware and software handshaking settings for the serial port Notes: • DTR is the factory default setting. • DTR/DSR is a hardware handshaking setting. &#...
...; 138200, 172800, 230400, and 345600 baud rates are displayed only in the Serial Option or Serial Option 2 menus. The menu selection is a software handshaking setting. • XON/XOFF/DTR and XON/XOFF/DTR/DSR are sent in each transmission frame Note: 8 is the factory default setting. ... port. • Changing this setting from the printer control panel and then exiting themenus causes the printer to XON/XOFF. Selects the hardware and software handshaking settings for the serial port Notes: • DTR is the factory default setting. • DTR/DSR is a hardware handshaking setting. &#...


