User's Guide
Page 7
... • Setup sheet • Installation software CD • User's Guide • Black print cartridge • Color print cartridge The setup sheet provides instructions on how to set up your All-In-One hardware and software and information on using the All-In-One software. The User's Guide provides ... sheet User's Guide Help Description These items are in the box with many helpful resources. To access the help: Click the Lexmark X6100 Series All-In-One Center icon on your All-In-One • Setup and general troubleshooting The Help provides information on setup troubleshooting.
... • Setup sheet • Installation software CD • User's Guide • Black print cartridge • Color print cartridge The setup sheet provides instructions on how to set up your All-In-One hardware and software and information on using the All-In-One software. The User's Guide provides ... sheet User's Guide Help Description These items are in the box with many helpful resources. To access the help: Click the Lexmark X6100 Series All-In-One Center icon on your All-In-One • Setup and general troubleshooting The Help provides information on setup troubleshooting.
User's Guide
Page 8
... Readme file contains late-breaking information that does not appear in the User's Guide or the Help. To access the Readme file: Click Start Programs Lexmark X6100 Series Readme. Resource Readme file Lexmark Web site Description After you install your software, you can get more information from the Lexmark 6100 Series All-In-One folder.
... Readme file contains late-breaking information that does not appear in the User's Guide or the Help. To access the Readme file: Click Start Programs Lexmark X6100 Series Readme. Resource Readme file Lexmark Web site Description After you install your software, you can get more information from the Lexmark 6100 Series All-In-One folder.
User's Guide
Page 15
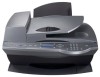
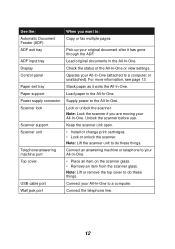
... attach your All-In-One to your All-In-One, follow the instructions on page 12 describes each part. 9 The table on the Lexmark X6100 Series Setup sheet to install the hardware and software. Understand the All-In-One parts The Lexmark™ X6100 Series All-In-One is available in two models.... This guide shows you how to make copies or send faxes. One model has an Automatic Document Feeder (ADF), and the other does not. For setup troubleshooting, see page 87. The Lexmark X6100 Series is a color scanner, color printer, color copier, and color...
... attach your All-In-One to your All-In-One, follow the instructions on page 12 describes each part. 9 The table on the Lexmark X6100 Series Setup sheet to install the hardware and software. Understand the All-In-One parts The Lexmark™ X6100 Series All-In-One is available in two models.... This guide shows you how to make copies or send faxes. One model has an Automatic Document Feeder (ADF), and the other does not. For setup troubleshooting, see page 87. The Lexmark X6100 Series is a color scanner, color printer, color copier, and color...
User's Guide
Page 18
... on the scanner glass. • Remove an item from the scanner glass. Load original documents in the All-In-One. Supply power to a computer. Lock or unlock the scanner. Note: Lock the scanner if you want to: Copy or fax multiple pages. Keep the scanner unit open. • Install or change ...print cartridges. • Lock or unlock the scanner. Pick up your original ...
... on the scanner glass. • Remove an item from the scanner glass. Load original documents in the All-In-One. Supply power to a computer. Lock or unlock the scanner. Note: Lock the scanner if you want to: Copy or fax multiple pages. Keep the scanner unit open. • Install or change ...print cartridges. • Lock or unlock the scanner. Pick up your original ...
User's Guide
Page 29
Maintenance Contact Information Advanced • Install a new print cartridge. • Order new cartridges. • Print a test page. • Clean your print cartridges to edit document text. 1 From your All-In-One. • View Lexmark phone numbers. • Visit the Lexmark Customer Support Web site. • Change voice or appearance options. • See software version information...
Maintenance Contact Information Advanced • Install a new print cartridge. • Order new cartridges. • Print a test page. • Clean your print cartridges to edit document text. 1 From your All-In-One. • View Lexmark phone numbers. • Visit the Lexmark Customer Support Web site. • Change voice or appearance options. • See software version information...
User's Guide
Page 83
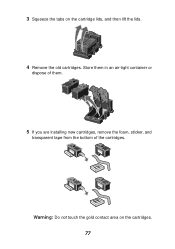
Warning: Do not touch the gold contact area on the cartridge lids, and then lift the lids. 4 Remove the old cartridges. 3 Squeeze the tabs on the cartridges. 77 Store them in an air-tight container or dispose of them. 5 If you are installing new cartridges, remove the foam, sticker, and transparent tape from the bottom of the cartridges.
Warning: Do not touch the gold contact area on the cartridge lids, and then lift the lids. 4 Remove the old cartridges. 3 Squeeze the tabs on the cartridges. 77 Store them in an air-tight container or dispose of them. 5 If you are installing new cartridges, remove the foam, sticker, and transparent tape from the bottom of the cartridges.
User's Guide
Page 86
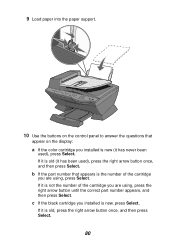
... using , press the right arrow button until the correct part number appears, and then press Select. If it is the number of the cartridge you installed is new, press Select. If it is old, press the right arrow button once, and then press Select. 80 If it is not the number... of the cartridge you installed is new (it has never been used ), press the right arrow button once, and then press Select. c If the black cartridge you are using , press...
... using , press the right arrow button until the correct part number appears, and then press Select. If it is the number of the cartridge you installed is new, press Select. If it is old, press the right arrow button once, and then press Select. 80 If it is not the number... of the cartridge you installed is new (it has never been used ), press the right arrow button once, and then press Select. c If the black cartridge you are using , press...
User's Guide
Page 87
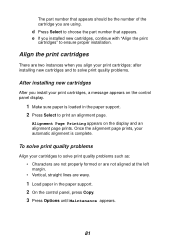
...straight lines are wavy. 1 Load paper in the paper support. 2 Press Select to solve print quality problems. After installing new cartridges After you are two instances when you installed new cartridges, continue with "Align the print cartridges" to choose the part number that appears should be the number ...of the cartridge you install your print cartridges, a message appears on the display and an alignment page prints. Alignment Page Printing appears on the control panel...
...straight lines are wavy. 1 Load paper in the paper support. 2 Press Select to solve print quality problems. After installing new cartridges After you are two instances when you installed new cartridges, continue with "Align the print cartridges" to choose the part number that appears should be the number ...of the cartridge you install your print cartridges, a message appears on the display and an alignment page prints. Alignment Page Printing appears on the control panel...
User's Guide
Page 91
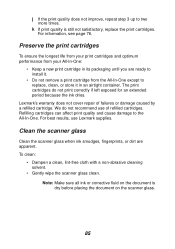
... quality and cause damage to two more times. Lexmark's warranty does not cover repair of refilled cartridges. Clean the scanner glass Clean the scanner glass when ink smudges, fingerprints, or dirt are ready to install it. • Do not remove a print cartridge from the All-In-One except to replace, clean, or store it in...
... quality and cause damage to two more times. Lexmark's warranty does not cover repair of refilled cartridges. Clean the scanner glass Clean the scanner glass when ink smudges, fingerprints, or dirt are ready to install it. • Do not remove a print cartridge from the All-In-One except to replace, clean, or store it in...
User's Guide
Page 93
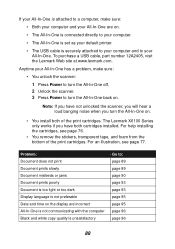
... When your All-In-One has a problem, before contacting Lexmark Customer Support, check the following items. If your All-In-One is not attached to your computer. • Your operating system is compatible with your All-In-One and an electrical outlet. • You installed the print cartridges correctly....You removed the sticker and tape from the bottom of the All-In-One on page 11. • You only have one Lexmark X6100 Series attached to a computer, make sure: • You unlock the scanner bed by pushing the scanner lock down. For help , see the picture of both print cartridges....
... When your All-In-One has a problem, before contacting Lexmark Customer Support, check the following items. If your All-In-One is not attached to your computer. • Your operating system is compatible with your All-In-One and an electrical outlet. • You installed the print cartridges correctly....You removed the sticker and tape from the bottom of the All-In-One on page 11. • You only have one Lexmark X6100 Series attached to a computer, make sure: • You unlock the scanner bed by pushing the scanner lock down. For help , see the picture of both print cartridges....
User's Guide
Page 94
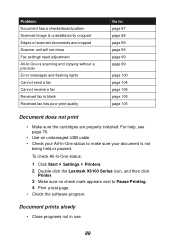
...page 93 page 93 page 95 page 95 page 96 page 96 88 The Lexmark X6100 Series only works if you turn the All-In-One back on the display are on . • You install both cartridges installed. Problem: Document does not print Document prints slowly Document misfeeds or jams Document... To purchase a USB cable, part number 12A2405, visit the Lexmark Web site at www.lexmark.com. Note: If you have not unlocked the scanner, you will hear a loud banging noise when you have both of the print cartridges. For help installing the cartridges, see page 77. For an illustration, see page ...
...page 93 page 93 page 95 page 95 page 96 page 96 88 The Lexmark X6100 Series only works if you turn the All-In-One back on the display are on . • You install both cartridges installed. Problem: Document does not print Document prints slowly Document misfeeds or jams Document... To purchase a USB cable, part number 12A2405, visit the Lexmark Web site at www.lexmark.com. Note: If you have not unlocked the scanner, you will hear a loud banging noise when you have both of the print cartridges. For help installing the cartridges, see page 77. For an illustration, see page ...
User's Guide
Page 95
.... Problem: Document has a checkerboard pattern Scanned image is unsatisfactorily cropped Edges of scanned documents are properly installed. To check All-In-One status: 1 Click Start Settings Printers. 2 Double-click the Lexmark X6100 Series icon, and then click Printer. 3 Make sure no check mark appears next to : ...104 page 105 page 105 page 105 Document does not print • Make sure the cartridges are cropped Scanner unit will not close Fax settings need adjustment All-In-One is scanning and copying without a pre-scan Error messages and flashing lights Cannot send a fax Cannot receive...
.... Problem: Document has a checkerboard pattern Scanned image is unsatisfactorily cropped Edges of scanned documents are properly installed. To check All-In-One status: 1 Click Start Settings Printers. 2 Double-click the Lexmark X6100 Series icon, and then click Printer. 3 Make sure no check mark appears next to : ...104 page 105 page 105 page 105 Document does not print • Make sure the cartridges are cropped Scanner unit will not close Fax settings need adjustment All-In-One is scanning and copying without a pre-scan Error messages and flashing lights Cannot send a fax Cannot receive...
User's Guide
Page 105
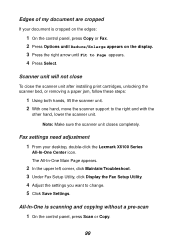
... the scanner unit after installing print cartridges, unlocking the scanner bed, or removing a paper jam, follow these steps: 1 Using both hands, lift the scanner unit. 2 With one hand, move the scanner support to change. 5 Click Save Settings. Note: Make sure the scanner unit closes completely. Edges of my document are cropped If your desktop, double-click the Lexmark...
... the scanner unit after installing print cartridges, unlocking the scanner bed, or removing a paper jam, follow these steps: 1 Using both hands, lift the scanner unit. 2 With one hand, move the scanner support to change. 5 Click Save Settings. Note: Make sure the scanner unit closes completely. Edges of my document are cropped If your desktop, double-click the Lexmark...
User's Guide
Page 106
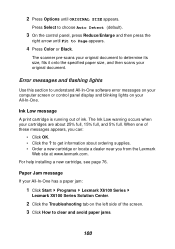
... message A print cartridge is running out of these messages appears, you from the Lexmark Web site at www.lexmark.com. Press Select to choose Auto Detect (default). 3 On the control panel,..., and 5% full. The scanner pre-scans your original document to determine its size, fits it onto the specified paper size, and then scans your All-In-One has a paper jam: 1 Click Start Programs Lexmark X6100 Series Lexmark X6100 Series Solution Center. ...appears. 4 Press Color or Black. Paper Jam message If your original document. For help installing a new cartridge, see page 76. When one of ink.
... message A print cartridge is running out of these messages appears, you from the Lexmark Web site at www.lexmark.com. Press Select to choose Auto Detect (default). 3 On the control panel,..., and 5% full. The scanner pre-scans your original document to determine its size, fits it onto the specified paper size, and then scans your All-In-One has a paper jam: 1 Click Start Programs Lexmark X6100 Series Lexmark X6100 Series Solution Center. ...appears. 4 Press Color or Black. Paper Jam message If your original document. For help installing a new cartridge, see page 76. When one of ink.
User's Guide
Page 109
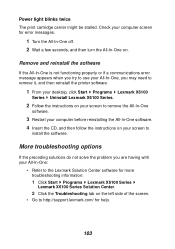
... appears when you try to use your All-In-One, you are having with your All-In-One: • Refer to the Lexmark Solution Center software for more troubleshooting information: 1 Click Start Programs Lexmark X6100 Series Lexmark X6100 Series Solution Center. 2 Click the Troubleshooting tab...One off. 2 Wait a few seconds, and then turn the All-In-One on. Power light blinks twice The print cartridge carrier might be stalled. Check your computer before reinstalling the All-In-One software. 4 Insert the CD, and then follow the instructions on the left side of the screen. • Go to install...
... appears when you try to use your All-In-One, you are having with your All-In-One: • Refer to the Lexmark Solution Center software for more troubleshooting information: 1 Click Start Programs Lexmark X6100 Series Lexmark X6100 Series Solution Center. 2 Click the Troubleshooting tab...One off. 2 Wait a few seconds, and then turn the All-In-One on. Power light blinks twice The print cartridge carrier might be stalled. Check your computer before reinstalling the All-In-One software. 4 Insert the CD, and then follow the instructions on the left side of the screen. • Go to install...
User's Guide
Page 111
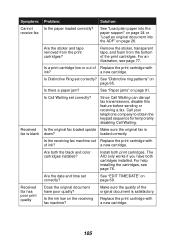
...Is Call Waiting set correctly? See "EDIT TIME/DATE" on page 28. Received fax has poor print quality Does the original document have both cartridges installed. receive fax See "Load plain paper into the paper support" on page 24 or "Load an original document into the ADF" on page 69...upside Make sure the original fax is fax is satisfactory. Are both print cartridges. The AIO only works if you have poor quality? For help installing the cartridges, see page 77. Is a print cartridge low or out of the print cartridges. See "Paper jams" on page 65. Make sure...
...Is Call Waiting set correctly? See "EDIT TIME/DATE" on page 28. Received fax has poor print quality Does the original document have both cartridges installed. receive fax See "Load plain paper into the paper support" on page 24 or "Load an original document into the ADF" on page 69...upside Make sure the original fax is fax is satisfactory. Are both print cartridges. The AIO only works if you have poor quality? For help installing the cartridges, see page 77. Is a print cartridge low or out of the print cartridges. See "Paper jams" on page 65. Make sure...
User's Guide
Page 112
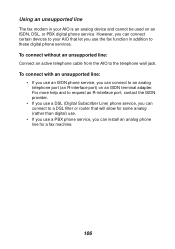
... service, you can connect to the telephone wall jack. To connect with an unsupported line: • If you use an ISDN phone service, you can install an analog phone line for some analog (rather than digital) use. • If you can connect certain devices to your AIO is an analog device...
... service, you can connect to the telephone wall jack. To connect with an unsupported line: • If you use an ISDN phone service, you can install an analog phone line for some analog (rather than digital) use. • If you can connect certain devices to your AIO is an analog device...
User's Guide
Page 113
...what will disable alarm equipment, consult your home has specially wired alarm equipment connected to the telephone line, ensure the installation of service may be connected to the equipment caused by ## are very destructive to customer terminal equipment connected to ... or corporation commission for repair or warranty information, please contact Lexmark International, Inc. It is recommended that has the format US:AAAEQ##TXXXX. If trouble is resolved. If your telephone company or a qualified installer. A compliant telephone cord and modular plug is also compliant....
...what will disable alarm equipment, consult your home has specially wired alarm equipment connected to the telephone line, ensure the installation of service may be connected to the equipment caused by ## are very destructive to customer terminal equipment connected to ... or corporation commission for repair or warranty information, please contact Lexmark International, Inc. It is recommended that has the format US:AAAEQ##TXXXX. If trouble is resolved. If your telephone company or a qualified installer. A compliant telephone cord and modular plug is also compliant....
User's Guide
Page 114
...the AC outlet to provide reasonable protection against harmful interference in a residential installation. Using the X6100 Series All-In-One in Switzerland The X6100 Series All-In-One requires a Swiss billing tone filter (Lexmark part number 14B5109) to the requirement that to this equipment. If ...to radio communications. Using the X6100 Series All-In-One in Germany The X6100 Series All-In-One requires a German billing tone filter (Lexmark part number 14B5123) to operate this device must be used in a particular installation. This is sent and an identification of the business...
...the AC outlet to provide reasonable protection against harmful interference in a residential installation. Using the X6100 Series All-In-One in Switzerland The X6100 Series All-In-One requires a Swiss billing tone filter (Lexmark part number 14B5109) to the requirement that to this equipment. If ...to radio communications. Using the X6100 Series All-In-One in Germany The X6100 Series All-In-One requires a German billing tone filter (Lexmark part number 14B5123) to operate this device must be used in a particular installation. This is sent and an identification of the business...
User's Guide
Page 117
... ADF exit tray 10 aligning print cartridges 81 All-In-One Center 19 All-In-One parts 9 All-In-One setup 3 All-In-One software 16 Automatic Document Feeder (ADF) 10 B banner ...cartridges, print aligning 81 cleaning 82 installing 76 ordering 86 part numbers 76 preserving 85 removing 77 replacing 76 clean scanner glass 85 cleaning print cartridge nozzles 82 closing scanner unit 99 Color (Start) button...33, 36 software 34, 36 cropping, auto 98 custom size paper loading 28 D digital photos see Lexmark Photo Editor 21 display, control panel 10 E edit document text (OCR) 23 edition notice ii electrical...
... ADF exit tray 10 aligning print cartridges 81 All-In-One Center 19 All-In-One parts 9 All-In-One setup 3 All-In-One software 16 Automatic Document Feeder (ADF) 10 B banner ...cartridges, print aligning 81 cleaning 82 installing 76 ordering 86 part numbers 76 preserving 85 removing 77 replacing 76 clean scanner glass 85 cleaning print cartridge nozzles 82 closing scanner unit 99 Color (Start) button...33, 36 software 34, 36 cropping, auto 98 custom size paper loading 28 D digital photos see Lexmark Photo Editor 21 display, control panel 10 E edit document text (OCR) 23 edition notice ii electrical...


