User's Guide
Page 1
www.lexmark.com X6100 Series User's Guide for Windows • "Learning about your All-In-One" on page 9 Information about the printer parts and software. • "Networking" on page 75 How to use your All-In-One in a network environment. • "Maintaining your All-In-One" on page 76 Caring for your print cartridges and ordering supplies. • "Troubleshooting" on page 87 Information about setup problems, error messages, print quality problems, paper jams, and much more.
www.lexmark.com X6100 Series User's Guide for Windows • "Learning about your All-In-One" on page 9 Information about the printer parts and software. • "Networking" on page 75 How to use your All-In-One in a network environment. • "Maintaining your All-In-One" on page 76 Caring for your print cartridges and ordering supplies. • "Troubleshooting" on page 87 Information about setup problems, error messages, print quality problems, paper jams, and much more.
User's Guide
Page 4
Scan using the All-In-One software and the scanner glass ........ 42 Scan using the control panel and the ADF 44 Scan using the All-In-One software and the ADF 45 Scan multiple images 46 E-mail ... 47 Enlarge or reduce documents 47 Printing 50 Print a document 50 Print collated copies 50 Print more than one page on a sheet of paper 51 Print an image as a multi-page poster 51 Print last page... first 51 Print repeating images 52 Print two images on one page 52 Print a banner 53 Faxing 55 Receive a fax 55 Send a fax 57 Send a fax from ...
Scan using the All-In-One software and the scanner glass ........ 42 Scan using the control panel and the ADF 44 Scan using the All-In-One software and the ADF 45 Scan multiple images 46 E-mail ... 47 Enlarge or reduce documents 47 Printing 50 Print a document 50 Print collated copies 50 Print more than one page on a sheet of paper 51 Print an image as a multi-page poster 51 Print last page... first 51 Print repeating images 52 Print two images on one page 52 Print a banner 53 Faxing 55 Receive a fax 55 Send a fax 57 Send a fax from ...

User's Guide
Page 5
Align the print cartridges 81 Improve print quality 82 Preserve the print cartridges 85 Clean the scanner glass 85 Order supplies 86 Troubleshooting 87 Setup troubleshooting 87 General troubleshooting 87 More troubleshooting options 103 Fax troubleshooting 104 iii
Align the print cartridges 81 Improve print quality 82 Preserve the print cartridges 85 Clean the scanner glass 85 Order supplies 86 Troubleshooting 87 Setup troubleshooting 87 General troubleshooting 87 More troubleshooting options 103 Fax troubleshooting 104 iii
User's Guide
Page 7
...Click the Lexmark X6100 Series All-In-One Center icon on setup troubleshooting. Resource Box contents Setup sheet User's Guide Help Description These items are in the box with many helpful resources. The User's Guide provides information on: • Basic usage of your All-In-One • ... software CD • User's Guide • Black print cartridge • Color print cartridge The setup sheet provides instructions on how to set up your All-In-One hardware and software and information on your All-In-One • Setup and general troubleshooting The Help provides information on...
...Click the Lexmark X6100 Series All-In-One Center icon on setup troubleshooting. Resource Box contents Setup sheet User's Guide Help Description These items are in the box with many helpful resources. The User's Guide provides information on: • Basic usage of your All-In-One • ... software CD • User's Guide • Black print cartridge • Color print cartridge The setup sheet provides instructions on how to set up your All-In-One hardware and software and information on your All-In-One • Setup and general troubleshooting The Help provides information on...
User's Guide
Page 18
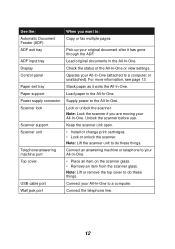
... a computer or unattached). Connect your All-In-One (attached to do these things. Operate your All-In-One to : Copy or fax multiple pages. Keep the scanner unit open. • Install or change print cartridges. • Lock or unlock the scanner. Connect an answering machine or telephone to the ...All-In-One. Load paper in the All-In-One. Use the: Automatic Document ...
... a computer or unattached). Connect your All-In-One (attached to do these things. Operate your All-In-One to : Copy or fax multiple pages. Keep the scanner unit open. • Install or change print cartridges. • Lock or unlock the scanner. Connect an answering machine or telephone to the ...All-In-One. Load paper in the All-In-One. Use the: Automatic Document ...
User's Guide
Page 29
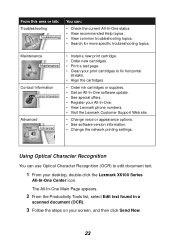
... Information Advanced • Install a new print cartridge. • Order new cartridges. • Print a test page. • Clean your print cartridges to edit document text. 1 From your desktop, double-click the Lexmark X6100 Series All-In-One Center icon. Using Optical Character Recognition You can... : • Check the current All-In-One status. • View recommended Help topics. ...
... Information Advanced • Install a new print cartridge. • Order new cartridges. • Print a test page. • Clean your print cartridges to edit document text. 1 From your desktop, double-click the Lexmark X6100 Series All-In-One Center icon. Using Optical Character Recognition You can... : • Check the current All-In-One status. • View recommended Help topics. ...
User's Guide
Page 44
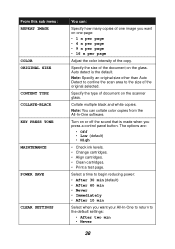
... white copies. Specify the type of the document on one image you want on the glass. The options are: • Off • Low (default) • High • Check ink levels. • Change cartridges. • Align cartridges. • Clean cartridges. • Print a test page. Turn on the scanner glass. From this sub menu: REPEAT IMAGE COLOR...
... white copies. Specify the type of the document on one image you want on the glass. The options are: • Off • Low (default) • High • Check ink levels. • Change cartridges. • Align cartridges. • Clean cartridges. • Print a test page. Turn on the scanner glass. From this sub menu: REPEAT IMAGE COLOR...
User's Guide
Page 76
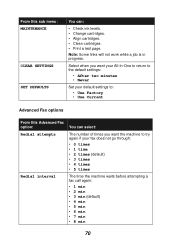
From this Advanced Fax option: Redial attempts Redial interval You can : • Check ink levels. • Change cartridges. • Align cartridges. • Clean cartridges. • Print a test page. Note: Some links will not work while a job is in progress. Select when you want the machine ... Current Advanced Fax options From this sub menu: MAINTENANCE CLEAR SETTINGS SET DEFAULTS You can select: The number of times you want your All-In-One to return to the default settings: • After two minutes • Never Set your fax does not go through: • 0 times • 1 ...
From this Advanced Fax option: Redial attempts Redial interval You can : • Check ink levels. • Change cartridges. • Align cartridges. • Clean cartridges. • Print a test page. Note: Some links will not work while a job is in progress. Select when you want the machine ... Current Advanced Fax options From this sub menu: MAINTENANCE CLEAR SETTINGS SET DEFAULTS You can select: The number of times you want your All-In-One to return to the default settings: • After two minutes • Never Set your fax does not go through: • 0 times • 1 ...

User's Guide
Page 82
Maintaining your All-In-One Replace the print cartridges The Lexmark X6100 Series uses the following cartridges: Item: Black cartridge Color cartridge Part number: 82 83 or 88 Note: For information about ordering supplies, see page 86. 1 Make sure the All-In-One is busy. 76 The print cartridge carrier moves and stops at the loading position, unless the All-In-One is on. 2 Lift the scanner unit until the scanner support keeps it open.
Maintaining your All-In-One Replace the print cartridges The Lexmark X6100 Series uses the following cartridges: Item: Black cartridge Color cartridge Part number: 82 83 or 88 Note: For information about ordering supplies, see page 86. 1 Make sure the All-In-One is busy. 76 The print cartridge carrier moves and stops at the loading position, unless the All-In-One is on. 2 Lift the scanner unit until the scanner support keeps it open.
User's Guide
Page 83
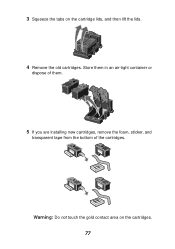
Store them in an air-tight container or dispose of them. 5 If you are installing new cartridges, remove the foam, sticker, and transparent tape from the bottom of the cartridges. Warning: Do not touch the gold contact area on the cartridge lids, and then lift the lids. 4 Remove the old cartridges. 3 Squeeze the tabs on the cartridges. 77
Store them in an air-tight container or dispose of them. 5 If you are installing new cartridges, remove the foam, sticker, and transparent tape from the bottom of the cartridges. Warning: Do not touch the gold contact area on the cartridge lids, and then lift the lids. 4 Remove the old cartridges. 3 Squeeze the tabs on the cartridges. 77
User's Guide
Page 84
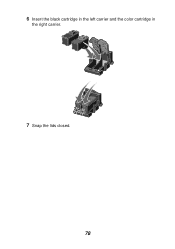
6 Insert the black cartridge in the left carrier and the color cartridge in the right carrier. 7 Snap the lids closed. 78
6 Insert the black cartridge in the left carrier and the color cartridge in the right carrier. 7 Snap the lids closed. 78
User's Guide
Page 86
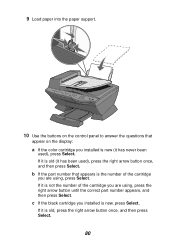
... press Select. b If the part number that appear on the display: a If the color cartridge you installed is new (it is not the number of the cartridge you installed is new, press Select. c If the black cartridge you are using , press Select. 9 Load paper into the paper support. 10 Use the ...buttons on the control panel to answer the questions that appears is the number of the cartridge you are using , press the right arrow button until the ...
... press Select. b If the part number that appear on the display: a If the color cartridge you installed is new (it is not the number of the cartridge you installed is new, press Select. c If the black cartridge you are using , press Select. 9 Load paper into the paper support. 10 Use the ...buttons on the control panel to answer the questions that appears is the number of the cartridge you are using , press the right arrow button until the ...
User's Guide
Page 87
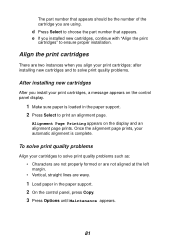
...If you are wavy. 1 Load paper in the paper support. 2 Press Select to solve print quality problems. After installing new cartridges After you install your print cartridges, a message appears on the display and an alignment page prints. d Press Select to choose the part number that appears should ...be the number of the cartridge you installed new cartridges, continue with "Align the print cartridges" to solve print quality problems such as: • Characters are not properly formed or are not aligned at...
...If you are wavy. 1 Load paper in the paper support. 2 Press Select to solve print quality problems. After installing new cartridges After you install your print cartridges, a message appears on the display and an alignment page prints. d Press Select to choose the part number that appears should ...be the number of the cartridge you installed new cartridges, continue with "Align the print cartridges" to solve print quality problems such as: • Characters are not properly formed or are not aligned at...
User's Guide
Page 88
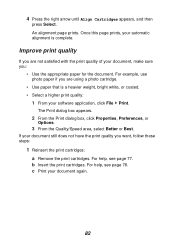
... the print quality of your document again. 82 For help , see page 77. For example, use photo paper if you are using a photo cartridge. • Use paper that is complete. Once this page prints, your document still does not have the print quality you : • Use... the Print dialog box, click Properties, Preferences, or Options. 3 From the Quality/Speed area, select Better or Best. 4 Press the right arrow until Align Cartridges appears, and then press Select. If your automatic alignment is a heavier weight, bright white, or coated. • Select a higher print quality: 1 From ...
... the print quality of your document again. 82 For help , see page 77. For example, use photo paper if you are using a photo cartridge. • Use paper that is complete. Once this page prints, your document still does not have the print quality you : • Use... the Print dialog box, click Properties, Preferences, or Options. 3 From the Quality/Speed area, select Better or Best. 4 Press the right arrow until Align Cartridges appears, and then press Select. If your automatic alignment is a heavier weight, bright white, or coated. • Select a higher print quality: 1 From ...
User's Guide
Page 89
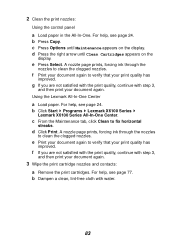
... Series Lexmark X6100 Series All-In-One Center. d Click Print. For help , see page 24. b Press Copy. A nozzle page prints, forcing ink through the nozzles to clean the clogged nozzles. c Press Options until Clean Cartridges appears on the display. c From the Maintenance tab, click ...then print your document again to fix horizontal streaks. e Print your document again. 3 Wipe the print cartridge nozzles and contacts: a Remove the print cartridges. Using the Lexmark All-In-One Center a Load paper. A nozzle page prints, forcing ink through the nozzles to verify that your ...
... Series Lexmark X6100 Series All-In-One Center. d Click Print. For help , see page 24. b Press Copy. A nozzle page prints, forcing ink through the nozzles to clean the clogged nozzles. c Press Options until Clean Cartridges appears on the display. c From the Maintenance tab, click ...then print your document again to fix horizontal streaks. e Print your document again. 3 Wipe the print cartridge nozzles and contacts: a Remove the print cartridges. Using the Lexmark All-In-One Center a Load paper. A nozzle page prints, forcing ink through the nozzles to verify that your ...

User's Guide
Page 90
Contacts e With another clean section of the cloth, repeat steps c through d. For help, see page 83. g Reinsert the print cartridges. f Let the nozzles and contacts dry completely. i Print your document again. 84 Nozzles d Using another clean section of the cloth, gently hold the cloth against the contacts for about three seconds, and then wipe in the direction shown. c Gently hold the cloth against the nozzles for about three seconds, and then wipe in the direction shown. h Clean the print nozzles.
Contacts e With another clean section of the cloth, repeat steps c through d. For help, see page 83. g Reinsert the print cartridges. f Let the nozzles and contacts dry completely. i Print your document again. 84 Nozzles d Using another clean section of the cloth, gently hold the cloth against the contacts for about three seconds, and then wipe in the direction shown. c Gently hold the cloth against the nozzles for about three seconds, and then wipe in the direction shown. h Clean the print nozzles.
User's Guide
Page 91
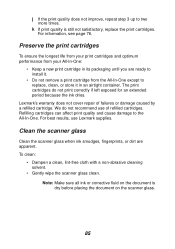
...Make sure all ink or corrective fluid on the scanner glass. 85 Clean the scanner glass Clean the scanner glass when ink smudges, fingerprints, or dirt are ready to install it. • Do not remove a print cartridge from the All-In-One except to replace, clean, or store it in...your All-In-One: • Keep a new print cartridge in an airtight container. For best results, use of failures or damage caused by a refilled cartridge. k If print quality is dry before placing the document on the document is still not satisfactory, replace the print cartridges. Lexmark's warranty does not...
...Make sure all ink or corrective fluid on the scanner glass. 85 Clean the scanner glass Clean the scanner glass when ink smudges, fingerprints, or dirt are ready to install it. • Do not remove a print cartridge from the All-In-One except to replace, clean, or store it in...your All-In-One: • Keep a new print cartridge in an airtight container. For best results, use of failures or damage caused by a refilled cartridge. k If print quality is dry before placing the document on the document is still not satisfactory, replace the print cartridges. Lexmark's warranty does not...

User's Guide
Page 92
Order supplies To order All-In-One supplies or to locate a dealer near you, contact the Lexmark Web site at www.lexmark.com. Item: Black cartridge Color cartridge USB cable Part number: 82 83 or 88 12A2405 86
Order supplies To order All-In-One supplies or to locate a dealer near you, contact the Lexmark Web site at www.lexmark.com. Item: Black cartridge Color cartridge USB cable Part number: 82 83 or 88 12A2405 86
User's Guide
Page 93
... paper is compatible with your All-In-One. For help , see the picture of both print cartridges. For help locating the scanner lock, see page 76. • You removed the sticker and tape from the bottom of the All-In-One on page 11. • You only have one Lexmark X6100 Series attached to a computer, make...
... paper is compatible with your All-In-One. For help , see the picture of both print cartridges. For help locating the scanner lock, see page 76. • You removed the sticker and tape from the bottom of the All-In-One on page 11. • You only have one Lexmark X6100 Series attached to a computer, make...
User's Guide
Page 94
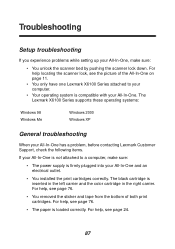
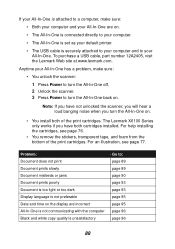
...make sure: • You unlock the scanner: 1 Press Power to turn the All-In-One off. 2 Unlock the scanner. 3 Press Power to turn the All-In-One on. • You install both cartridges installed. For help installing the cartridges, see page 77. Note: If you have not unlocked the scanner, you will hear a loud banging noise...-In-One is not communicating with the computer Black and white copy quality is unsatisfactory Go to: page 89 page 89 page 90 page 93 page 93 page 95 page 95 page 96 page 96 88 To purchase a USB cable, part number 12A2405, visit the Lexmark Web site at www.lexmark.com...
...make sure: • You unlock the scanner: 1 Press Power to turn the All-In-One off. 2 Unlock the scanner. 3 Press Power to turn the All-In-One on. • You install both cartridges installed. For help installing the cartridges, see page 77. Note: If you have not unlocked the scanner, you will hear a loud banging noise...-In-One is not communicating with the computer Black and white copy quality is unsatisfactory Go to: page 89 page 89 page 90 page 93 page 93 page 95 page 95 page 96 page 96 88 To purchase a USB cable, part number 12A2405, visit the Lexmark Web site at www.lexmark.com...

