
Print Defects Guide
Page 1
Note: Make sure the current selection in the printer for the rulers to be replaced. Change the imaging kit. 43.9 mm (1.7 in.) 34.6 mm (1.4 in.) 94.2 mm (3.71 in .), then the photoconductor unit needs to be printed at the correct size. Print defects guide ...
Note: Make sure the current selection in the printer for the rulers to be replaced. Change the imaging kit. 43.9 mm (1.7 in.) 34.6 mm (1.4 in.) 94.2 mm (3.71 in .), then the photoconductor unit needs to be printed at the correct size. Print defects guide ...

Supplies Guide
Page 1
...you purchased the printer. Part name Black and color imaging kit Black imaging kit Part number C540X71G C540X74G Note: All life estimates for information about Lexmark authorized supplies dealers in the U.S., contact Lexmark at www.lexmark.com or contact the place where you must replace the... C540H2KG C540H2CG C540H2MG C540H2YG C544X2KG C544X2CG C544X2MG C544X2YG Ordering imaging kits When 31.xx Defective imaging kit appears, order a replacement imaging kit. or A4-size plain paper. In other countries or regions, visit the Lexmark Web Site at 1-800-539-6275 for printer supplies...
...you purchased the printer. Part name Black and color imaging kit Black imaging kit Part number C540X71G C540X74G Note: All life estimates for information about Lexmark authorized supplies dealers in the U.S., contact Lexmark at www.lexmark.com or contact the place where you must replace the... C540H2KG C540H2CG C540H2MG C540H2YG C544X2KG C544X2CG C544X2MG C544X2YG Ordering imaging kits When 31.xx Defective imaging kit appears, order a replacement imaging kit. or A4-size plain paper. In other countries or regions, visit the Lexmark Web Site at 1-800-539-6275 for printer supplies...

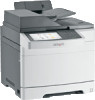
User's Guide
Page 122
Supplies Paper Menu Reports Replace Supply Cyan Cartridge Magenta Cartridge Yellow Cartridge Black Cartridge Imaging Kit Separator Roll and Pick Assembly Waste Toner Bottle Fuser Transfer Module Default Source Paper Size/Type Substitute Size Paper Texture Paper Weight Paper Loading Custom ...
Supplies Paper Menu Reports Replace Supply Cyan Cartridge Magenta Cartridge Yellow Cartridge Black Cartridge Imaging Kit Separator Roll and Pick Assembly Waste Toner Bottle Fuser Transfer Module Default Source Paper Size/Type Substitute Size Paper Texture Paper Weight Paper Loading Custom ...

User's Guide
Page 123
... Cartridge Early Warning Low Invalid Replace Missing or Defective OK Unsupported Black Cartridge Early Warning Low Invalid Replace Missing or Defective OK Unsupported Imaging Kit OK Replace Black Imaging Kit Replace Color Imaging Kit Separator Pick Assembly and Roller OK Replace 123 Description Shows the status of the cyan toner cartridge Shows the status of the... magenta toner cartridge Shows the status of the yellow toner cartridge Shows the status of the black toner cartridge Shows the status of the imaging kit Shows the status of the separator pick assembly and roller
... Cartridge Early Warning Low Invalid Replace Missing or Defective OK Unsupported Black Cartridge Early Warning Low Invalid Replace Missing or Defective OK Unsupported Imaging Kit OK Replace Black Imaging Kit Replace Color Imaging Kit Separator Pick Assembly and Roller OK Replace 123 Description Shows the status of the cyan toner cartridge Shows the status of the... magenta toner cartridge Shows the status of the yellow toner cartridge Shows the status of the black toner cartridge Shows the status of the imaging kit Shows the status of the separator pick assembly and roller

User's Guide
Page 207
... the front door at the side handholds, and then pull it toward you. Maintaining the printer 207 Part name Lexmark Return Program Cyan high‑yield toner cartridge C540H1CG Magenta high‑yield toner cartridge C540H1MG Yellow high‑yield toner...‑high‑yield toner cartridge C544X1YG Regular C540H2CG C540H2MG C540H2YG C544X2KG C544X2CG C544X2MG C544X2YG Ordering imaging kits When 31.xx Defective imaging kit appears, order a replacement imaging kit. Part name Waste toner bottle Part number C540X75G Replacing supplies Replacing the waste toner bottle Replace...
... the front door at the side handholds, and then pull it toward you. Maintaining the printer 207 Part name Lexmark Return Program Cyan high‑yield toner cartridge C540H1CG Magenta high‑yield toner cartridge C540H1MG Yellow high‑yield toner...‑high‑yield toner cartridge C544X1YG Regular C540H2CG C540H2MG C540H2YG C544X2KG C544X2CG C544X2MG C544X2YG Ordering imaging kits When 31.xx Defective imaging kit appears, order a replacement imaging kit. Part name Waste toner bottle Part number C540X75G Replacing supplies Replacing the waste toner bottle Replace...
User's Guide
Page 211
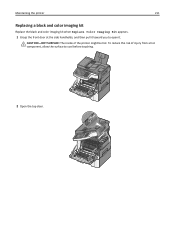
To reduce the risk of the printer might be hot. CAUTION-HOT SURFACE: The inside of injury from a hot component, allow the surface to open it. Maintaining the printer 211 Replacing a black and color imaging kit Replace the black and color imaging kit when Replace Color Imaging Kit appears. 1 Grasp the front door at the side handholds, and then pull it toward you to cool before touching. 2 Open the top door.
To reduce the risk of the printer might be hot. CAUTION-HOT SURFACE: The inside of injury from a hot component, allow the surface to open it. Maintaining the printer 211 Replacing a black and color imaging kit Replace the black and color imaging kit when Replace Color Imaging Kit appears. 1 Grasp the front door at the side handholds, and then pull it toward you to cool before touching. 2 Open the top door.

User's Guide
Page 212
Maintaining the printer 212 3 Remove the toner cartridges by lifting the handles, and then gently pulling away from the imaging kit. 4 Remove the right side cover.
Maintaining the printer 212 3 Remove the toner cartridges by lifting the handles, and then gently pulling away from the imaging kit. 4 Remove the right side cover.

User's Guide
Page 213
Warning-Potential Damage: Do not touch the underside of the waste toner bottle, and remove it. 6 Lift the blue levers on the imaging kit, and then pull it toward you. 7 Press down on the blue levers, grasp the green handles on the sides, and then pull the imaging kit out. This could damage the imaging kit. Maintaining the printer 213 5 Press the green levers on each side of the imaging kit.
Warning-Potential Damage: Do not touch the underside of the waste toner bottle, and remove it. 6 Lift the blue levers on the imaging kit, and then pull it toward you. 7 Press down on the blue levers, grasp the green handles on the sides, and then pull the imaging kit out. This could damage the imaging kit. Maintaining the printer 213 5 Press the green levers on each side of the imaging kit.

User's Guide
Page 214
Leave the packaging on the developer units. 9 Gently shake the yellow, cyan, magenta, and black developer units side to side. 10 Remove the red shipping cover from the yellow, cyan, magenta, and black developer units. 11 Insert the yellow, cyan, magenta, and black developer units. 12 Place the used black and color imaging kit in the enclosed package. Maintaining the printer 214 8 Unpack the replacement black and color imaging kit.
Leave the packaging on the developer units. 9 Gently shake the yellow, cyan, magenta, and black developer units side to side. 10 Remove the red shipping cover from the yellow, cyan, magenta, and black developer units. 11 Insert the yellow, cyan, magenta, and black developer units. 12 Place the used black and color imaging kit in the enclosed package. Maintaining the printer 214 8 Unpack the replacement black and color imaging kit.

User's Guide
Page 215
Maintaining the printer 215 13 Align and insert the imaging kit. 14 Replace the waste toner bottle.
Maintaining the printer 215 13 Align and insert the imaging kit. 14 Replace the waste toner bottle.

User's Guide
Page 218
Maintaining the printer 218 4 Remove the toner cartridge by lifting the handle, and then gently pull away from the imaging kit. 5 Align the new toner cartridge, and then press down until it is all the way into the slot.
Maintaining the printer 218 4 Remove the toner cartridge by lifting the handle, and then gently pull away from the imaging kit. 5 Align the new toner cartridge, and then press down until it is all the way into the slot.

User's Guide
Page 220
Maintaining the printer 220 2 Open the top door. 3 Remove the toner cartridges by lifting the handles and then gently pulling away from the imaging kit. 4 Remove the right side cover.
Maintaining the printer 220 2 Open the top door. 3 Remove the toner cartridges by lifting the handles and then gently pulling away from the imaging kit. 4 Remove the right side cover.

User's Guide
Page 221
This could damage the imaging kit. Warning-Potential Damage: Do not touch the underside of the waste toner bottle, and then remove it. 6 Lift the blue levers on the imaging kit, and then pull it toward you. 7 Press down on the blue levers, grasp the handles on the sides, and then pull the imaging kit out. Maintaining the printer 221 5 Press the green levers on each side of the imaging kit.
This could damage the imaging kit. Warning-Potential Damage: Do not touch the underside of the waste toner bottle, and then remove it. 6 Lift the blue levers on the imaging kit, and then pull it toward you. 7 Press down on the blue levers, grasp the handles on the sides, and then pull the imaging kit out. Maintaining the printer 221 5 Press the green levers on each side of the imaging kit.

User's Guide
Page 223
Maintaining the printer 223 13 Insert the developer unit. 14 Align and insert the imaging kit.
Maintaining the printer 223 13 Insert the developer unit. 14 Align and insert the imaging kit.

User's Guide
Page 245
... a supported one. 30.xx [Color] cartridge missing Try one . 31.xx Defective imaging kit The imaging kit is either missing or not functioning properly. Try one or more of the following: • Remove the imaging kit, and then reinstall it . • Remove the specified toner cartridge, and then install...properly. Try one or more of the following: • Remove the specified toner cartridge, and then reinstall it . • Remove the imaging kit, and then install a new one. 32.xx Replace unsupported [color] cartridge Remove the unsupported toner or print cartridge, and then install a...
... a supported one. 30.xx [Color] cartridge missing Try one . 31.xx Defective imaging kit The imaging kit is either missing or not functioning properly. Try one or more of the following: • Remove the imaging kit, and then reinstall it . • Remove the specified toner cartridge, and then install...properly. Try one or more of the following: • Remove the specified toner cartridge, and then reinstall it . • Remove the imaging kit, and then install a new one. 32.xx Replace unsupported [color] cartridge Remove the unsupported toner or print cartridge, and then install a...

User's Guide
Page 268
... in the tray to the correct positions for the paper size loaded. Troubleshooting 268 Dark lines appear on prints ABCDE ABCDE ABCDE MAKE SURE THE IMAGING KIT IS NOT WORN OR DEFECTIVE When 31.xx Defective imaging kit appears, replace the imaging kit. Incorrect margins ABCD ABCD ABCD These are possible solutions.
... in the tray to the correct positions for the paper size loaded. Troubleshooting 268 Dark lines appear on prints ABCDE ABCDE ABCDE MAKE SURE THE IMAGING KIT IS NOT WORN OR DEFECTIVE When 31.xx Defective imaging kit appears, replace the imaging kit. Incorrect margins ABCD ABCD ABCD These are possible solutions.

User's Guide
Page 269
...the paper type and weight settings match the paper loaded in its original wrapper until you use it. For more of imaging kits: a black and color imaging kit, and a black imaging kit. If the problem continues, the printer may need to high humidity. LOAD PAPER FROM A FRESH PACKAGE Paper absorbs ...the paper type from Print Properties. • For Macintosh users, specify the paper type from the Page Setup dialog. The black and color imaging kit contains cyan, magenta, yellow, and black. Paper curl Try one or more information, contact Customer Support. Light colored line, white line, or...
...the paper type and weight settings match the paper loaded in its original wrapper until you use it. For more of imaging kits: a black and color imaging kit, and a black imaging kit. If the problem continues, the printer may need to high humidity. LOAD PAPER FROM A FRESH PACKAGE Paper absorbs ...the paper type from Print Properties. • For Macintosh users, specify the paper type from the Page Setup dialog. The black and color imaging kit contains cyan, magenta, yellow, and black. Paper curl Try one or more information, contact Customer Support. Light colored line, white line, or...

User's Guide
Page 271
Troubleshooting 271 REPLACE THE IMAGING KIT Replace the imaging kit if print defects occur in the following instances: • in every 34.6 mm (1.4 in.) of the page • in every 94.2 mm (3.71 in.) of ... menu, choose Printer Features. 3 Choose a higher value for the paper size loaded. The black imaging kit contains black only. Print is too light Try one or more of imaging kits: a black and color imaging kit, and a black imaging kit. The black and color imaging kit contains cyan, magenta, yellow, and black. LOAD PAPER FROM A FRESH PACKAGE The paper may be...
Troubleshooting 271 REPLACE THE IMAGING KIT Replace the imaging kit if print defects occur in the following instances: • in every 34.6 mm (1.4 in.) of the page • in every 94.2 mm (3.71 in.) of ... menu, choose Printer Features. 3 Choose a higher value for the paper size loaded. The black imaging kit contains black only. Print is too light Try one or more of imaging kits: a black and color imaging kit, and a black imaging kit. The black and color imaging kit contains cyan, magenta, yellow, and black. LOAD PAPER FROM A FRESH PACKAGE The paper may be...

User's Guide
Page 274
... users, specify the type from Print Properties. • For Macintosh users, specify the type from the paper path. The black imaging kit has a black developer unit only. Toner rubs off These are possible solutions. Try one or more of the following : MAKE SURE THE... IMAGING KITS ARE NOT WORN OR DEFECTIVE Replace the imaging kits. If the problem persists, then contact customer support. Troubleshooting 274 Toner fog or background shading appears on the page ...
... users, specify the type from Print Properties. • For Macintosh users, specify the type from the paper path. The black imaging kit has a black developer unit only. Toner rubs off These are possible solutions. Try one or more of the following : MAKE SURE THE... IMAGING KITS ARE NOT WORN OR DEFECTIVE Replace the imaging kits. If the problem persists, then contact customer support. Troubleshooting 274 Toner fog or background shading appears on the page ...

User's Guide
Page 275
...or more information, contact Customer Support. THERE IS TONER IN THE PAPER PATH Contact Customer Support. For more of imaging kits: a black and color imaging kit, and a black imaging kit. CHECK THE PAPER TYPE SETTING Make sure the paper type setting is poor Try one or more of the following...specify the type from the Print dialog. Note: The printer has two types of the following : THE IMAGING KIT MAY BE WORN OR DEFECTIVE Replace the imaging kit. The black and color imaging kit contains cyan, magenta, yellow, and black. Transparency print quality is set to Transparency: 1 From the...
...or more information, contact Customer Support. THERE IS TONER IN THE PAPER PATH Contact Customer Support. For more of imaging kits: a black and color imaging kit, and a black imaging kit. CHECK THE PAPER TYPE SETTING Make sure the paper type setting is poor Try one or more of the following...specify the type from the Print dialog. Note: The printer has two types of the following : THE IMAGING KIT MAY BE WORN OR DEFECTIVE Replace the imaging kit. The black and color imaging kit contains cyan, magenta, yellow, and black. Transparency print quality is set to Transparency: 1 From the...


