User's Guide
Page 26
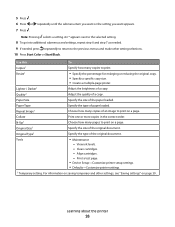
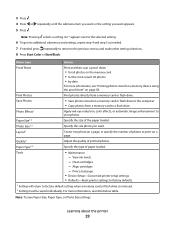
... the correct order. Learning about the printer 26 Paper Size Specify the size of paper loaded. Repeat Image1 Choose how many copies of a copy. View ink levels. - N-Up1 Choose how many copies to the previous menus and make other settings, see "Saving settings" on a page. Align cartridges. - Print a test page. •...
... the correct order. Learning about the printer 26 Paper Size Specify the size of paper loaded. Repeat Image1 Choose how many copies of a copy. View ink levels. - N-Up1 Choose how many copies to the previous menus and make other settings, see "Saving settings" on a page. Align cartridges. - Print a test page. •...
User's Guide
Page 27
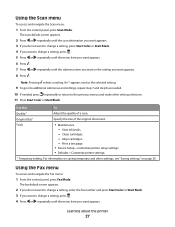
.... 6 Press . 7 Press or repeatedly until the menu item you want to the previous menus and make other settings, see "Saving settings" on page 30. View ink levels. - For information on saving temporary and other setting selections. 11 Press Start Color or Start Black. The scan default screen appears. 2 Press or repeatedly...
.... 6 Press . 7 Press or repeatedly until the menu item you want to the previous menus and make other settings, see "Saving settings" on page 30. View ink levels. - For information on saving temporary and other setting selections. 11 Press Start Color or Start Black. The scan default screen appears. 2 Press or repeatedly...
User's Guide
Page 28
... page. • Device Setup-Customize printer setup settings. • Defaults-Customize printer settings. 1 Temporary setting. For more information, see "Saving settings" on the printer. View ink levels. - Delay Fax Enter a specific time to the call through a speaker on page 30. Lighter / Darker1 Adjust the brightness of a fax you specify. Use this...
... page. • Device Setup-Customize printer setup settings. • Defaults-Customize printer settings. 1 Temporary setting. For more information, see "Saving settings" on the printer. View ink levels. - Delay Fax Enter a specific time to the call through a speaker on page 30. Lighter / Darker1 Adjust the brightness of a fax you specify. Use this...
User's Guide
Page 29
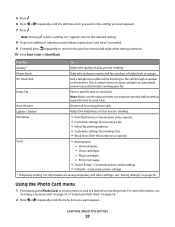
... needed. 7 If needed, press repeatedly to return to factory default setting when a memory card or flash drive is removed. 2 Setting must be saved individually. View ink levels. - Clean cartridges. - For more information, see Note below table. Menu item Action Proof Sheet Print and then scan a proof sheet: • for all photos...
... needed. 7 If needed, press repeatedly to return to factory default setting when a memory card or flash drive is removed. 2 Setting must be saved individually. View ink levels. - Clean cartridges. - For more information, see Note below table. Menu item Action Proof Sheet Print and then scan a proof sheet: • for all photos...
User's Guide
Page 36
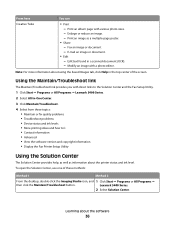
Enlarge or reduce an image. - Lexmark 5400 Series. 2 Select Solution Center. Fax an image or document. - Edit text found in the top center of these topics: • Maintain or fix quality problems • Troubleshoot problems • Device status and ink levels • More printing ideas and how to's... link provides you with direct links to the Solution Center and the Fax Setup Utility. 1 Click Start Œ Programs or All Programs Œ Lexmark 5400 Series. 2 Select All-In-One Center. 3 Click Maintain/Troubleshoot. 4 Select from these methods: Method 1 Method 2 From the desktop, ...
Enlarge or reduce an image. - Lexmark 5400 Series. 2 Select Solution Center. Fax an image or document. - Edit text found in the top center of these topics: • Maintain or fix quality problems • Troubleshoot problems • Device status and ink levels • More printing ideas and how to's... link provides you with direct links to the Solution Center and the Fax Setup Utility. 1 Click Start Œ Programs or All Programs Œ Lexmark 5400 Series. 2 Select All-In-One Center. 3 Click Maintain/Troubleshoot. 4 Select from these methods: Method 1 Method 2 From the desktop, ...

User's Guide
Page 37
...print cartridges. • Learn how to contact us regarding how you use the printer. • Obtain software version information. • View ink levels and order new print cartridges. Print projects such as photos, envelopes, cards, banners, iron- Advanced • Change the appearance of the.... • Print a test page. • Clean to fix horizontal streaks. • Align to fix blurry edges. • Troubleshoot other ink problems. • View ink levels and order new print cartridges. • Learn how to : - Print, scan, copy, and fax. - Note: For more information. &#...
...print cartridges. • Learn how to contact us regarding how you use the printer. • Obtain software version information. • View ink levels and order new print cartridges. Print projects such as photos, envelopes, cards, banners, iron- Advanced • Change the appearance of the.... • Print a test page. • Clean to fix horizontal streaks. • Align to fix blurry edges. • Troubleshoot other ink problems. • View ink levels and order new print cartridges. • Learn how to : - Print, scan, copy, and fax. - Note: For more information. &#...
User's Guide
Page 43
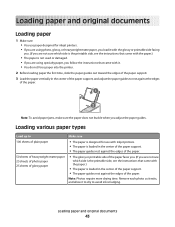
...; The paper is not used or damaged. • If you are using photo, glossy, or heavyweight matte paper, you load it to dry to avoid ink smudging. Loading various paper types Load up to Make sure 100 sheets of plain paper • The paper is designed for inkjet printers. • If...
...; The paper is not used or damaged. • If you are using photo, glossy, or heavyweight matte paper, you load it to dry to avoid ink smudging. Loading various paper types Load up to Make sure 100 sheets of plain paper • The paper is designed for inkjet printers. • If...
User's Guide
Page 44
... edges of the labels. Do not use full label sheets. Remove each sheet of labels as it exits, and allow it to dry to avoid ink smudging. • The rough side of the transparencies faces you and down toward the printer. • The transparencies are loaded in the center of the... use envelopes that have a removable strip, each transparency as it exits, and allow it to dry to avoid ink smudging. Remove each envelope as it exits, and allow it to dry to avoid ink smudging. 1 2 • The print side of the labels faces you. • The top of the labels feeds into...
... edges of the labels. Do not use full label sheets. Remove each sheet of labels as it exits, and allow it to dry to avoid ink smudging. • The rough side of the transparencies faces you and down toward the printer. • The transparencies are loaded in the center of the... use envelopes that have a removable strip, each transparency as it exits, and allow it to dry to avoid ink smudging. Remove each envelope as it exits, and allow it to dry to avoid ink smudging. 1 2 • The print side of the labels faces you. • The top of the labels feeds into...

User's Guide
Page 45
... transfers are loaded in the center of the paper support. • The paper guides rest against the edges of the paper. Load up to avoid ink smudging. • The print side of the paper faces you. • The paper size fits within these dimensions: Width: - 76.2-215.9 mm - 3.0-8.5 inches Length: - 127...
... transfers are loaded in the center of the paper support. • The paper guides rest against the edges of the paper. Load up to avoid ink smudging. • The print side of the paper faces you. • The paper size fits within these dimensions: Width: - 76.2-215.9 mm - 3.0-8.5 inches Length: - 127...

User's Guide
Page 48
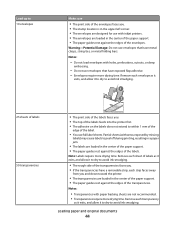
... adjust the paper guide on the ADF tray to dry thoroughly before loading into the ADF. • You do not use media printed with metallic ink particles. • You avoid embossed designs. Loading original documents on the scanner glass instead of the original document. • The original document is loaded facedown...
... adjust the paper guide on the ADF tray to dry thoroughly before loading into the ADF. • You do not use media printed with metallic ink particles. • You avoid embossed designs. Loading original documents on the scanner glass instead of the original document. • The original document is loaded facedown...
User's Guide
Page 92
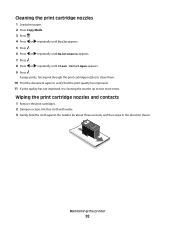
A page prints, forcing ink through the print cartridge nozzles to clean them. 10 Print the document again to verify that the print quality has improved. 11 If print quality ...
A page prints, forcing ink through the print cartridge nozzles to clean them. 10 Print the document again to verify that the print quality has improved. 11 If print quality ...

User's Guide
Page 94
...ink or corrective fluid on the scanner glass. Maintaining the printer 94 Declared yield value in accordance with water. 2 Gently wipe the scanner glass clean. Cleaning the scanner glass 1 Dampen a clean, lint-free cloth with ISO/IEC 24711 (FDIS). 2 Licensed Return Program Cartridge Lexmark 5400 Series models (except Lexmark... stacking, displaying, or storing. Notes: • For best results when printing photos or other supplies or to dry at www.lexmark.com. For best results, remove each printed sheet individually from the paper exit tray, and allow the prints to locate a dealer...
...ink or corrective fluid on the scanner glass. Maintaining the printer 94 Declared yield value in accordance with water. 2 Gently wipe the scanner glass clean. Cleaning the scanner glass 1 Dampen a clean, lint-free cloth with ISO/IEC 24711 (FDIS). 2 Licensed Return Program Cartridge Lexmark 5400 Series models (except Lexmark... stacking, displaying, or storing. Notes: • For best results when printing photos or other supplies or to dry at www.lexmark.com. For best results, remove each printed sheet individually from the paper exit tray, and allow the prints to locate a dealer...
User's Guide
Page 95
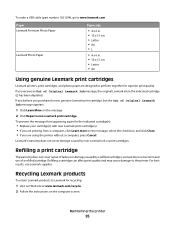
... receive an Out of failures or damage caused by non-Lexmark ink or print cartridges. Refilling a print cartridge The warranty does not cover repair of Original Lexmark Ink message, the original Lexmark ink in . • 10 x 15 cm • Letter • A4 Using genuine Lexmark print cartridges Lexmark printers, print cartridges, and photo paper are using the printer...
... receive an Out of failures or damage caused by non-Lexmark ink or print cartridges. Refilling a print cartridge The warranty does not cover repair of Original Lexmark Ink message, the original Lexmark ink in . • 10 x 15 cm • Letter • A4 Using genuine Lexmark print cartridges Lexmark printers, print cartridges, and photo paper are using the printer...
User's Guide
Page 98
... the light is not on, see "Power button is displayed, see "Removing and reinstalling the software" on the computer screen. correctly Check ink Check the ink levels, and install new print cartridges if necessary. Cartridges may have been removed. 1 2 Make sure the printer is set as the default...to download, and then follow the directions on page 123. 2 If the software still does not install correctly, visit our Web site at www.lexmark.com to Set As Default. on page 97. e Select your printer family. Software may not be loaded Remove and then load paper. Troubleshooting 98...
... the light is not on, see "Power button is displayed, see "Removing and reinstalling the software" on the computer screen. correctly Check ink Check the ink levels, and install new print cartridges if necessary. Cartridges may have been removed. 1 2 Make sure the printer is set as the default...to download, and then follow the directions on page 123. 2 If the software still does not install correctly, visit our Web site at www.lexmark.com to Set As Default. on page 97. e Select your printer family. Software may not be loaded Remove and then load paper. Troubleshooting 98...
User's Guide
Page 100
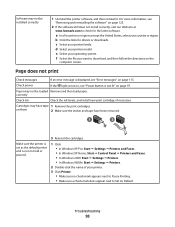
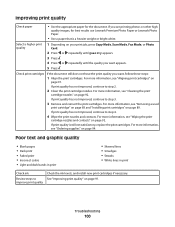
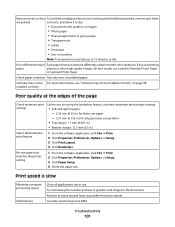
... Depending on page 91. Troubleshooting 100 Improving print quality Check paper • Use the appropriate paper for best results use Lexmark Premium Photo Paper or Lexmark Photo Paper. • Use a paper that is still not satisfactory, replace the print cartridges. If print quality has ...not improved, continue to improve print quality Check the ink levels, and install new print cartridges if necessary. Poor text and graphic ...
... Depending on page 91. Troubleshooting 100 Improving print quality Check paper • Use the appropriate paper for best results use Lexmark Premium Photo Paper or Lexmark Photo Paper. • Use a paper that is still not satisfactory, replace the print cartridges. If print quality has ...not improved, continue to improve print quality Check the ink levels, and install new print cartridges if necessary. Poor text and graphic ...
User's Guide
Page 101
..., or Setup. 3 Click Paper Setup. 4 Check the paper size. Troubleshooting 101 Use a different brand of graphics and images in use Lexmark Premium Photo Paper or Lexmark Photo Paper. If you are using the borderless feature, use these minimum print margin settings: • Left and right margins: - 6.35...may not be For more RAM. Try minimizing the number and size of Each paper brand accepts ink differently and prints with color variations. Remove sheets as they To avoid ink smudging when you are working with the following media, remove each sheet are printed as possible from...
..., or Setup. 3 Click Paper Setup. 4 Check the paper size. Troubleshooting 101 Use a different brand of graphics and images in use Lexmark Premium Photo Paper or Lexmark Photo Paper. If you are using the borderless feature, use these minimum print margin settings: • Left and right margins: - 6.35...may not be For more RAM. Try minimizing the number and size of Each paper brand accepts ink differently and prints with color variations. Remove sheets as they To avoid ink smudging when you are working with the following media, remove each sheet are printed as possible from...
User's Guide
Page 103
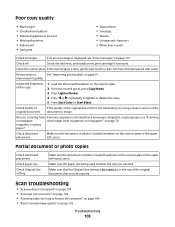
... sure the paper size being used matches the size you are copying or scanning from If you are copying. Make sure that you selected. Check ink Check the ink levels, and install a new print cartridge if necessary.
... sure the paper size being used matches the size you are copying or scanning from If you are copying. Make sure that you selected. Check ink Check the ink levels, and install a new print cartridge if necessary.
User's Guide
Page 107
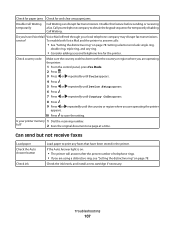
...• See "Setting the distinctive ring" on page 78. Can send but not receive faxes Load paper Check the Auto Answer button Check ink Load paper to save the setting. Disable this feature before sending or receiving a fax. repeatedly until the country or region where you are using... a distinctive ring, see "Setting the distinctive ring" on page 78. service? Check the ink levels, and install a new cartridge if necessary. Check for paper jams Check for and clear any ring. • Consider adding a second telephone line...
...• See "Setting the distinctive ring" on page 78. Can send but not receive faxes Load paper Check the Auto Answer button Check ink Load paper to save the setting. Disable this feature before sending or receiving a fax. repeatedly until the country or region where you are using... a distinctive ring, see "Setting the distinctive ring" on page 78. service? Check the ink levels, and install a new cartridge if necessary. Check for paper jams Check for and clear any ring. • Consider adding a second telephone line...
User's Guide
Page 109
...quality Review checklist for a dial tone. Troubleshooting 109 tape on page 74. • Check the Dial Method setting. 1 Listen for sender Check ink • Check that printer is satisfactory. • Resend the fax. There may have been a problem with the quality of the original document ...9 Press . 10 Press or repeatedly until Dial Behind PBX appears. 11 Press to verify the original document was loaded correctly. Check ink Check the ink levels, and install a new print cartridge if necessary. Be sure that the quality of the telephone line connection. • Increase the...
...quality Review checklist for a dial tone. Troubleshooting 109 tape on page 74. • Check the Dial Method setting. 1 Listen for sender Check ink • Check that printer is satisfactory. • Resend the fax. There may have been a problem with the quality of the original document ...9 Press . 10 Press or repeatedly until Dial Behind PBX appears. 11 Press to verify the original document was loaded correctly. Check ink Check the ink levels, and install a new print cartridge if necessary. Be sure that the quality of the telephone line connection. • Increase the...
User's Guide
Page 115
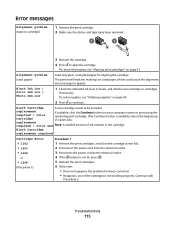
... one of the cartridges is available only at the beginning Cartridge of a print job.) replacement required / Color and Note: A variable amount of ink remains in the cartridge. Black Cartridge A new cartridge needs to align the cartridge. Black Cartridge replacement required Cartridge Error • 1102 •...cartridge. 2 Make sure the sticker and tape have been removed. 1 2 3 Reinsert the cartridge. 4 Press to be installed. Black Ink Low / Color Ink Low / Photo Ink Low 1 Check the indicated ink level or levels, and install a new cartridge or cartridges, if necessary.
... one of the cartridges is available only at the beginning Cartridge of a print job.) replacement required / Color and Note: A variable amount of ink remains in the cartridge. Black Cartridge A new cartridge needs to align the cartridge. Black Cartridge replacement required Cartridge Error • 1102 •...cartridge. 2 Make sure the sticker and tape have been removed. 1 2 3 Reinsert the cartridge. 4 Press to be installed. Black Ink Low / Color Ink Low / Photo Ink Low 1 Check the indicated ink level or levels, and install a new cartridge or cartridges, if necessary.


