
User's Guide
Page 3
... a modem...32 Connecting to a telephone ...33 Setting up to fax while behind a PBX ...34 Using a digital phone service ...35 Understanding the control panel...35 Using the control panel ...35 Saving settings...39 Installing another language control panel...40 Installing the printer software...41 Understanding the printer software...41 Turning printing voice notification on or off...
... a modem...32 Connecting to a telephone ...33 Setting up to fax while behind a PBX ...34 Using a digital phone service ...35 Understanding the control panel...35 Using the control panel ...35 Saving settings...39 Installing another language control panel...40 Installing the printer software...41 Understanding the printer software...41 Turning printing voice notification on or off...

User's Guide
Page 7
... ring...110 Setting the number of rings before receiving a fax automatically 111 Setting up Speed Dial...111 Printing fax activity reports...112 Maintaining the printer 113 Replacing print cartridges...113 Installing print cartridges...113 Removing a used print cartridge ...114 Refilling print cartridges...115 Using genuine Lexmark print cartridges...115 Aligning print cartridges...115 Cleaning the...
... ring...110 Setting the number of rings before receiving a fax automatically 111 Setting up Speed Dial...111 Printing fax activity reports...112 Maintaining the printer 113 Replacing print cartridges...113 Installing print cartridges...113 Removing a used print cartridge ...114 Refilling print cartridges...115 Using genuine Lexmark print cartridges...115 Aligning print cartridges...115 Cleaning the...
User's Guide
Page 8
...121 Power button is not lit ...121 Software does not install...122 Page does not print...123 Solving printer communication problems ...124 Understanding Warning levels ...125 Removing and reinstalling the software ...125 Enabling the USB port...125 Print troubleshooting...126 Improving print quality ...126 Poor...page prints...131 Characters on printout are missing or unexpected ...131 Colors on printout are faded or differ from colors on the screen 132 Copied item does not match the original item...132 Glossy photo paper or transparencies stick together ...133 Page prints with different fonts...
...121 Power button is not lit ...121 Software does not install...122 Page does not print...123 Solving printer communication problems ...124 Understanding Warning levels ...125 Removing and reinstalling the software ...125 Enabling the USB port...125 Print troubleshooting...126 Improving print quality ...126 Poor...page prints...131 Characters on printout are missing or unexpected ...131 Colors on printout are faded or differ from colors on the screen 132 Copied item does not match the original item...132 Glossy photo paper or transparencies stick together ...133 Page prints with different fonts...
User's Guide
Page 14
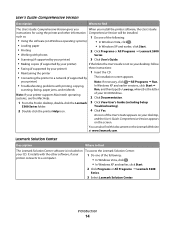
... Setup 5300 Series folder. To access the Lexmark Solution Center: 1 Do one of the User's Guide appears on your desktop, and the User's Guide: Comprehensive Version appears on your printer) • Troubleshooting problems with printing, copying, scanning, faxing, paper jams, and misfeeds The installation screen appears. It installs with photos Series. • Scanning (if supported by your...
... Setup 5300 Series folder. To access the Lexmark Solution Center: 1 Do one of the User's Guide appears on your desktop, and the User's Guide: Comprehensive Version appears on your printer) • Troubleshooting problems with printing, copying, scanning, faxing, paper jams, and misfeeds The installation screen appears. It installs with photos Series. • Scanning (if supported by your...
User's Guide
Page 16
...warranty that we may serve you contact us so that shipped with the printer software. original date of purchase. 2 Click Warranty Information. 3 From the Statement of Limited Warranty section, click Inkjet & All-In-One Printers. 4 Scroll through the Web page to find (US) Where to ...lexmark.com. For complete descriptions: • Windows users-See the User's Guide. • Macintosh users-If your this limited warranty, see the Mac Help installed with your product supports Macintosh, see the Statement of country or region. this printer will be free of defects in printer...
...warranty that we may serve you contact us so that shipped with the printer software. original date of purchase. 2 Click Warranty Information. 3 From the Statement of Limited Warranty section, click Inkjet & All-In-One Printers. 4 Scroll through the Web page to find (US) Where to ...lexmark.com. For complete descriptions: • Windows users-See the User's Guide. • Macintosh users-If your this limited warranty, see the Mac Help installed with your product supports Macintosh, see the Statement of country or region. this printer will be free of defects in printer...

User's Guide
Page 17
...see "Choosing a fax connection" on the installation software CD. Setting up the printer Your printer may need to be installed into the printer 2 Color print cartridge Note: Cartridge combinations vary depending on the product purchased. 3 Telephone cord Use for the printer • User... port located at the back of the printer 5 Quick Setup sheet Initial setup directions 6 Installation software CD • Installation software for faxing. Note: You may not support: • Memory Cards • PictBridge-enabled digital camera • Photo Card mode Checking the box contents 12 ...
...see "Choosing a fax connection" on the installation software CD. Setting up the printer Your printer may need to be installed into the printer 2 Color print cartridge Note: Cartridge combinations vary depending on the product purchased. 3 Telephone cord Use for the printer • User... port located at the back of the printer 5 Quick Setup sheet Initial setup directions 6 Installation software CD • Installation software for faxing. Note: You may not support: • Memory Cards • PictBridge-enabled digital camera • Photo Card mode Checking the box contents 12 ...
User's Guide
Page 18
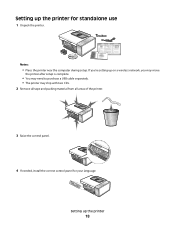
Notes: • Place the printer near the computer during setup. Setting up the printer 18 If you're setting up on a wireless network, you may move the printer after setup is complete. • You may need to purchase a USB cable separately. • The printer may ship with two CDs. 2 Remove all tape and packing material from all areas of the printer. 3 Raise the control panel. 4 If needed, install the correct control panel for standalone use 1 Unpack the printer. Setting up the printer for your language.
Notes: • Place the printer near the computer during setup. Setting up the printer 18 If you're setting up on a wireless network, you may move the printer after setup is complete. • You may need to purchase a USB cable separately. • The printer may ship with two CDs. 2 Remove all tape and packing material from all areas of the printer. 3 Raise the control panel. 4 If needed, install the correct control panel for standalone use 1 Unpack the printer. Setting up the printer for your language.
User's Guide
Page 24
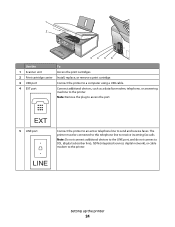
... digital network), or cable modem to the printer. LINE Setting up the printer 24 1 2 34 5 6 Use the To 1 Scanner unit Access the print cartridges. 2 Print cartridge carrier Install, replace, or remove a print cartridge. 3 USB port Connect the printer to a computer using a USB cable. 4 EXT port Connect additional devices, such as a data/fax modem, telephone, or answering machine to...
... digital network), or cable modem to the printer. LINE Setting up the printer 24 1 2 34 5 6 Use the To 1 Scanner unit Access the print cartridges. 2 Print cartridge carrier Install, replace, or remove a print cartridge. 3 USB port Connect the printer to a computer using a USB cable. 4 EXT port Connect additional devices, such as a data/fax modem, telephone, or answering machine to...
User's Guide
Page 28
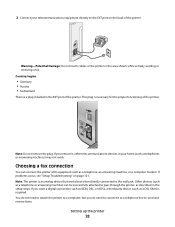
... a DSL filter) is a plug installed in the setup steps. Setting up the printer 28 This plug is an analog device that works best when directly connected to the wall jack. If problems occur, see "Setup Troubleshooting" on the back of the printer. Country/region • Germany •...; Austria • Switzerland There is required. Choosing a fax connection You can be successfully attached to connect it , other telecommunications devices in the area ...
... a DSL filter) is a plug installed in the setup steps. Setting up the printer 28 This plug is an analog device that works best when directly connected to the wall jack. If problems occur, see "Setup Troubleshooting" on the back of the printer. Country/region • Germany •...; Austria • Switzerland There is required. Choosing a fax connection You can be successfully attached to connect it , other telecommunications devices in the area ...
User's Guide
Page 35
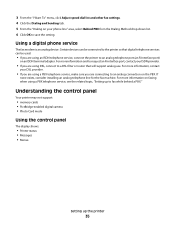
... cards • PictBridge-enabled digital camera • Photo Card mode Using the control panel The display shows: • Printer status • Messages • Menus Setting up to fax while behind a PBX." Certain devices can be connected to the printer so that will support analog use. For more information... • If you are connecting to an analog connection on the PBX. If none exists, consider installing an analog telephone line for the fax machine. For more information on faxing when using DSL, connect to a DSL filter or router that digital telephone services can be used. ...
... cards • PictBridge-enabled digital camera • Photo Card mode Using the control panel The display shows: • Printer status • Messages • Menus Setting up to fax while behind a PBX." Certain devices can be connected to the printer so that will support analog use. For more information... • If you are connecting to an analog connection on the PBX. If none exists, consider installing an analog telephone line for the fax machine. For more information on faxing when using DSL, connect to a DSL filter or router that digital telephone services can be used. ...
User's Guide
Page 40
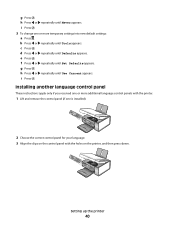
... until Set Defaults appears. i Press . 3 To change one is installed). 2 Choose the correct control panel for your language. 3 Align the clips on the control panel with the printer. 1 Lift and remove the control panel (if one or more temporary settings into new default settings: a Press .... i Press . Installing another language control panel These instructions apply only if you received one or more additional language control panels ...
... until Set Defaults appears. i Press . 3 To change one is installed). 2 Choose the correct control panel for your language. 3 Align the clips on the control panel with the printer. 1 Lift and remove the control panel (if one or more temporary settings into new default settings: a Press .... i Press . Installing another language control panel These instructions apply only if you received one or more additional language control panels ...
User's Guide
Page 41
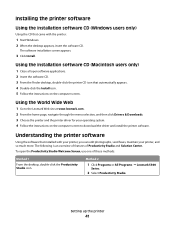
... more. Method 2 1 Click Programs or All Programs ΠLexmark 5300 Series. 2 Select Productivity Studio. The software installation screen appears. 3 Click Install. Understanding the printer software Using the software that installed with the printer: 1 Start Windows. 2 When the desktop appears, insert the software CD. Installing the printer software Using the installation software CD (Windows users only) Using the CD that...
... more. Method 2 1 Click Programs or All Programs ΠLexmark 5300 Series. 2 Select Productivity Studio. The software installation screen appears. 3 Click Install. Understanding the printer software Using the software that installed with the printer: 1 Start Windows. 2 When the desktop appears, insert the software CD. Installing the printer software Using the installation software CD (Windows users only) Using the CD that...

User's Guide
Page 43
...to such printing features as photos, envelopes, cards, banners, iron-on the Solution Center icon. 2 Click Setup and diagnose printer. 1 Click Programs or All Programs Œ Lexmark 5300 Series. 2 Select ...one of the Printing Status window. • Turn printing voice notification on or off. • Change network printing settings. • Share information with us regarding how you use the printer... and installing and maintaining supplies. To open . Advanced • Change the appearance of the following methods. Click Fax History and Settings To Set printer fax settings for...
...to such printing features as photos, envelopes, cards, banners, iron-on the Solution Center icon. 2 Click Setup and diagnose printer. 1 Click Programs or All Programs Œ Lexmark 5300 Series. 2 Select ...one of the Printing Status window. • Turn printing voice notification on or off. • Change network printing settings. • Share information with us regarding how you use the printer... and installing and maintaining supplies. To open . Advanced • Change the appearance of the following methods. Click Fax History and Settings To Set printer fax settings for...

User's Guide
Page 44
... the printer software being installed. To turn the voice notification on your printer to work properly, allow the printer software to fix blurry edges. • View ink levels. • Troubleshoot other ink problems. Turning printing voice notification on or off : 1 Do one of the...Programs Œ Lexmark 5300 Series. 3 Click Solution Center. 4 Click Advanced. 5 Click Printing Status. 6 Select or clear Play voice notification for printing events. 7 Click OK. Note: Wait until scanning is completed. Setting up the printer 44 From here Maintenance You can: • Install a new print...
... the printer software being installed. To turn the voice notification on your printer to work properly, allow the printer software to fix blurry edges. • View ink levels. • Troubleshoot other ink problems. Turning printing voice notification on or off : 1 Do one of the...Programs Œ Lexmark 5300 Series. 3 Click Solution Center. 4 Click Advanced. 5 Click Printing Status. 6 Select or clear Play voice notification for printing events. 7 Click OK. Note: Wait until scanning is completed. Setting up the printer 44 From here Maintenance You can: • Install a new print...

User's Guide
Page 45
...• You want to assign a specific IP address. • You move the printer to the company. There are two common types of the installation, sends all print jobs across the network to the printer attached to the print server using network adapters • Make sure the adapter connections are... networks, it is often called a subnet), you can try manually entering an address after selecting your printer/print server from the available list. During the Direct IP printing installation of printer software, the IP address is visible in the port name. You must manually enter an IP address ...
...• You want to assign a specific IP address. • You move the printer to the company. There are two common types of the installation, sends all print jobs across the network to the printer attached to the print server using network adapters • Make sure the adapter connections are... networks, it is often called a subnet), you can try manually entering an address after selecting your printer/print server from the available list. During the Direct IP printing installation of printer software, the IP address is visible in the port name. You must manually enter an IP address ...

User's Guide
Page 46
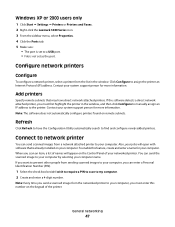
...name should be in a Windows environment 1 Prepare the computers to the printer. 2 Identify the printer. b Install the printer software on page 46. b Right-click the Lexmark 5300 Series icon. a Click Start Œ Settings Œ Printers or Printers and Faxes. h Click Close on the Ports tab, and then click Apply....Sharing. On the computer that will print to share the printer. Note: The remote computer is the one that was specified in step 2 on all computers printing to a USB port. • File is selected on the Printer Ports dialog box. g Click OK. See the Windows ...
...name should be in a Windows environment 1 Prepare the computers to the printer. 2 Identify the printer. b Install the printer software on page 46. b Right-click the Lexmark 5300 Series icon. a Click Start Œ Settings Œ Printers or Printers and Faxes. h Click Close on the Ports tab, and then click Apply....Sharing. On the computer that will print to share the printer. Note: The remote computer is the one that was specified in step 2 on all computers printing to a USB port. • File is selected on the Printer Ports dialog box. g Click OK. See the Windows ...
User's Guide
Page 47
...scanned image from a network attached printer to your system support person for more information. Contact your computer. Add printers Specify remote subnets that is not set to a USB port. • File is already installed on the keypad of the printer. Contact your jobs will appear on... can send the scanned image to your computer by selecting your networked printer. General networking 47 Windows XP or 2000 users only 1 Click Start Œ Settings Œ Printers or Printers and Faxes. 2 Right-click the Lexmark 5300 Series icon. 3 From the sidebar menu, select Properties. 4 ...
...scanned image from a network attached printer to your system support person for more information. Contact your computer. Add printers Specify remote subnets that is not set to a USB port. • File is already installed on the keypad of the printer. Contact your jobs will appear on... can send the scanned image to your computer by selecting your networked printer. General networking 47 Windows XP or 2000 users only 1 Click Start Œ Settings Œ Printers or Printers and Faxes. 2 Right-click the Lexmark 5300 Series icon. 3 From the sidebar menu, select Properties. 4 ...
User's Guide
Page 88
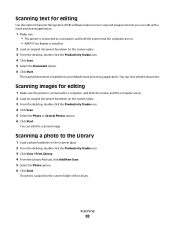
.... Scanning text for editing 1 Make sure the printer is connected to a computer, and both the printer and the computer are on. • ABBYY Fine Reader is installed. 2 Load an original document facedown on the scanner glass. 3 From the desktop, double-click the... Productivity Studio icon. 4 Click Scan. 5 Select the Document option. 6 Click Start. Scanning a photo to the Library 1 Load a photo facedown on the scanner...
.... Scanning text for editing 1 Make sure the printer is connected to a computer, and both the printer and the computer are on. • ABBYY Fine Reader is installed. 2 Load an original document facedown on the scanner glass. 3 From the desktop, double-click the... Productivity Studio icon. 4 Click Scan. 5 Select the Document option. 6 Click Start. Scanning a photo to the Library 1 Load a photo facedown on the scanner...
User's Guide
Page 113
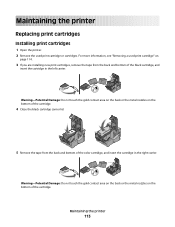
..., remove the tape from the back and bottom of the color cartridge, and insert the cartridge in the left carrier. For more information, see "Removing a used print cartridge or cartridges. Maintaining the printer 113 Maintaining the printer Replacing print cartridges Installing print cartridges 1 Open the printer. 2 Remove the used print cartridge" on the bottom of...
..., remove the tape from the back and bottom of the color cartridge, and insert the cartridge in the left carrier. For more information, see "Removing a used print cartridge or cartridges. Maintaining the printer 113 Maintaining the printer Replacing print cartridges Installing print cartridges 1 Open the printer. 2 Remove the used print cartridge" on the bottom of...

User's Guide
Page 189
...printer does not feed paper, envelopes, or specialty media 149 junk faxes, blocking 108 L labels, loading 49 language changing 121 last page first 56 left cartridge error 166 left cartridge incorrect 166 left cartridge missing 166 Lexmark Productivity Studio creating and viewing slideshow 81 Library scanning a photo... from scanned images 74 N network adapters using 45 network printer installing 45 network printers configuring 47 network scanning 92 newspapers, loading on the scanner glass 52 no images selected error 167 no photo/paper size error 167 no proof sheet information error 167 no...
...printer does not feed paper, envelopes, or specialty media 149 junk faxes, blocking 108 L labels, loading 49 language changing 121 last page first 56 left cartridge error 166 left cartridge incorrect 166 left cartridge missing 166 Lexmark Productivity Studio creating and viewing slideshow 81 Library scanning a photo... from scanned images 74 N network adapters using 45 network printer installing 45 network printers configuring 47 network scanning 92 newspapers, loading on the scanner glass 52 no images selected error 167 no photo/paper size error 167 no proof sheet information error 167 no...


