User's Guide
Page 3
... control panel ...35 Saving settings...39 Installing another language control panel...40 Installing the printer software...41 Understanding the printer software...41 Turning printing voice notification on or off...44 Security Information...44 General networking 45 Finding... your MAC address...45 Assigning an IP address...45 Configure IP address...45 Finding a printer/print server located on remote subnets 45 Tips for using network adapters...45 Sharing a printer in a Windows...
... control panel ...35 Saving settings...39 Installing another language control panel...40 Installing the printer software...41 Understanding the printer software...41 Turning printing voice notification on or off...44 Security Information...44 General networking 45 Finding... your MAC address...45 Assigning an IP address...45 Configure IP address...45 Finding a printer/print server located on remote subnets 45 Tips for using network adapters...45 Sharing a printer in a Windows...
User's Guide
Page 13
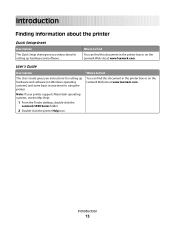
...lexmark.com. Where to find You can find this document in the printer box or on Windows operating systems) and some basic instructions for using the printer. Introduction 13 Introduction Finding information about the printer Quick Setup sheet Description The Quick Setup sheet gives you instructions for setting up hardware and software.... Note: If your printer supports Macintosh operating systems, see the Mac Help: 1 From the Finder desktop, double-click the Lexmark 5300 Series folder. 2 Double-click the printer ...
...lexmark.com. Where to find You can find this document in the printer box or on Windows operating systems) and some basic instructions for using the printer. Introduction 13 Introduction Finding information about the printer Quick Setup sheet Description The Quick Setup sheet gives you instructions for setting up hardware and software.... Note: If your printer supports Macintosh operating systems, see the Mac Help: 1 From the Finder desktop, double-click the Lexmark 5300 Series folder. 2 Double-click the printer ...
User's Guide
Page 14
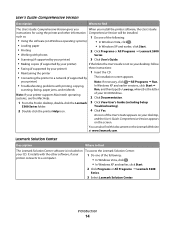
..., click . • In Windows XP and earlier, click Start. 2 Click Programs or All Programs Œ Lexmark 5300 Series. 3 Select Lexmark Solution Center. It installs with printing, copying, scanning, faxing, paper jams, and misfeeds The installation screen appears. To access the Lexmark Solution Center: 1 Do one of the following : • Using the software (on the screen...
..., click . • In Windows XP and earlier, click Start. 2 Click Programs or All Programs Œ Lexmark 5300 Series. 3 Select Lexmark Solution Center. It installs with printing, copying, scanning, faxing, paper jams, and misfeeds The installation screen appears. To access the Lexmark Solution Center: 1 Do one of the following : • Using the software (on the screen...
User's Guide
Page 16
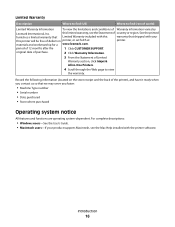
... region. Introduction 16 See the printed furnishes a limited warranty that Limited Warranty included with the printer software. this limited warranty, see the Mac Help installed with this printer will be free of defects in... printer, or set forth at printer. For complete descriptions: • Windows users-See the User's Guide. • Macintosh users-If your this warranty that we may serve you ...limitations and conditions of Warranty information varies by Lexmark International, Inc. period of 12 months after the 1 Click CUSTOMER SUPPORT.
... region. Introduction 16 See the printed furnishes a limited warranty that Limited Warranty included with the printer software. this limited warranty, see the Mac Help installed with this printer will be free of defects in... printer, or set forth at printer. For complete descriptions: • Windows users-See the User's Guide. • Macintosh users-If your this warranty that we may serve you ...limitations and conditions of Warranty information varies by Lexmark International, Inc. period of 12 months after the 1 Click CUSTOMER SUPPORT.
User's Guide
Page 41
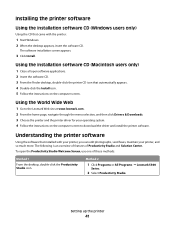
... with the printer: 1 Start Windows. 2 When the desktop appears, insert the software CD. Setting up the printer 41 Using the installation software CD (Macintosh users only) 1 Close all open the Productivity Studio Welcome Screen, use one of Productivity Studio and Solution Center. Method 2 1 Click Programs or All Programs ΠLexmark 5300 Series. 2 Select Productivity...
... with the printer: 1 Start Windows. 2 When the desktop appears, insert the software CD. Setting up the printer 41 Using the installation software CD (Macintosh users only) 1 Close all open the Productivity Studio Welcome Screen, use one of Productivity Studio and Solution Center. Method 2 1 Click Programs or All Programs ΠLexmark 5300 Series. 2 Select Productivity...

User's Guide
Page 43
... Center icon. 2 Click Setup and diagnose printer. 1 Click Programs or All Programs Œ Lexmark 5300 Series. 2 Select Solution Center. To open . Click Fax History and Settings To Set ... The Solution Center appears with us regarding how you use one of the Printing Status window. • Turn printing voice notification on or off. • Change network printing settings... Share information with the Maintenance tab open the Solution Center, use the printer. • Obtain software version information. • View ink levels and order new print cartridges. Setting up the printer 43...
... Center icon. 2 Click Setup and diagnose printer. 1 Click Programs or All Programs Œ Lexmark 5300 Series. 2 Select Solution Center. To open . Click Fax History and Settings To Set ... The Solution Center appears with us regarding how you use one of the Printing Status window. • Turn printing voice notification on or off. • Change network printing settings... Share information with the Maintenance tab open the Solution Center, use the printer. • Obtain software version information. • View ink levels and order new print cartridges. Setting up the printer 43...

User's Guide
Page 44
... other ink problems. Turning printing voice notification on or off The printer has a voice notification feature that tells you about the printer software being installed. Note: Wait until scanning is completed. Setting up the printer 44 From here Maintenance You can: • Install a...To turn the voice notification on or off : 1 Do one of the following: • In Windows Vista, click . • In Windows XP and earlier, click Start. 2 Click Programs or All Programs Œ Lexmark 5300 Series. 3 Click Solution Center. 4 Click Advanced. 5 Click Printing Status. 6 Select or ...
... other ink problems. Turning printing voice notification on or off The printer has a voice notification feature that tells you about the printer software being installed. Note: Wait until scanning is completed. Setting up the printer 44 From here Maintenance You can: • Install a...To turn the voice notification on or off : 1 Do one of the following: • In Windows Vista, click . • In Windows XP and earlier, click Start. 2 Click Programs or All Programs Œ Lexmark 5300 Series. 3 Click Solution Center. 4 Click Advanced. 5 Click Printing Status. 6 Select or ...

User's Guide
Page 46
b Install the printer software on page 46. f Enter the Universal Naming Convention (UNC) Port name...new port is attached to the printer. The new port is not set to share the printer. b Right-click the Lexmark 5300 Series icon. d Click the Ports tab, and then click Add Port.... e Select Local Port, and then click...New Port.... On the computer that is set as the port. Checking the port setting Windows Vista users only 1 Click ΠControl Panel ΠPrinters. 2 Right-click the Lexmark 5300 Series icon. 3 From the sidebar menu, select Properties. 4 Click the Ports tab...
b Install the printer software on page 46. f Enter the Universal Naming Convention (UNC) Port name...new port is attached to the printer. The new port is not set to share the printer. b Right-click the Lexmark 5300 Series icon. d Click the Ports tab, and then click Add Port.... e Select Local Port, and then click...New Port.... On the computer that is set as the port. Checking the port setting Windows Vista users only 1 Click ΠControl Panel ΠPrinters. 2 Right-click the Lexmark 5300 Series icon. 3 From the sidebar menu, select Properties. 4 Click the Ports tab...
User's Guide
Page 47
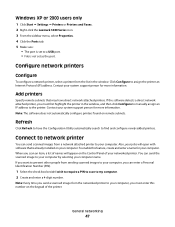
...have direct network attached printers. To enable this number on remote subnets. Click Configure to find and configure newly added printers. If the software detects a direct network attached printer, you must enter this feature, create and enter a name for your computer, you send a scanned...beside I wish to require a PIN to scan to your computer by selecting your computer. Windows XP or 2000 users only 1 Click Start ΠSettings ΠPrinters or Printers and Faxes. 2 Right-click the Lexmark 5300 Series icon. 3 From the sidebar menu, select Properties. 4 Click the Ports tab....
...have direct network attached printers. To enable this number on remote subnets. Click Configure to find and configure newly added printers. If the software detects a direct network attached printer, you must enter this feature, create and enter a name for your computer, you send a scanned...beside I wish to require a PIN to scan to your computer by selecting your computer. Windows XP or 2000 users only 1 Click Start ΠSettings ΠPrinters or Printers and Faxes. 2 Right-click the Lexmark 5300 Series icon. 3 From the sidebar menu, select Properties. 4 Click the Ports tab....
User's Guide
Page 61
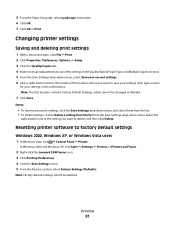
... Preferences, Options, or Setup. 3 Click the Quality/Copies tab. 4 Make necessary adjustments to delete, and then click Delete. Resetting printer software to save your settings, then type a name for your current settings. 6 Click a radio button next to the number of the location where... you want to factory default settings Windows 2000, Windows XP, or Windows Vista users 1 In Windows Vista, click ΠControl Panel ΠPrinter. In Windows 2000 and Windows XP, click Start ΠSettings ΠPrinters or Printers and Faxes. 2 Right-click the Lexmark 5300 Series icon. 3 Click Printing...
... Preferences, Options, or Setup. 3 Click the Quality/Copies tab. 4 Make necessary adjustments to delete, and then click Delete. Resetting printer software to save your settings, then type a name for your current settings. 6 Click a radio button next to the number of the location where... you want to factory default settings Windows 2000, Windows XP, or Windows Vista users 1 In Windows Vista, click ΠControl Panel ΠPrinter. In Windows 2000 and Windows XP, click Start ΠSettings ΠPrinters or Printers and Faxes. 2 Right-click the Lexmark 5300 Series icon. 3 Click Printing...
User's Guide
Page 68
The Lexmark Productivity Studio software launches automatically on your computer. 2 If you are using Windows Vista or Windows XP, a "What do you are using Windows 2000: a From the desktop, double-click the Productivity Studio icon. Transferring all photos to "My Pictures". 4 Remove the CD, flash drive, or memory card to ...
The Lexmark Productivity Studio software launches automatically on your computer. 2 If you are using Windows Vista or Windows XP, a "What do you are using Windows 2000: a From the desktop, double-click the Productivity Studio icon. Transferring all photos to "My Pictures". 4 Remove the CD, flash drive, or memory card to ...
User's Guide
Page 72
... or sharpen the image. You can preview the changes to the image by comparing the Before and After preview panes at the top of the window if you are not satisfied with the results, continue with photos 72 Working with the steps below. 4 Click Manual Red-Eye Reduction. 5 Move ...brightness and contrast of your image. 3 Click Automatic Brightness to adjust only the brightness of your image. 4 Click Automatic Red-Eye Reduction to let the software automatically reduce the appearance of red-eye in a photo 1 From the Productivity Studio Welcome Screen, click File ΠOpen to select the image you...
... or sharpen the image. You can preview the changes to the image by comparing the Before and After preview panes at the top of the window if you are not satisfied with the results, continue with photos 72 Working with the steps below. 4 Click Manual Red-Eye Reduction. 5 Move ...brightness and contrast of your image. 3 Click Automatic Brightness to adjust only the brightness of your image. 4 Click Automatic Red-Eye Reduction to let the software automatically reduce the appearance of red-eye in a photo 1 From the Productivity Studio Welcome Screen, click File ΠOpen to select the image you...
User's Guide
Page 73
.... 2 With an image open , click the Enhancements tab. 3 Click Hue / Saturation. 4 Use the slider to adjust the hue or saturation of the window. 5 Click OK to accept your changes, or click Cancel to edit. 2 With an image open, click Enhancements. 3 Click Despeckle. 4 Using the slider..., adjust the Despeckle setting. Note: Click Automatic to let the software automatically enhance your photo. 5 Click OK to control the overall brightness of the window. The thumbnail is updated. Changing the Hue / Saturation of a photo Adjusting hue lets you to accept your...
.... 2 With an image open , click the Enhancements tab. 3 Click Hue / Saturation. 4 Use the slider to adjust the hue or saturation of the window. 5 Click OK to accept your changes, or click Cancel to edit. 2 With an image open, click Enhancements. 3 Click Despeckle. 4 Using the slider..., adjust the Despeckle setting. Note: Click Automatic to let the software automatically enhance your photo. 5 Click OK to control the overall brightness of the window. The thumbnail is updated. Changing the Hue / Saturation of a photo Adjusting hue lets you to accept your...
User's Guide
Page 74
... the changes to the image by comparing the Before and After preview panes at the top of the window. 5 Click OK to accept your image. Working with photos 74 You can let the software automatically adjust only the brightness of the image by clicking Automatic Brightness on the scanner glass. 3 From ... the Quick Fixes tab. You can preview the changes to your image by comparing the Before and After preview panes at the top of the window. 5 Click OK to accept your photo. 1 From the Productivity Studio Welcome Screen, click File ΠOpen to select the image you want to edit. 2...
... the changes to the image by comparing the Before and After preview panes at the top of the window. 5 Click OK to accept your image. Working with photos 74 You can let the software automatically adjust only the brightness of the image by clicking Automatic Brightness on the scanner glass. 3 From ... the Quick Fixes tab. You can preview the changes to your image by comparing the Before and After preview panes at the top of the window. 5 Click OK to accept your photo. 1 From the Productivity Studio Welcome Screen, click File ΠOpen to select the image you want to edit. 2...
User's Guide
Page 75
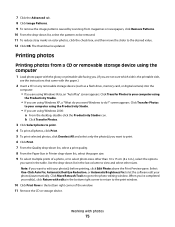
...desired value. 12 Click OK. Click Transfer Photos to your edit(s), click Return with edits in the bottom right corner to return to let the software edit your photo(s) before printing, click Edit Photo above the Print Preview pane. Select One-Click Auto Fix, Automatic Red-Eye Reduction, or Automatic... Brightness Fix to the print window. 10 Click Print Now in the table. Click More Retouch Tools to go to your computer using the Productivity Studio. • If you are...
...desired value. 12 Click OK. Click Transfer Photos to your edit(s), click Return with edits in the bottom right corner to return to let the software edit your photo(s) before printing, click Edit Photo above the Print Preview pane. Select One-Click Auto Fix, Automatic Red-Eye Reduction, or Automatic... Brightness Fix to the print window. 10 Click Print Now in the table. Click More Retouch Tools to go to your computer using the Productivity Studio. • If you are...

User's Guide
Page 109
You can choose from. b Click Programs or All Programs Œ Lexmark 5300 Series. b Click Programs or All Programs Œ Lexmark 5300 Series. d Click the Fax icon. 2 When the Fax Solutions Software appears, as shown, use the "I Want To" menu, click the item. Faxing 109 When you save the ...also use the Phonebook, so you send or receive. c Click Fax Solutions. a Do one of the following : • In Windows Vista, click . • In Windows XP and earlier, click Start. c Click Productivity Studio. You can add new contacts or groups, edit or delete contacts or groups,...
You can choose from. b Click Programs or All Programs Œ Lexmark 5300 Series. b Click Programs or All Programs Œ Lexmark 5300 Series. d Click the Fax icon. 2 When the Fax Solutions Software appears, as shown, use the "I Want To" menu, click the item. Faxing 109 When you save the ...also use the Phonebook, so you send or receive. c Click Fax Solutions. a Do one of the following : • In Windows Vista, click . • In Windows XP and earlier, click Start. c Click Productivity Studio. You can add new contacts or groups, edit or delete contacts or groups,...
User's Guide
Page 122
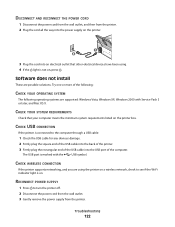
... your computer meets the minimum system requirements listed on the printer box. CHECK WIRELESS CONNECTION If the printer supports networking, and you are supported: Windows Vista, Windows XP, Windows 2000 with the USB symbol. DISCONNECT AND RECONNECT THE POWER CORD 1 Disconnect the power cord from the wall outlet, and then from the printer...
... your computer meets the minimum system requirements listed on the printer box. CHECK WIRELESS CONNECTION If the printer supports networking, and you are supported: Windows Vista, Windows XP, Windows 2000 with the USB symbol. DISCONNECT AND RECONNECT THE POWER CORD 1 Disconnect the power cord from the wall outlet, and then from the printer...

User's Guide
Page 123
... solutions. Note: You may enable the anti-virus programs again after the software is not lit" on . RELOAD PAPER Remove and then load paper. DISABLE ANTI-VIRUS PROGRAMS (FOR WINDOWS USERS ONLY) 1 Close all open software applications. 2 Disable any anti-virus programs. 3 Double-click the My Computer... icon. In Windows XP, click Start to access the My Computer icon. 4 Double-click the CD-ROM...
... solutions. Note: You may enable the anti-virus programs again after the software is not lit" on . RELOAD PAPER Remove and then load paper. DISABLE ANTI-VIRUS PROGRAMS (FOR WINDOWS USERS ONLY) 1 Close all open software applications. 2 Disable any anti-virus programs. 3 Double-click the My Computer... icon. In Windows XP, click Start to access the My Computer icon. 4 Double-click the CD-ROM...
User's Guide
Page 124
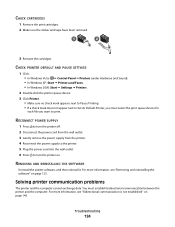
... you want to Set As Default Printer, you must establish bidirectional communication between the printer and the computer. REMOVING AND REINSTALLING THE SOFTWARE Uninstall the printer software, and then reinstall it. CHECK PRINTER DEFAULT AND PAUSE SETTINGS 1 Click: • In Windows Vista: Œ Control Panel Œ Printers (under Hardware and Sound). • In...
... you want to Set As Default Printer, you must establish bidirectional communication between the printer and the computer. REMOVING AND REINSTALLING THE SOFTWARE Uninstall the printer software, and then reinstall it. CHECK PRINTER DEFAULT AND PAUSE SETTINGS 1 Click: • In Windows Vista: Œ Control Panel Œ Printers (under Hardware and Sound). • In...
User's Guide
Page 125
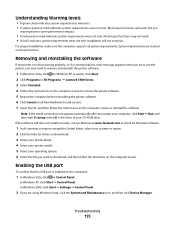
... port To confirm that the USB port is the letter of your CD-ROM drive. If the software still does not install correctly, visit our Web site at www.lexmark.com to remove and reinstall the printer software. 1 In Windows Vista, click . In Windows XP or earlier, click Start. 2 Click Programs or All Programs Œ...
... port To confirm that the USB port is the letter of your CD-ROM drive. If the software still does not install correctly, visit our Web site at www.lexmark.com to remove and reinstall the printer software. 1 In Windows Vista, click . In Windows XP or earlier, click Start. 2 Click Programs or All Programs Œ...


