
User's Guide
Page 2
...misused, a risk of fire or electrical shock results. SAVE THESE INSTRUCTIONS. The safety features of some parts may not always be obvious. Lexmark is designed, tested, and approved to abrasion or stress. Refer service or repairs, other replacement parts. Remove the power cord from the ... a lightning storm. Do not subject the power cord to meet strict global safety standards with this product or make any electrical or cabling connections, such as furniture and walls. If the power cord is near the product and easily accessible. This product is not responsible...
...misused, a risk of fire or electrical shock results. SAVE THESE INSTRUCTIONS. The safety features of some parts may not always be obvious. Lexmark is designed, tested, and approved to abrasion or stress. Refer service or repairs, other replacement parts. Remove the power cord from the ... a lightning storm. Do not subject the power cord to meet strict global safety standards with this product or make any electrical or cabling connections, such as furniture and walls. If the power cord is near the product and easily accessible. This product is not responsible...

User's Guide
Page 8
... listed as the status...139 Printing a test page...139 Test page does not print ...140 Checking external devices...141 Removing an external print server ...141 Cable is not connected, is loose, or is damaged...141 Printer is plugged in but does not print ...142 Printer is trying to print to File...
... listed as the status...139 Printing a test page...139 Test page does not print ...140 Checking external devices...141 Removing an external print server ...141 Cable is not connected, is loose, or is damaged...141 Printer is plugged in but does not print ...142 Printer is trying to print to File...

User's Guide
Page 17
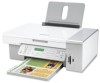
... printer 2 Color print cartridge Note: Cartridge combinations vary depending on the installation software CD. Setting up the printer Your printer may need to purchase a USB cable separately.
... printer 2 Color print cartridge Note: Cartridge combinations vary depending on the installation software CD. Setting up the printer Your printer may need to purchase a USB cable separately.
User's Guide
Page 18
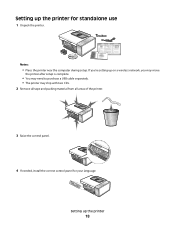
If you may move the printer after setup is complete. • You may need to purchase a USB cable separately. • The printer may ship with two CDs. 2 Remove all tape and packing material from all areas of the printer. 3 Raise the control panel. 4 If needed, install the correct control panel for standalone use 1 Unpack the printer. Setting up on a wireless network, you 're setting up the printer for your language. Setting up the printer 18 Notes: • Place the printer near the computer during setup.
If you may move the printer after setup is complete. • You may need to purchase a USB cable separately. • The printer may ship with two CDs. 2 Remove all tape and packing material from all areas of the printer. 3 Raise the control panel. 4 If needed, install the correct control panel for standalone use 1 Unpack the printer. Setting up on a wireless network, you 're setting up the printer for your language. Setting up the printer 18 Notes: • Place the printer near the computer during setup.
User's Guide
Page 24
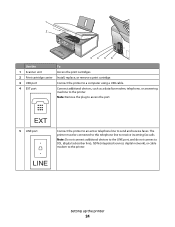
... Do not connect additional devices to the LINE port, and do not connect a DSL (digital subscriber line), ISDN (integrated services digital network), or cable modem to access the port. Note: Remove the plug to the printer. 1 2 34 5 6 Use the To 1 Scanner unit Access the print... cartridges. 2 Print cartridge carrier Install, replace, or remove a print cartridge. 3 USB port Connect the printer to a computer using a USB cable. 4 EXT port Connect additional devices, such as a data/fax modem, telephone, or answering machine to send and receive faxes. EXT 5 LINE port Connect...
... Do not connect additional devices to the LINE port, and do not connect a DSL (digital subscriber line), ISDN (integrated services digital network), or cable modem to access the port. Note: Remove the plug to the printer. 1 2 34 5 6 Use the To 1 Scanner unit Access the print... cartridges. 2 Print cartridge carrier Install, replace, or remove a print cartridge. 3 USB port Connect the printer to a computer using a USB cable. 4 EXT port Connect additional devices, such as a data/fax modem, telephone, or answering machine to send and receive faxes. EXT 5 LINE port Connect...

User's Guide
Page 25
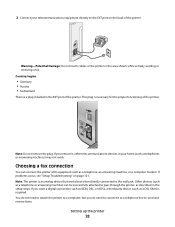
... on , press . Use the To 6 Power supply with the printer. 1 Connect one end of the printer. Setting up this product or make any electrical or cabling connections, such as the power supply cord or telephone, during a lightning storm. Using an RJ11 adapter Country/region • United Kingdom • Ireland • Finland...
... on , press . Use the To 6 Power supply with the printer. 1 Connect one end of the printer. Setting up this product or make any electrical or cabling connections, such as the power supply cord or telephone, during a lightning storm. Using an RJ11 adapter Country/region • United Kingdom • Ireland • Finland...

User's Guide
Page 27
or region-specific equipment that you connect to the printer: 1 Remove the plug from the back of the printer. Warning-Potential Damage: Do not touch cables or the printer in the area shown while actively sending or receiving a fax. Setting up the printer 27 2 Connect your telecommunications equipment directly to the ...
or region-specific equipment that you connect to the printer: 1 Remove the plug from the back of the printer. Warning-Potential Damage: Do not touch cables or the printer in the area shown while actively sending or receiving a fax. Setting up the printer 27 2 Connect your telecommunications equipment directly to the ...
User's Guide
Page 28
... in the EXT port of the printer. Choosing a fax connection You can be successfully attached to the wall jack. Warning-Potential Damage: Do not touch cables or the printer in your telecommunications equipment directly to the EXT port on page 121. Note: Do not remove the plug. You do not need...
... in the EXT port of the printer. Choosing a fax connection You can be successfully attached to the wall jack. Warning-Potential Damage: Do not touch cables or the printer in your telecommunications equipment directly to the EXT port on page 121. Note: Do not remove the plug. You do not need...

User's Guide
Page 63
... transmitting data. Also, do not remove the memory card while actively printing, reading, or writing from the memory card. Warning-Potential Damage: Do not touch cables, any network adapter, the memory card, or the printer in the area shown while actively printing, reading, or writing from it into the slot. 12...
... transmitting data. Also, do not remove the memory card while actively printing, reading, or writing from the memory card. Warning-Potential Damage: Do not touch cables, any network adapter, the memory card, or the printer in the area shown while actively printing, reading, or writing from it into the slot. 12...

User's Guide
Page 64
... into the port. 2 If your flash drive has a light, it . Note: The printer recognizes one memory card at a time. Warning-Potential Damage: Do not remove cables or media devices, or touch the printer in the area shown while the light is blinking. 3 When reading of images is being read the memory...
... into the port. 2 If your flash drive has a light, it . Note: The printer recognizes one memory card at a time. Warning-Potential Damage: Do not remove cables or media devices, or touch the printer in the area shown while the light is blinking. 3 When reading of images is being read the memory...
User's Guide
Page 66
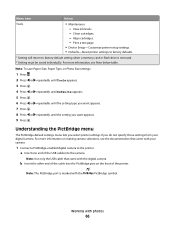
Align cartridges. - b Insert the other end of the cable into the camera. Note: Use only the USB cable that came with your digital camera. Working with the PictBridge symbol. Clean cartridges. - For more information, see the documentation that came with... removed. 2 Setting must be saved individually. Menu item Action Tools • Maintenance - For more information on the front of the USB cable into the PictBridge port on making camera selections, see Note below table. Understanding the PictBridge menu The PictBridge default settings menu lets you select printer...
Align cartridges. - b Insert the other end of the cable into the camera. Note: Use only the USB cable that came with your digital camera. Working with the PictBridge symbol. Clean cartridges. - For more information, see the documentation that came with... removed. 2 Setting must be saved individually. Menu item Action Tools • Maintenance - For more information on the front of the USB cable into the PictBridge port on making camera selections, see Note below table. Understanding the PictBridge menu The PictBridge default settings menu lets you select printer...

User's Guide
Page 69
... destination. 8 Press Start Color or Start Black. Working with the most recent month. • If the computer is complete. Warning-Potential Damage: Do not touch cables, any network adapter, the memory card or flash drive, or the printer in the Library. 4 Click Deselect All. 5 Click to select the photo(s) you want...
... destination. 8 Press Start Color or Start Black. Working with the most recent month. • If the computer is complete. Warning-Potential Damage: Do not touch cables, any network adapter, the memory card or flash drive, or the printer in the Library. 4 Click Deselect All. 5 Click to select the photo(s) you want...
User's Guide
Page 79
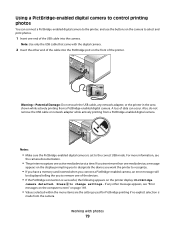
...Error messages on the computer screen" on the front of the USB cable into the camera. Press to the correct USB mode. Note: Use only the USB cable that came with photos 79 Also, do not remove the USB cable or network adapter while actively printing from a PictBridge-enabled digital camera.... Using a PictBridge-enabled digital camera to control printing photos You can occur. Warning-Potential Damage: Do not touch the USB cable, any other end of the cable into the PictBridge port on page 169. • Values selected within the menu items are the settings used for Pictbridge printing ...
...Error messages on the computer screen" on the front of the USB cable into the camera. Press to the correct USB mode. Note: Use only the USB cable that came with photos 79 Also, do not remove the USB cable or network adapter while actively printing from a PictBridge-enabled digital camera.... Using a PictBridge-enabled digital camera to control printing photos You can occur. Warning-Potential Damage: Do not touch the USB cable, any other end of the cable into the PictBridge port on page 169. • Values selected within the menu items are the settings used for Pictbridge printing ...
User's Guide
Page 96
... instructions on how to add Speed Dial or Group Dial numbers using the control panel, see "Setting up this product or make any electrical or cabling connections, such as part of the fax number. • Enter a maximum of 30 fax numbers have been entered. b Enter Speed Dial and/or Group Dial...
... instructions on how to add Speed Dial or Group Dial numbers using the control panel, see "Setting up this product or make any electrical or cabling connections, such as part of the fax number. • Enter a maximum of 30 fax numbers have been entered. b Enter Speed Dial and/or Group Dial...

User's Guide
Page 118
... electric shock, unplug the power cord from the wall outlet and disconnect all ink or corrective fluid on the scanner glass. Note: Make sure all cables to remove any ink residue that the printer is dry before placing the document on a document is turned off and unplugged from the paper support...
... electric shock, unplug the power cord from the wall outlet and disconnect all ink or corrective fluid on the scanner glass. Note: Make sure all cables to remove any ink residue that the printer is dry before placing the document on a document is turned off and unplugged from the paper support...

User's Guide
Page 119
... To order supplies or to locate a dealer near you, visit our Web site at www.lexmark.com. Item Part number USB cable 1021294 Paper Lexmark PerfectFinish Photo Paper Lexmark Premium Photo Paper Note: Availability may vary by continuous printing. Ordering supplies Ordering print cartridges... Lexmark 5300 Series models Item Part number Average cartridge standard page yield is up to1...
... To order supplies or to locate a dealer near you, visit our Web site at www.lexmark.com. Item Part number USB cable 1021294 Paper Lexmark PerfectFinish Photo Paper Lexmark Premium Photo Paper Note: Availability may vary by continuous printing. Ordering supplies Ordering print cartridges... Lexmark 5300 Series models Item Part number Average cartridge standard page yield is up to1...
User's Guide
Page 122
... SYSTEM REQUIREMENTS Check that other electrical devices have been using the printer on a wireless network, check to the computer through a USB cable: 1 Check the USB cable for any obvious damage. 2 Firmly plug the square end of the USB cable into the back of the printer. 3 Firmly plug the rectangular end of the USB... cable into an electrical outlet that your computer meets the minimum system requirements listed on the printer. 3 Plug the cord into the USB port of the ...
... SYSTEM REQUIREMENTS Check that other electrical devices have been using the printer on a wireless network, check to the computer through a USB cable: 1 Check the USB cable for any obvious damage. 2 Firmly plug the square end of the USB cable into the back of the printer. 3 Firmly plug the rectangular end of the USB... cable into an electrical outlet that your computer meets the minimum system requirements listed on the printer. 3 Plug the cord into the USB port of the ...
User's Guide
Page 131
... is connected to the computer. Plug the long, flat end of the USB cable into this port. 2 Make sure that the smaller, more of the printer. 3 Check that the USB cable is not damaged and that the USB cable is properly installed in the same program. Try one or more square end of... the USB cable is on the bottom of the following : ARE YOU PRINTING PHOTOS OR DOCUMENTS WITH...
... is connected to the computer. Plug the long, flat end of the USB cable into this port. 2 Make sure that the smaller, more of the printer. 3 Check that the USB cable is not damaged and that the USB cable is properly installed in the same program. Try one or more square end of... the USB cable is on the bottom of the following : ARE YOU PRINTING PHOTOS OR DOCUMENTS WITH...
User's Guide
Page 138
... CORRECTLY IN THE PROGRAM? Use the program that the Default data type is low. Install a new cartridge. For more information, see "Cable is not connected, is loose, or is damaged." WAS THE DOCUMENT FORMATTED OR CREATED FOR THE PRINTER? Troubleshooting 138 DO THE PRINT CARTRIDGES... HAVE INK? 1 Click Programs or All Programs ΠLexmark 5300 Series. 2 Click Solution Center. If an exclamation point (!) appears on either of the Advanced tab, click Print Processor. 6 Verify that ...
... CORRECTLY IN THE PROGRAM? Use the program that the Default data type is low. Install a new cartridge. For more information, see "Cable is not connected, is loose, or is damaged." WAS THE DOCUMENT FORMATTED OR CREATED FOR THE PRINTER? Troubleshooting 138 DO THE PRINT CARTRIDGES... HAVE INK? 1 Click Programs or All Programs ΠLexmark 5300 Series. 2 Click Solution Center. If an exclamation point (!) appears on either of the Advanced tab, click Print Processor. 6 Verify that ...
User's Guide
Page 139
... that the USB cable is not damaged and that the light is on. Try printing a different image. The USB port on the back of the following: • In Windows Vista, click . • In Windows XP and earlier, click Start. 2 Click Programs or All Programs Œ Lexmark 5300 Series. 3... Click Solution Center. 4 From the Maintenance tab, click Print a test page. 5 Compare the printed page to the image displayed on the computer screen. IS THE PROBLEM WITH THE PROGRAM? IS THERE A PROBLEM WITH THE CONNECTIONS? 1 Check that the USB cable is connected ...
... that the USB cable is not damaged and that the light is on. Try printing a different image. The USB port on the back of the following: • In Windows Vista, click . • In Windows XP and earlier, click Start. 2 Click Programs or All Programs Œ Lexmark 5300 Series. 3... Click Solution Center. 4 From the Maintenance tab, click Print a test page. 5 Compare the printed page to the image displayed on the computer screen. IS THE PROBLEM WITH THE PROGRAM? IS THERE A PROBLEM WITH THE CONNECTIONS? 1 Check that the USB cable is connected ...

