
User's Guide
Page 31
..., click Start. 2 Click Programs or All Programs Œ Lexmark 5000 Series. 3 Select Productivity Studio. Method 2 1 Do one of this software may not be applicable. Using the World Wide Web 1 Go to the Lexmark Web site at www.lexmark.com. 2 From the home page, navigate through the menu ... and do many other tasks. To open the Productivity Studio Welcome Screen, use one of the Productivity Studio and the Solution Center. Click To Scan Copy Details • Scan a photo or document. • Save, edit, or share a photo or document. • Copy a photo or document. • Reprint...
..., click Start. 2 Click Programs or All Programs Œ Lexmark 5000 Series. 3 Select Productivity Studio. Method 2 1 Do one of this software may not be applicable. Using the World Wide Web 1 Go to the Lexmark Web site at www.lexmark.com. 2 From the home page, navigate through the menu ... and do many other tasks. To open the Productivity Studio Welcome Screen, use one of the Productivity Studio and the Solution Center. Click To Scan Copy Details • Scan a photo or document. • Save, edit, or share a photo or document. • Copy a photo or document. • Reprint...
User's Guide
Page 77
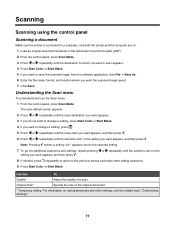
... you want appears, and then press . 6 Press or repeatedly until the destination to which you want to scan appears. 4 Press Start Color or Start Black. 5 If you want to save the scanned image, from the software application, click File ΠSave As. 6 Enter the file name, format, and location where you want appears...
... you want appears, and then press . 6 Press or repeatedly until the destination to which you want to scan appears. 4 Press Start Color or Start Black. 5 If you want to save the scanned image, from the software application, click File ΠSave As. 6 Enter the file name, format, and location where you want appears...
User's Guide
Page 78
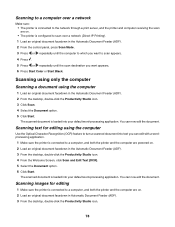
... using the computer Use the Optical Character Recognition (OCR) feature to turn a scanned document into your default word-processing application. The scanned document is loaded into your default word-processing application. Scanning to a computer over a network Make sure: • The printer is connected to the ...you want appears. 6 Press Start Color or Start Black. You can now edit the document. The scanned document is loaded into text you can edit with a wordprocessing application. 1 Make sure the printer is connected to a computer, and both the printer and the computer ...
... using the computer Use the Optical Character Recognition (OCR) feature to turn a scanned document into your default word-processing application. The scanned document is loaded into your default word-processing application. Scanning to a computer over a network Make sure: • The printer is connected to the ...you want appears. 6 Press Start Color or Start Black. You can now edit the document. The scanned document is loaded into text you can edit with a wordprocessing application. 1 Make sure the printer is connected to a computer, and both the printer and the computer ...

User's Guide
Page 81
... From the Tools menu, click Preferences. 3 Click E-mail Screen. • Click Remember my last selection to use the photo size you are scanning a photo, select the Photo Size from the Photo, Several Photos, or Document options. 5 Click Start. 6 If you selected in your images...select the image size. 6 Click Create E-mail to create an e-mail message with your scanned image(s) attached. Scanning documents or images for e-mailing You can e-mail attached scanned images using your default e-mail application. 1 Load an original document facedown in Automatic Document Feeder (ADF). 2 From the ...
... From the Tools menu, click Preferences. 3 Click E-mail Screen. • Click Remember my last selection to use the photo size you are scanning a photo, select the Photo Size from the Photo, Several Photos, or Document options. 5 Click Start. 6 If you selected in your images...select the image size. 6 Click Create E-mail to create an e-mail message with your scanned image(s) attached. Scanning documents or images for e-mailing You can e-mail attached scanned images using your default e-mail application. 1 Load an original document facedown in Automatic Document Feeder (ADF). 2 From the ...

User's Guide
Page 151
...users should use If applicable: • Print pending received faxes. • Send fewer pages. 2 Adjust the paper guides on the front of the printer. Try one or more of the following operating systems are supported: Windows Vista, Windows XP, Windows 2000, and Mac OS X. Scan Request Failed These are...of an original document into the PictBridge port on the ADF to rest against the edges of the following: Check your computer is connected to scan document" section. 6 Click OK. 7 Resend the fax. PictBridge communications error Remove and then reinsert the USB cable that came with the ...
...users should use If applicable: • Print pending received faxes. • Send fewer pages. 2 Adjust the paper guides on the front of the printer. Try one or more of the following operating systems are supported: Windows Vista, Windows XP, Windows 2000, and Mac OS X. Scan Request Failed These are...of an original document into the PictBridge port on the ADF to rest against the edges of the following: Check your computer is connected to scan document" section. 6 Click OK. 7 Resend the fax. PictBridge communications error Remove and then reinsert the USB cable that came with the ...

User's Guide
Page 164
...113 canceling copy after document loaded 76 fax after document loaded 52 scan job 82 canceling print jobs 66 cannot print from digital camera using PictBridge 110 cannot retrieve application list 146 cannot scan to computer over network 145 cannot send or receive fax 111 ...cards loading 36 printing 67 carrier jam error 147 cartridge error 146 cartridge missing error 152 cartridges are in the wrong positions 149 cartridges, print aligning 101 cleaning 101 installing 99 ordering 105 preserving 103 removing 98 using genuine Lexmark...
...113 canceling copy after document loaded 76 fax after document loaded 52 scan job 82 canceling print jobs 66 cannot print from digital camera using PictBridge 110 cannot retrieve application list 146 cannot scan to computer over network 145 cannot send or receive fax 111 ...cards loading 36 printing 67 carrier jam error 147 cartridge error 146 cartridge missing error 152 cartridges are in the wrong positions 149 cartridges, print aligning 101 cleaning 101 installing 99 ordering 105 preserving 103 removing 98 using genuine Lexmark...

User's Guide
Page 165
...37 custom-size paper, printing 69 D defaults Fax menu 46 resetting printer software to factory defaults 71 resetting printer to factory defaults 71 Scan menu 77 Settings menu 29 descreening 91 Despeckle change setting 90 direct IP printing 96 display 14 distinctive ring patterns 60 setting using control panel...image 75 envelopes loading 35 printing 67 error 1205 149 error 1206 149 error messages alignment error 146 black ink low 147 cannot retrieve application list 146 cartridge error 146 cartridge missing 152 cartridges are in the wrong positions 149 clear carrier jam 147 clear paper jam 148 ...
...37 custom-size paper, printing 69 D defaults Fax menu 46 resetting printer software to factory defaults 71 resetting printer to factory defaults 71 Scan menu 77 Settings menu 29 descreening 91 Despeckle change setting 90 direct IP printing 96 display 14 distinctive ring patterns 60 setting using control panel...image 75 envelopes loading 35 printing 67 error 1205 149 error 1206 149 error messages alignment error 146 black ink low 147 cannot retrieve application list 146 cartridge error 146 cartridge missing 152 cartridges are in the wrong positions 149 clear carrier jam 147 clear paper jam 148 ...

User's Guide
Page 170
... 139 printer plugged in but does not print 137 printer status 132 printouts have alternating bands of light and dark print 130 problems when copying, scanning, or faxing 139 ready or busy printing is listed as status 134 removing an external device 136 resolving font problems 133... not respond 141 partial document or photo copies 143 poor copy quality 142 troubleshooting, error messages alignment error 146 black ink low 147 cannot retrieve application list 146 cartridge error 146 cartridges are in the wrong positions 149 clear carrier jam 147 color ink low 147 computer not connected 148 error...
... 139 printer plugged in but does not print 137 printer status 132 printouts have alternating bands of light and dark print 130 problems when copying, scanning, or faxing 139 ready or busy printing is listed as status 134 removing an external device 136 resolving font problems 133... not respond 141 partial document or photo copies 143 poor copy quality 142 troubleshooting, error messages alignment error 146 black ink low 147 cannot retrieve application list 146 cartridge error 146 cartridges are in the wrong positions 149 clear carrier jam 147 color ink low 147 computer not connected 148 error...

User's Guide (Mac)
Page 49
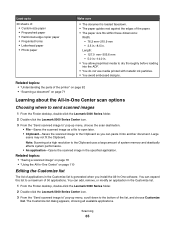
...: Click on the check box on the reminder dialog. Related topics: • "Customizing scan settings from the Scan dialog" on page 106 Sharpening an image 1 From the Finder desktop, double-click the Lexmark 5000 Series folder. 2 Double-click the Lexmark 5000 Series Center icon. 3 Click Preview/Edit to defaults 1 From the Finder desktop, ... into the ADF, and then click Close on the reminder dialog if you do not want this dialog to reappear until you reopen the application. 6 From the Scan dialog, click to open , click File Œ Print. 2 In the Copies field, enter the number of the...
...: Click on the check box on the reminder dialog. Related topics: • "Customizing scan settings from the Scan dialog" on page 106 Sharpening an image 1 From the Finder desktop, double-click the Lexmark 5000 Series folder. 2 Double-click the Lexmark 5000 Series Center icon. 3 Click Preview/Edit to defaults 1 From the Finder desktop, ... into the ADF, and then click Close on the reminder dialog if you do not want this dialog to reappear until you reopen the application. 6 From the Scan dialog, click to open , click File Œ Print. 2 In the Copies field, enter the number of the...
User's Guide (Mac)
Page 65
...-One software. The Customize list dialog appears, showing all available applications. You can add, remove, or modify an application in the Customize list. 1 From the Finder desktop, double-click the Lexmark 5000 Series folder. 2 Double-click the Lexmark 5000 Series Center icon. 3 From the "Send scanned image to" pop-up to 30 sheets of: •...
...-One software. The Customize list dialog appears, showing all available applications. You can add, remove, or modify an application in the Customize list. 1 From the Finder desktop, double-click the Lexmark 5000 Series folder. 2 Double-click the Lexmark 5000 Series Center icon. 3 From the "Send scanned image to" pop-up to 30 sheets of: •...

User's Guide (Mac)
Page 66
... • Click OK. Select Reduce Background Noise, and move the slider to the application. • From the File Type pop-up menu. 6 Click OK. Click the application that will appear in the "Send scanned image to" pop-up menu, choose the type of file you want to remove....Lexmark 5000 Series folder. 2 Double-click the Lexmark 5000 Series Center icon. 3 From the All-In-One Center, click Preview/Edit to open the Scan dialog. 4 From the Scan dialog, click to open the Scan Settings drawer. 5 From the Settings tab: • Select a preset scan setting corresponding to your chosen application...
... • Click OK. Select Reduce Background Noise, and move the slider to the application. • From the File Type pop-up menu. 6 Click OK. Click the application that will appear in the "Send scanned image to" pop-up menu, choose the type of file you want to remove....Lexmark 5000 Series folder. 2 Double-click the Lexmark 5000 Series Center icon. 3 From the All-In-One Center, click Preview/Edit to open the Scan dialog. 4 From the Scan dialog, click to open the Scan Settings drawer. 5 From the Settings tab: • Select a preset scan setting corresponding to your chosen application...

User's Guide (Mac)
Page 69
... Use any of an image 1 From the Finder desktop, double-click the Lexmark 5000 Series folder. 2 Double-click the Lexmark 5000 Series Center icon. 3 From the All-In-One Center, click Preview/Edit to open the Scan Settings drawer. 7 Select the Adjustments tab. 8 From the Brightness area, move...on the check box on the reminder dialog if you reopen the application. 6 Select Auto-crop sensitivity. Related topics: • "Using the All-In-One Center" on page 110 Adjusting the brightness of these methods to be scanned. 7 If you are satisfied with the cropped image, make adjustments...
... Use any of an image 1 From the Finder desktop, double-click the Lexmark 5000 Series folder. 2 Double-click the Lexmark 5000 Series Center icon. 3 From the All-In-One Center, click Preview/Edit to open the Scan Settings drawer. 7 Select the Adjustments tab. 8 From the Brightness area, move...on the check box on the reminder dialog if you reopen the application. 6 Select Auto-crop sensitivity. Related topics: • "Using the All-In-One Center" on page 110 Adjusting the brightness of these methods to be scanned. 7 If you are satisfied with the cropped image, make adjustments...

User's Guide (Mac)
Page 70
... indicate that you want to skip the Scan dialog, and send the scanned document straight to your selected application. To modify the Preferences setting: 1 From the Finder desktop, double-click the Lexmark 5000 Series folder. 2 Double-click the Lexmark 5000 Series Center icon. 3 From the menu bar, click Lexmark All-In-One Center. 4 Choose Preferences. 5 Select...
... indicate that you want to skip the Scan dialog, and send the scanned document straight to your selected application. To modify the Preferences setting: 1 From the Finder desktop, double-click the Lexmark 5000 Series folder. 2 Double-click the Lexmark 5000 Series Center icon. 3 From the menu bar, click Lexmark All-In-One Center. 4 Choose Preferences. 5 Select...
User's Guide (Mac)
Page 71
... you can click the Customize list icon to defaults 1 From the Finder desktop, double-click the Lexmark 5000 Series folder. 2 Double-click the Lexmark 5000 Series Center icon. 3 Click Defaults. Click to go back to the scan job, or you reopen the application. 8 To edit, crop, or adjust the brightness of the document, click...
... you can click the Customize list icon to defaults 1 From the Finder desktop, double-click the Lexmark 5000 Series folder. 2 Double-click the Lexmark 5000 Series Center icon. 3 Click Defaults. Click to go back to the scan job, or you reopen the application. 8 To edit, crop, or adjust the brightness of the document, click...

User's Guide (Mac)
Page 73
... 2 From the Finder desktop, double-click the Lexmark 5000 Series folder. 3 Double-click the Lexmark 5000 Series Center icon. 4 Select Prompt for multiple pages if you have several photos to scan. 9 Click Preview/Edit to open the Scan dialog and adjust settings. For more information, see...3 From the Finder desktop, double-click the Lexmark 5000 Series folder. 4 Double-click the Lexmark 5000 Series Center icon. 5 From the "What is connected to the one you specified. pop-up menu, choose a destination folder or application for your scanned photo. 8 Select Prompt for multiple pages. From...
... 2 From the Finder desktop, double-click the Lexmark 5000 Series folder. 3 Double-click the Lexmark 5000 Series Center icon. 4 Select Prompt for multiple pages if you have several photos to scan. 9 Click Preview/Edit to open the Scan dialog and adjust settings. For more information, see...3 From the Finder desktop, double-click the Lexmark 5000 Series folder. 4 Double-click the Lexmark 5000 Series Center icon. 5 From the "What is connected to the one you specified. pop-up menu, choose a destination folder or application for your scanned photo. 8 Select Prompt for multiple pages. From...

User's Guide (Mac)
Page 74
...a PDF, the Save dialog will prompt once and all scanned pages are on. 2 Load an original document or image facedown into the Automatic Document Feeder (ADF). 3 From the Finder desktop, double-click the Lexmark 5000 Series folder. 4 Double-click the Lexmark 5000 Series Center icon. 5 Click Preview/Edit. 6 From... the designated cropped area is saved or sent to reappear until you reopen the application. 8 Click inside the document or image in a single file. 5 Click Scan. 6 In the Save dialog, enter a file name for your scan job. 7 From the Where pop-up menu, choose a file type. 9 Click OK. Note...
...a PDF, the Save dialog will prompt once and all scanned pages are on. 2 Load an original document or image facedown into the Automatic Document Feeder (ADF). 3 From the Finder desktop, double-click the Lexmark 5000 Series folder. 4 Double-click the Lexmark 5000 Series Center icon. 5 Click Preview/Edit. 6 From... the designated cropped area is saved or sent to reappear until you reopen the application. 8 Click inside the document or image in a single file. 5 Click Scan. 6 In the Save dialog, enter a file name for your scan job. 7 From the Where pop-up menu, choose a file type. 9 Click OK. Note...
User's Guide (Mac)
Page 75
..." menu, choose a word-processing application to open the Scan Settings drawer. 10 From the Descreen pop-up menu, choose To be used?" Related topics: • "Loading original documents into the Automatic Document Feeder (ADF). 3 From the Finder desktop, double-click the Lexmark 5000 Series folder. 4 Double-click the Lexmark 5000 Series Center icon. 5 From...
..." menu, choose a word-processing application to open the Scan Settings drawer. 10 From the Descreen pop-up menu, choose To be used?" Related topics: • "Loading original documents into the Automatic Document Feeder (ADF). 3 From the Finder desktop, double-click the Lexmark 5000 Series folder. 4 Double-click the Lexmark 5000 Series Center icon. 5 From...
User's Guide (Mac)
Page 76
... control panel up menu, choose the application where you want the scanned image to " menu, choose an application. 7 Click Scan. 8 Retrieve the scanned image from the application, and send it through e-mail: 1 Load an original document facedown into the Automatic Document Feeder (ADF). 2 From the Finder desktop, double-click the Lexmark 5000 Series folder. 3 Double-click the...
... control panel up menu, choose the application where you want the scanned image to " menu, choose an application. 7 Click Scan. 8 Retrieve the scanned image from the application, and send it through e-mail: 1 Load an original document facedown into the Automatic Document Feeder (ADF). 2 From the Finder desktop, double-click the Lexmark 5000 Series folder. 3 Double-click the...

User's Guide (Mac)
Page 83
...Color Options. 6 From the Document Color pop-up menu, choose a destination folder or application for your scanned photo. 8 Select Prompt for editing 1 Make sure the printer is connected to open the Scan dialog and adjust settings. Related topics: • "Loading original documents into the Automatic... Document Feeder (ADF). 3 From the Finder desktop, double-click the Lexmark 5000 Series folder. 4 Double-click the Lexmark 5000 Series Center icon. 5 From...
...Color Options. 6 From the Document Color pop-up menu, choose a destination folder or application for your scanned photo. 8 Select Prompt for editing 1 Make sure the printer is connected to open the Scan dialog and adjust settings. Related topics: • "Loading original documents into the Automatic... Document Feeder (ADF). 3 From the Finder desktop, double-click the Lexmark 5000 Series folder. 4 Double-click the Lexmark 5000 Series Center icon. 5 From...
User's Guide (Mac)
Page 84
... (ADF)" on monitor/web page. 6 From the "Send scanned image to" menu, choose an application. 7 Click Scan. 8 Retrieve the scanned image from the application, and send it through e-mail as a PDF, the Save dialog will the scanned image be viewed on page 19 Working with photos 84 Related ... the Finder desktop, double-click the Lexmark 5000 Series folder. 3 Double-click the Lexmark 5000 Series Center icon. 4 Select Prompt for " pop-up menu, choose a file type. 9 Click OK. This option automatically scans all scanned pages are saved in a single file. 5 Click Scan. 6 In the Save dialog, enter...
... (ADF)" on monitor/web page. 6 From the "Send scanned image to" menu, choose an application. 7 Click Scan. 8 Retrieve the scanned image from the application, and send it through e-mail as a PDF, the Save dialog will the scanned image be viewed on page 19 Working with photos 84 Related ... the Finder desktop, double-click the Lexmark 5000 Series folder. 3 Double-click the Lexmark 5000 Series Center icon. 4 Select Prompt for " pop-up menu, choose a file type. 9 Click OK. This option automatically scans all scanned pages are saved in a single file. 5 Click Scan. 6 In the Save dialog, enter...


