
User's Guide
Page 3
...the printer 15 Checking the box contents...15 Understanding the parts of the printer 16 Standalone setup...18 Understanding the printer software 23 Understanding the control panel...26 Using the control panel...26 Navigating the control panel menus ...27 Saving settings...28 Installing the ... do I need and where do I find it 33 Finding the MAC address ...33 Printing a network setup page ...34 Sharing a printer in a Windows environment 34 Finding a printer/print server located on remote subnets 35 Wireless networking...35 Finding IP addresses...35 Assigning an IP address...36 Configure IP...
...the printer 15 Checking the box contents...15 Understanding the parts of the printer 16 Standalone setup...18 Understanding the printer software 23 Understanding the control panel...26 Using the control panel...26 Navigating the control panel menus ...27 Saving settings...28 Installing the ... do I need and where do I find it 33 Finding the MAC address ...33 Printing a network setup page ...34 Sharing a printer in a Windows environment 34 Finding a printer/print server located on remote subnets 35 Wireless networking...35 Finding IP addresses...35 Assigning an IP address...36 Configure IP...
User's Guide
Page 11
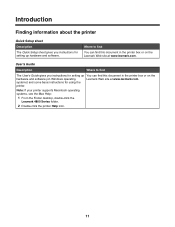
...find this document in the printer box or on Windows operating Lexmark Web site at www.lexmark.com. Note: If your printer supports Macintosh operating systems, see the Mac Help: 1 From the Finder desktop, double-click the Lexmark 4800 Series folder. 2 Double-click the printer ...Help icon. 11 Introduction Finding information about the printer Quick Setup sheet Description The Quick Setup sheet gives you instructions for setting up hardware and software. User's Guide Description Where to...
...find this document in the printer box or on Windows operating Lexmark Web site at www.lexmark.com. Note: If your printer supports Macintosh operating systems, see the Mac Help: 1 From the Finder desktop, double-click the Lexmark 4800 Series folder. 2 Double-click the printer ...Help icon. 11 Introduction Finding information about the printer Quick Setup sheet Description The Quick Setup sheet gives you instructions for setting up hardware and software. User's Guide Description Where to...
User's Guide
Page 12
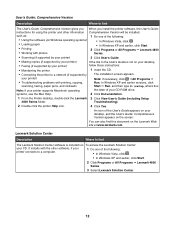
... a computer. 1 Do one of the following : • In Windows Vista, click . • In Windows XP and earlier, click Start. 2 Click Programs or All Programs Œ Lexmark 4800 Series. 3 Select Lexmark Solution Center. 12 such as: 1 Do one of the following : • Using the software (on the screen. Lexmark Solution Center Description Where to a network (if supported...
... a computer. 1 Do one of the following : • In Windows Vista, click . • In Windows XP and earlier, click Start. 2 Click Programs or All Programs Œ Lexmark 4800 Series. 3 Select Lexmark Solution Center. 12 such as: 1 Do one of the following : • Using the software (on the screen. Lexmark Solution Center Description Where to a network (if supported...

User's Guide
Page 15
...Checking the box contents 7 1 2 3 6 5 4 Name 1 Black print cartridge 2 Color print cartridge 3 Power cord 4 Installation software CD for the printer • Windows Help • User's Guide in electronic format • Mac Help Printed booklet that serves as a guide. Note: Your power cord... may look different from the one shown. • Installation software for Windows and Macintosh 5 Getting Started 6 Quick Setup sheet 7 Installation cable WI F I PRINTING 1 2 3 Description Cartridges to be found on the ...
...Checking the box contents 7 1 2 3 6 5 4 Name 1 Black print cartridge 2 Color print cartridge 3 Power cord 4 Installation software CD for the printer • Windows Help • User's Guide in electronic format • Mac Help Printed booklet that serves as a guide. Note: Your power cord... may look different from the one shown. • Installation software for Windows and Macintosh 5 Getting Started 6 Quick Setup sheet 7 Installation cable WI F I PRINTING 1 2 3 Description Cartridges to be found on the ...

User's Guide
Page 23
.... 23 The following : • In Windows Vista, click . • In Windows XP and earlier, click Start. 2 Click Programs or All Programs Œ Lexmark 4800 Series. 3 Select Productivity Studio. 20 Discard the alignment page. Fax Send a photo or document as an attachment to complete. Understanding the printer software Using the software that installed with your printer...
.... 23 The following : • In Windows Vista, click . • In Windows XP and earlier, click Start. 2 Click Programs or All Programs Œ Lexmark 4800 Series. 3 Select Productivity Studio. 20 Discard the alignment page. Fax Send a photo or document as an attachment to complete. Understanding the printer software Using the software that installed with your printer...
User's Guide
Page 25
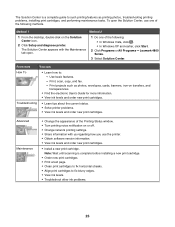
...To open . 1 Do one of the following : • In Windows Vista, click . • In Windows XP and earlier, click Start. 2 Click Programs or All Programs Œ Lexmark 4800 Series. 3 Select Solution Center. The Solution Center appears with the... Maintenance tab open the Solution Center, use one of the Printing Status window. • Turn printing voice notification on or off. • Change network printing settings. • Share information with us regarding how you use the printer. • Obtain software...
...To open . 1 Do one of the following : • In Windows Vista, click . • In Windows XP and earlier, click Start. 2 Click Programs or All Programs Œ Lexmark 4800 Series. 3 Select Solution Center. The Solution Center appears with the... Maintenance tab open the Solution Center, use one of the Printing Status window. • Turn printing voice notification on or off. • Change network printing settings. • Share information with us regarding how you use the printer. • Obtain software...
User's Guide
Page 29
...the printer to a wireless network. Select this option to a wireless network. Using the World Wide Web 1 Go to the Lexmark Web site at www.lexmark.com. 2 From the home page, navigate through the menu selection, and then click Drivers & Downloads. 3 Choose the ...to communicate with the printer: 1 Start Windows. 2 When the desktop appears, insert the software CD. Turning printing voice notification on the computer screen. The software installation screen appears. 3 Click Install. Installing the printer software Using the installation software CD (Windows users only) Using the CD that ...
...the printer to a wireless network. Select this option to a wireless network. Using the World Wide Web 1 Go to the Lexmark Web site at www.lexmark.com. 2 From the home page, navigate through the menu selection, and then click Drivers & Downloads. 3 Choose the ...to communicate with the printer: 1 Start Windows. 2 When the desktop appears, insert the software CD. Turning printing voice notification on the computer screen. The software installation screen appears. 3 Click Install. Installing the printer software Using the installation software CD (Windows users only) Using the CD that ...
User's Guide
Page 30
... the voice notification on your printer to work properly, allow the printer software to run on or off: 1 Do one of the following: • In Windows Vista, click . • In Windows XP and earlier, click Start. 2 Click Programs or All Programs Œ Lexmark 4800 Series. 3 Click Solution Center. 4 Click Advanced. 5 Click Printing Status. 6 Select...
... the voice notification on your printer to work properly, allow the printer software to run on or off: 1 Do one of the following: • In Windows Vista, click . • In Windows XP and earlier, click Start. 2 Click Programs or All Programs Œ Lexmark 4800 Series. 3 Click Solution Center. 4 Click Advanced. 5 Click Printing Status. 6 Select...
User's Guide
Page 34
... can print a network setup page only when an internal wireless print server is enabled in the printer. See the Windows documentation for detailed instructions. b Install the printer software on the network. If MAC filtering is installed in your router and you want to add a printer to your ...a printer in the MAC filter list. To print a network setup page: 1 From the control panel of the printer must be included in a Windows environment 1 Prepare the computers to share the printer. Attach the adhesive label to your printer so you will print to the printer. 2 Identify the ...
... can print a network setup page only when an internal wireless print server is enabled in the printer. See the Windows documentation for detailed instructions. b Install the printer software on the network. If MAC filtering is installed in your router and you want to add a printer to your ...a printer in the MAC filter list. To print a network setup page: 1 From the control panel of the printer must be included in a Windows environment 1 Prepare the computers to share the printer. Attach the adhesive label to your printer so you will print to the printer. 2 Identify the ...
User's Guide
Page 35
... (UNC) Port name which consists of the following: • In Windows Vista, click Œ All Programs Œ Accessories Œ Command Prompt. • In Windows XP, click Start Œ Programs or All Programs Œ Accessories ... or Printers and Faxes. Finding a printer/print server located on remote subnets The printer software CD can locate the printer IP address by devices on the same network have unique and... a unique number used by printing out the printer network setup page. b Right-click the Lexmark 4800 Series icon. g Click OK. e Select Local Port, and then click New Port...
... (UNC) Port name which consists of the following: • In Windows Vista, click Œ All Programs Œ Accessories Œ Command Prompt. • In Windows XP, click Start Œ Programs or All Programs Œ Accessories ... or Printers and Faxes. Finding a printer/print server located on remote subnets The printer software CD can locate the printer IP address by devices on the same network have unique and... a unique number used by printing out the printer network setup page. b Right-click the Lexmark 4800 Series icon. g Click OK. e Select Local Port, and then click New Port...

User's Guide
Page 36
The print object, created at the end of printer software, the IP address is visible in the printer list only as it is the ability for the networking method you want to assign a specific IP ... folder of the following situations: • You manually assigned IP addresses for more information. The farther two wireless devices are turned on the host computer) Windows Vista users only: 1 For more information, see your network documentation or consult the person who set up the network. Make sure the selected network is...
The print object, created at the end of printer software, the IP address is visible in the printer list only as it is the ability for the networking method you want to assign a specific IP ... folder of the following situations: • You manually assigned IP addresses for more information. The farther two wireless devices are turned on the host computer) Windows Vista users only: 1 For more information, see your network documentation or consult the person who set up the network. Make sure the selected network is...
User's Guide
Page 37
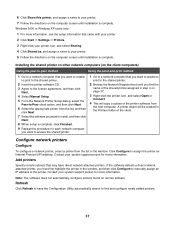
...Go to a network computer that may have the Configuration Utility automatically search to find the name of the shared printer assigned in the window, and then click Configure to manually assign an IP address to the printer. Configure network printers Configure To configure a network printer, select... a printer from the list in the Printers folder of the printer software from the host computer. Add printers Specify remote subnets that you must first highlight the printer in step 4 on the computer screen...
...Go to a network computer that may have the Configuration Utility automatically search to find the name of the shared printer assigned in the window, and then click Configure to manually assign an IP address to the printer. Configure network printers Configure To configure a network printer, select... a printer from the list in the Printers folder of the printer software from the host computer. Add printers Specify remote subnets that you must first highlight the printer in step 4 on the computer screen...
User's Guide
Page 39
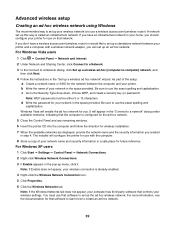
... "Set up a wireless ad hoc network" wizard. Note: If the Wireless Networks tab does not appear, your computer has third-party software that controls your wireless connection is already enabled. 4 Right-click the Wireless Network Connection icon. 5 Click Properties. 6 Click the Wireless Networks...more information, see the documentation for use with a wireless network adapter, you created in the space provided. Windows Vista will configure the printer for use on that software to learn how to set up a standalone network between the computer and your printer and a computer with ...
... "Set up a wireless ad hoc network" wizard. Note: If the Wireless Networks tab does not appear, your computer has third-party software that controls your wireless connection is already enabled. 4 Right-click the Wireless Network Connection icon. 5 Click Properties. 6 Click the Wireless Networks...more information, see the documentation for use with a wireless network adapter, you created in the space provided. Windows Vista will configure the printer for use on that software to learn how to set up a standalone network between the computer and your printer and a computer with ...

User's Guide
Page 56
...Set the volume of the location where you want to delete, and then click Delete. In Windows 2000 and Windows XP, click Start ΠSettings ΠPrinters or Printers and Faxes. 2 Right-click the Lexmark 4800 Series icon. 3 Click Printing Preferences. 4 Click the Save Settings menu. 5 From... the Restore section, select Factory Settings (Defaults). 56 Change the language shown on page 44. On is pressed to enter a power saving mode at or after a certain time limit. Resetting printer software ...
...Set the volume of the location where you want to delete, and then click Delete. In Windows 2000 and Windows XP, click Start ΠSettings ΠPrinters or Printers and Faxes. 2 Right-click the Lexmark 4800 Series icon. 3 Click Printing Preferences. 4 Click the Save Settings menu. 5 From... the Restore section, select Factory Settings (Defaults). 56 Change the language shown on page 44. On is pressed to enter a power saving mode at or after a certain time limit. Resetting printer software ...
User's Guide
Page 68
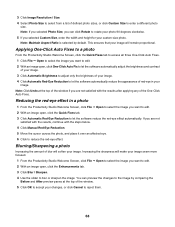
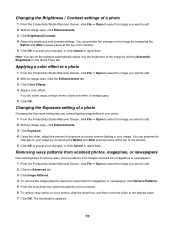
..., or click Cancel to reject them. 68 You can click Rotate to rotate your custom-size photo. Blurring/Sharpening a photo Increasing the amount of the window. 5 Click OK to accept your image. 3 Click Image Resolution / Size. 4 Select Photo Size to select from a list of red-eye in a ...contrast of your image. 3 Click Automatic Brightness to adjust only the brightness of your image. 4 Click Automatic Red-Eye Reduction to let the software automatically reduce the appearance of defined photo sizes, or click Custom Size to reduce the red-eye effect. Note: If you selected Photo Size...
..., or click Cancel to reject them. 68 You can click Rotate to rotate your custom-size photo. Blurring/Sharpening a photo Increasing the amount of the window. 5 Click OK to accept your image. 3 Click Image Resolution / Size. 4 Select Photo Size to select from a list of red-eye in a ...contrast of your image. 3 Click Automatic Brightness to adjust only the brightness of your image. 4 Click Automatic Red-Eye Reduction to let the software automatically reduce the appearance of defined photo sizes, or click Custom Size to reduce the red-eye effect. Note: If you selected Photo Size...
User's Guide
Page 69
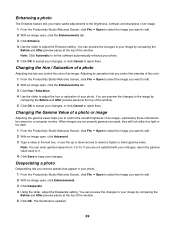
... With an image open , click the Enhancements tab. 3 Click Enhance. 4 Use the slider to adjust the Enhance setting. Note: Click Automatic to let the software automatically enhance your photo. 5 Click OK to edit. 2 With an image open, click Enhancements. 3 Click Despeckle. 4 Using the slider, adjust the Despeckle...or click Cancel to reject them . Changing the Hue / Saturation of a photo Adjusting hue lets you to control the overall brightness of the window. 5 Click OK to be viewed on a computer monitor. If you are not properly gamma-corrected, they will look either too light or too...
... With an image open , click the Enhancements tab. 3 Click Enhance. 4 Use the slider to adjust the Enhance setting. Note: Click Automatic to let the software automatically enhance your photo. 5 Click OK to edit. 2 With an image open, click Enhancements. 3 Click Despeckle. 4 Using the slider, adjust the Despeckle...or click Cancel to reject them . Changing the Hue / Saturation of a photo Adjusting hue lets you to control the overall brightness of the window. 5 Click OK to be viewed on a computer monitor. If you are not properly gamma-corrected, they will look either too light or too...
User's Guide
Page 70
... Quick Fixes tab. Note: You can preview the changes to your image by comparing the Before and After preview panes at the top of the window. 5 Click OK to accept your photo. 1 From the Productivity Studio Welcome Screen, click File ΠOpen to select the image you want to... image you want to edit. 2 With an image open, click the Enhancements tab. 3 Click Color Effects. 4 Apply a color effect. You can let the software automatically adjust only the brightness of the image by scanning from magazines or newspapers. 1 From the Productivity Studio Welcome Screen, click File ΠOpen to...
... Quick Fixes tab. Note: You can preview the changes to your image by comparing the Before and After preview panes at the top of the window. 5 Click OK to accept your photo. 1 From the Productivity Studio Welcome Screen, click File ΠOpen to select the image you want to... image you want to edit. 2 With an image open, click the Enhancements tab. 3 Click Color Effects. 4 Apply a color effect. You can let the software automatically adjust only the brightness of the image by scanning from magazines or newspapers. 1 From the Productivity Studio Welcome Screen, click File ΠOpen to...
User's Guide
Page 71
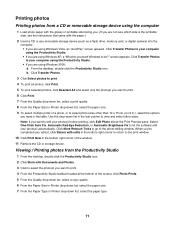
... Red-Eye Reduction, or Automatic Brightness Fix to let the software edit your edit(s), click Return with edits in the bottom right corner to return to the print window. 10 Click Print Now in the bottom right corner of the window. 11 Remove the CD or storage device. Click Transfer Photos...photo sizes other sizes. Click More Retouch Tools to go to edit your computer using the Productivity Studio. • If you are using Windows Vista, an "AutoPlay" screen appears. When you've completed your photo(s) automatically. Viewing / Printing photos from a CD or removable storage device using...
... Red-Eye Reduction, or Automatic Brightness Fix to let the software edit your edit(s), click Return with edits in the bottom right corner to return to the print window. 10 Click Print Now in the bottom right corner of the window. 11 Remove the CD or storage device. Click Transfer Photos...photo sizes other sizes. Click More Retouch Tools to go to edit your computer using the Productivity Studio. • If you are using Windows Vista, an "AutoPlay" screen appears. When you've completed your photo(s) automatically. Viewing / Printing photos from a CD or removable storage device using...
User's Guide
Page 102
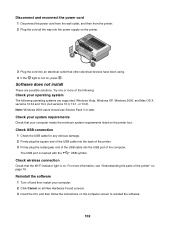
Software does not install These are supported: Windows Vista, Windows XP, Windows 2000, and Mac OS X versions 10.34 and 10.4 (not versions 10.0, 10.1, or 10.2). Note: Windows 2000 users should use Service Pack 3 or later. Check USB connection 1 Check the USB cable for any obvious damage. 2 Firmly plug.... 3 Firmly plug the rectangular end of the USB cable into an electrical outlet that the Wi-Fi indicator light is on. Reinstall the software 1 Turn off and then restart your computer meets the minimum system requirements listed on the printer box. The USB port is not on, ...
Software does not install These are supported: Windows Vista, Windows XP, Windows 2000, and Mac OS X versions 10.34 and 10.4 (not versions 10.0, 10.1, or 10.2). Note: Windows 2000 users should use Service Pack 3 or later. Check USB connection 1 Check the USB cable for any obvious damage. 2 Firmly plug.... 3 Firmly plug the rectangular end of the USB cable into an electrical outlet that the Wi-Fi indicator light is on. Reinstall the software 1 Turn off and then restart your computer meets the minimum system requirements listed on the printer box. The USB port is not on, ...
User's Guide
Page 103
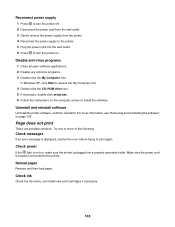
...the printer is plugged into a properly grounded outlet. Reload paper Remove and then load paper. In Windows XP, click Start to install the software. Uninstall and reinstall software Uninstall the printer software, and then reinstall it. Check ink Check the ink levels, and install new print cartridges if... necessary. 103 Page does not print These are possible solutions. Try one or more information, see "Removing and reinstalling the software" on the computer screen to access the My Computer icon. 4 Double-click the CD-ROM drive icon. 5 If necessary, double-click...
...the printer is plugged into a properly grounded outlet. Reload paper Remove and then load paper. In Windows XP, click Start to install the software. Uninstall and reinstall software Uninstall the printer software, and then reinstall it. Check ink Check the ink levels, and install new print cartridges if... necessary. 103 Page does not print These are possible solutions. Try one or more information, see "Removing and reinstalling the software" on the computer screen to access the My Computer icon. 4 Double-click the CD-ROM drive icon. 5 If necessary, double-click...


