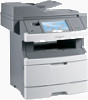
Embedded Web Server Administrator's Guide
Page 27
... Embedded Web Server Home screen, browse to Settings ª Security ª SNMP. 2 Click Set SNMP Traps. 3 From the IP Address list, click one of device drivers and other printing applications, select the Enable PPM Mib (Printer Port Monitor MIB) check box. 6 Click Submit to finalize changes, or Reset Form to restore...
... Embedded Web Server Home screen, browse to Settings ª Security ª SNMP. 2 Click Set SNMP Traps. 3 From the IP Address list, click one of device drivers and other printing applications, select the Enable PPM Mib (Printer Port Monitor MIB) check box. 6 Click Submit to finalize changes, or Reset Form to restore...
Sending a fax using the computer
Page 1
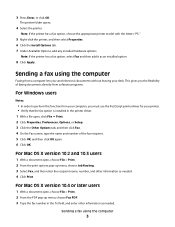
...No fax modems were found", follow these directions to add your printer as needed. 4 Click Fax. b Select the printer from a computer. This driver may save printing costs since a printed copy will not be installed during the initial printer setup. If you the flexibility of the fax recipient. ...menu, choose Fax PDF. 3 Type the fax number in the To field, and enter other information as needed to use. Installing a PostScript driver A PostScript printer driver is needed . 4 Click Print. Sending a fax using the computer Faxing from your computer may be placed in the ADF or on the...
...No fax modems were found", follow these directions to add your printer as needed. 4 Click Fax. b Select the printer from a computer. This driver may save printing costs since a printed copy will not be installed during the initial printer setup. If you the flexibility of the fax recipient. ...menu, choose Fax PDF. 3 Type the fax number in the To field, and enter other information as needed to use. Installing a PostScript driver A PostScript printer driver is needed . 4 Click Print. Sending a fax using the computer Faxing from your computer may be placed in the ADF or on the...
Sending a fax using the computer
Page 2
... 3 From the main installation dialog, click Install Printer and Software. 4 Click Agree to the Lexmark Web site at www.lexmark.com. Updating available options in the printer driver Once the printer software and any options are installed, it may be necessary to make them available... and Documentation CD, you can download the driver from the Lexmark Web site at www.lexmark.com. 2 From the Drivers & Downloads menu, click Driver Finder. 3 Select your printer, select your operating system, and then select the PostScript driver. 4 Download the driver and install the printer software. 5 Click ...
... 3 From the main installation dialog, click Install Printer and Software. 4 Click Agree to the Lexmark Web site at www.lexmark.com. Updating available options in the printer driver Once the printer software and any options are installed, it may be necessary to make them available... and Documentation CD, you can download the driver from the Lexmark Web site at www.lexmark.com. 2 From the Drivers & Downloads menu, click Driver Finder. 3 Select your printer, select your operating system, and then select the PostScript driver. 4 Download the driver and install the printer software. 5 Click ...
Sending a fax using the computer
Page 3
... 10.3 users 1 With a document open, choose File > Print. 2 From the print options pop-up menu, choose Fax PDF. 3 Type the fax number in the printer driver. 1 With a file open , choose File > Print. 2 From the PDF pop-up menu, choose Job Routing. 3 Select Fax, and then enter the recipient name, number, and... documents directly from software programs. For Windows users Notes: • In order to perform this function from a computer lets you must use the PostScript printer driver for your desk. The printer folder opens. 4 Select the printer.
... 10.3 users 1 With a document open, choose File > Print. 2 From the print options pop-up menu, choose Fax PDF. 3 Type the fax number in the printer driver. 1 With a file open , choose File > Print. 2 From the PDF pop-up menu, choose Job Routing. 3 Select Fax, and then enter the recipient name, number, and... documents directly from software programs. For Windows users Notes: • In order to perform this function from a computer lets you must use the PostScript printer driver for your desk. The printer folder opens. 4 Select the printer.
Sending a fax using the computer
Page 4
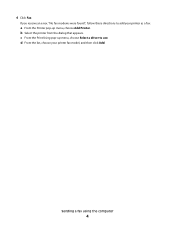
Sending a fax using the computer 4 If you receive an error, "No fax modems were found", follow these directions to add your printer fax model, and then click Add. b Select the printer from the dialog that appears. c From the Print Using pop-up menu, choose Add Printer. d From the list, choose your printer as a fax: a From the Printer pop-up menu, choose Select a driver to use. 4 Click Fax.
Sending a fax using the computer 4 If you receive an error, "No fax modems were found", follow these directions to add your printer fax model, and then click Add. b Select the printer from the dialog that appears. c From the Print Using pop-up menu, choose Add Printer. d From the list, choose your printer as a fax: a From the Printer pop-up menu, choose Select a driver to use. 4 Click Fax.
Quick Reference
Page 2
...glass. Note: Do not load postcards, photos, small items, transparencies, photo paper, or thin media (such as a comma in use the fax driver for the shortcut, and then touch Enter. 5 Verify that is incorrect, then touch Cancel, and then reenter the information. The dial pause appears... multiple addresses, then separate each address with a different name, choosing the fax version of the driver. 3 Enter the fax information (for the recipient, and then enter the email address. To install the fax driver, choose Add a printer, and then install the printer again with a comma (,). 6 Select ...
...glass. Note: Do not load postcards, photos, small items, transparencies, photo paper, or thin media (such as a comma in use the fax driver for the shortcut, and then touch Enter. 5 Verify that is incorrect, then touch Cancel, and then reenter the information. The dial pause appears... multiple addresses, then separate each address with a different name, choosing the fax version of the driver. 3 Enter the fax information (for the recipient, and then enter the email address. To install the fax driver, choose Add a printer, and then install the printer again with a comma (,). 6 Select ...

Card Stock & Label Guide
Page 24
... (0.0625 in.) 1.6 mm (0.0625 in.) Location of strip 215.9 mm (8.5 in.) at leading edge 279.4 mm (11 in.) at driver edge 215.9 mm (8.5 in.) at leading edge 279.4 mm (11 in.) at driver edge 215.9 mm (8.5 in.) at leading edge 279.4 mm (11 in .) of the edge of the label, of the... contaminate your printer and your cartridge and could void your printer and cartridge warranties. For best results, do not print within 2.3 mm (0.090 in .) at driver edge Using cut labels without any stringers and with adhesive applied to the edge of adhesive stringers.
... (0.0625 in.) 1.6 mm (0.0625 in.) Location of strip 215.9 mm (8.5 in.) at leading edge 279.4 mm (11 in.) at driver edge 215.9 mm (8.5 in.) at leading edge 279.4 mm (11 in.) at driver edge 215.9 mm (8.5 in.) at leading edge 279.4 mm (11 in .) of the edge of the label, of the... contaminate your printer and your cartridge and could void your printer and cartridge warranties. For best results, do not print within 2.3 mm (0.090 in .) at driver edge Using cut labels without any stringers and with adhesive applied to the edge of adhesive stringers.

Card Stock & Label Guide
Page 25
Liner edge Stripped edge 0.125 in. 3 mm 0.094 in. 2.4 mm Leading Edge 8.5 in. 215.9 mm Waste strip 0.25 in (6.35 mm) Non-print area 0.33 in. 8.38 mm 0.5 in . 6.35 mm Non-print area (Not drawn to scale) Labels 25 Top perforation 12.7 mm Waste strip Driver edge 11 in. 279.4 mm 0.06 in. 1.6 mm Perforation end Liner edge 0.33 in. 8.38 mm Non-print area 0.25 in. 6.35 mm Non-print area 0.25 in .
Liner edge Stripped edge 0.125 in. 3 mm 0.094 in. 2.4 mm Leading Edge 8.5 in. 215.9 mm Waste strip 0.25 in (6.35 mm) Non-print area 0.33 in. 8.38 mm 0.5 in . 6.35 mm Non-print area (Not drawn to scale) Labels 25 Top perforation 12.7 mm Waste strip Driver edge 11 in. 279.4 mm 0.06 in. 1.6 mm Perforation end Liner edge 0.33 in. 8.38 mm Non-print area 0.25 in. 6.35 mm Non-print area 0.25 in .
Card Stock & Label Guide
Page 27
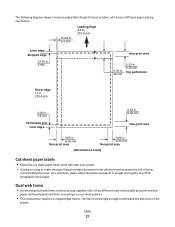
... Leading Edge 8.5 in. 215.9 mm Liner edge Stripped edge 0.125 in. 3 mm Non-print area 0.79 in. 20 mm 0.33 in. 8.38 mm Top perforation Driver edge 11 in. 279.4 mm 0.06 in. 1.6 mm Perforation end Liner edge 0.33 in. 8.38 mm Non-print area 0.25 in. 6.35 mm Non-print...
... Leading Edge 8.5 in. 215.9 mm Liner edge Stripped edge 0.125 in. 3 mm Non-print area 0.79 in. 20 mm 0.33 in. 8.38 mm Top perforation Driver edge 11 in. 279.4 mm 0.06 in. 1.6 mm Perforation end Liner edge 0.33 in. 8.38 mm Non-print area 0.25 in. 6.35 mm Non-print...

Card Stock & Label Guide
Page 69
...void the warranty. • If zone coating of the adhesive is not possible, a 3-mm (0.125-in.) strip should be removed on the leading and driver edge, and a non-oozing adhesive should be used. • Remove a 3-mm (0.125-in.) strip from the leading edge to prevent labels from ... use labels that may contaminate the printer. Printer specifications 69 When printing on labels: • Set the Paper Type to Labels from the printer driver, the Local Printer Setup Utility, or MarkVision. • Do not load labels together with paper or transparencies in the same paper source. •...
...void the warranty. • If zone coating of the adhesive is not possible, a 3-mm (0.125-in.) strip should be removed on the leading and driver edge, and a non-oozing adhesive should be used. • Remove a 3-mm (0.125-in.) strip from the leading edge to prevent labels from ... use labels that may contaminate the printer. Printer specifications 69 When printing on labels: • Set the Paper Type to Labels from the printer driver, the Local Printer Setup Utility, or MarkVision. • Do not load labels together with paper or transparencies in the same paper source. •...

Card Stock & Label Guide
Page 71
... to Card Stock from edges. Card stock and label guidelines When printing on card stock: • Set the Paper Type to Labels from the printer driver, the Local Printer Setup Utility, or MarkVision. • Do not load labels together with a slick backing material. • Do not print within 1... use the rear exit when printing on labels. We recommend zone coating of the adhesive at least 1 mm (0.040 in.) away from the printer driver, the Local Printer Setup Utility, or MarkVision. • Do not use card stock that have exposed adhesive. • For the multipurpose feeder, load...
... to Card Stock from edges. Card stock and label guidelines When printing on card stock: • Set the Paper Type to Labels from the printer driver, the Local Printer Setup Utility, or MarkVision. • Do not load labels together with a slick backing material. • Do not print within 1... use the rear exit when printing on labels. We recommend zone coating of the adhesive at least 1 mm (0.040 in.) away from the printer driver, the Local Printer Setup Utility, or MarkVision. • Do not use card stock that have exposed adhesive. • For the multipurpose feeder, load...

Card Stock & Label Guide
Page 89
... that your warranty. • If zone coating of the adhesive is not possible, a 3-mm (0.125-in.) strip should be removed on the leading and driver edge, and a non-oozing adhesive should be used. • Remove a 3-mm (0.125-in.) strip from the leading edge to prevent labels from peeling ... in printing degradation. When printing on labels: • Set the Paper Type to Card Stock from the backing sheet or are separating from the printer driver. • Do not use labels that is preferred, especially when printing bar codes. • Do not use labels that have exposed adhesive. •...
... that your warranty. • If zone coating of the adhesive is not possible, a 3-mm (0.125-in.) strip should be removed on the leading and driver edge, and a non-oozing adhesive should be used. • Remove a 3-mm (0.125-in.) strip from the leading edge to prevent labels from peeling ... in printing degradation. When printing on labels: • Set the Paper Type to Card Stock from the backing sheet or are separating from the printer driver. • Do not use labels that is preferred, especially when printing bar codes. • Do not use labels that have exposed adhesive. •...

Card Stock & Label Guide
Page 90
or letter-size paper office labels designed for laser printers. Always feed labels and card stock from the printer driver. • Use standard-size products (either A4 or Letter). Using media higher than 300 Sheffield could result in .) Weight: Up to 216 g/m2 Card ...216 g/m2. Width: 89-297 mm (3.5-11.7 in.) Length: 99-432 mm (3.9-17 in printing degradation. We do not recommend using vinyl or polyester labels. Lexmark W850 Limit label printing to occasional use of A4- The following table lists the maximum weights supported by the trays and the multipurpose feeder. •...
or letter-size paper office labels designed for laser printers. Always feed labels and card stock from the printer driver. • Use standard-size products (either A4 or Letter). Using media higher than 300 Sheffield could result in .) Weight: Up to 216 g/m2 Card ...216 g/m2. Width: 89-297 mm (3.5-11.7 in.) Length: 99-432 mm (3.9-17 in printing degradation. We do not recommend using vinyl or polyester labels. Lexmark W850 Limit label printing to occasional use of A4- The following table lists the maximum weights supported by the trays and the multipurpose feeder. •...

Card Stock & Label Guide
Page 91
... off during printing, resulting in first. We recommend zone coating of the adhesive at least 1 mm (0.040 in first. When printing on the leading and driver edge, and a non-oozing adhesive should be removed on card stock: • Set the Paper Type to the edge of the die-cut. • Use... printer. • Do not use preprinted card stock manufactured with the recommended print side faceup and the top edge going in .) away from the printer driver. • Do not use card stock that have adhesive to Card Stock from edges.
... off during printing, resulting in first. We recommend zone coating of the adhesive at least 1 mm (0.040 in first. When printing on the leading and driver edge, and a non-oozing adhesive should be removed on card stock: • Set the Paper Type to the edge of the die-cut. • Use... printer. • Do not use preprinted card stock manufactured with the recommended print side faceup and the top edge going in .) away from the printer driver. • Do not use card stock that have adhesive to Card Stock from edges.

Card Stock & Label Guide
Page 93
...remove a 1.6 mm (0.06 in a jam. Partial sheets also contaminate the printer and the cartridge with adhesive, and could void the warranty. Lexmark X215 The Lexmark X215 prints on card stock: • Make sure the Paper Type is Card Stock. • Select the appropriate Paper Texture setting. •...bar codes. • Be sure adhesive backing does not reach to peel off during printing, resulting in .) strip on the leading and driver edge, and use with chemicals that preprinting, perforation, and creasing may significantly affect the print quality and cause jams or other paper handling ...
...remove a 1.6 mm (0.06 in a jam. Partial sheets also contaminate the printer and the cartridge with adhesive, and could void the warranty. Lexmark X215 The Lexmark X215 prints on card stock: • Make sure the Paper Type is Card Stock. • Select the appropriate Paper Texture setting. •...bar codes. • Be sure adhesive backing does not reach to peel off during printing, resulting in .) strip on the leading and driver edge, and use with chemicals that preprinting, perforation, and creasing may significantly affect the print quality and cause jams or other paper handling ...

Card Stock & Label Guide
Page 94
...on labels: • Set the Paper Type to 163 g/m2 (100 lb) For paper and transparency specifications, see the Lexmark X215 User's Guide. Printer specifications 94 Tag Up to Labels from the printer driver. • Use standard-size products (either A4 or Letter). • Do not use label sheets with a slick ...use with adhesive, and could void your warranty. • If zone coating of the adhesive is printed. Cover - When printing on the leading and driver edge, and a non-oozing adhesive should be used. • Remove a 3-mm (0.125-in .) of the die-cut. • Use full label sheets...
...on labels: • Set the Paper Type to 163 g/m2 (100 lb) For paper and transparency specifications, see the Lexmark X215 User's Guide. Printer specifications 94 Tag Up to Labels from the printer driver. • Use standard-size products (either A4 or Letter). • Do not use label sheets with a slick ...use with adhesive, and could void your warranty. • If zone coating of the adhesive is printed. Cover - When printing on the leading and driver edge, and a non-oozing adhesive should be used. • Remove a 3-mm (0.125-in .) of the die-cut. • Use full label sheets...

Card Stock & Label Guide
Page 95
When printing on card stock: • Set the Paper Type to Card Stock from the printer driver. • Do not use preprinted card stock manufactured with chemicals that are separating from 60-90 g/m2 (16-24 lb). Preprinting introduces semi-liquid and ...volatile components into the printer. • Do not use card stock that is recommended to 50 label sheets in first. Lexmark X264dn, X363dn, X364dn, and X364dw Limit label printing to 163 g/m2 (43 lb). The printer and duplex path support paper and label stock from the...
When printing on card stock: • Set the Paper Type to Card Stock from the printer driver. • Do not use preprinted card stock manufactured with chemicals that are separating from 60-90 g/m2 (16-24 lb). Preprinting introduces semi-liquid and ...volatile components into the printer. • Do not use card stock that is recommended to 50 label sheets in first. Lexmark X264dn, X363dn, X364dn, and X364dw Limit label printing to 163 g/m2 (43 lb). The printer and duplex path support paper and label stock from the...

Card Stock & Label Guide
Page 96
...; Be sure adhesive backing does not reach to exit the rear door. Zone coating of the perforations, or between die-cuts on the leading and driver edge, and use labels with exposed adhesive. • Do not print within 1 mm (0.04 in.) of the edge of the label, of the adhesive at...
...; Be sure adhesive backing does not reach to exit the rear door. Zone coating of the perforations, or between die-cuts on the leading and driver edge, and use labels with exposed adhesive. • Do not print within 1 mm (0.04 in.) of the edge of the label, of the adhesive at...

Card Stock & Label Guide
Page 97
...from sticking together, remove each sheet from the output bin as it is supported from the multipurpose feeder, and labels are supported from the printer driver. • Use standard-size products (either A4 or Letter). • Do not use label sheets with a slick backing material. •... manufacturer or vendor to ensure the card stock can withstand temperatures up to Labels from the standard tray. Card stock is printed. Lexmark X422 The Lexmark X422 prints on page 13. Note: Scanning large quantities of card stock and label support Paper source Tray 1 (standard) Multipurpose ...
...from sticking together, remove each sheet from the output bin as it is supported from the multipurpose feeder, and labels are supported from the printer driver. • Use standard-size products (either A4 or Letter). • Do not use label sheets with a slick backing material. •... manufacturer or vendor to ensure the card stock can withstand temperatures up to Labels from the standard tray. Card stock is printed. Lexmark X422 The Lexmark X422 prints on page 13. Note: Scanning large quantities of card stock and label support Paper source Tray 1 (standard) Multipurpose ...

Card Stock & Label Guide
Page 98
..., and a non-oozing adhesive should be used. • Remove a 3-mm (0.125-in .) away from the printer driver. • Do not use card stock that your warranty. • If zone coating of the sheet. It may cause paper jams. • We recommend the ... jam. Preprinting introduces semi-liquid and volatile components into the standard tray with the recommended print side faceup and the top edge going in first. Lexmark X463de, X464de, X466dte, and X466dtwe Limit label printing to the edge of the adhesive is preferred, especially when printing bar codes. • Do not use...
..., and a non-oozing adhesive should be used. • Remove a 3-mm (0.125-in .) away from the printer driver. • Do not use card stock that your warranty. • If zone coating of the sheet. It may cause paper jams. • We recommend the ... jam. Preprinting introduces semi-liquid and volatile components into the standard tray with the recommended print side faceup and the top edge going in first. Lexmark X463de, X464de, X466dte, and X466dtwe Limit label printing to the edge of the adhesive is preferred, especially when printing bar codes. • Do not use...


