
User's Guide
Page 2
..., or services, except those described in certain transactions; therefore, this product or the manufacturer's authorized replacement power supply and power supply cord. Connect the power supply cord to an electrical outlet that product, program, or service may not apply to you . these available in... all countries in the products or the programs described may be incorporated in this product, visit the Lexmark Web...
..., or services, except those described in certain transactions; therefore, this product or the manufacturer's authorized replacement power supply and power supply cord. Connect the power supply cord to an electrical outlet that product, program, or service may not apply to you . these available in... all countries in the products or the programs described may be incorporated in this product, visit the Lexmark Web...
User's Guide
Page 13
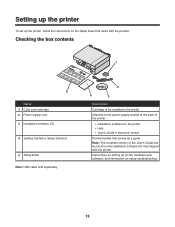
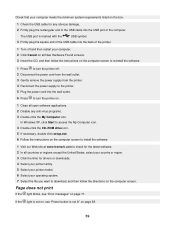
... and software, and information on setup troubleshooting 13 Instructions on setting up the printer, follow the instructions on the installation software CD that came with the printer. Checking the box contents 1 ?? ? 5 Name 1 Color print cartridge 2 Power supply cord 3 Installation software CD 4 Getting Started or Setup Solutions 5 Setup sheet Note: USB cable sold separately 2 4 3 Description...
... and software, and information on setup troubleshooting 13 Instructions on setting up the printer, follow the instructions on the installation software CD that came with the printer. Checking the box contents 1 ?? ? 5 Name 1 Color print cartridge 2 Power supply cord 3 Installation software CD 4 Getting Started or Setup Solutions 5 Setup sheet Note: USB cable sold separately 2 4 3 Description...
User's Guide
Page 15
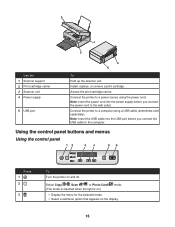
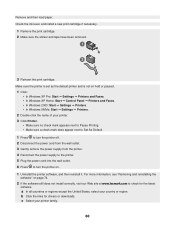
... display. 15 Access the print cartridge carrier. Connect the printer to a power source using a USB cable (sometimes sold separately). Connect the printer to a computer using the power cord. Install, replace, or remove a print cartridge. Note: Insert the USB cable into the power supply before you connect the power cord to the computer. Select Copy , Scan , or Photo Card...
... display. 15 Access the print cartridge carrier. Connect the printer to a power source using a USB cable (sometimes sold separately). Connect the printer to a computer using the power cord. Install, replace, or remove a print cartridge. Note: Insert the USB cable into the power supply before you connect the power cord to the computer. Select Copy , Scan , or Photo Card...
User's Guide
Page 58
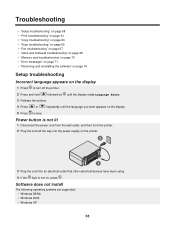
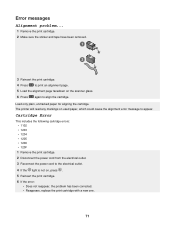
... supported: • Windows 98/Me • Windows 2000 • Windows XP 58 Power button is not lit 1 Disconnect the power cord from the wall outlet, and then from the printer. 2 Plug the cord all the way into the power supply on the printer. 2 1 3 Plug the cord into an electrical outlet that other electrical devices have been using. 4 If... on , press . until the display reads Language Reset. 4 Press or repeatedly until the language you want appears on the display. 5 Press to turn off the printer. 2 Press and hold followed by 3 Release the buttons.
... supported: • Windows 98/Me • Windows 2000 • Windows XP 58 Power button is not lit 1 Disconnect the power cord from the wall outlet, and then from the printer. 2 Plug the cord all the way into the power supply on the printer. 2 1 3 Plug the cord into an electrical outlet that other electrical devices have been using. 4 If... on , press . until the display reads Language Reset. 4 Press or repeatedly until the language you want appears on the display. 5 Press to turn off the printer. 2 Press and hold followed by 3 Release the buttons.
User's Guide
Page 59
...If necessary, double-click setup.exe. 6 Follow the instructions on the computer screen to install the software. 1 Visit our Web site at www.lexmark.com to check for the latest software. 2 In all countries or regions except the United States, select your country or region. 3 Click the...of the USB cable into the wall outlet. 6 Press to turn the printer off. 2 Disconnect the power cord from the wall outlet. 3 Gently remove the power supply from the printer. 4 Reconnect the power supply to the printer. 5 Plug the power cord into the USB port of the computer. Check that your computer meets the...
...If necessary, double-click setup.exe. 6 Follow the instructions on the computer screen to install the software. 1 Visit our Web site at www.lexmark.com to check for the latest software. 2 In all countries or regions except the United States, select your country or region. 3 Click the...of the USB cable into the wall outlet. 6 Press to turn the printer off. 2 Disconnect the power cord from the wall outlet. 3 Gently remove the power supply from the printer. 4 Reconnect the power supply to the printer. 5 Plug the power cord into the USB port of the computer. Check that your computer meets the...
User's Guide
Page 60
... mark does appear next to Set As Default. 1 Press to turn the printer off. 2 Disconnect the power cord from the wall outlet. 3 Gently remove the power supply from the printer. 4 Reconnect the power supply to the printer. 5 Plug the power cord into the wall outlet. 6 Press to check for drivers or downloads. Make... correctly, visit our Web site at www.lexmark.com to turn the printer on hold or paused. 1 Click: • In Windows XP Pro: Start Œ Settings Œ Printers and Faxes. • In Windows XP Home: Start Œ Control Panel Œ Printers and Faxes. • In Windows 2000:...
... mark does appear next to Set As Default. 1 Press to turn the printer off. 2 Disconnect the power cord from the wall outlet. 3 Gently remove the power supply from the printer. 4 Reconnect the power supply to the printer. 5 Plug the power cord into the wall outlet. 6 Press to check for drivers or downloads. Make... correctly, visit our Web site at www.lexmark.com to turn the printer on hold or paused. 1 Click: • In Windows XP Pro: Start Œ Settings Œ Printers and Faxes. • In Windows XP Home: Start Œ Control Panel Œ Printers and Faxes. • In Windows 2000:...
User's Guide
Page 71
The printer will read any markings on the scanner glass. 6 Press again to align the... 1203 • 1204 • 1205 • 1206 • 120F 1 Remove the print cartridge. 2 Disconnect the power cord from the electrical outlet. 3 Reconnect the power cord to the electrical outlet. 4 If the light is not on, press . 5 Reinsert the print cartridge. 6 If the... error: • Does not reappear, the problem has been corrected. • Reappears, replace the print cartridge with a new one. ...
The printer will read any markings on the scanner glass. 6 Press again to align the... 1203 • 1204 • 1205 • 1206 • 120F 1 Remove the print cartridge. 2 Disconnect the power cord from the electrical outlet. 3 Reconnect the power cord to the electrical outlet. 4 If the light is not on, press . 5 Reinsert the print cartridge. 6 If the... error: • Does not reappear, the problem has been corrected. • Reappears, replace the print cartridge with a new one. ...

User's Guide
Page 79
Mode Description Power consumption (Watts) High Off The product is plugged into a wall outlet, but the power switch n/a is turned off. Low Off (
Mode Description Power consumption (Watts) High Off The product is plugged into a wall outlet, but the power switch n/a is turned off. Low Off (

