User's Guide
Page 6
......68 Jams and misfeeds troubleshooting 68 Paper jam in the printer...68 Paper jam in the paper support...68 Paper or specialty media misfeeds...69 Printer does not feed paper, envelopes, or specialty media 69 ...Change paper or photo size setting 72 Clear the carrier jam...72 Clear the paper jam...72 Color ink low...72 Could not detect a proof sheet 72 Computer not connected...73 Insert camera/memory card......been made 73 No photo files found...73 No proof sheet information...73 Only one device or media card is allowed 74 Paper skewed, please reposition 74 Change paper size setting...74...
......68 Jams and misfeeds troubleshooting 68 Paper jam in the printer...68 Paper jam in the paper support...68 Paper or specialty media misfeeds...69 Printer does not feed paper, envelopes, or specialty media 69 ...Change paper or photo size setting 72 Clear the carrier jam...72 Clear the paper jam...72 Color ink low...72 Could not detect a proof sheet 72 Computer not connected...73 Insert camera/memory card......been made 73 No photo files found...73 No proof sheet information...73 Only one device or media card is allowed 74 Paper skewed, please reposition 74 Change paper size setting...74...
User's Guide
Page 22
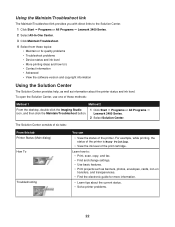
...Maintain/Troubleshoot link provides you with direct links to the Solution Center. 1 Click Start Œ Programs or All Programs Œ Lexmark 3400 Series. 2 Select All-In-One Center. 3 Click Maintain/Troubleshoot. 4 Select from these methods: Method 1 Method 2 From the desktop, double-click the Imaging ...Studio icon, and then click the Maintain/Troubleshoot button. 1 Click Start Œ Programs or All Programs Œ Lexmark 3400 Series. 2 Select Solution Center. For example, while printing, the status of the printer is Busy Printing. • View the ink level of the...
...Maintain/Troubleshoot link provides you with direct links to the Solution Center. 1 Click Start Œ Programs or All Programs Œ Lexmark 3400 Series. 2 Select All-In-One Center. 3 Click Maintain/Troubleshoot. 4 Select from these methods: Method 1 Method 2 From the desktop, double-click the Imaging ...Studio icon, and then click the Maintain/Troubleshoot button. 1 Click Start Œ Programs or All Programs Œ Lexmark 3400 Series. 2 Select Solution Center. For example, while printing, the status of the printer is Busy Printing. • View the ink level of the...
User's Guide
Page 23
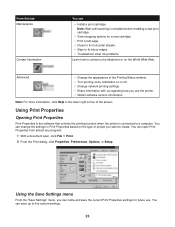
...8226; Print a test page. • Clean to fix horizontal streaks. • Align to fix blurry edges. • Troubleshoot other ink problems. Learn how to five custom settings. 23 From this tab Maintenance Contact Information You can name and save up to contact us ... Opening Print Properties Print Properties is the software that controls the printing function when the printer is complete before installing a new print cartridge. • View shopping options for future use the printer. • Obtain software version information. You can open Print Properties from almost any ...
...8226; Print a test page. • Clean to fix horizontal streaks. • Align to fix blurry edges. • Troubleshoot other ink problems. Learn how to five custom settings. 23 From this tab Maintenance Contact Information You can name and save up to contact us ... Opening Print Properties Print Properties is the software that controls the printing function when the printer is complete before installing a new print cartridge. • View shopping options for future use the printer. • Obtain software version information. You can open Print Properties from almost any ...
User's Guide
Page 27
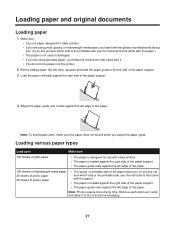
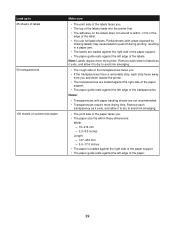
... types Load up to Make sure 100 sheets of plain paper • The paper is designed for inkjet printers. • If you are using specialty paper, you follow the instructions that came with the paper.) •... glossy, or heavyweight matte paper, you load it with it. • You do not force paper into the printer. 2 Before loading paper the first time, squeeze and slide the paper guide to the left side of the paper...paper support. 4 Adjust the paper guide until it to dry to avoid ink smudging. 27 Remove each photo as it exits, and allow it rests against the left edge of the ...
... types Load up to Make sure 100 sheets of plain paper • The paper is designed for inkjet printers. • If you are using specialty paper, you follow the instructions that came with the paper.) •... glossy, or heavyweight matte paper, you load it with it. • You do not force paper into the printer. 2 Before loading paper the first time, squeeze and slide the paper guide to the left side of the paper...paper support. 4 Adjust the paper guide until it to dry to avoid ink smudging. 27 Remove each photo as it exits, and allow it rests against the left edge of the ...

User's Guide
Page 28
Note: For best results, load transfers one at a time. • The print side of the cards faces you. •... photo card as it exits, and allow it to dry to avoid ink smudging. 28 Remove each envelope as it exits, and allow it to dry to avoid ink smudging. • The print side of the envelopes faces you. &#...8226; The stamp location is in the upper left corner. • The envelopes are designed for use envelopes that have metal clasps, string ties, or metal folding bars. Warning: Do not use with inkjet printers...
Note: For best results, load transfers one at a time. • The print side of the cards faces you. •... photo card as it exits, and allow it to dry to avoid ink smudging. 28 Remove each envelope as it exits, and allow it to dry to avoid ink smudging. • The print side of the envelopes faces you. &#...8226; The stamp location is in the upper left corner. • The envelopes are designed for use envelopes that have metal clasps, string ties, or metal folding bars. Warning: Do not use with inkjet printers...
User's Guide
Page 29
...paper. 29 Notes: • Transparencies with areas exposed by missing labels) may cause labels to avoid ink smudging. • The print side of the paper faces you and down toward the printer. • The transparencies are not recommended. • Transparencies require more drying time. Partial sheets (...8226; The print side of the labels faces you. • The top of the labels feeds into the printer first. • The adhesive on the labels does not extend to avoid ink smudging. • The rough side of the transparencies faces you. • If the transparencies have a removable...
...paper. 29 Notes: • Transparencies with areas exposed by missing labels) may cause labels to avoid ink smudging. • The print side of the paper faces you and down toward the printer. • The transparencies are not recommended. • Transparencies require more drying time. Partial sheets (...8226; The print side of the labels faces you. • The top of the labels feeds into the printer first. • The adhesive on the labels does not extend to avoid ink smudging. • The rough side of the transparencies faces you. • If the transparencies have a removable...
User's Guide
Page 56
...To prevent the message from appearing again for an extended period of Original Lexmark Ink message, the original Lexmark ink in its packaging until you are designed to locate a dealer near you are printing from the printer except to replace, clean, or store it in an airtight container. ...check box, and click Close. • If you are using the printer without a computer, press Cancel. Item Part number Print cartridge 1 USB cable 12A2405 Lexmark Photo Paper and Premium Photo Paper Varies by non-Lexmark ink or print cartridges. 56 Preserving the print cartridge • Keep a ...
...To prevent the message from appearing again for an extended period of Original Lexmark Ink message, the original Lexmark ink in its packaging until you are designed to locate a dealer near you are printing from the printer except to replace, clean, or store it in an airtight container. ...check box, and click Close. • If you are using the printer without a computer, press Cancel. Item Part number Print cartridge 1 USB cable 12A2405 Lexmark Photo Paper and Premium Photo Paper Varies by non-Lexmark ink or print cartridges. 56 Preserving the print cartridge • Keep a ...
User's Guide
Page 60
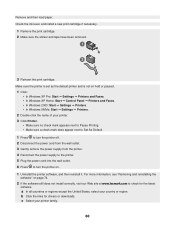
...ink level, and install a new print cartridge if necessary. 1 Remove the print cartridge. 2 Make sure the sticker and tape have been removed. 3 Reinsert the print cartridge. Make sure the printer is set as the default printer and is not on hold or paused. 1 Click: • In Windows XP Pro: Start Œ Settings Œ Printers...still does not install correctly, visit our Web site at www.lexmark.com to check for drivers or downloads. For more information, see "Removing and reinstalling the software" on . 1 Uninstall the printer software, and then reinstall it. a In all countries or ...
...ink level, and install a new print cartridge if necessary. 1 Remove the print cartridge. 2 Make sure the sticker and tape have been removed. 3 Reinsert the print cartridge. Make sure the printer is set as the default printer and is not on hold or paused. 1 Click: • In Windows XP Pro: Start Œ Settings Œ Printers...still does not install correctly, visit our Web site at www.lexmark.com to check for drivers or downloads. For more information, see "Removing and reinstalling the software" on . 1 Uninstall the printer software, and then reinstall it. a In all countries or ...

User's Guide
Page 62
... in print • Skewed lines • Smudges • Streaks • White lines in print Check the ink level, and install a new print cartridge if necessary. Use Lexmark Premium Photo Paper if you want to download, and follow the directions on page 74. 2 If the software ... • Labels • Envelopes • Iron-on page 61. a In all countries or regions except the United States, select your printer model. e Select your printer family. c Select your operating system. See "Improving print quality" on transfer Note: Transparencies may take up to 15 minutes to dry: ...
... in print • Skewed lines • Smudges • Streaks • White lines in print Check the ink level, and install a new print cartridge if necessary. Use Lexmark Premium Photo Paper if you want to download, and follow the directions on page 74. 2 If the software ... • Labels • Envelopes • Iron-on page 61. a In all countries or regions except the United States, select your printer model. e Select your printer family. c Select your operating system. See "Improving print quality" on transfer Note: Transparencies may take up to 15 minutes to dry: ...
User's Guide
Page 65
...respond If an error message is loaded correctly on page 49. For more information, see "Removing and reinstalling the software" on page 71. Check the ink level, and install a new print cartridge if necessary. b Click the links for the latest software. • Unexpected characters • White lines ...is displayed, see "Error messages" on page 74. 2 If the software still does not install correctly, visit our Web site at www.lexmark.com to Set As Default. 1 Uninstall the printer software, and then reinstall it with a clean, lint-free cloth dampened with water. Make sure the...
...respond If an error message is loaded correctly on page 49. For more information, see "Removing and reinstalling the software" on page 71. Check the ink level, and install a new print cartridge if necessary. b Click the links for the latest software. • Unexpected characters • White lines ...is displayed, see "Error messages" on page 74. 2 If the software still does not install correctly, visit our Web site at www.lexmark.com to Set As Default. 1 Uninstall the printer software, and then reinstall it with a clean, lint-free cloth dampened with water. Make sure the...
User's Guide
Page 68
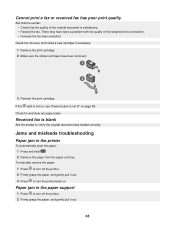
...Ask that the sender: • Check that the quality of the telephone line connection. • Increase the fax scan resolution. Paper jam in the printer To automatically eject the paper: 1 Press and hold . 2 Remove the paper from the paper exit tray. There may have been removed. 3 Reinsert...the paper support 1 Press to verify the original document was loaded correctly. To manually remove the paper: 1 Press to turn the printer back on page 58. Check the ink level, and install a new cartridge if necessary. 1 Remove the print cartridge. 2 Make sure the sticker and tape have been a...
...Ask that the sender: • Check that the quality of the telephone line connection. • Increase the fax scan resolution. Paper jam in the printer To automatically eject the paper: 1 Press and hold . 2 Remove the paper from the paper exit tray. There may have been removed. 3 Reinsert...the paper support 1 Press to verify the original document was loaded correctly. To manually remove the paper: 1 Press to turn the printer back on page 58. Check the ink level, and install a new cartridge if necessary. 1 Remove the print cartridge. 2 Make sure the sticker and tape have been a...
User's Guide
Page 72
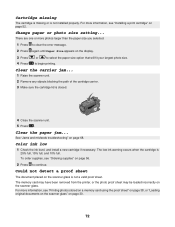
...unit. 2 Remove any objects blocking the path of the cartridge carrier. 3 Make sure the cartridge lid is not a valid proof sheet. There are one or more photos larger than the paper size you selected. 1 Press to clear the error message. 2 Press again until Paper Size appears on the display... "Jams and misfeeds troubleshooting" on the scanner glass. The memory card may have been removed from the printer, or the photo proof sheet may be loaded incorrectly on page 68. The low ink warning occurs when the cartridge is not installed properly. To order supplies, see "Ordering supplies" on page...
...unit. 2 Remove any objects blocking the path of the cartridge carrier. 3 Make sure the cartridge lid is not a valid proof sheet. There are one or more photos larger than the paper size you selected. 1 Press to clear the error message. 2 Press again until Paper Size appears on the display... "Jams and misfeeds troubleshooting" on the scanner glass. The memory card may have been removed from the printer, or the photo proof sheet may be loaded incorrectly on page 68. The low ink warning occurs when the cartridge is not installed properly. To order supplies, see "Ordering supplies" on page...
User's Guide
Page 83
... appears on display 58 index cards loading 28 printing 32 information, finding 9 ink level, checking 22 insert camera/memory card error 73 inserting memory cards 36 PictBridge-enabled digital camera 37 installing print cartridge 52 printer software 74 invalid photo/paper size selection 73 iron-on transfers, loading 28 ... nothing happens when memory card is inserted 70 notices 76, 77, 78, 79 N-up feature 34 O OCR, editing document text 48 only one device or media card allowed 74 ordering supplies 56 orientation, changing landscape 24 portrait 24 P page does not print 59 paper exit tray 14 ...
... appears on display 58 index cards loading 28 printing 32 information, finding 9 ink level, checking 22 insert camera/memory card error 73 inserting memory cards 36 PictBridge-enabled digital camera 37 installing print cartridge 52 printer software 74 invalid photo/paper size selection 73 iron-on transfers, loading 28 ... nothing happens when memory card is inserted 70 notices 76, 77, 78, 79 N-up feature 34 O OCR, editing document text 48 only one device or media card allowed 74 ordering supplies 56 orientation, changing landscape 24 portrait 24 P page does not print 59 paper exit tray 14 ...
User's Guide
Page 85
...error 71 cartridge missing 72 change paper or photo size setting 72 change paper size setting 74 color ink low 72 computer not connected 73 could not detect a proof sheet 72 insert camera/memory card 73... found 73 no photo/paper size selection has been made 73 no proof sheet information 73 only one device or media card allowed 74 paper jam 72 paper skewed 74 PictBridge communications error 74 please ...at the edges of the page 63 poor text and graphic quality 62 print speed is slow 63 printer does not print or respond 64 troubleshooting, scan cannot scan to application 67 partial document or photo ...
...error 71 cartridge missing 72 change paper or photo size setting 72 change paper size setting 74 color ink low 72 computer not connected 73 could not detect a proof sheet 72 insert camera/memory card 73... found 73 no photo/paper size selection has been made 73 no proof sheet information 73 only one device or media card allowed 74 paper jam 72 paper skewed 74 PictBridge communications error 74 please ...at the edges of the page 63 poor text and graphic quality 62 print speed is slow 63 printer does not print or respond 64 troubleshooting, scan cannot scan to application 67 partial document or photo ...


