
User's Guide
Page 2
... Changes are the user's responsibility. © 2006 Lexmark International, Inc. Lexmark may be made to Lexmark International Ltd., Marketing and Services Department, Westhorpe House, Westhorpe, Marlow Bucks SL7 3RQ. Connect the power supply cord to make any existing intellectual property right may be ...this product or make these changes will be used . All rights reserved. Safety information Use only the power supply and power supply cord provided with local law: LEXMARK INTERNATIONAL, INC., PROVIDES THIS PUBLICATION "AS IS" WITHOUT WARRANTY OF ANY KIND, EITHER EXPRESS OR ...
... Changes are the user's responsibility. © 2006 Lexmark International, Inc. Lexmark may be made to Lexmark International Ltd., Marketing and Services Department, Westhorpe House, Westhorpe, Marlow Bucks SL7 3RQ. Connect the power supply cord to make any existing intellectual property right may be ...this product or make these changes will be used . All rights reserved. Safety information Use only the power supply and power supply cord provided with local law: LEXMARK INTERNATIONAL, INC., PROVIDES THIS PUBLICATION "AS IS" WITHOUT WARRANTY OF ANY KIND, EITHER EXPRESS OR ...
User's Guide
Page 13
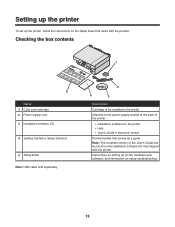
... box contents 1 ?? ? 5 Name 1 Color print cartridge 2 Power supply cord 3 Installation software CD 4 Getting Started or Setup Solutions 5 Setup sheet Note: USB cable sold separately 2 4 3 Description Cartridge to be installed in the printer Attaches to the power supply located at the back of the printer • Installation software for the printer • Help • User's Guide in...
... box contents 1 ?? ? 5 Name 1 Color print cartridge 2 Power supply cord 3 Installation software CD 4 Getting Started or Setup Solutions 5 Setup sheet Note: USB cable sold separately 2 4 3 Description Cartridge to be installed in the printer Attaches to the power supply located at the back of the printer • Installation software for the printer • Help • User's Guide in...
User's Guide
Page 15
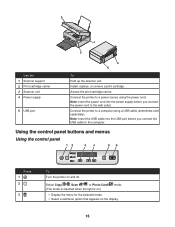
...printer to the wall outlet. Note: Insert the power cord into the USB port before you connect the USB cable to a power source using a USB cable (sometimes sold separately). Note: Insert the USB cable into the power supply before you connect the power cord to a computer using the power cord. 3 1 2 Use the 1 Scanner support 2 Print cartridge carrier 3 Scanner unit 4 Power...Using the control panel buttons and menus Using the control panel Press 1 2 3 To Turn the printer on the display. 15 Connect the printer to the computer. Install, replace, or remove a print cartridge.
...printer to the wall outlet. Note: Insert the power cord into the USB port before you connect the USB cable to a power source using a USB cable (sometimes sold separately). Note: Insert the USB cable into the power supply before you connect the power cord to a computer using the power cord. 3 1 2 Use the 1 Scanner support 2 Print cartridge carrier 3 Scanner unit 4 Power...Using the control panel buttons and menus Using the control panel Press 1 2 3 To Turn the printer on the display. 15 Connect the printer to the computer. Install, replace, or remove a print cartridge.
User's Guide
Page 58
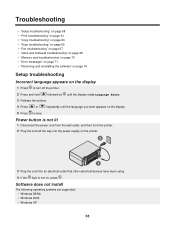
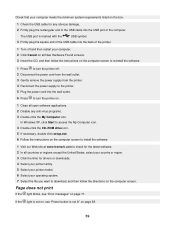
... the software" on page 74 Setup troubleshooting Incorrect language appears on , press . Power button is not lit 1 Disconnect the power cord from the wall outlet, and then from the printer. 2 Plug the cord all the way into the power supply on the printer. 2 1 3 Plug the cord into an electrical outlet that other electrical devices have been using. 4 If... XP 58 until the display reads Language Reset. 4 Press or repeatedly until the language you want appears on the display. 5 Press to turn off the printer. 2 Press and hold followed by 3 Release the buttons.
... the software" on page 74 Setup troubleshooting Incorrect language appears on , press . Power button is not lit 1 Disconnect the power cord from the wall outlet, and then from the printer. 2 Plug the cord all the way into the power supply on the printer. 2 1 3 Plug the cord into an electrical outlet that other electrical devices have been using. 4 If... XP 58 until the display reads Language Reset. 4 Press or repeatedly until the language you want appears on the display. 5 Press to turn off the printer. 2 Press and hold followed by 3 Release the buttons.
User's Guide
Page 59
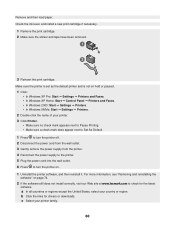
... software applications. 2 Disable any obvious damage. 2 Firmly plug the rectangular end of the USB cable into the wall outlet. 6 Press to the printer. 5 Plug the power cord into the USB port of the computer. In Windows XP, click Start to access the My Computer icon. 4 Double-click the CD-ROM drive... icon. 5 If necessary, double-click setup.exe. 6 Follow the instructions on the computer screen to install the software. 1 Visit our Web site at www.lexmark...
... software applications. 2 Disable any obvious damage. 2 Firmly plug the rectangular end of the USB cable into the wall outlet. 6 Press to the printer. 5 Plug the power cord into the USB port of the computer. In Windows XP, click Start to access the My Computer icon. 4 Double-click the CD-ROM drive... icon. 5 If necessary, double-click setup.exe. 6 Follow the instructions on the computer screen to install the software. 1 Visit our Web site at www.lexmark...
User's Guide
Page 60
... the software still does not install correctly, visit our Web site at www.lexmark.com to turn the printer off. 2 Disconnect the power cord from the wall outlet. 3 Gently remove the power supply from the printer. 4 Reconnect the power supply to the printer. 5 Plug the power cord into the wall outlet. 6 Press to check for drivers or downloads. For more...
... the software still does not install correctly, visit our Web site at www.lexmark.com to turn the printer off. 2 Disconnect the power cord from the wall outlet. 3 Gently remove the power supply from the printer. 4 Reconnect the power supply to the printer. 5 Plug the power cord into the wall outlet. 6 Press to check for drivers or downloads. For more...
User's Guide
Page 71
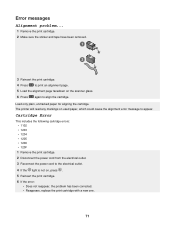
Load only plain, unmarked paper for aligning the cartridge. The printer will read any markings on used paper, which could cause the alignment error message to...• 1203 • 1204 • 1205 • 1206 • 120F 1 Remove the print cartridge. 2 Disconnect the power cord from the electrical outlet. 3 Reconnect the power cord to appear. Error messages Alignment problem... 1 Remove the print cartridge. 2 Make sure the sticker and tape have been removed....: • Does not reappear, the problem has been corrected. • Reappears, replace the print cartridge with a new one. 71
Load only plain, unmarked paper for aligning the cartridge. The printer will read any markings on used paper, which could cause the alignment error message to...• 1203 • 1204 • 1205 • 1206 • 120F 1 Remove the print cartridge. 2 Disconnect the power cord from the electrical outlet. 3 Reconnect the power cord to appear. Error messages Alignment problem... 1 Remove the print cartridge. 2 Make sure the sticker and tape have been removed....: • Does not reappear, the problem has been corrected. • Reappears, replace the print cartridge with a new one. 71

User's Guide
Page 79
Mode Description Power consumption (Watts) High Off The product is plugged into a wall outlet, but the power switch n/a is turned off. Low Off (
Mode Description Power consumption (Watts) High Off The product is plugged into a wall outlet, but the power switch n/a is turned off. Low Off (

