User's Guide
Page 6
... Memory card cannot be inserted...70 Nothing happens when a memory card is inserted 70 Error messages on display...70 Error messages...71 Alignment problem...71 Cartridge Error...71 Cartridge missing...72 Change paper or photo size setting 72 Clear the carrier jam...72 Clear the paper jam...72 Color... ink low...72 Could not detect a proof sheet 72 Computer not connected...73 Insert camera/memory card...73 Invalid photo/paper size selection 73 Load paper......
... Memory card cannot be inserted...70 Nothing happens when a memory card is inserted 70 Error messages on display...70 Error messages...71 Alignment problem...71 Cartridge Error...71 Cartridge missing...72 Change paper or photo size setting 72 Clear the carrier jam...72 Clear the paper jam...72 Color... ink low...72 Could not detect a proof sheet 72 Computer not connected...73 Insert camera/memory card...73 Invalid photo/paper size selection 73 Load paper......
User's Guide
Page 22
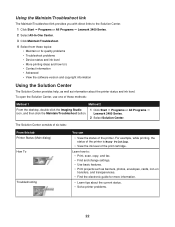
...; Find the electronic guide for more information. • Learn tips about the printer status and ink level. The Solution Center consists of six tabs: From this tab Printer Status (Main dialog) How... To Troubleshooting You can • View the status of the print cartridge. Learn how to: • Print, scan, copy, and fax. • Find and change settings... with direct links to the Solution Center. 1 Click Start Œ Programs or All Programs Œ Lexmark 3400 Series. 2 Select All-In-One Center. 3 Click Maintain/Troubleshoot. 4 Select from these methods:...
...; Find the electronic guide for more information. • Learn tips about the printer status and ink level. The Solution Center consists of six tabs: From this tab Printer Status (Main dialog) How... To Troubleshooting You can • View the status of the print cartridge. Learn how to: • Print, scan, copy, and fax. • Find and change settings... with direct links to the Solution Center. 1 Click Start Œ Programs or All Programs Œ Lexmark 3400 Series. 2 Select All-In-One Center. 3 Click Maintain/Troubleshoot. 4 Select from these methods:...
User's Guide
Page 23
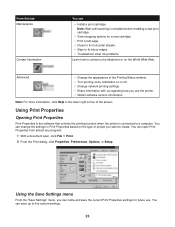
...the World Wide Web. You can save the current Print Properties settings for a new cartridge. • Print a test page. • Clean to fix horizontal streaks. • Align to fix blurry edges. • Troubleshoot other ink problems. Learn how to contact us regarding how you use . You can open ... menu From the "Save Settings" menu, you can name and save up to five custom settings. 23 You can • Install a print cartridge. From this tab Maintenance Contact Information You can change the settings in the lower right corner of the Printing Status window. • Turn printing...
...the World Wide Web. You can save the current Print Properties settings for a new cartridge. • Print a test page. • Clean to fix horizontal streaks. • Align to fix blurry edges. • Troubleshoot other ink problems. Learn how to contact us regarding how you use . You can open ... menu From the "Save Settings" menu, you can name and save up to five custom settings. 23 You can • Install a print cartridge. From this tab Maintenance Contact Information You can change the settings in the lower right corner of the Printing Status window. • Turn printing...
User's Guide
Page 55
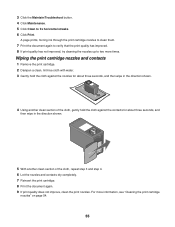
...ink through the print cartridge nozzles to clean them. 7 Print the document again to verify that the print quality has improved. 8 If print quality has not improved, try cleaning the nozzles up to fix horizontal streaks. 6 Click Print. For more times. Wiping the print cartridge nozzles and contacts 1 Remove the print cartridge...clean section of the cloth, repeat step 3 and step 4. 6 Let the nozzles and contacts dry completely. 7 Reinsert the print cartridge. 8 Print the document again. 9 If print quality does not improve, clean the print nozzles. 3 Click the Maintain/Troubleshoot button....
...ink through the print cartridge nozzles to clean them. 7 Print the document again to verify that the print quality has improved. 8 If print quality has not improved, try cleaning the nozzles up to fix horizontal streaks. 6 Click Print. For more times. Wiping the print cartridge nozzles and contacts 1 Remove the print cartridge...clean section of the cloth, repeat step 3 and step 4. 6 Let the nozzles and contacts dry completely. 7 Reinsert the print cartridge. 8 Print the document again. 9 If print quality does not improve, clean the print nozzles. 3 Click the Maintain/Troubleshoot button....
User's Guide
Page 56
... an extended period of Original Lexmark Ink message, the original Lexmark ink in an airtight container. Item Part number Print cartridge 1 USB cable 12A2405 Lexmark Photo Paper and Premium Photo Paper Varies by non-Lexmark ink or print cartridges. 56 Lexmark's warranty does not cover damage caused by country or region Using genuine Lexmark print cartridges Lexmark printers, print cartridges, and photo paper are...
... an extended period of Original Lexmark Ink message, the original Lexmark ink in an airtight container. Item Part number Print cartridge 1 USB cable 12A2405 Lexmark Photo Paper and Premium Photo Paper Varies by non-Lexmark ink or print cartridges. 56 Lexmark's warranty does not cover damage caused by country or region Using genuine Lexmark print cartridges Lexmark printers, print cartridges, and photo paper are...
User's Guide
Page 60
... more information, see "Removing and reinstalling the software" on page 74. 2 If the software still does not install correctly, visit our Web site at www.lexmark.com to turn the printer on hold or paused. 1 Click: • In Windows XP Pro: Start Œ Settings Œ Printers and Faxes. &#...printer. 5 Plug the power cord into the wall outlet. 6 Press to check for drivers or downloads. c Select your printer family. 60 Check the ink level, and install a new print cartridge if necessary. 1 Remove the print cartridge. 2 Make sure the sticker and tape have been removed. 3 Reinsert the print...
... more information, see "Removing and reinstalling the software" on page 74. 2 If the software still does not install correctly, visit our Web site at www.lexmark.com to turn the printer on hold or paused. 1 Click: • In Windows XP Pro: Start Œ Settings Œ Printers and Faxes. &#...printer. 5 Plug the power cord into the wall outlet. 6 Press to check for drivers or downloads. c Select your printer family. 60 Check the ink level, and install a new print cartridge if necessary. 1 Remove the print cartridge. 2 Make sure the sticker and tape have been removed. 3 Reinsert the print...

User's Guide
Page 62
..., see "Removing and reinstalling the software" on transfer Note: Transparencies may take up to 15 minutes to check for drivers and downloads. Use Lexmark Premium Photo Paper if you want to download, and follow the directions on page 61. e Select your printer model. Use only new, unwrinkled...; Light and dark bands in print • Skewed lines • Smudges • Streaks • White lines in print Check the ink level, and install a new print cartridge if necessary. f Select the file you are working with the following media, remove each sheet as it exits, and allow it . ...
..., see "Removing and reinstalling the software" on transfer Note: Transparencies may take up to 15 minutes to check for drivers and downloads. Use Lexmark Premium Photo Paper if you want to download, and follow the directions on page 61. e Select your printer model. Use only new, unwrinkled...; Light and dark bands in print • Skewed lines • Smudges • Streaks • White lines in print Check the ink level, and install a new print cartridge if necessary. f Select the file you are working with the following media, remove each sheet as it exits, and allow it . ...
User's Guide
Page 65
... more information, see "Removing and reinstalling the software" on page 74. 2 If the software still does not install correctly, visit our Web site at www.lexmark.com to Set As Default. 1 Uninstall the printer software, and then reinstall it with a clean, lint-free cloth dampened with water. • Unexpected characters •... document or photo is dirty, gently wipe it . If the scanner glass is loaded correctly on page 71. c Select your country or region. Check the ink level, and install a new print cartridge if necessary.
... more information, see "Removing and reinstalling the software" on page 74. 2 If the software still does not install correctly, visit our Web site at www.lexmark.com to Set As Default. 1 Uninstall the printer software, and then reinstall it with a clean, lint-free cloth dampened with water. • Unexpected characters •... document or photo is dirty, gently wipe it . If the scanner glass is loaded correctly on page 71. c Select your country or region. Check the ink level, and install a new print cartridge if necessary.
User's Guide
Page 68
...printer To automatically eject the paper: 1 Press and hold . 2 Remove the paper from the paper exit tray. Check the ink level, and install a new cartridge if necessary. 1 Remove the print cartridge. 2 Make sure the sticker and tape have been a problem with the quality of the original document is not lit" on... . There may have been removed. 3 Reinsert the print cartridge. If the light is not on, see "Power button is satisfactory. • Resend the fax. To manually remove the paper: 1 Press to ...
...printer To automatically eject the paper: 1 Press and hold . 2 Remove the paper from the paper exit tray. Check the ink level, and install a new cartridge if necessary. 1 Remove the print cartridge. 2 Make sure the sticker and tape have been a problem with the quality of the original document is not lit" on... . There may have been removed. 3 Reinsert the print cartridge. If the light is not on, see "Power button is satisfactory. • Resend the fax. To manually remove the paper: 1 Press to ...
User's Guide
Page 72
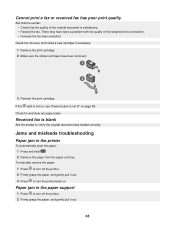
...1 Raise the scanner unit. 2 Remove any objects blocking the path of the cartridge carrier. 3 Make sure the cartridge lid is 25% full, 15% full, and 10% full. Color ink low 1 Check the ink level, and install a new cartridge if necessary. To order supplies, see "Printing photos stored on a memory card... using the proof sheet" on page 38, or "Loading original documents on the scanner glass" on page 30. 72 The low ink warning occurs when the cartridge is closed. 4 Close the scanner unit. 5 Press . Could not detect a proof sheet The document placed on page 68. to ...
...1 Raise the scanner unit. 2 Remove any objects blocking the path of the cartridge carrier. 3 Make sure the cartridge lid is 25% full, 15% full, and 10% full. Color ink low 1 Check the ink level, and install a new cartridge if necessary. To order supplies, see "Printing photos stored on a memory card... using the proof sheet" on page 38, or "Loading original documents on the scanner glass" on page 30. 72 The low ink warning occurs when the cartridge is closed. 4 Close the scanner unit. 5 Press . Could not detect a proof sheet The document placed on page 68. to ...
User's Guide
Page 80
... beyond repair, or if the product is not free of all print cartridges, programs, data, and removable storage media (unless directed otherwise by Lexmark TO THE EXTENT PERMITTED BY APPLICABLE LAW, NEITHER LEXMARK NOR ITS THIRD PARTY SUPPLIERS OR REMARKETERS MAKE ANY OTHER WARRANTY OR CONDITION.... Limited warranty service The warranty period starts on the date of original purchase as ink) not furnished by Lexmark -Products, components, parts, materials, software, or interfaces not furnished by Lexmark). ANY WARRANTIES THAT MAY NOT BE DISCLAIMED UNDER APPLICABLE LAW ARE LIMITED IN DURATION...
... beyond repair, or if the product is not free of all print cartridges, programs, data, and removable storage media (unless directed otherwise by Lexmark TO THE EXTENT PERMITTED BY APPLICABLE LAW, NEITHER LEXMARK NOR ITS THIRD PARTY SUPPLIERS OR REMARKETERS MAKE ANY OTHER WARRANTY OR CONDITION.... Limited warranty service The warranty period starts on the date of original purchase as ink) not furnished by Lexmark -Products, components, parts, materials, software, or interfaces not furnished by Lexmark). ANY WARRANTIES THAT MAY NOT BE DISCLAIMED UNDER APPLICABLE LAW ARE LIMITED IN DURATION...
User's Guide
Page 82
... 52 wiping 55 change paper or photo size setting error 72 change paper size setting error 74 cleaning print cartridge nozzles 54 coated paper, loading 27 collating copies 34 color ink low 72 computer not connected error 73 Contact Information tab 23 contents, box 13 control panel 14 Copy menu... an image 43 envelopes loading 28 printing 33 error messages alignment problem 71 carrier jam 72 cartridge error 71 cartridge missing 72 change paper or photo size setting 72 change paper size setting 74 color ink low 72 computer not connected 73 could not detect a proof sheet 72 insert camera/memory...
... 52 wiping 55 change paper or photo size setting error 72 change paper size setting error 74 cleaning print cartridge nozzles 54 coated paper, loading 27 collating copies 34 color ink low 72 computer not connected error 73 Contact Information tab 23 contents, box 13 control panel 14 Copy menu... an image 43 envelopes loading 28 printing 33 error messages alignment problem 71 carrier jam 72 cartridge error 71 cartridge missing 72 change paper or photo size setting 72 change paper size setting 74 color ink low 72 computer not connected 73 could not detect a proof sheet 72 insert camera/memory...
User's Guide
Page 83
... language appears on display 58 index cards loading 28 printing 32 information, finding 9 ink level, checking 22 insert camera/memory card error 73 inserting memory cards 36 PictBridge-enabled digital camera 37 installing print cartridge 52 printer software 74 invalid photo/paper size selection 73 iron-on transfers, loading 28...14 display 14 memory card slots 14 paper exit tray 14 paper guide 14 paper support 14 PictBridge port 14 power supply 15 print cartridge carrier 14 scanner glass 14 scanner support 14 scanner unit 15 top cover 14 USB port 15 Photo Card menu 16 photo cards, loading...
... language appears on display 58 index cards loading 28 printing 32 information, finding 9 ink level, checking 22 insert camera/memory card error 73 inserting memory cards 36 PictBridge-enabled digital camera 37 installing print cartridge 52 printer software 74 invalid photo/paper size selection 73 iron-on transfers, loading 28...14 display 14 memory card slots 14 paper exit tray 14 paper guide 14 paper support 14 PictBridge port 14 power supply 15 print cartridge carrier 14 scanner glass 14 scanner support 14 scanner unit 15 top cover 14 USB port 15 Photo Card menu 16 photo cards, loading...
User's Guide
Page 85
... quality 64 scanner unit does not close 64 troubleshooting, error messages alignment problem 71 carrier jam 72 cartridge error 71 cartridge missing 72 change paper or photo size setting 72 change paper size setting 74 color ink low 72 computer not connected 73 could not detect a proof sheet 72 insert camera/memory card...
... quality 64 scanner unit does not close 64 troubleshooting, error messages alignment problem 71 carrier jam 72 cartridge error 71 cartridge missing 72 change paper or photo size setting 72 change paper size setting 74 color ink low 72 computer not connected 73 could not detect a proof sheet 72 insert camera/memory card...


