
Troubleshooting Guide
Page 2
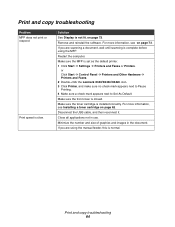
... Minimize the number and size of paper into the MFP. or Click Start Control Panel Printers and Other Hardware Printers and Faxes. 2 Double-click the Lexmark X340/X340n/ X342n icon. 3 Click Printer, and make sure the guides are against both sides. • For copies, adjust the darkness settings by ... appears. 3 Press . 4 Press or repeatedly until scanning is complete before using the manual feeder, this is set as the default printer. 1 Click Start Settings Printers and Faxes or Printers. Straighten the edges on both sides of the envelope.
... Minimize the number and size of paper into the MFP. or Click Start Control Panel Printers and Other Hardware Printers and Faxes. 2 Double-click the Lexmark X340/X340n/ X342n icon. 3 Click Printer, and make sure the guides are against both sides. • For copies, adjust the darkness settings by ... appears. 3 Press . 4 Press or repeatedly until scanning is complete before using the manual feeder, this is set as the default printer. 1 Click Start Settings Printers and Faxes or Printers. Straighten the edges on both sides of the envelope.

Troubleshooting Guide
Page 4
...From the control panel, press Scan. 2 From the QLINK dialog on hold or paused. 1 Click Start Settings Printers and Faxes or Printers. For more information, see "Removing and reinstalling the drivers software" on the scanner glass. • Check the Prefix setting. 1 ... replace the photoconductor. or Click Start Control Panel Printers and Other Hardware Printers and Faxes. 2 Double-click the Lexmark X340/X340n/ X342n icon. 3 Click Printer, and make sure that have been stored in the printer. • Check to use . • If you are secure, ...
...From the control panel, press Scan. 2 From the QLINK dialog on hold or paused. 1 Click Start Settings Printers and Faxes or Printers. For more information, see "Removing and reinstalling the drivers software" on the scanner glass. • Check the Prefix setting. 1 ... replace the photoconductor. or Click Start Control Panel Printers and Other Hardware Printers and Faxes. 2 Double-click the Lexmark X340/X340n/ X342n icon. 3 Click Printer, and make sure that have been stored in the printer. • Check to use . • If you are secure, ...
User's Guide
Page 7
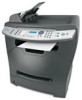
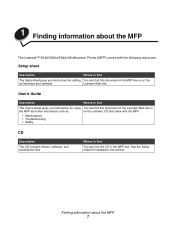
... site or the MFP and other information such as: on the up hardware and software. Finding information about the MFP The Lexmark™ X340/X340n/X342n Multifunction Printer (MFP) comes with the MFP. • Maintenance • Troubleshooting • Safety CD Description The CD contains drivers, software, and publications files. Where to find The ...
... site or the MFP and other information such as: on the up hardware and software. Finding information about the MFP The Lexmark™ X340/X340n/X342n Multifunction Printer (MFP) comes with the MFP. • Maintenance • Troubleshooting • Safety CD Description The CD contains drivers, software, and publications files. Where to find The ...
User's Guide
Page 84
... MFP is not lit. Solution See Display is set as the default printer. 1 Click Start Æ Settings Æ Printers and Faxes or Printers. or Click Start Æ Control Panel Æ Printers and Other Hardware Æ Printers and Faxes. 2 Double-click the Lexmark X340/X340n/X342n icon. 3 Click Printer, and make sure no check mark appears next to Pause Printing...
... MFP is not lit. Solution See Display is set as the default printer. 1 Click Start Æ Settings Æ Printers and Faxes or Printers. or Click Start Æ Control Panel Æ Printers and Other Hardware Æ Printers and Faxes. 2 Double-click the Lexmark X340/X340n/X342n icon. 3 Click Printer, and make sure no check mark appears next to Pause Printing...

User's Guide
Page 88
Make sure the MFP is set as the default printer and is an error message, see Removing and reinstalling the drivers software on page 54. If you are printing a document, wait until printing is done ... the software. For more information, see Error messages troubleshooting on page 91. or Click Start Æ Control Panel Æ Printers and Other Hardware Æ Printers and Faxes. 2 Double-click the Lexmark X340/X340n/X342n icon. 3 Click Printer, and make sure no check mark appears next to Pause Printing. 4 Make sure a check mark appears next to use...
Make sure the MFP is set as the default printer and is an error message, see Removing and reinstalling the drivers software on page 54. If you are printing a document, wait until printing is done ... the software. For more information, see Error messages troubleshooting on page 91. or Click Start Æ Control Panel Æ Printers and Other Hardware Æ Printers and Faxes. 2 Double-click the Lexmark X340/X340n/X342n icon. 3 Click Printer, and make sure no check mark appears next to Pause Printing. 4 Make sure a check mark appears next to use...
User's Guide
Page 100
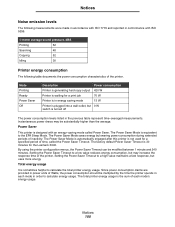
... Mode is designed with ISO 9296. 1-meter average sound pressure, dBA Printing 52 Scanning 48 Copying 52 Idling 30 Printer energy consumption The following table documents the power consumption characteristics of Watts, the power consumption should be multiplied by lowering ...power consumption claims are provided in power units of the printer. Notices 100 Mode Printing Ready Power Saver Off Description Power consumption Printer is generating hard copy output 420 W Printer is 30 minutes for the Lexmark X340. Notices Noise emission levels The following measurements were made...
... Mode is designed with ISO 9296. 1-meter average sound pressure, dBA Printing 52 Scanning 48 Copying 52 Idling 30 Printer energy consumption The following table documents the power consumption characteristics of Watts, the power consumption should be multiplied by lowering ...power consumption claims are provided in power units of the printer. Notices 100 Mode Printing Ready Power Saver Off Description Power consumption Printer is generating hard copy output 420 W Printer is 30 minutes for the Lexmark X340. Notices Noise emission levels The following measurements were made...


