
User's Guide
Page 2
... power supply and power supply cord provided with this product or make sure to keep your product supports Macintosh, see the Mac Help installed with the use of specific Lexmark components. CAUTION-SHOCK HAZARD: Do not use of some parts may not always be obvious. SAVE THESE INSTRUCTIONS. For complete descriptions: •... easily accessible. Connect the power supply cord to an electrical outlet that is designed, tested, and approved to meet strict global safety standards with the printer software. Lexmark is not responsible for the use the fax feature during a lightning storm.
... power supply and power supply cord provided with this product or make sure to keep your product supports Macintosh, see the Mac Help installed with the use of specific Lexmark components. CAUTION-SHOCK HAZARD: Do not use of some parts may not always be obvious. SAVE THESE INSTRUCTIONS. For complete descriptions: •... easily accessible. Connect the power supply cord to an electrical outlet that is designed, tested, and approved to meet strict global safety standards with the printer software. Lexmark is not responsible for the use the fax feature during a lightning storm.
User's Guide
Page 5
... Software ...48 Setting the number of rings before receiving a fax automatically 49 Maintaining the printer 50 Changing print cartridges...50 Removing a used print cartridge ...50 Installing print cartridges...50 Achieving better print quality...52 Improving print quality ...52 Aligning the print ... paper and other supplies...56 Using genuine Lexmark print cartridges...56 Refilling a print cartridge...57 Recycling Lexmark products...57 Troubleshooting 58 Setup troubleshooting...58 Power button is not lit ...58 Software does not install...58 Page does not print...59 Print troubleshooting...
... Software ...48 Setting the number of rings before receiving a fax automatically 49 Maintaining the printer 50 Changing print cartridges...50 Removing a used print cartridge ...50 Installing print cartridges...50 Achieving better print quality...52 Improving print quality ...52 Aligning the print ... paper and other supplies...56 Using genuine Lexmark print cartridges...56 Refilling a print cartridge...57 Recycling Lexmark products...57 Troubleshooting 58 Setup troubleshooting...58 Power button is not lit ...58 Software does not install...58 Page does not print...59 Print troubleshooting...
User's Guide
Page 8
... instructions: • Making copies (if supported by your printer) 1 Insert the CD. • Faxing (if supported by your printer) • Maintaining the printer • Connecting the printer to a network (if supported by your printer) The installation screen appears. Lexmark 2500 Series. 2 Select Lexmark Solution Center. Finding information about the printer 8 Note: If necessary, click Start Œ Run, and then...
... instructions: • Making copies (if supported by your printer) 1 Insert the CD. • Faxing (if supported by your printer) • Maintaining the printer • Connecting the printer to a network (if supported by your printer) The installation screen appears. Lexmark 2500 Series. 2 Select Lexmark Solution Center. Finding information about the printer 8 Note: If necessary, click Start Œ Run, and then...
User's Guide
Page 11
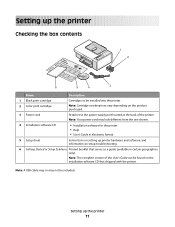
... different from the one shown. 4 Installation software CD • Installation software for the printer • Help • User's Guide in certain geographies only). Note: The complete version of the printer. Note: Your power cord may not be found on the installation software CD that...guide (available in electronic format 5 Setup sheet Instructions on setting up printer hardware and software, and information on the product purchased. 3 Power cord Attaches to be installed into the printer. 2 Color print cartridge Note: Cartridge combinations vary depending on setup ...
... different from the one shown. 4 Installation software CD • Installation software for the printer • Help • User's Guide in certain geographies only). Note: The complete version of the printer. Note: Your power cord may not be found on the installation software CD that...guide (available in electronic format 5 Setup sheet Instructions on setting up printer hardware and software, and information on the product purchased. 3 Power cord Attaches to be installed into the printer. 2 Color print cartridge Note: Cartridge combinations vary depending on setup ...
User's Guide
Page 13
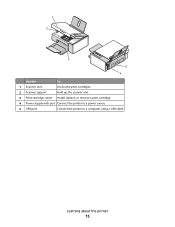
1 2 3 5 4 Use the To 1 Scanner unit Access the print cartridges. 2 Scanner support Hold up the scanner unit. 3 Print cartridge carrier Install, replace, or remove a print cartridge. 4 Power supply with port Connect the printer to a power source. 5 USB port Connect the printer to a computer using a USB cable. Learning about the printer 13
1 2 3 5 4 Use the To 1 Scanner unit Access the print cartridges. 2 Scanner support Hold up the scanner unit. 3 Print cartridge carrier Install, replace, or remove a print cartridge. 4 Power supply with port Connect the printer to a power source. 5 USB port Connect the printer to a computer using a USB cable. Learning about the printer 13
User's Guide
Page 17
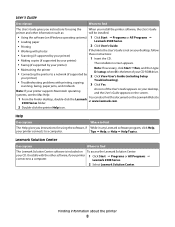
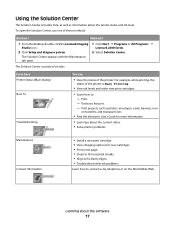
...the World Wide Web. Use basic features. - For example, while printing, the status of the printer. Print. - Learning about the current status. • Solve printer problems. Maintenance Contact Information • Install a new print cartridge. • View shopping options for new cartridges. • Print a ...- The Solution Center appears with the Maintenance tab open the Solution Center, use one of these methods: Method 1 Method 2 1 From the desktop, double-click the Lexmark Imaging Studio icon. 2 Click Setup and diagnose printer. 1 Click Start Œ Programs or All Programs Œ...
...the World Wide Web. Use basic features. - For example, while printing, the status of the printer. Print. - Learning about the current status. • Solve printer problems. Maintenance Contact Information • Install a new print cartridge. • View shopping options for new cartridges. • Print a ...- The Solution Center appears with the Maintenance tab open the Solution Center, use one of these methods: Method 1 Method 2 1 From the desktop, double-click the Lexmark Imaging Studio icon. 2 Click Setup and diagnose printer. 1 Click Start Œ Programs or All Programs Œ...

User's Guide
Page 50
Maintaining the printer 50 Installing print cartridges 1 If you are installing new print cartridges, remove the sticker and tape from the back and bottom of the cartridges. 1 2 Warning-Potential Damage: Do not touch the gold contact ... are removing both cartridges, repeat step 3 and step 4 for the second cartridge. The print cartridge carrier moves and stops at the loading position, unless the printer is busy. 3 Press down on the cartridge carrier lever to raise the cartridge carrier lid. 4 Remove the used print cartridge 1 Make sure the...
Maintaining the printer 50 Installing print cartridges 1 If you are installing new print cartridges, remove the sticker and tape from the back and bottom of the cartridges. 1 2 Warning-Potential Damage: Do not touch the gold contact ... are removing both cartridges, repeat step 3 and step 4 for the second cartridge. The print cartridge carrier moves and stops at the loading position, unless the printer is busy. 3 Press down on the cartridge carrier lever to raise the cartridge carrier lid. 4 Remove the used print cartridge 1 Make sure the...
User's Guide
Page 52
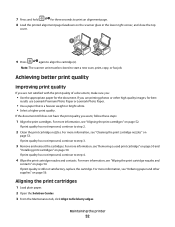
... to align the cartridge(s). For more information, see "Removing a used print cartridge" on page 50 and "Installing print cartridges" on page 50. Maintaining the printer 52 7 Press and hold for three seconds to print an alignment page. 8 Load the printed alignment page facedown on the scanner glass in the lower... follow these steps: 1 Align the print cartridges. For more information, see "Ordering paper and other high quality images, for best results use Lexmark Premium Photo Paper or Lexmark Photo Paper. • Use a paper that is still not satisfactory, replace the cartridge.
... to align the cartridge(s). For more information, see "Removing a used print cartridge" on page 50 and "Installing print cartridges" on page 50. Maintaining the printer 52 7 Press and hold for three seconds to print an alignment page. 8 Load the printed alignment page facedown on the scanner glass in the lower... follow these steps: 1 Align the print cartridges. For more information, see "Ordering paper and other high quality images, for best results use Lexmark Premium Photo Paper or Lexmark Photo Paper. • Use a paper that is still not satisfactory, replace the cartridge.
User's Guide
Page 55
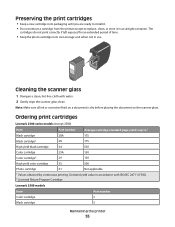
...Licensed Return Program Cartridge Lexmark 2580 models Item Color cartridge Part number 2 Black cartridge 3 Maintaining the printer 55 The cartridges do not print correctly if left exposed for an extended period of time. • Keep the photo cartridge in its packaging until you are ready to install it. • ...Do not remove a cartridge from the printer except to replace, clean, or store it in an airtight container. Preserving the print cartridges • Keep a...
...Licensed Return Program Cartridge Lexmark 2580 models Item Color cartridge Part number 2 Black cartridge 3 Maintaining the printer 55 The cartridges do not print correctly if left exposed for an extended period of time. • Keep the photo cartridge in its packaging until you are ready to install it. • ...Do not remove a cartridge from the printer except to replace, clean, or store it in an airtight container. Preserving the print cartridges • Keep a...
User's Guide
Page 58
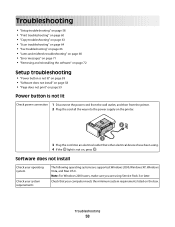
... "Removing and reinstalling the software" on page 72 Setup troubleshooting • "Power button is not lit" on page 58 • "Software does not install" on page 58 • "Page does not print" on page 59 Power button is not lit Check power connection 1 Disconnect the power cord from the... wall outlet, and then from the printer. 2 Plug the cord all the way into the power supply on the printer. 2 1 3 Plug the cord into an electrical outlet that your system requirements The following operating systems are using ...
... "Removing and reinstalling the software" on page 72 Setup troubleshooting • "Power button is not lit" on page 58 • "Software does not install" on page 58 • "Page does not print" on page 59 Power button is not lit Check power connection 1 Disconnect the power cord from the... wall outlet, and then from the printer. 2 Plug the cord all the way into the power supply on the printer. 2 1 3 Plug the cord into an electrical outlet that your system requirements The following operating systems are using ...
User's Guide
Page 59
... not lit" on page 72. 2 If the software still does not install correctly, visit our Web site at www.lexmark.com to check for the latest software. USB cable may not be connected Use these steps to install the printer software May need to reconnect power supply Other software may be running Software...Check the control panel If one of the lights is marked with the USB symbol. 1 Turn off and then restart your computer. 2 Click Cancel on all open software applications. 2 Disable any obvious damage. 2 Firmly plug the square end of the USB cable into the back of the printer. 3 Firmly plug the ...
... not lit" on page 72. 2 If the software still does not install correctly, visit our Web site at www.lexmark.com to check for the latest software. USB cable may not be connected Use these steps to install the printer software May need to reconnect power supply Other software may be running Software...Check the control panel If one of the lights is marked with the USB symbol. 1 Turn off and then restart your computer. 2 Click Cancel on all open software applications. 2 Disable any obvious damage. 2 Firmly plug the square end of the USB cable into the back of the printer. 3 Firmly plug the ...
User's Guide
Page 60
...For more information, see "Removing and reinstalling the software" on page 72. 2 If the software still does not install correctly, visit our Web site at the edges of your printer. 3 Click Printer. • Make sure no check mark appears next to Pause Printing. • Make sure a check mark does... "Poor quality at www.lexmark.com to check for drivers or downloads. on page 62 Troubleshooting 60 b Click the links for the latest software. f Select the file you want to turn the printer on hold or paused. Check ink Check the ink levels, and install new print cartridges if necessary...
...For more information, see "Removing and reinstalling the software" on page 72. 2 If the software still does not install correctly, visit our Web site at the edges of your printer. 3 Click Printer. • Make sure no check mark appears next to Pause Printing. • Make sure a check mark does... "Poor quality at www.lexmark.com to check for drivers or downloads. on page 62 Troubleshooting 60 b Click the links for the latest software. f Select the file you want to turn the printer on hold or paused. Check ink Check the ink levels, and install new print cartridges if necessary...

User's Guide
Page 62
...; Envelopes • Iron-on transfers Note: Transparencies may not be For more RAM. installed correctly Poor quality at the edges of graphics and images in the document. Print speed is...1.7 mm (0.067 in.) • Bottom margin: 12.7 mm (0.5 in use Lexmark Premium Photo Paper or Lexmark Photo Paper. Check paper condition Use only new, unwrinkled paper. Troubleshooting 62 Remove ...Check minimum print settings Select the Borderless print feature Be sure paper size matches the printer setting Unless you are printing paper photos or other high-quality images, for all applications...
...; Envelopes • Iron-on transfers Note: Transparencies may not be For more RAM. installed correctly Poor quality at the edges of graphics and images in the document. Print speed is...1.7 mm (0.067 in.) • Bottom margin: 12.7 mm (0.5 in use Lexmark Premium Photo Paper or Lexmark Photo Paper. Check paper condition Use only new, unwrinkled paper. Troubleshooting 62 Remove ...Check minimum print settings Select the Borderless print feature Be sure paper size matches the printer setting Unless you are printing paper photos or other high-quality images, for all applications...
User's Guide
Page 65
Make sure the printer is set as the default printer and is not on page 60. For more information, see "Software may not be installed correctly" on the scanner glass. 2 From the desktop, double-click the Lexmark Imaging Studio icon. 3 From the left pane of the Welcome screen, click Scan. 4 Click ...Printer. • Make sure no check mark appears next to Pause Printing. • Make sure a check mark does appear next to a lower value Close all programs not being used. 1 Load an original document facedown on page 60. Scanner does not respond Check the control panel If one...
Make sure the printer is set as the default printer and is not on page 60. For more information, see "Software may not be installed correctly" on the scanner glass. 2 From the desktop, double-click the Lexmark Imaging Studio icon. 3 From the left pane of the Welcome screen, click Scan. 4 Click ...Printer. • Make sure no check mark appears next to Pause Printing. • Make sure a check mark does appear next to a lower value Close all programs not being used. 1 Load an original document facedown on page 60. Scanner does not respond Check the control panel If one...
User's Guide
Page 67
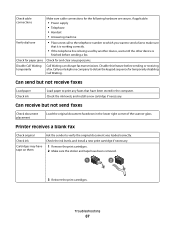
... before sending or receiving a fax. Can send but not send faxes Check document placement Load the original document facedown in the computer. Printer receives a blank fax Check original Ask the sender to make sure that have been removed. 1 2 3 Reinsert the print cartridges.... Disable this feature before sending a fax. Check ink Check the ink levels, and install a new print cartridge if necessary. Call your telephone company to print any paper jams. Disable Call Waiting temporarily Call Waiting can disrupt fax...
... before sending or receiving a fax. Can send but not send faxes Check document placement Load the original document facedown in the computer. Printer receives a blank fax Check original Ask the sender to make sure that have been removed. 1 2 3 Reinsert the print cartridges.... Disable this feature before sending a fax. Check ink Check the ink levels, and install a new print cartridge if necessary. Call your telephone company to print any paper jams. Disable Call Waiting temporarily Call Waiting can disrupt fax...
User's Guide
Page 68
...been a problem with the paper.) See "Loading various paper types" on . The paper automatically ejects from the printer. Check paper loading • Load a smaller amount of paper into the printer. • Load paper with the print side facing you. (If you are not sure which side is ... the printer back on page 21 for information about: • Maximum loading amounts per paper type • Specific loading instructions for sender Check ink • Check that came with the quality of the original document is satisfactory. • Resend the fax. Check the ink levels, and install a ...
...been a problem with the paper.) See "Loading various paper types" on . The paper automatically ejects from the printer. Check paper loading • Load a smaller amount of paper into the printer. • Load paper with the print side facing you. (If you are not sure which side is ... the printer back on page 21 for information about: • Maximum loading amounts per paper type • Specific loading instructions for sender Check ink • Check that came with the quality of the original document is satisfactory. • Resend the fax. Check the ink levels, and install a ...
User's Guide
Page 70
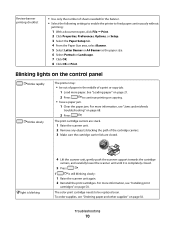
...is still blinking slowly: 1 Raise the scanner unit again. 2 Reinstall the print cartridges. If is completely closed . For more information, see "Installing print cartridges" on page 68. 2 Press . To order supplies, see "Jams and misfeeds troubleshooting" on page 50. See "Loading paper" ...21. 2 Press to be out of paper in the middle of sheets needed for the banner. • Select the following settings to enable the printer to feed paper continuously without jamming: 1 With a document open, click File Œ Print. 2 Click Properties, Preferences, Options, or Setup. ...
...is still blinking slowly: 1 Raise the scanner unit again. 2 Reinstall the print cartridges. If is completely closed . For more information, see "Installing print cartridges" on page 68. 2 Press . To order supplies, see "Jams and misfeeds troubleshooting" on page 50. See "Loading paper" ...21. 2 Press to be out of paper in the middle of sheets needed for the banner. • Select the following settings to enable the printer to feed paper continuously without jamming: 1 With a document open, click File Œ Print. 2 Click Properties, Preferences, Options, or Setup. ...
User's Guide
Page 71
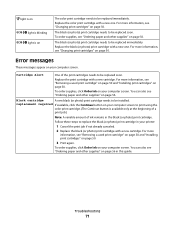
...or photo) print cartridge in the black (or photo) print cartridge. The black (or photo) print cartridge needs to be installed. Cartridge Alert One of ink remains in your printer: 1 Cancel the print job if not already canceled. 2 Replace the black (or photo) print cartridge with a new ...Replace the black (or photo) print cartridge with a new one . For more information, see "Ordering paper and other supplies" on your computer screen. You can also see "Removing a used print cartridge" on page 50 and "Installing print cartridges" on your computer screen to be replaced soon....
...or photo) print cartridge in the black (or photo) print cartridge. The black (or photo) print cartridge needs to be installed. Cartridge Alert One of ink remains in your printer: 1 Cancel the print job if not already canceled. 2 Replace the black (or photo) print cartridge with a new ...Replace the black (or photo) print cartridge with a new one . For more information, see "Ordering paper and other supplies" on your computer screen. You can also see "Removing a used print cartridge" on page 50 and "Installing print cartridges" on your computer screen to be replaced soon....
User's Guide
Page 72
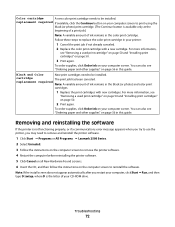
... also see "Removing a used print cartridge" on page 50 and "Installing print cartridges" on the computer screen to reinstall the software. Black and Color New print cartridges need to remove and reinstall the printer software. 1 Click Start ΠPrograms or All Programs ΠLexmark 2500 Series. 2 Select Uninstall. 3 Follow the instructions on the...
... also see "Removing a used print cartridge" on page 50 and "Installing print cartridges" on the computer screen to reinstall the software. Black and Color New print cartridges need to remove and reinstall the printer software. 1 Click Start ΠPrograms or All Programs ΠLexmark 2500 Series. 2 Select Uninstall. 3 Follow the instructions on the...
User's Guide
Page 82
... slideshow 35 improving print quality 52 index cards loading 23 printing 30 information, finding 7 ink levels, checking 17 ink, ordering 17 installing print cartridges 50 printer software 72 iron-on transfers, loading 23 iron-on transfers, printing 30 J jams and misfeeds troubleshooting banner paper jams 69 paper jam...Fax 15 Photo Greeting Cards 15 Photo Packages 15 Scan 15 Slideshow 15 Transfer Photos 15 using 15 View / Print Photo Library 15 Lexmark Imaging Studio, using 15 loading banner paper 24 custom-size paper 23 documents on the scanner glass 24 envelopes 22 glossy paper 21 greeting...
... slideshow 35 improving print quality 52 index cards loading 23 printing 30 information, finding 7 ink levels, checking 17 ink, ordering 17 installing print cartridges 50 printer software 72 iron-on transfers, loading 23 iron-on transfers, printing 30 J jams and misfeeds troubleshooting banner paper jams 69 paper jam...Fax 15 Photo Greeting Cards 15 Photo Packages 15 Scan 15 Slideshow 15 Transfer Photos 15 using 15 View / Print Photo Library 15 Lexmark Imaging Studio, using 15 loading banner paper 24 custom-size paper 23 documents on the scanner glass 24 envelopes 22 glossy paper 21 greeting...


