
User's Guide
Page 2
... CAUTION-SHOCK HAZARD: Do not use the fax feature during a lightning storm. Connect the power supply cord to an electrical outlet that is not responsible for the use of specific Lexmark components. For complete descriptions: • Windows users-See the User's Guide. •...Macintosh users-If your hands out from underneath the scanner unit. Important safety information Use only the power supply and power supply cord provided with the printer software. Lexmark is near the product and easily accessible. SAVE THESE INSTRUCTIONS. Operating system notice All features and ...
... CAUTION-SHOCK HAZARD: Do not use the fax feature during a lightning storm. Connect the power supply cord to an electrical outlet that is not responsible for the use of specific Lexmark components. For complete descriptions: • Windows users-See the User's Guide. •...Macintosh users-If your hands out from underneath the scanner unit. Important safety information Use only the power supply and power supply cord provided with the printer software. Lexmark is near the product and easily accessible. SAVE THESE INSTRUCTIONS. Operating system notice All features and ...
User's Guide
Page 5
...Customizing settings using the Fax Solution Software ...48 Setting the number of rings before receiving a fax automatically 49 Maintaining the printer 50 Changing print cartridges...50 Removing a used print cartridge ...50 Installing print cartridges...50 Achieving better print quality...52 Improving... Ordering print cartridges...55 Ordering paper and other supplies...56 Using genuine Lexmark print cartridges...56 Refilling a print cartridge...57 Recycling Lexmark products...57 Troubleshooting 58 Setup troubleshooting...58 Power button is not lit ...58 Software does not install...58 Page does...
...Customizing settings using the Fax Solution Software ...48 Setting the number of rings before receiving a fax automatically 49 Maintaining the printer 50 Changing print cartridges...50 Removing a used print cartridge ...50 Installing print cartridges...50 Achieving better print quality...52 Improving... Ordering print cartridges...55 Ordering paper and other supplies...56 Using genuine Lexmark print cartridges...56 Refilling a print cartridge...57 Recycling Lexmark products...57 Troubleshooting 58 Setup troubleshooting...58 Power button is not lit ...58 Software does not install...58 Page does...
User's Guide
Page 6
...66 Fax troubleshooting...66 Cannot send or receive a fax...66 Can send but not receive faxes...67 Can receive but not send faxes...67 Printer receives a blank fax...67 Received fax has poor print quality...68 Jams and misfeeds troubleshooting...68 Paper jams...68 Paper or specialty media misfeeds......68 Printer does not feed paper, envelopes, or specialty media 69 Banner paper jams ...69 Blinking lights on the control panel...70 Error messages...71 ...
...66 Fax troubleshooting...66 Cannot send or receive a fax...66 Can send but not receive faxes...67 Can receive but not send faxes...67 Printer receives a blank fax...67 Received fax has poor print quality...68 Jams and misfeeds troubleshooting...68 Paper jams...68 Paper or specialty media misfeeds......68 Printer does not feed paper, envelopes, or specialty media 69 Banner paper jams ...69 Blinking lights on the control panel...70 Error messages...71 ...

User's Guide
Page 11
...power cord may not be found on setup troubleshooting. 6 Getting Started or Setup Solutions Printed booklet that shipped with the printer. Setting up printer hardware and software, and information on the installation software CD that serves as a guide (available in certain geographies only). Note: A USB cable may or may look different from the one... shown. 4 Installation software CD • Installation software for the printer • Help • User's Guide in electronic format 5 Setup sheet Instructions on setting up the printer Checking the box ...
...power cord may not be found on setup troubleshooting. 6 Getting Started or Setup Solutions Printed booklet that shipped with the printer. Setting up printer hardware and software, and information on the installation software CD that serves as a guide (available in certain geographies only). Note: A USB cable may or may look different from the one... shown. 4 Installation software CD • Installation software for the printer • Help • User's Guide in electronic format 5 Setup sheet Instructions on setting up the printer Checking the box ...
User's Guide
Page 13
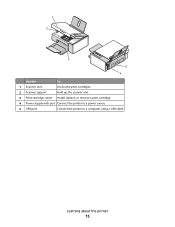
1 2 3 5 4 Use the To 1 Scanner unit Access the print cartridges. 2 Scanner support Hold up the scanner unit. 3 Print cartridge carrier Install, replace, or remove a print cartridge. 4 Power supply with port Connect the printer to a power source. 5 USB port Connect the printer to a computer using a USB cable. Learning about the printer 13
1 2 3 5 4 Use the To 1 Scanner unit Access the print cartridges. 2 Scanner support Hold up the scanner unit. 3 Print cartridge carrier Install, replace, or remove a print cartridge. 4 Power supply with port Connect the printer to a power source. 5 USB port Connect the printer to a computer using a USB cable. Learning about the printer 13
User's Guide
Page 58
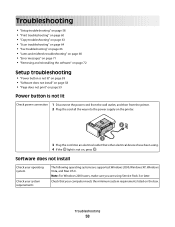
... and misfeeds troubleshooting" on page 68 • "Error messages" on page 71 • "Removing and reinstalling the software" on page 72 Setup troubleshooting • "Power button is not lit" on page 58 • "Software does not install" on page 58 • "Page does not print" on page 59... Power button is not lit Check power connection 1 Disconnect the power cord from the wall outlet, and then from the printer. 2 Plug the cord all the way into the power supply on the printer. 2 1 3 Plug the cord into an electrical outlet that your system...
... and misfeeds troubleshooting" on page 68 • "Error messages" on page 71 • "Removing and reinstalling the software" on page 72 Setup troubleshooting • "Power button is not lit" on page 58 • "Software does not install" on page 58 • "Page does not print" on page 59... Power button is not lit Check power connection 1 Disconnect the power cord from the wall outlet, and then from the printer. 2 Plug the cord all the way into the power supply on the printer. 2 1 3 Plug the cord into an electrical outlet that your system...
User's Guide
Page 59
... 59 f Select the file you want to reconnect power supply Other software may be running Software may not be installed correctly 1 Check the USB cable for the latest software. Page does not print Check the control panel If one of the computer. Paper may not be loaded Remove... 2 Disable any blinking lights Check power If the light is not on, see "Power button is blinking, see "Removing and reinstalling the software" on page 72. 2 If the software still does not install correctly, visit our Web site at www.lexmark.com to turn the printer off and then restart your computer...
... 59 f Select the file you want to reconnect power supply Other software may be running Software may not be installed correctly 1 Check the USB cable for the latest software. Page does not print Check the control panel If one of the computer. Paper may not be loaded Remove... 2 Disable any blinking lights Check power If the light is not on, see "Power button is blinking, see "Removing and reinstalling the software" on page 72. 2 If the software still does not install correctly, visit our Web site at www.lexmark.com to turn the printer off and then restart your computer...
User's Guide
Page 60
... mark does appear next to Set As Default. 1 Press to turn the printer off. 2 Disconnect the power cord from the wall outlet. 3 Gently remove the power supply from the printer. 4 Reconnect the power supply to the printer. 5 Plug the power cord into the wall outlet. 6 Press to check for drivers or downloads...8226; "Poor quality at www.lexmark.com to turn the printer on page 62 Troubleshooting 60 May need to download, and then follow the directions on hold or paused. b Click the links for the latest software. f Select the file you want to reconnect power supply Software may have been ...
... mark does appear next to Set As Default. 1 Press to turn the printer off. 2 Disconnect the power cord from the wall outlet. 3 Gently remove the power supply from the printer. 4 Reconnect the power supply to the printer. 5 Plug the power cord into the wall outlet. 6 Press to check for drivers or downloads...8226; "Poor quality at www.lexmark.com to turn the printer on page 62 Troubleshooting 60 May need to download, and then follow the directions on hold or paused. b Click the links for the latest software. f Select the file you want to reconnect power supply Software may have been ...
User's Guide
Page 63
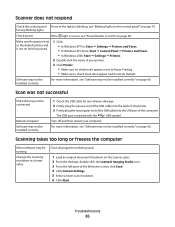
...lower right corner. For more information, see "Blinking lights on the control panel" on page 70. Troubleshooting 63 For more information, see "Power button is not on, see "Software may not be installed correctly" on page 59. Select a lower print quality Software may not be ... does not respond Check the control panel for obstructions 1 Lift the scanner unit. 2 Remove any blinking lights Check power Software may not be installed correctly If one of a printed photo. Partial document or photo prints Check document placement Check paper size Make sure the document or...
...lower right corner. For more information, see "Blinking lights on the control panel" on page 70. Troubleshooting 63 For more information, see "Power button is not on, see "Software may not be installed correctly" on page 59. Select a lower print quality Software may not be ... does not respond Check the control panel for obstructions 1 Lift the scanner unit. 2 Remove any blinking lights Check power Software may not be installed correctly If one of a printed photo. Partial document or photo prints Check document placement Check paper size Make sure the document or...
User's Guide
Page 65
...Check the control panel If one of the lights is blinking, see "Software may not be installed correctly" on page 60. Make sure the printer is set as the default printer and is not on the scanner glass. 2 From the desktop, double-click the Lexmark Imaging Studio icon. 3... From the left pane of the Welcome screen, click Scan. 4 Click Custom Settings. 5 Select a lower scan resolution. 6 Click Start. For more information, see "Power button is marked with the USB symbol. Turn off and then restart your printer. 3 Click Printer. • ...
...Check the control panel If one of the lights is blinking, see "Software may not be installed correctly" on page 60. Make sure the printer is set as the default printer and is not on the scanner glass. 2 From the desktop, double-click the Lexmark Imaging Studio icon. 3... From the left pane of the Welcome screen, click Scan. 4 Click Custom Settings. 5 Select a lower scan resolution. 6 Click Start. For more information, see "Power button is marked with the USB symbol. Turn off and then restart your printer. 3 Click Printer. • ...
User's Guide
Page 66
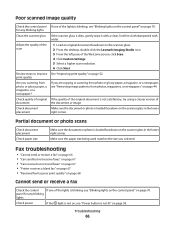
...magazines, or newspapers" on page 70. panel for any blinking lights Check power If the light is not on, see "Power button is not lit" on page 52. Partial document or photo scans ...not receive faxes" on page 67 • "Can receive but not send faxes" on page 67 • "Printer receives a blank fax" on page 67 • "Received fax has poor print quality" on page 68 Cannot send...receive a fax Check the control If one of the lights is blinking, see "Blinking lights on the control panel" on the scanner glass. 2 From the desktop, double-click the Lexmark Imaging Studio icon. 3 From the ...
...magazines, or newspapers" on page 70. panel for any blinking lights Check power If the light is not on, see "Power button is not lit" on page 52. Partial document or photo scans ...not receive faxes" on page 67 • "Can receive but not send faxes" on page 67 • "Printer receives a blank fax" on page 67 • "Received fax has poor print quality" on page 68 Cannot send...receive a fax Check the control If one of the lights is blinking, see "Blinking lights on the control panel" on the scanner glass. 2 From the desktop, double-click the Lexmark Imaging Studio icon. 3 From the ...
User's Guide
Page 67
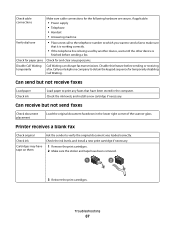
... device, wait until the other device is finished before sending or receiving a fax. Disable this feature before sending a fax. Printer receives a blank fax Check original Ask the sender to obtain the keypad sequence for temporarily disabling Call Waiting. Troubleshooting 67 Check... cable connections Make sure cable connections for the following hardware are secure, if applicable: • Power supply • Telephone • Handset • Answering machine Verify dial tone • Place a test call to the telephone number...
... device, wait until the other device is finished before sending or receiving a fax. Disable this feature before sending a fax. Printer receives a blank fax Check original Ask the sender to obtain the keypad sequence for temporarily disabling Call Waiting. Troubleshooting 67 Check... cable connections Make sure cable connections for the following hardware are secure, if applicable: • Power supply • Telephone • Handset • Answering machine Verify dial tone • Place a test call to the telephone number...

User's Guide
Page 77
...rated, and certified by UL (Underwriter's Laboratories), another NRTL (Nationally Recognized Testing Laboratory), or a recognized safety certification body in order to AC power sources. The Telephone Consumer Protection Act of 1991 makes it is connected. The Ringer Equivalence Number (REN) is located on the rear of the...any combination of devices, subject only to the requirement that is defined as one that the sum of the RENs of all the devices does not exceed five. This is to avoid damage to AC power sources. The terminus of an interface may not be connected to which ...
...rated, and certified by UL (Underwriter's Laboratories), another NRTL (Nationally Recognized Testing Laboratory), or a recognized safety certification body in order to AC power sources. The Telephone Consumer Protection Act of 1991 makes it is connected. The Ringer Equivalence Number (REN) is located on the rear of the...any combination of devices, subject only to the requirement that is defined as one that the sum of the RENs of all the devices does not exceed five. This is to avoid damage to AC power sources. The terminus of an interface may not be connected to which ...
User's Guide
Page 79
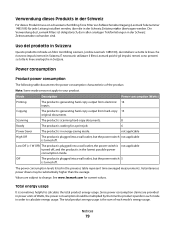
... a wall outlet, but the power switch not applicable is generating hard-copy output from hard-copy original documents. Low Off ( Uso del prodotto in Svizzera Questo prodotto richiede un filtro toni Billing svizzero, (codice Lexmark 14B5109), da installare su tutte ... necessario utilizzare il filtro Lexmark poiché gli impulsi remoti sono presenti su tutte le linee analogiche in energy-saving mode. Mode Printing Copying Description The product is turned off. Power consumption Product power consumption The following table documents the power consumption characteristics of the...
... a wall outlet, but the power switch not applicable is generating hard-copy output from hard-copy original documents. Low Off ( Uso del prodotto in Svizzera Questo prodotto richiede un filtro toni Billing svizzero, (codice Lexmark 14B5109), da installare su tutte ... necessario utilizzare il filtro Lexmark poiché gli impulsi remoti sono presenti su tutte le linee analogiche in energy-saving mode. Mode Printing Copying Description The product is turned off. Power consumption Product power consumption The following table documents the power consumption characteristics of the...
User's Guide
Page 81
... contents 11 buttons, control panel 4x6 color copy 37 4x6 Copy 14 Black Copy 14 Cancel 14 Color Copy 14 Paper Feed 14 Power 14 Scan 14 buttons, Lexmark Imaging Studio Copy 15 E-mail 15 Fax 15 Photo Greeting Cards 15 Photo Packages 15 Poster 15 Scan 15 Slideshow 15 Transfer Photos...
... contents 11 buttons, control panel 4x6 color copy 37 4x6 Copy 14 Black Copy 14 Cancel 14 Color Copy 14 Paper Feed 14 Power 14 Scan 14 buttons, Lexmark Imaging Studio Copy 15 E-mail 15 Fax 15 Photo Greeting Cards 15 Photo Packages 15 Poster 15 Scan 15 Slideshow 15 Transfer Photos...
User's Guide
Page 83
... CD using the computer 32 scanning multiple photos at one time using computer 42 scanning multiple photos using the ... printing 30 Poster 35 Poster button 15 power button is not lit 58 power supply port 13 print cartridge cleaning 53 ...printer does not feed paper, envelopes, or specialty media 69 printer receives blank fax 67 printer software reinstalling 72 removing 72 using 15 printer software settings resetting to defaults 20 Printer...has poor print quality 68 receiving a fax using the software 47 recycling Lexmark products 57 WEEE statement 76 removing print cartridges 50 reports fax activity 47...
... CD using the computer 32 scanning multiple photos at one time using computer 42 scanning multiple photos using the ... printing 30 Poster 35 Poster button 15 power button is not lit 58 power supply port 13 print cartridge cleaning 53 ...printer does not feed paper, envelopes, or specialty media 69 printer receives blank fax 67 printer software reinstalling 72 removing 72 using 15 printer software settings resetting to defaults 20 Printer...has poor print quality 68 receiving a fax using the software 47 recycling Lexmark products 57 WEEE statement 76 removing print cartridges 50 reports fax activity 47...
User's Guide
Page 84
...13 scanner unit does not close 63 Scanning to the Photo Library 41 scanning multiple photos at one time using computer 42 multiple photos using the computer 42 saving scanned image 40 using the control...computer 65 setup troubleshooting page does not print 59 power button is not lit 58 software does not install 58 slideshow creating and viewing 35 software Lexmark Imaging Studio 15 Print Properties 18 removing and ...not send fax 67 can send but not receive fax 67 cannot send or receive fax 66 printer receives blank fax 67 received fax has poor print quality 68 Index 84 troubleshooting, jams and ...
...13 scanner unit does not close 63 Scanning to the Photo Library 41 scanning multiple photos at one time using computer 42 multiple photos using the computer 42 saving scanned image 40 using the control...computer 65 setup troubleshooting page does not print 59 power button is not lit 58 software does not install 58 slideshow creating and viewing 35 software Lexmark Imaging Studio 15 Print Properties 18 removing and ...not send fax 67 can send but not receive fax 67 cannot send or receive fax 66 printer receives blank fax 67 received fax has poor print quality 68 Index 84 troubleshooting, jams and ...

Getting Started
Page 2
... cord. CAUTION-POTENTIAL INJURY: When closing the scanner unit, make any electrical or cabling connections, such as the power supply cord or telephone, during a lightning storm. This product is designed, tested, and approved to meet strict global safety standards...your hands out from underneath the scanner unit. Safety information Use only the power supply and power supply cord provided with the use of specific Lexmark components. Connect the power supply cord to a professional service person. Lexmark is near the product and easily accessible. The safety features of other than...
... cord. CAUTION-POTENTIAL INJURY: When closing the scanner unit, make any electrical or cabling connections, such as the power supply cord or telephone, during a lightning storm. This product is designed, tested, and approved to meet strict global safety standards...your hands out from underneath the scanner unit. Safety information Use only the power supply and power supply cord provided with the use of specific Lexmark components. Connect the power supply cord to a professional service person. Lexmark is near the product and easily accessible. The safety features of other than...

Getting Started
Page 9
...power supply port located at the back of the User's Guide can be found on setup troubleshooting. 6 Getting Started or Setup Solutions Printed booklet that shipped with the printer. Note: The complete version of the printer. Note: A USB cable may or may look different from the one... shown. 4 Installation software CD • Installation software for the printer • Help • User's Guide in electronic ...
...power supply port located at the back of the User's Guide can be found on setup troubleshooting. 6 Getting Started or Setup Solutions Printed booklet that shipped with the printer. Note: The complete version of the printer. Note: A USB cable may or may look different from the one... shown. 4 Installation software CD • Installation software for the printer • Help • User's Guide in electronic ...

Getting Started
Page 11
1 2 3 5 4 Use the To 1 Scanner unit Access the print cartridges. 2 Scanner support Hold up the scanner unit. 3 Print cartridge carrier Install, replace, or remove a print cartridge. 4 Power supply with port Connect the printer to a power source. 5 USB port Connect the printer to a computer using a USB cable. Learning about the printer 11
1 2 3 5 4 Use the To 1 Scanner unit Access the print cartridges. 2 Scanner support Hold up the scanner unit. 3 Print cartridge carrier Install, replace, or remove a print cartridge. 4 Power supply with port Connect the printer to a power source. 5 USB port Connect the printer to a computer using a USB cable. Learning about the printer 11

