
User's Guide
Page 3
Contents Chapter 1: Getting started 7 Understanding the parts 8 Front view 8 Rear view 8 Unpacking ...9 Installing the toner cartridge 11 Connecting the cables 13 Powering on the machine 14 Understanding the operator panel 15 Setting the date and time 16 Changing the display language ...
Contents Chapter 1: Getting started 7 Understanding the parts 8 Front view 8 Rear view 8 Unpacking ...9 Installing the toner cartridge 11 Connecting the cables 13 Powering on the machine 14 Understanding the operator panel 15 Setting the date and time 16 Changing the display language ...
User's Guide
Page 5
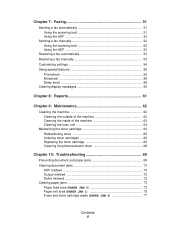
... 62 Cleaning the outside of the machine 62 Cleaning the inside of the machine 63 Cleaning the scan unit 64 Maintaining the toner cartridge 64 Redistributing toner 65 Ordering toner cartridges 65 Replacing the toner cartridge 66 Cleaning the photoconductor drum 68 Chapter 10: Troubleshooting 69 Preventing document and paper jams 69 Clearing document jams 70 ADF...
... 62 Cleaning the outside of the machine 62 Cleaning the inside of the machine 63 Cleaning the scan unit 64 Maintaining the toner cartridge 64 Redistributing toner 65 Ordering toner cartridges 65 Replacing the toner cartridge 66 Cleaning the photoconductor drum 68 Chapter 10: Troubleshooting 69 Preventing document and paper jams 69 Clearing document jams 70 ADF...
User's Guide
Page 9
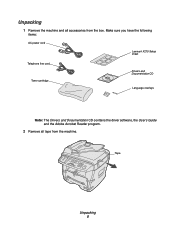
Tape Unpacking 9 Make sure you have the following items: AC power cord Lexmark X215 Setup sheet Telephone line cord Toner cartridge Drivers and Documentation CD Language overlays Note: The Drivers and Documentation CD contains the driver software, the User's Guide and the Adobe Acrobat Reader program. 2 Remove all accessories from the machine. Unpacking 1 Remove the machine and all tape from the box.
Tape Unpacking 9 Make sure you have the following items: AC power cord Lexmark X215 Setup sheet Telephone line cord Toner cartridge Drivers and Documentation CD Language overlays Note: The Drivers and Documentation CD contains the driver software, the User's Guide and the Adobe Acrobat Reader program. 2 Remove all accessories from the machine. Unpacking 1 Remove the machine and all tape from the box.

User's Guide
Page 11
Installing the toner cartridge 1 Open the front cover. 2 Remove the toner cartridge. CAUTION: Do not touch the photoconductor drum located on the bottom of the toner cartridge. Installing the toner cartridge 11
Installing the toner cartridge 1 Open the front cover. 2 Remove the toner cartridge. CAUTION: Do not touch the photoconductor drum located on the bottom of the toner cartridge. Installing the toner cartridge 11

User's Guide
Page 12
Note: Thoroughly shaking the cartridge will assure the maximum copies per cartridge. 4 Insert the toner cartridge until it locks into place. 5 Close the front cover. Installing the toner cartridge 12 3 Gently shake the cartridge to distribute the toner.
Note: Thoroughly shaking the cartridge will assure the maximum copies per cartridge. 4 Insert the toner cartridge until it locks into place. 5 Close the front cover. Installing the toner cartridge 12 3 Gently shake the cartridge to distribute the toner.
User's Guide
Page 15
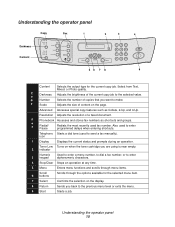
... any time. 5 Menu Enters menu functions and scrolls through menu items. Scroll 6 buttons Scrolls through the options available for the current copy job. Toner Low Turns on when the toner cartridge you are using is near empty. 2 indicator Numeric Used to enter a menu number, to dial a fax number, or to enter programmed delays...
... any time. 5 Menu Enters menu functions and scrolls through menu items. Scroll 6 buttons Scrolls through the options available for the current copy job. Toner Low Turns on when the toner cartridge you are using is near empty. 2 indicator Numeric Used to enter a menu number, to dial a fax number, or to enter programmed delays...

User's Guide
Page 62
9 Maintenance Cleaning the machine To maintain print quality, follow these cleaning procedures each time the toner cartridge is replaced or if print quality problems occur. Warning: • Do not put water directly onto any part of the machine. • Do not use ... cloth. Cleaning the outside of the machine Wipe the outside surface of the machine, be careful not to touch the transfer roller located under the toner cartridge. Maintenance 62
9 Maintenance Cleaning the machine To maintain print quality, follow these cleaning procedures each time the toner cartridge is replaced or if print quality problems occur. Warning: • Do not put water directly onto any part of the machine. • Do not use ... cloth. Cleaning the outside of the machine Wipe the outside surface of the machine, be careful not to touch the transfer roller located under the toner cartridge. Maintenance 62

User's Guide
Page 63
... 63 Warning: Do not touch the photoconductor drum located on the bottom of the toner cartridge. 3 Place the toner cartridge on a clean, dry surface. 4 With a dry, lint-free cloth, wipe away any dust and spilled toner from the toner cartridge area and the toner cartridge cavity. Cleaning the inside of the machine eliminates or reduces these problems. 1 Turn the... to light for more than a few minutes. This buildup can accumulate inside the machine. Cleaning the inside of the machine During the printing process, paper, toner, and dust particles can cause print quality problems, such as...
... 63 Warning: Do not touch the photoconductor drum located on the bottom of the toner cartridge. 3 Place the toner cartridge on a clean, dry surface. 4 With a dry, lint-free cloth, wipe away any dust and spilled toner from the toner cartridge area and the toner cartridge cavity. Cleaning the inside of the machine eliminates or reduces these problems. 1 Turn the... to light for more than a few minutes. This buildup can accumulate inside the machine. Cleaning the inside of the machine During the printing process, paper, toner, and dust particles can cause print quality problems, such as...

User's Guide
Page 64
...are clean and dry. 4 Wipe the underside of graphics, you may need to change the cartridge more often. For help, see pages 65 and 68. Before changing the cartridge, try redistributing the toner or cleaning the photoconductor drum first. To clean the scan unit: 1 Slightly dampen a soft...the document cover. Cleaning the scan unit Keeping the scan unit clean helps ensure the best possible copies. Maintaining the toner cartridge The life of the toner cartridge depends on . 5 Reinsert the toner cartridge and close the cover. 6 Plug in the power cord and turn the machine on the amount of...
...are clean and dry. 4 Wipe the underside of graphics, you may need to change the cartridge more often. For help, see pages 65 and 68. Before changing the cartridge, try redistributing the toner or cleaning the photoconductor drum first. To clean the scan unit: 1 Slightly dampen a soft...the document cover. Cleaning the scan unit Keeping the scan unit clean helps ensure the best possible copies. Maintaining the toner cartridge The life of the toner cartridge depends on . 5 Reinsert the toner cartridge and close the cover. 6 Plug in the power cord and turn the machine on the amount of...

User's Guide
Page 65
... cloth and wash clothing in the cartridge: 1 Open the front cover. 2 Pull the toner cartridge out, and then gently shake the cartridge to distribute the toner evenly. Note: If the toner gets on your machine. Ordering toner cartridges Within the United States or Canada, order a toner cartridge (P/N 18S0090) from any authorized Lexmark supplies dealer. Maintaining the toner cartridge 65 To temporarily reestablish print...
... cloth and wash clothing in the cartridge: 1 Open the front cover. 2 Pull the toner cartridge out, and then gently shake the cartridge to distribute the toner evenly. Note: If the toner gets on your machine. Ordering toner cartridges Within the United States or Canada, order a toner cartridge (P/N 18S0090) from any authorized Lexmark supplies dealer. Maintaining the toner cartridge 65 To temporarily reestablish print...

User's Guide
Page 66
See page 68 for appropriate environmental handling. Note: Return the empty toner cartridge to Lexmark for more information. Maintaining the toner cartridge 66 Replacing the toner cartridge If the toner runs out, the message TONER EMPTY appears on the display and blank pages print. To replace the toner cartridge: 1 Open the front cover. 2 Pull the toner cartridge out. Note: Incoming faxes will not print if this message appears.
See page 68 for appropriate environmental handling. Note: Return the empty toner cartridge to Lexmark for more information. Maintaining the toner cartridge 66 Replacing the toner cartridge If the toner runs out, the message TONER EMPTY appears on the display and blank pages print. To replace the toner cartridge: 1 Open the front cover. 2 Pull the toner cartridge out. Note: Incoming faxes will not print if this message appears.
User's Guide
Page 67
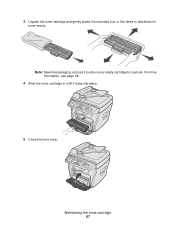
Maintaining the toner cartridge 67 Note: Save the packaging, and use it horizontally four or five times to Lexmark. 3 Unpack the toner cartridge and gently shake it to return your empty cartridge to distribute the toner evenly. For more information, see page 68. 4 Slide the toner cartridge in until it locks into place. 5 Close the front cover.
Maintaining the toner cartridge 67 Note: Save the packaging, and use it horizontally four or five times to Lexmark. 3 Unpack the toner cartridge and gently shake it to return your empty cartridge to distribute the toner evenly. For more information, see page 68. 4 Slide the toner cartridge in until it locks into place. 5 Close the front cover.

User's Guide
Page 68
... on the photoconductor surface are streaks or spots on the program. Returning the empty toner cartridge Using the Lexmark Cartridge Return Program is a free and easy way to return cartridges directly to Lexmark for country-specific instructions. Visit our web site, www.lexmark.com/or for appropriate environmental handling. To clean the photoconductor drum: 1 Make sure paper...
... on the photoconductor surface are streaks or spots on the program. Returning the empty toner cartridge Using the Lexmark Cartridge Return Program is a free and easy way to return cartridges directly to Lexmark for country-specific instructions. Visit our web site, www.lexmark.com/or for appropriate environmental handling. To clean the photoconductor drum: 1 Make sure paper...

User's Guide
Page 73
... and close the front cover. Message PAPER JAM 0 PAPER JAM 1 PAPER JAM 2 BYPASS JAM Location of jam Paper feed area Paper exit area Fuser and toner cartridge areas Manual bypass area Go to locate and clear the paper jam. If the paper does not exit, continue with step 2. 2 Pull the paper tray...
... and close the front cover. Message PAPER JAM 0 PAPER JAM 1 PAPER JAM 2 BYPASS JAM Location of jam Paper feed area Paper exit area Fuser and toner cartridge areas Manual bypass area Go to locate and clear the paper jam. If the paper does not exit, continue with step 2. 2 Pull the paper tray...

User's Guide
Page 74
If there is any resistance when you pull the paper, or the paper is not seen in this area, continue with the instructions for clearing a jam in the fuser and toner cartridge areas on page 77. 4 Insert the paper tray until it straight out. Clearing paper jams 74 3 Remove the jammed paper by gently pulling it snaps into place.
If there is any resistance when you pull the paper, or the paper is not seen in this area, continue with the instructions for clearing a jam in the fuser and toner cartridge areas on page 77. 4 Insert the paper tray until it straight out. Clearing paper jams 74 3 Remove the jammed paper by gently pulling it snaps into place.

User's Guide
Page 77
Clearing paper jams 77 Printing automatically resumes. Fuser and toner cartridge areas (PAPER JAM 2) CAUTION: The fuser area is hot. Avoid contact with the fuser area to prevent burns. 1 Open the front cover and remove the toner cartridge. 2 Remove the jammed paper by gently pulling it straight out. 3 Reinstall the toner cartridge and close the front cover.
Clearing paper jams 77 Printing automatically resumes. Fuser and toner cartridge areas (PAPER JAM 2) CAUTION: The fuser area is hot. Avoid contact with the fuser area to prevent burns. 1 Open the front cover and remove the toner cartridge. 2 Remove the jammed paper by gently pulling it straight out. 3 Reinstall the toner cartridge and close the front cover.

User's Guide
Page 79
... securely Close the covers until they lock. Clear the jam. Unplug the power cord and plug it back in . Toner cartridge is powered on. Install the toner cartridge. Load paper. Paper jam in the manual bypass or remove the jam from the manual bypass. Power interruption and the... the job you may experience and the suggested solutions have been exhausted, call for service. (See page 89.) Clearing display messages 79 Toner cartridge has run out. If the problem persists after all suggested solutions. If the problem persists, call for service. Collated copy is not saved...
... securely Close the covers until they lock. Clear the jam. Unplug the power cord and plug it back in . Toner cartridge is powered on. Install the toner cartridge. Load paper. Paper jam in the manual bypass or remove the jam from the manual bypass. Power interruption and the... the job you may experience and the suggested solutions have been exhausted, call for service. (See page 89.) Clearing display messages 79 Toner cartridge has run out. If the problem persists after all suggested solutions. If the problem persists, call for service. Collated copy is not saved...

User's Guide
Page 81
... Spool setting may be set incorrectly. 1 Click Start Settings Printers. 2 Right-click the Lexmark X215 printer icon. 3 Click Properties. 4 From the Details tab, click Spool Settings. 5 Select the spool setting you want. Wait until scanning is malfunctioning. Install the toner cartridge. Configuration incorrect. Machine is extremely Job may be very complex. See be incorrect...
... Spool setting may be set incorrectly. 1 Click Start Settings Printers. 2 Right-click the Lexmark X215 printer icon. 3 Click Properties. 4 From the Details tab, click Spool Settings. 5 Select the spool setting you want. Wait until scanning is malfunctioning. Install the toner cartridge. Configuration incorrect. Machine is extremely Job may be very complex. See be incorrect...

User's Guide
Page 82
... Wrong printer driver selected. Illustrations print The setting in the software incorrectly in the Advanced Options window of toner. • If necessary, replace the toner cartridge. When the USB mode is dirty. • If defects appear on the original, clean the document ...press Select. 5 To return to ensure that the machine power switch is not receiving on copies. See page 64. Blank pages print. Toner cartridge is malfunctioning. Check the file to the Ready prompt, press Stop/Clear. Contact a service representative. Try printing a job from another ...
... Wrong printer driver selected. Illustrations print The setting in the software incorrectly in the Advanced Options window of toner. • If necessary, replace the toner cartridge. When the USB mode is dirty. • If defects appear on the original, clean the document ...press Select. 5 To return to ensure that the machine power switch is not receiving on copies. See page 64. Blank pages print. Toner cartridge is malfunctioning. Check the file to the Ready prompt, press Stop/Clear. Contact a service representative. Try printing a job from another ...

User's Guide
Page 83
... are forms, newsletters, books, and so on. • The machine is positioned correctly on and off the copy easily. Frequent jams. Fewer copies from the toner cartridge than expected. Possible cause Solution Original document not positioned correctly. • Ensure the original is being turned on document glass or that paper is closed...
... are forms, newsletters, books, and so on. • The machine is positioned correctly on and off the copy easily. Frequent jams. Fewer copies from the toner cartridge than expected. Possible cause Solution Original document not positioned correctly. • Ensure the original is being turned on document glass or that paper is closed...

