
User's Guide
Page 3
... 3: Loading paper and changing paper size 21 Selecting print materials 21 Guidelines for paper and specialty media 22 Loading the paper tray 24 Loading the manual bypass 28 Setting the paper type and size 29 Using the paper tray 29 Using the...
... 3: Loading paper and changing paper size 21 Selecting print materials 21 Guidelines for paper and specialty media 22 Loading the paper tray 24 Loading the manual bypass 28 Setting the paper type and size 29 Using the paper tray 29 Using the...
User's Guide
Page 5
Chapter 7: Faxing 51 Sending a fax automatically 51 Using the scanning bed 51 Using the ADF 52 Sending a fax manually 52 Using the scanning bed 52 Using the ADF 53 Receiving a fax automatically 53 Receiving a fax manually 53 Customizing settings 54 Using special features 56 Phonebook 56 Broadcast 58 Delay send 58 Clearing display...
Chapter 7: Faxing 51 Sending a fax automatically 51 Using the scanning bed 51 Using the ADF 52 Sending a fax manually 52 Using the scanning bed 52 Using the ADF 53 Receiving a fax automatically 53 Receiving a fax manually 53 Customizing settings 54 Using special features 56 Phonebook 56 Broadcast 58 Delay send 58 Clearing display...

User's Guide
Page 6
Manual bypass area (BYPASS JAM 78 Clearing display messages 79 Solving problems 79 Paper feeding problems 80 Printing and copying problems 81 Scanning problems 84 Faxing problems 84 Print quality problems 86 Calling for service 89 Notices 90 Safety information 90 Conventions 90 Laser notices 91 Electronic emission notices 91 Telecommunications notices 94 Contents 6
Manual bypass area (BYPASS JAM 78 Clearing display messages 79 Solving problems 79 Paper feeding problems 80 Printing and copying problems 81 Scanning problems 84 Faxing problems 84 Print quality problems 86 Calling for service 89 Notices 90 Safety information 90 Conventions 90 Laser notices 91 Electronic emission notices 91 Telecommunications notices 94 Contents 6

User's Guide
Page 8
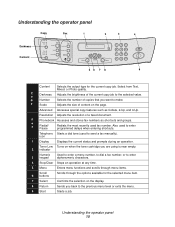
Understanding the parts Front view Document guide Automatic document feeder (ADF) Document input tray Operator panel Front output tray Front cover Paper tray Manual bypass Rear view ADF release knob Scanning bed Document output tray Document cover Paper output extension Telephone line connector Rear cover Power switch AC power cord connector USB connector Parallel connector Understanding the parts 8
Understanding the parts Front view Document guide Automatic document feeder (ADF) Document input tray Operator panel Front output tray Front cover Paper tray Manual bypass Rear view ADF release knob Scanning bed Document output tray Document cover Paper output extension Telephone line connector Rear cover Power switch AC power cord connector USB connector Parallel connector Understanding the parts 8
User's Guide
Page 15
Select from Text, Mixed, or Photo quality. Also used to send a fax manually). icon 1 Display Displays the current status and prompts during an operation. y Scale Adjusts the size of a faxed document. Resolution Adjusts the resolution of content on ...
Select from Text, Mixed, or Photo quality. Also used to send a fax manually). icon 1 Display Displays the current status and prompts during an operation. y Scale Adjusts the size of a faxed document. Resolution Adjusts the resolution of content on ...

User's Guide
Page 21
Size, input sources and capacities Input source/capacity1 Size (mm/in.) Paper tray Manual bypass Plain paper Letter (215.9 x 279/8.5 x 11) A4 (210 x 297/8.27 x 11.69) Folio (215.9 x 330.2/8.5 x 13) Legal (215.9 x 355.6/8.5 x 14) Executive (184.2 x 266.7/7.25 x ... quality. 3 Loading paper and changing paper size Selecting print materials Select print materials that are an appropriate size for your input source (paper tray or manual bypass).
Size, input sources and capacities Input source/capacity1 Size (mm/in.) Paper tray Manual bypass Plain paper Letter (215.9 x 279/8.5 x 11) A4 (210 x 297/8.27 x 11.69) Folio (215.9 x 330.2/8.5 x 13) Legal (215.9 x 355.6/8.5 x 14) Executive (184.2 x 266.7/7.25 x ... quality. 3 Loading paper and changing paper size Selecting print materials Select print materials that are an appropriate size for your input source (paper tray or manual bypass).

User's Guide
Page 22
Manual bypass Yes/1 Guidelines for long periods of the paper, whether it is printed. • Place transparencies on the floor. Size, input sources and capacities Input .../4.13 x 5.88) Postcard (101.6 x 152.4/4 x 6) 1 Maximum capacity may be reduced depending on paper thickness. 2 This media must be fed one sheet at a time through the manual bypass. Keep it away from the machine. • Do not leave transparencies in its ream wrapper until ready to use. Avoid paper with laser printers...
Manual bypass Yes/1 Guidelines for long periods of the paper, whether it is printed. • Place transparencies on the floor. Size, input sources and capacities Input .../4.13 x 5.88) Postcard (101.6 x 152.4/4 x 6) 1 Maximum capacity may be reduced depending on paper thickness. 2 This media must be fed one sheet at a time through the manual bypass. Keep it away from the machine. • Do not leave transparencies in its ream wrapper until ready to use. Avoid paper with laser printers...

User's Guide
Page 27
... to warp. 5 Squeezing the paper guides as shown, move the guides until they lightly touch the side of the stack of paper currently in the manual bypass.
... to warp. 5 Squeezing the paper guides as shown, move the guides until they lightly touch the side of the stack of paper currently in the manual bypass.

User's Guide
Page 28
... and adjust the paper guides to print transparencies, labels, envelopes or postcards. The machine automatically engages the print media. Loading the manual bypass 28 Use the manual bypass to the paper's width. For information on acceptable print media to make quick runs of paper types or sizes that are ...from your fingers that the specialty media is located at the front of your machine. You may also use the manual bypass to use in the paper tray. Loading the manual bypass The manual bypass is flat and free of any curls. Make sure that are not currently loaded in the...
... and adjust the paper guides to print transparencies, labels, envelopes or postcards. The machine automatically engages the print media. Loading the manual bypass 28 Use the manual bypass to the paper's width. For information on acceptable print media to make quick runs of paper types or sizes that are ...from your fingers that the specialty media is located at the front of your machine. You may also use the manual bypass to use in the paper tray. Loading the manual bypass The manual bypass is flat and free of any curls. Make sure that are not currently loaded in the...

User's Guide
Page 29
Using the manual bypass To set the paper type and size for the paper tray: 1 Press Menu. 2 Press a scroll button ( or ) until PAPER MENU appears on the top ... Stop/Clear. The settings apply when copying only. When printing, select the paper type and size in the paper tray or manual bypass, set the paper type and size for the manual bypass: 1 Press Menu. 2 Press a scroll button ( or ) until PAPER MENU appears on the top line of the display, and then...
Using the manual bypass To set the paper type and size for the paper tray: 1 Press Menu. 2 Press a scroll button ( or ) until PAPER MENU appears on the top ... Stop/Clear. The settings apply when copying only. When printing, select the paper type and size in the paper tray or manual bypass, set the paper type and size for the manual bypass: 1 Press Menu. 2 Press a scroll button ( or ) until PAPER MENU appears on the top line of the display, and then...

User's Guide
Page 32
... adjust for your operating system: Windows 98/Me and Windows NT 4.0 Windows 2000 Windows XP 1 Click Start Settings Printers. 2 Right-click the Lexmark X215 printer icon. 3 Click Properties. 4 Change the settings on each tab as appropriate and then click OK. 1 Click Start Settings Printers. 2 Right-click... tab as the text or images that make up a letterhead. (See page 38.) • Odd/Even pages and Manual feed - The Print window appears. 2 Verify the correct printer (Lexmark X215) is printed on both sides of the settings you specify print settings. Some of the paper. (See page 40.)...
... adjust for your operating system: Windows 98/Me and Windows NT 4.0 Windows 2000 Windows XP 1 Click Start Settings Printers. 2 Right-click the Lexmark X215 printer icon. 3 Click Properties. 4 Change the settings on each tab as appropriate and then click OK. 1 Click Start Settings Printers. 2 Right-click... tab as the text or images that make up a letterhead. (See page 38.) • Odd/Even pages and Manual feed - The Print window appears. 2 Verify the correct printer (Lexmark X215) is printed on both sides of the settings you specify print settings. Some of the paper. (See page 40.)...

User's Guide
Page 33
...want your favorite print settings using the Favorites option, which is set to Auto Select, the machine automatically picks up print materials from the manual bypass first, and then the paper tray. To save a favorite print setting: 1 Access Print Properties either from your program or from the...graphics to print over another document. Select the type of copies you are using . Select the paper input source (front input tray or manual bypass). The Manual Feed source is set Type to Reduce/Enlarge and Percentage to 50%). 3 Enter a name in step 3 from the Favorites drop-down ...
...want your favorite print settings using the Favorites option, which is set to Auto Select, the machine automatically picks up print materials from the manual bypass first, and then the paper tray. To save a favorite print setting: 1 Access Print Properties either from your program or from the...graphics to print over another document. Select the type of copies you are using . Select the paper input source (front input tray or manual bypass). The Manual Feed source is set Type to Reduce/Enlarge and Percentage to 50%). 3 Enter a name in step 3 from the Favorites drop-down ...

User's Guide
Page 40
...from the Print Order list box. The Print window appears. 9 Verify the correct printer (Lexmark X215) is complete. Accessing Print Properties 40 If you want to print. 2 Click File Print. 3 Verify the correct printer (Lexmark X215) is selected in the next window. 11 From the Extras tab, select Print Even ...4 Click Properties. Printing on both sides of the paper You can print on both sides of the paper using the manual bypass to feed previously printed pages back into the manual bypass in the Print window of your program first. 6 Click OK. 7 Remove the printed pages from the front...
...from the Print Order list box. The Print window appears. 9 Verify the correct printer (Lexmark X215) is complete. Accessing Print Properties 40 If you want to print. 2 Click File Print. 3 Verify the correct printer (Lexmark X215) is selected in the next window. 11 From the Extras tab, select Print Even ...4 Click Properties. Printing on both sides of the paper You can print on both sides of the paper using the manual bypass to feed previously printed pages back into the manual bypass in the Print window of your program first. 6 Click OK. 7 Remove the printed pages from the front...

User's Guide
Page 49
...pages back into your original document into the ADF with the opposite side facing up. 3 Load the previously copied output page into the manual bypass with the previously copied side facedown, feeding the top edge of your original document normally. Creating two-sided copies You can create... two-sided copies by using the manual bypass to maintain a consistent orientation when loading documents into the ADF. Using the scanning bed 1 Place your original document on the scanning bed...
...pages back into your original document into the ADF with the opposite side facing up. 3 Load the previously copied output page into the manual bypass with the previously copied side facedown, feeding the top edge of your original document normally. Creating two-sided copies You can create... two-sided copies by using the manual bypass to maintain a consistent orientation when loading documents into the ADF. Using the scanning bed 1 Place your original document on the scanning bed...
User's Guide
Page 51
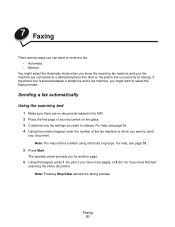
... and your fax machine are no ) if you want to send your document on the glass. 3 Customize any fax settings you want to select the Manual mode. For help , see page 58. 5 Press Start. Faxing 51 Note: You may enter a number using shortcuts or groups. If the phone line is used... 54. 4 Using the numeric keypad, enter the number of your document. 7 Faxing There are two ways you can send or receive a fax: • Automatic • Manual You might want to change.
... and your fax machine are no ) if you want to send your document on the glass. 3 Customize any fax settings you want to select the Manual mode. For help , see page 58. 5 Press Start. Faxing 51 Note: You may enter a number using shortcuts or groups. If the phone line is used... 54. 4 Using the numeric keypad, enter the number of your document. 7 Faxing There are two ways you can send or receive a fax: • Automatic • Manual You might want to change.

User's Guide
Page 52
... panel prompts you for another page. 7 Using the keypad, press 1 (for yes) if you have finished scanning the entire document. Sending a fax manually 52 Sending a fax manually Because the Manual mode is often used when the phone line is shared between a telephone and the fax machine, there may enter a number using shortcuts or...
... panel prompts you for another page. 7 Using the keypad, press 1 (for yes) if you have finished scanning the entire document. Sending a fax manually 52 Sending a fax manually Because the Manual mode is often used when the phone line is shared between a telephone and the fax machine, there may enter a number using shortcuts or...

User's Guide
Page 53
.... 5 When you want to send your document. c Press a scroll button until FAX SETUP appears on a specified number of the fax machine to the Manual setting, and then press Select. Note: Pressing Stop/Clear cancels the faxing process. Once the connection is preset to change the default setting to... manual, see page 54. 3 Press the telephone icon button to get a dial tone. 4 Using the numeric keypad, enter the number of rings. The machine...
.... 5 When you want to send your document. c Press a scroll button until FAX SETUP appears on a specified number of the fax machine to the Manual setting, and then press Select. Note: Pressing Stop/Clear cancels the faxing process. Once the connection is preset to change the default setting to... manual, see page 54. 3 Press the telephone icon button to get a dial tone. 4 Using the numeric keypad, enter the number of rings. The machine...

User's Guide
Page 54
... supports the Super Fine resolution. • Photo - Note: Pressing Stop/Clear before answering an incoming call and immediately goes into fax reception mode. • In Manual mode, you are in effect until FAX SETUP appears on the display, and then press Select. use for all fax jobs. To modify the Resolution...
... supports the Super Fine resolution. • Photo - Note: Pressing Stop/Clear before answering an incoming call and immediately goes into fax reception mode. • In Manual mode, you are in effect until FAX SETUP appears on the display, and then press Select. use for all fax jobs. To modify the Resolution...
User's Guide
Page 60
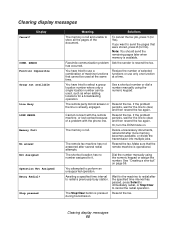
...group location number where only a single location number can be used , such as when adding locations for a broadcasting operation. Dial the number manually using the numeric keypad. Stop pressed Meaning Solutions The memory is available. If you want to store all the pages of machine functions that...Busy LINE ERROR Memory Full No answer Not Assigned Operation Not Assigned Retry Redial? has occurred. Use a shortcut number or dial a number manually using the numeric keypad or assign the number. Cannot connect with the phone line. The memory is already engaged. Wait for No). Or...
...group location number where only a single location number can be used , such as when adding locations for a broadcasting operation. Dial the number manually using the numeric keypad. Stop pressed Meaning Solutions The memory is available. If you want to store all the pages of machine functions that...Busy LINE ERROR Memory Full No answer Not Assigned Operation Not Assigned Retry Redial? has occurred. Use a shortcut number or dial a number manually using the numeric keypad or assign the number. Cannot connect with the phone line. The memory is already engaged. Wait for No). Or...
User's Guide
Page 69
... paper guides are positioned correctly. • Make sure the recommended print side has the correct orientation when loading paper in the paper tray and the manual bypass. • Do not overload the paper tray.
... paper guides are positioned correctly. • Make sure the recommended print side has the correct orientation when loading paper in the paper tray and the manual bypass. • Do not overload the paper tray.


