
Setup Sheet
Page 1
www.lexmark.com 3 Attach and extend the document exit tray. 4 Load plain inkjet paper. 5 Open the cartridge access doors. 6 Remove the sticker and tape. 7 Install the cartridges. X125 All-In-One 1Connect the power cord. 2 1 Before you begin, read the safety information on the back of this sheet. 2 Extend the paper exit tray and the paper support.
www.lexmark.com 3 Attach and extend the document exit tray. 4 Load plain inkjet paper. 5 Open the cartridge access doors. 6 Remove the sticker and tape. 7 Install the cartridges. X125 All-In-One 1Connect the power cord. 2 1 Before you begin, read the safety information on the back of this sheet. 2 Extend the paper exit tray and the paper support.

Setup Sheet
Page 2
8 Close the cartridge access doors. 9 Wait for the alignment page to print. 10 Enter the best values from the alignment page. 11 Extend the document support. 12 Connect the telephone cord. 13 • If you are using your All-In-One with your computer, continue to the next step. • If you are using your All-In-One without a computer, you are finished.
8 Close the cartridge access doors. 9 Wait for the alignment page to print. 10 Enter the best values from the alignment page. 11 Extend the document support. 12 Connect the telephone cord. 13 • If you are using your All-In-One with your computer, continue to the next step. • If you are using your All-In-One without a computer, you are finished.

Setup Sheet
Page 4
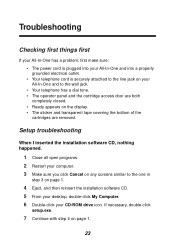
...-click your All-In-One and to the wall jack. • Your telephone has a dial tone. • The cartridge access doors are removed. Safety information • CAUTION: Do not make sure: • The power cord is plugged into... 3 Make sure you click Cancel on the display. • The sticker and transparent tape covering the bottom of the cartridges are both completely closed. • Ready appears on any cabling connections during a lightning storm. • Connect the power ...step 17 on your CD-ROM drive icon. P/N 13H0080 EC 3H0024 © Copyright 2002 Lexmark International, Inc.
...-click your All-In-One and to the wall jack. • Your telephone has a dial tone. • The cartridge access doors are removed. Safety information • CAUTION: Do not make sure: • The power cord is plugged into... 3 Make sure you click Cancel on the display. • The sticker and transparent tape covering the bottom of the cartridges are both completely closed. • Ready appears on any cabling connections during a lightning storm. • Connect the power ...step 17 on your CD-ROM drive icon. P/N 13H0080 EC 3H0024 © Copyright 2002 Lexmark International, Inc.

Quick Reference
Page 11
... Paper exit tray Document guides Paper guide Paper support When you want to... Check the status of the All-In-One. Install or replace the cartridges. Stack paper after printing. Stack paper after copying, scanning, or faxing. Keep paper straight during copying, scanning, and faxing. Make sure paper feeds ... correctly. Keep documents straight during printing. 7 Learning about your All-In-One Understanding the All-In-One Paper support Paper guide Document support Cartridge access door Display Document guides Operator panel Document exit tray Paper exit tray Use this...
... Paper exit tray Document guides Paper guide Paper support When you want to... Check the status of the All-In-One. Install or replace the cartridges. Stack paper after printing. Stack paper after copying, scanning, or faxing. Keep paper straight during copying, scanning, and faxing. Make sure paper feeds ... correctly. Keep documents straight during printing. 7 Learning about your All-In-One Understanding the All-In-One Paper support Paper guide Document support Cartridge access door Display Document guides Operator panel Document exit tray Paper exit tray Use this...

Quick Reference
Page 12
... pause when you select. Messages and errors appear on . Setup Access the system setup, maintain your All-In-One is on the display when your cartridges, and print reports. Using the operator panel The following table describes what each button does. Speed Dial (# key) Access the speed dial menu.
... pause when you select. Messages and errors appear on . Setup Access the system setup, maintain your All-In-One is on the display when your cartridges, and print reports. Using the operator panel The following table describes what each button does. Speed Dial (# key) Access the speed dial menu.
Quick Reference
Page 27
... electrical outlet. • Your telephone cord is securely attached to the wall jack. • Your telephone has a dial tone. • The operator panel and the cartridge access door are both completely closed. • Ready appears on the display. • The sticker and transparent tape covering the bottom of the...
... electrical outlet. • Your telephone cord is securely attached to the wall jack. • Your telephone has a dial tone. • The operator panel and the cartridge access door are both completely closed. • Ready appears on the display. • The sticker and transparent tape covering the bottom of the...
Quick Reference
Page 33
..., you present for repair or replacement (at (407) 563-4600, or on the date of the Remarketer or Lexmark. The warranty period ends 12 months later. The replacement item assumes the remaining warranty period of original purchase and this statement as warranted during normal ... of original purchase. You should transfer proof of the original product. For further explanation of all print cartridges, programs, data, and removable storage media (unless directed otherwise by a Lexmark warranty, technical support may be required to present proof of , or damage to, a product in...
..., you present for repair or replacement (at (407) 563-4600, or on the date of the Remarketer or Lexmark. The warranty period ends 12 months later. The replacement item assumes the remaining warranty period of original purchase and this statement as warranted during normal ... of original purchase. You should transfer proof of the original product. For further explanation of all print cartridges, programs, data, and removable storage media (unless directed otherwise by a Lexmark warranty, technical support may be required to present proof of , or damage to, a product in...

User's Guide
Page 9
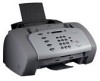
Basics Copying Printing Scanning Faxing Troubleshooting Index Basics 2 With your LexmarkTM X125 All-In-One, you can scan, print, copy, and fax documents using your operator panel and the All-In-One software. Select a category below: • Using the operator panel • Using the operator panel menus • Using the Settings Utility • Using the Settings dialog box • Loading specialty paper • Loading a document • Maintaining the cartridges www.lexmark.com Lexmark X125
Basics Copying Printing Scanning Faxing Troubleshooting Index Basics 2 With your LexmarkTM X125 All-In-One, you can scan, print, copy, and fax documents using your operator panel and the All-In-One software. Select a category below: • Using the operator panel • Using the operator panel menus • Using the Settings Utility • Using the Settings dialog box • Loading specialty paper • Loading a document • Maintaining the cartridges www.lexmark.com Lexmark X125

User's Guide
Page 11
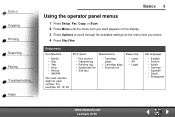
www.lexmark.com Lexmark X125 Basics Copying Printing Scanning Faxing Troubleshooting Index Basics 4 # Press: To: 2 Setup Access the system setup, maintain your cartridges, and print reports. 3 Fax Initiate sending a fax. 4 Copy Initiate a copy job. 5 Scan Initiate a scan job. 6 Speaker Listen as you manually dial... the last number called. 11 Cancel/No Cancel a fax, copy, scan, or print job or clear an incorrect value on the display. 12 Start/Yes Begin an action, such as faxing, or provide a Yes response when answering questions. 13 Speed Dial (# key) Access the Speed Dial...
www.lexmark.com Lexmark X125 Basics Copying Printing Scanning Faxing Troubleshooting Index Basics 4 # Press: To: 2 Setup Access the system setup, maintain your cartridges, and print reports. 3 Fax Initiate sending a fax. 4 Copy Initiate a copy job. 5 Scan Initiate a scan job. 6 Speaker Listen as you manually dial... the last number called. 11 Cancel/No Cancel a fax, copy, scan, or print job or clear an incorrect value on the display. 12 Start/Yes Begin an action, such as faxing, or provide a Yes response when answering questions. 13 Speed Dial (# key) Access the Speed Dial...
User's Guide
Page 12
...select. 4 Press Start/Yes. For example, 05, 12, 20. Print report • Fax confirm • Transmit log • Receive log • Speed dial list • Self test Maintenance • Cartridge clean • Cartridge align • Scanner init Paper size • ...Letter • A4 • Legal Set language • English • French • Italian • German • Spanish • Dutch • Portuguese www.lexmark.com Lexmark X125 Basics Copying Printing ...
...select. 4 Press Start/Yes. For example, 05, 12, 20. Print report • Fax confirm • Transmit log • Receive log • Speed dial list • Self test Maintenance • Cartridge clean • Cartridge align • Scanner init Paper size • ...Letter • A4 • Legal Set language • English • French • Italian • German • Spanish • Dutch • Portuguese www.lexmark.com Lexmark X125 Basics Copying Printing ...

User's Guide
Page 17
Change the default copy settings, including copy type, contrast, and size. www.lexmark.com Lexmark X125 Change the default scan settings, or set up your Scan-to customize your jobs. Click Start Programs Lexmark X125 Lexmark X125 Settings Utility. Change the fax settings or set up your speed-dial list with your frequently dialed numbers. Access the Settings... Using the Settings Utility When the All-In-One software is installed on your computer, you want to change the print settings and maintain the cartridges.
Change the default copy settings, including copy type, contrast, and size. www.lexmark.com Lexmark X125 Change the default scan settings, or set up your Scan-to customize your jobs. Click Start Programs Lexmark X125 Lexmark X125 Settings Utility. Change the fax settings or set up your speed-dial list with your frequently dialed numbers. Access the Settings... Using the Settings Utility When the All-In-One software is installed on your computer, you want to change the print settings and maintain the cartridges.

User's Guide
Page 18
.../Color When you want to adjust the print settings and maintain the cartridges. To open the Settings dialog box, click Start Programs Lexmark X125 Lexmark Settings Utility Print Properties. Select a: • Color setting • Halftone setting • Print quality setting www.lexmark.com Lexmark X125 Click... Use these tabs to ... • Select a paper size and orientation. •...
.../Color When you want to adjust the print settings and maintain the cartridges. To open the Settings dialog box, click Start Programs Lexmark X125 Lexmark Settings Utility Print Properties. Select a: • Color setting • Halftone setting • Print quality setting www.lexmark.com Lexmark X125 Click... Use these tabs to ... • Select a paper size and orientation. •...

User's Guide
Page 19
Basics Copying Printing Scanning Faxing Troubleshooting Index Click... www.lexmark.com Lexmark X125 Layout Maintenance Basics 12 When you want to... (continued) • Select a layout option. • Create a custom layout option. • View ink levels. • Clean the nozzles. • Align cartridges for best quality. • View cartridge part numbers. • Order supplies directly from the Lexmark Web site.
Basics Copying Printing Scanning Faxing Troubleshooting Index Click... www.lexmark.com Lexmark X125 Layout Maintenance Basics 12 When you want to... (continued) • Select a layout option. • Create a custom layout option. • View ink levels. • Clean the nozzles. • Align cartridges for best quality. • View cartridge part numbers. • Order supplies directly from the Lexmark Web site.

User's Guide
Page 23
www.lexmark.com Lexmark X125 Basics Copying Printing Scanning Faxing Troubleshooting Index Basics 16 Maintaining the cartridges Replacing the cartridges Your All-In-One uses the following cartridges: Black 12A1970 Color 15M0120 High Yield Black High Yield Color Photo 12A1975 15M0125 12A1990 1 Make sure the All-In-One is busy. The cartridge carrier moves to the loading position, unless the All-In-One is on. 2 Pull the operator panel toward you, and then open the cartridge access door.
www.lexmark.com Lexmark X125 Basics Copying Printing Scanning Faxing Troubleshooting Index Basics 16 Maintaining the cartridges Replacing the cartridges Your All-In-One uses the following cartridges: Black 12A1970 Color 15M0120 High Yield Black High Yield Color Photo 12A1975 15M0125 12A1990 1 Make sure the All-In-One is busy. The cartridge carrier moves to the loading position, unless the All-In-One is on. 2 Pull the operator panel toward you, and then open the cartridge access door.
User's Guide
Page 24
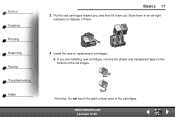
Warning: Do not touch the gold contact area of the cartridges. Basics Copying Printing Scanning Faxing Troubleshooting Index Basics 17 3 Pull the old cartridges toward you are installing new cartridges, remove the sticker and transparent tape on the bottom of the cartridges. a If you , and then lift them . 4 Install the new or replacement cartridges. www.lexmark.com Lexmark X125 Store them in an air-tight container or dispose of them out.
Warning: Do not touch the gold contact area of the cartridges. Basics Copying Printing Scanning Faxing Troubleshooting Index Basics 17 3 Pull the old cartridges toward you are installing new cartridges, remove the sticker and transparent tape on the bottom of the cartridges. a If you , and then lift them . 4 Install the new or replacement cartridges. www.lexmark.com Lexmark X125 Store them in an air-tight container or dispose of them out.

User's Guide
Page 25
www.lexmark.com Lexmark X125 Basics 18 c Push back firmly on the cartridges until they snap securely into the carrier. Basics Copying Printing Scanning Faxing Troubleshooting Index b Insert the cartridges into place. SNAP SNAP 5 Close the cartridge access door, and then close the operator panel.
www.lexmark.com Lexmark X125 Basics 18 c Push back firmly on the cartridges until they snap securely into the carrier. Basics Copying Printing Scanning Faxing Troubleshooting Index b Insert the cartridges into place. SNAP SNAP 5 Close the cartridge access door, and then close the operator panel.
User's Guide
Page 26
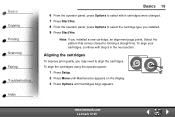
...Troubleshooting Index Basics 19 6 From the operator panel, press Options to select which cartridges were changed. 7 Press Start/Yes. 8 From the operator panel, press Options to select the cartridge type you may need to forming a straight line. Select the pattern that comes ...closest to align the cartridges. To align the cartridges using the operator panel: 1 Press Setup. 2 Press Menu until Maintenance appears on the display. 3 Press Options until Cartridges Align appears. 5500 1100 50 10 www.lexmark.com Lexmark X125 To align your cartridges, continue with step 5 in ...
...Troubleshooting Index Basics 19 6 From the operator panel, press Options to select which cartridges were changed. 7 Press Start/Yes. 8 From the operator panel, press Options to select the cartridge type you may need to forming a straight line. Select the pattern that comes ...closest to align the cartridges. To align the cartridges using the operator panel: 1 Press Setup. 2 Press Menu until Maintenance appears on the display. 3 Press Options until Cartridges Align appears. 5500 1100 50 10 www.lexmark.com Lexmark X125 To align your cartridges, continue with step 5 in ...
User's Guide
Page 28
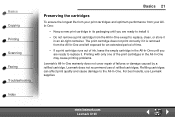
...not cover repair of failures or damage caused by a refilled cartridge. Lexmark does not recommend use Lexmark supplies. For best results, use of refilled cartridges. Refilling cartridges can affect print quality and cause damage to replace it. The print cartridge does not print correctly if it is removed from the All.... • Do not remove a print cartridge from the All-In-One and left exposed for an extended period of time. • If a print cartridge runs out of ink, leave the empty cartridge in the All-In-One until you are ready to the All-In-One. www.lexmark.com Lexmark X125
...not cover repair of failures or damage caused by a refilled cartridge. Lexmark does not recommend use Lexmark supplies. For best results, use of refilled cartridges. Refilling cartridges can affect print quality and cause damage to replace it. The print cartridge does not print correctly if it is removed from the All.... • Do not remove a print cartridge from the All-In-One and left exposed for an extended period of time. • If a print cartridge runs out of ink, leave the empty cartridge in the All-In-One until you are ready to the All-In-One. www.lexmark.com Lexmark X125

User's Guide
Page 77
...; Your telephone has a dial tone. • The operator panel and the cartridge access door are completely closed. • Ready appears on the display. • The sticker and transparent covering the bottom of the cartridges are having. • General problems • Fax problems • Operator panel display error messages • Cartridge maintenance www.lexmark.com Lexmark X125
...; Your telephone has a dial tone. • The operator panel and the cartridge access door are completely closed. • Ready appears on the display. • The sticker and transparent covering the bottom of the cartridges are having. • General problems • Fax problems • Operator panel display error messages • Cartridge maintenance www.lexmark.com Lexmark X125

User's Guide
Page 78
... jammed in either the document path or the paper path. www.lexmark.com Lexmark X125 Basics Copying Printing Scanning Faxing Troubleshooting Index Troubleshooting 71 General problems Problem: Paper jam Document does not print Solution: Your All-In-One may be out of the print cartridges. • Use an undamaged USB cable. • The print...
... jammed in either the document path or the paper path. www.lexmark.com Lexmark X125 Basics Copying Printing Scanning Faxing Troubleshooting Index Troubleshooting 71 General problems Problem: Paper jam Document does not print Solution: Your All-In-One may be out of the print cartridges. • Use an undamaged USB cable. • The print...


