

User's Guide
Page 3
... the control panel 5 Understanding the software 5 Using the Lexmark All-In-One Center 5 Using Print Properties 7 Using the Lexmark Solution Center 8 Using the Lexmark Photo Editor 9 Using the All-In-One 9 Printing 9 Scanning 11 Copying 12 Faxing 12 Creating fun projects 13 Replacing print cartridges 13 Troubleshooting 14 Troubleshooting checklist 14 Setup troubleshooting 14 Printing troubleshooting...
... the control panel 5 Understanding the software 5 Using the Lexmark All-In-One Center 5 Using Print Properties 7 Using the Lexmark Solution Center 8 Using the Lexmark Photo Editor 9 Using the All-In-One 9 Printing 9 Scanning 11 Copying 12 Faxing 12 Creating fun projects 13 Replacing print cartridges 13 Troubleshooting 14 Troubleshooting checklist 14 Setup troubleshooting 14 Printing troubleshooting...
User's Guide
Page 4
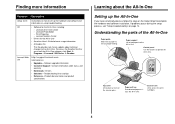
... the buttons to access the print cartridges. 4 Scanner unit Lift to operate the All-In-One. Lexmark Photo Editor - To access the Readme file after you have not already done so, follow the steps on the Setup Sheet to load paper into the All-In-One. If problems occur during the setup...Product documentation and product specifications Learning about technical changes to hold paper as it exits the All-In-One. Lexmark All-In-One Center - Top cover Lift to ensure proper feeding. Understanding the parts of the All-In-One Paper guide Slide next to paper to place an item on the scanner glass...
... the buttons to access the print cartridges. 4 Scanner unit Lift to operate the All-In-One. Lexmark Photo Editor - To access the Readme file after you have not already done so, follow the steps on the Setup Sheet to load paper into the All-In-One. If problems occur during the setup...Product documentation and product specifications Learning about technical changes to hold paper as it exits the All-In-One. Lexmark All-In-One Center - Top cover Lift to ensure proper feeding. Understanding the parts of the All-In-One Paper guide Slide next to paper to place an item on the scanner glass...

User's Guide
Page 5
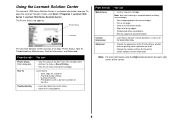
... (scanning, copying, and faxing) • Print Properties (printing) • The Lexmark Solution Center (troubleshooting, maintenance, and cartridge ordering information) • The Lexmark Photo Editor (editing graphics) Using the Lexmark All-In-One Center Use the Lexmark 1200 Series All-In-One Center software to scan, copy, and fax documents.There are three ways to make copies. Understanding...
... (scanning, copying, and faxing) • Print Properties (printing) • The Lexmark Solution Center (troubleshooting, maintenance, and cartridge ordering information) • The Lexmark Photo Editor (editing graphics) Using the Lexmark All-In-One Center Use the Lexmark 1200 Series All-In-One Center software to scan, copy, and fax documents.There are three ways to make copies. Understanding...
User's Guide
Page 8
... Center consists of the All-In-One. From this tab: Maintenance Contact Information Advanced You can : • View the status of six tabs: Printer Status, How To, Troubleshooting, Maintenance, Contact Information, and Advanced. Using the Lexmark Solution Center The Lexmark 1200 Series Solution Center is complete before installing new cartridges. • View shopping options for...
... Center consists of the All-In-One. From this tab: Maintenance Contact Information Advanced You can : • View the status of six tabs: Printer Status, How To, Troubleshooting, Maintenance, Contact Information, and Advanced. Using the Lexmark Solution Center The Lexmark 1200 Series Solution Center is complete before installing new cartridges. • View shopping options for...
User's Guide
Page 13
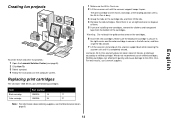
... cartridge lids, and then lift the lids. 4 Remove the old cartridges. Lexmark's All-In-One warranty does not cover repair of refilled cartridges. We do not recommend use Lexmark supplies. 13 Refilling cartridges can affect print quality and cause damage to the All-In-One... the cartridges. Store them in the right carrier and the color cartridge is busy. 3 Grasp the tabs on the cartridges. 6 Insert the new cartridges. Replacing print cartridges The Lexmark 1200 Series uses the following cartridges: Item: Part number: Black cartridge 10N0016 16 17 Color cartridge 10N0026 26...
... cartridge lids, and then lift the lids. 4 Remove the old cartridges. Lexmark's All-In-One warranty does not cover repair of refilled cartridges. We do not recommend use Lexmark supplies. 13 Refilling cartridges can affect print quality and cause damage to the All-In-One... the cartridges. Store them in the right carrier and the color cartridge is busy. 3 Grasp the tabs on the cartridges. 6 Insert the new cartridges. Replacing print cartridges The Lexmark 1200 Series uses the following cartridges: Item: Part number: Black cartridge 10N0016 16 17 Color cartridge 10N0026 26...
User's Guide
Page 14
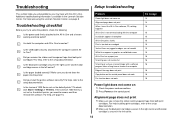
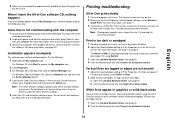
... computer and All-In-One turned on? Did you do not force the paper into the printer. If the Lexmark 1200 Series is not set as the default printer, you install the printer software correctly? Is the paper loaded correctly? Is the black print cartridge secure in the right carrier and the color cartridge secure in the left...
... computer and All-In-One turned on? Did you do not force the paper into the printer. If the Lexmark 1200 Series is not set as the default printer, you install the printer software correctly? Is the paper loaded correctly? Is the black print cartridge secure in the right carrier and the color cartridge secure in the left...
User's Guide
Page 15
... Maintenance tab, click Clean to the setup documentation. Do not delete any Lexmark devices shown here, highlight them and, then press the Delete key. For best print quality, select Better or Best. 2 Align the print cartridges. When I insert the All-In-One software CD, nothing happens From the Desktop, double-click the My...
... Maintenance tab, click Clean to the setup documentation. Do not delete any Lexmark devices shown here, highlight them and, then press the Delete key. For best print quality, select Better or Best. 2 Align the print cartridges. When I insert the All-In-One software CD, nothing happens From the Desktop, double-click the My...
User's Guide
Page 19
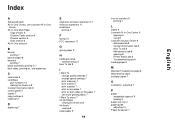
... paper 7 see more printing ideas 7 I Want To menu 7 ink cartridges viewing ink levels of 8 ink levels viewing 8 inkjet paper 9 19 iron-on transfers 9 printing 7 L labels 9 Lexmark All-In-One Center 5 opening 5 using 5 Lexmark Solution Center 8 Advanced tab 8 Contact Information tab 8 How To tab 8 Maintenance tab 8 opening 8 Printer Status tab 8 Troubleshooting tab 8 loading paper 9 M Maintain/Troubleshoot page...
... paper 7 see more printing ideas 7 I Want To menu 7 ink cartridges viewing ink levels of 8 ink levels viewing 8 inkjet paper 9 19 iron-on transfers 9 printing 7 L labels 9 Lexmark All-In-One Center 5 opening 5 using 5 Lexmark Solution Center 8 Advanced tab 8 Contact Information tab 8 How To tab 8 Maintenance tab 8 opening 8 Printer Status tab 8 Troubleshooting tab 8 loading paper 9 M Maintain/Troubleshoot page...
User's Guide
Page 20
...problems 16 scanning problems 16 troubleshooting checklist 14 Troubleshooting tab 8 V View Saved Images page 6 Open with... parts of your All-In-One 4 photo paper 9 photos printing 7 scanning 11 poor quality printing 15 posters printing 7 Preview Now button 11 Preview section Preview Now ...button 11 Print/Copy preview 6 Scan preview 6 print cartridges viewing ink levels of 8 Print Layout tab 7 Print Properties 7 I Want To menu 7 opening 7 Options menu 7 Paper Setup tab 7 Print Layout...
...problems 16 scanning problems 16 troubleshooting checklist 14 Troubleshooting tab 8 V View Saved Images page 6 Open with... parts of your All-In-One 4 photo paper 9 photos printing 7 scanning 11 poor quality printing 15 posters printing 7 Preview Now button 11 Preview section Preview Now ...button 11 Print/Copy preview 6 Scan preview 6 print cartridges viewing ink levels of 8 Print Layout tab 7 Print Properties 7 I Want To menu 7 opening 7 Options menu 7 Paper Setup tab 7 Print Layout...

