User Guide
Page 3
...67 Using recycled paper ...68 Storing paper ...69 Supported paper sizes, types, and weights 69 Paper sizes supported by the printer...69 Paper types and weights supported by the printer 71 Paper types and weights supported by the output bins 71 Printing...73 Printing a... document...73 Printing on specialty media...73 Tips on using letterhead ...73 Tips on using transparencies ...74 Tips on using envelopes...74 Tips on using labels...
...67 Using recycled paper ...68 Storing paper ...69 Supported paper sizes, types, and weights 69 Paper sizes supported by the printer...69 Paper types and weights supported by the printer 71 Paper types and weights supported by the output bins 71 Printing...73 Printing a... document...73 Printing on specialty media...73 Tips on using letterhead ...73 Tips on using transparencies ...74 Tips on using envelopes...74 Tips on using labels...

User Guide
Page 6
... wiper...171 Ordering pick rollers ...172 Ordering staple cartridges ...172 Ordering a transfer roller...172 Recycling Lexmark products...172 Moving the printer...172 Before moving the printer ...172 Moving the printer to another location...173 Shipping the printer ...173 Administrative support 174 Finding advanced networking and administrator information 174 Using the Embedded Web Server...174 Checking the...
... wiper...171 Ordering pick rollers ...172 Ordering staple cartridges ...172 Ordering a transfer roller...172 Recycling Lexmark products...172 Moving the printer...172 Before moving the printer ...172 Moving the printer to another location...173 Shipping the printer ...173 Administrative support 174 Finding advanced networking and administrator information 174 Using the Embedded Web Server...174 Checking the...

User Guide
Page 7
... Toner fog or background shading appears on the page 194 Toner rubs off ...195 Toner specks ...195 Transparency print quality is poor...196 Contacting Customer Support...196 Notices...197 Product information...197 Edition notice...197 Power consumption...201 Index...212
... Toner fog or background shading appears on the page 194 Toner rubs off ...195 Toner specks ...195 Transparency print quality is poor...196 Contacting Customer Support...196 Notices...197 Product information...197 Edition notice...197 Power consumption...201 Index...212
User Guide
Page 10
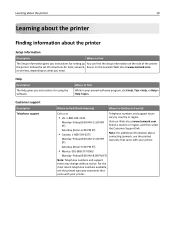
... to find (rest of world) Call us at www.lexmark.com. Note: For additional information about the printer Setup information Description Where to find The Setup information gives you instructions for using the software. Follow the set of the printer the printer. Customer support Description Telephone support Where to find (North America) Where to find the...
... to find (rest of world) Call us at www.lexmark.com. Note: For additional information about the printer Setup information Description Where to find The Setup information gives you instructions for using the software. Follow the set of the printer the printer. Customer support Description Telephone support Where to find (North America) Where to find the...
User Guide
Page 11
... may need additional furniture. Note: For additional information about the printer 11 Description E-mail support Where to find (North America) Where to find (rest of world) For e-mail support, visit our Web site: www.lexmark.com. 1 Click SUPPORT. 2 Click Technical Support. 3 Select your printer type. 4 Select your printer. Fully configured model CAUTION-TIPPING HAZARD: Floor-mounted configurations require...
... may need additional furniture. Note: For additional information about the printer 11 Description E-mail support Where to find (North America) Where to find (rest of world) For e-mail support, visit our Web site: www.lexmark.com. 1 Click SUPPORT. 2 Click Technical Support. 3 Select your printer type. 4 Select your printer. Fully configured model CAUTION-TIPPING HAZARD: Floor-mounted configurations require...

User Guide
Page 12
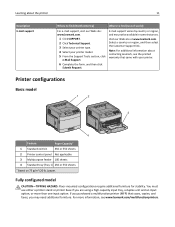
Models with a 250‑sheet standard tray. Learning about the printer 4 5 12 1 2 3 6 7 8 9 Feature/Option Paper Capacity1 1 5‑bin mailbox2 500 sheets 2 5‑bin mailbox 500 sheets 3 Envelope feeder 85 envelopes 4 Standard tray (Tray 1) 250...3) 250 or 550 sheets 8 Optional 2000‑sheet tray (Tray 4) 2000 sheets 9 Caster base Not applicable 1 Based on 75 g/m2 (20 lb.) paper. 2 The printer supports up to three output expander units, two 5-bin mailboxes, one high capacity output expander (not depicted), or one stapler unit (not depicted). 3 An optional duplex...
Models with a 250‑sheet standard tray. Learning about the printer 4 5 12 1 2 3 6 7 8 9 Feature/Option Paper Capacity1 1 5‑bin mailbox2 500 sheets 2 5‑bin mailbox 500 sheets 3 Envelope feeder 85 envelopes 4 Standard tray (Tray 1) 250...3) 250 or 550 sheets 8 Optional 2000‑sheet tray (Tray 4) 2000 sheets 9 Caster base Not applicable 1 Based on 75 g/m2 (20 lb.) paper. 2 The printer supports up to three output expander units, two 5-bin mailboxes, one high capacity output expander (not depicted), or one stapler unit (not depicted). 3 An optional duplex...

User Guide
Page 15
Note: Only the front USB port supports flash drives. Learning about the printer 15 Item 8 Menu Description Opens the menu index Note: The menus are available only when the printer is in the Ready state. 9 USB port Insert a flash drive into the front of the printer to print saved files.
Note: Only the front USB port supports flash drives. Learning about the printer 15 Item 8 Menu Description Opens the menu index Note: The menus are available only when the printer is in the Ready state. 9 USB port Insert a flash drive into the front of the printer to print saved files.

User Guide
Page 23
... electronic components are accessing the system board or installing optional hardware or memory devices sometime after setting up the printer, then turn them off , and unplug the power cord from the wall outlet before touching any cables going into the... printer. Touch something metal on the system board. Install an ISP for additional connectivity options. Note: This task requires a flathead screwdriver. Additional printer setup 23 Installing an Internal Solutions Port The system board supports one optional Lexmark Internal Solutions Port (ISP).
... electronic components are accessing the system board or installing optional hardware or memory devices sometime after setting up the printer, then turn them off , and unplug the power cord from the wall outlet before touching any cables going into the... printer. Touch something metal on the system board. Install an ISP for additional connectivity options. Note: This task requires a flathead screwdriver. Additional printer setup 23 Installing an Internal Solutions Port The system board supports one optional Lexmark Internal Solutions Port (ISP).
User Guide
Page 33
... a support unit. All drawers are accessing the system board or installing optional hardware or memory devices sometime after setting up the printer, then turn the printer off , and unplug the power cord from the wall outlet before continuing. For more information on installing a printer stand, caster base, or 2,000‑sheet tray, see www.lexmark...
... a support unit. All drawers are accessing the system board or installing optional hardware or memory devices sometime after setting up the printer, then turn the printer off , and unplug the power cord from the wall outlet before continuing. For more information on installing a printer stand, caster base, or 2,000‑sheet tray, see www.lexmark...

User Guide
Page 35
... as well, and unplug any packing material. 2 Place the duplex unit in the printer. • T652n and T654n models do not support an optional duplex unit. Removing an optional duplex unit Warning-Potential Damage: Lifting the printer from the wall outlet before continuing. If you have an internal duplex unit installed in the location...
... as well, and unplug any packing material. 2 Place the duplex unit in the printer. • T652n and T654n models do not support an optional duplex unit. Removing an optional duplex unit Warning-Potential Damage: Lifting the printer from the wall outlet before continuing. If you have an internal duplex unit installed in the location...
User Guide
Page 37
... then press . 4 Press the arrow buttons until you have not made any menu item settings changes yet, then the menu settings page lists all printer options are installed correctly. Once you installed is not listed, then it is "Not Connected," the LAN drop may not be active, or the ...network cable may be malfunctioning. Consult a system support person for a solution, and then print another value, and save other settings from the menus, they replace the factory default settings as user default ...
... then press . 4 Press the arrow buttons until you have not made any menu item settings changes yet, then the menu settings page lists all printer options are installed correctly. Once you installed is not listed, then it is "Not Connected," the LAN drop may not be active, or the ...network cable may be malfunctioning. Consult a system support person for a solution, and then print another value, and save other settings from the menus, they replace the factory default settings as user default ...

User Guide
Page 39
... users In Mac OS X version 10.5 or later 1 From the Apple menu, choose System Preferences. 2 Click Print & Fax. 3 Select the printer, and then click Options & Supplies. 4 Click Driver, and then add any installed hardware options, and then click Apply Changes. WEP key If your system... support person if you will need to auto for Security Method: - Select the key currently in the provided spaces. In Mac OS X version 10...
... users In Mac OS X version 10.5 or later 1 From the Apple menu, choose System Preferences. 2 Click Print & Fax. 3 Select the printer, and then click Options & Supplies. 4 Click Driver, and then add any installed hardware options, and then click Apply Changes. WEP key If your system... support person if you will need to auto for Security Method: - Select the key currently in the provided spaces. In Mac OS X version 10...
User Guide
Page 46
...Preferences. 2 Click Print & Fax. 3 Click +. 4 Click AppleTalk. 5 Select the printer from the list. 10 Click Add. Additional printer setup 46 3 Click +. 4 Click IP. 5 Type in the IP address of your system support person for assistance. In Mac OS X version 10.4 and earlier 1 From the Finder... desktop, choose Go > Applications. 2 Double‑click Utilities. 3 Double‑click Print Center or Printer Setup Utility. 4 From the Printer List, click Add. 5 Choose the ...
...Preferences. 2 Click Print & Fax. 3 Click +. 4 Click AppleTalk. 5 Select the printer from the list. 10 Click Add. Additional printer setup 46 3 Click +. 4 Click IP. 5 Type in the IP address of your system support person for assistance. In Mac OS X version 10.4 and earlier 1 From the Finder... desktop, choose Go > Applications. 2 Double‑click Utilities. 3 Double‑click Print Center or Printer Setup Utility. 4 From the Printer List, click Add. 5 Choose the ...
User Guide
Page 51
... press . 4 Press the arrow buttons until the correct Paper Type setting appears, and then press . Specify a unit of measurement 1 Make sure the printer is 216 x 356 mm (8.5 x 14 in.). The Paper Type setting must be set manually. Ready appears. Configuring Universal paper settings The Universal Paper Size...the tray for all of measure (millimeters or inches) • Portrait Width • Portrait Height • Feed Direction Note: The smallest supported Universal size is not available from the Paper Size menu. Then, specify all trays that do not contain plain paper. 1 Make sure the...
... press . 4 Press the arrow buttons until the correct Paper Type setting appears, and then press . Specify a unit of measurement 1 Make sure the printer is 216 x 356 mm (8.5 x 14 in.). The Paper Type setting must be set manually. Ready appears. Configuring Universal paper settings The Universal Paper Size...the tray for all of measure (millimeters or inches) • Portrait Width • Portrait Height • Feed Direction Note: The smallest supported Universal size is not available from the Paper Size menu. Then, specify all trays that do not contain plain paper. 1 Make sure the...
User Guide
Page 52
... or 550‑sheet tray Although the 250-sheet tray and the 550-sheet tray are different in the portrait orientation) allows the printer to support the size, including support for loading paper. Note: Do not remove trays while a job prints or while Busy appears on one sheet. 1 From the Universal Setup menu...
... or 550‑sheet tray Although the 250-sheet tray and the 550-sheet tray are different in the portrait orientation) allows the printer to support the size, including support for loading paper. Note: Do not remove trays while a job prints or while Busy appears on one sheet. 1 From the Universal Setup menu...

User Guide
Page 62
Make sure the paper fits loosely in the multipurpose feeder, lies flat, and is not bent or wrinkled. 7 From the printer control panel, set the Paper Size and Paper Type. Loading paper and specialty media 62 6 Adjust the width guide to the right. 4 ...envelope you are loading: • Short envelopes-Fully close the envelope support. • Medium‑length envelopes-Extend the envelope support to the middle position. • Long envelopes-Fully open the envelope support. 2 Lift the envelope weight back toward the printer. 3 Slide the width guide to lightly touch the edge of the...
Make sure the paper fits loosely in the multipurpose feeder, lies flat, and is not bent or wrinkled. 7 From the printer control panel, set the Paper Size and Paper Type. Loading paper and specialty media 62 6 Adjust the width guide to the right. 4 ...envelope you are loading: • Short envelopes-Fully close the envelope support. • Medium‑length envelopes-Extend the envelope support to the middle position. • Long envelopes-Fully open the envelope support. 2 Lift the envelope weight back toward the printer. 3 Slide the width guide to lightly touch the edge of the...
User Guide
Page 64
.... When a Custom Type name is selected. To unlink a tray, change the following tray settings so that best describes your paper is on the printer model. To change the Paper Size setting for example: Plain Paper, Letterhead, Custom Type ) Paper Type names describe the paper characteristics. Note: Not... all exit bins support every paper size and type. Linking exit bins The standard exit bin holds up to 350 sheets or 550 sheets of the fuser varies ...
.... When a Custom Type name is selected. To unlink a tray, change the following tray settings so that best describes your paper is on the printer model. To change the Paper Size setting for example: Plain Paper, Letterhead, Custom Type ) Paper Type names describe the paper characteristics. Note: Not... all exit bins support every paper size and type. Linking exit bins The standard exit bin holds up to 350 sheets or 550 sheets of the fuser varies ...

User Guide
Page 68
... that paper was identified as the Forestry Stewardship Council (FSC) or The Program for special applications is another. Using recycled paper As an environmentally conscientious company, Lexmark supports the use of recycled paper produced specifically for use in laser (electro-photographic) printers. Many factors are better than does normal paper production. However, using recycled papers...
... that paper was identified as the Forestry Stewardship Council (FSC) or The Program for special applications is another. Using recycled paper As an environmentally conscientious company, Lexmark supports the use of recycled paper produced specifically for use in laser (electro-photographic) printers. Many factors are better than does normal paper production. However, using recycled papers...

User Guide
Page 69
... .) unless the size is specified by the printer Note: An optional 250‑sheet Universally Adjustable Tray is turned off. Supported paper sizes, types, and weights The following tables provide information on the Lexmark Web site. For information on card stock and labels, see the Card Stock & Label Guide on standard and optional paper sources...
... .) unless the size is specified by the printer Note: An optional 250‑sheet Universally Adjustable Tray is turned off. Supported paper sizes, types, and weights The following tables provide information on the Lexmark Web site. For information on card stock and labels, see the Card Stock & Label Guide on standard and optional paper sources...

User Guide
Page 70
...x 250 mm (6.9 x 9.8 in.) 1 This size appears in the Paper Size menu only when Tray Size Sensing is specified by the software application. 4 To support duplexing, the Universal width must be between 182 mm (7.2 in) and 356 mm (14 in .) unless the size is turned off. For more information, contact... Customer Support. 2 Only the standard exit bin supports this size. 3 This size setting formats the page for 216 x 356 mm (8.5 x 14 in ). Universal length must be between 148 mm...
...x 250 mm (6.9 x 9.8 in.) 1 This size appears in the Paper Size menu only when Tray Size Sensing is specified by the software application. 4 To support duplexing, the Universal width must be between 182 mm (7.2 in) and 356 mm (14 in .) unless the size is turned off. For more information, contact... Customer Support. 2 Only the standard exit bin supports this size. 3 This size setting formats the page for 216 x 356 mm (8.5 x 14 in ). Universal length must be between 148 mm...


