Clearing Jams Guide
Page 2
... printer: 1 Pull down the top rear door. 230 paper jam Rear paper jams 1 Remove the standard tray from the printer. 2 Pull down the bottom rear door. 3 Push the tab down. 4 Remove the jammed paper. 5 Close the bottom rear door. 6 Insert the standard tray. 7 Press . 2 Slowly remove the jammed paper to remove, then open the rear door and remove the paper from a hot component, allow...
... printer: 1 Pull down the top rear door. 230 paper jam Rear paper jams 1 Remove the standard tray from the printer. 2 Pull down the bottom rear door. 3 Push the tab down. 4 Remove the jammed paper. 5 Close the bottom rear door. 6 Insert the standard tray. 7 Press . 2 Slowly remove the jammed paper to remove, then open the rear door and remove the paper from a hot component, allow...
Clearing Jams Guide
Page 3
Front paper jams 1 Remove the standard tray from the printer. 2 Remove the duplex jam access tray. 3 Remove the jammed paper. 4 Insert the standard tray. 5 Press . 2 Remove the jammed paper. 3 Close the rear duplex door. 4 Press . 3 Front paper jams 1 Remove the standard tray from the printer. 2 Push the tab down. 231-239 paper jams (optional external duplex unit) Rear paper jams 1 Push in and hold the latch while pulling up the rear duplex door.
Front paper jams 1 Remove the standard tray from the printer. 2 Remove the duplex jam access tray. 3 Remove the jammed paper. 4 Insert the standard tray. 5 Press . 2 Remove the jammed paper. 3 Close the rear duplex door. 4 Press . 3 Front paper jams 1 Remove the standard tray from the printer. 2 Push the tab down. 231-239 paper jams (optional external duplex unit) Rear paper jams 1 Push in and hold the latch while pulling up the rear duplex door.
User's Guide
Page 83
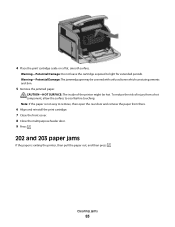
... might be covered with unfused toner which can stain garments and skin. 5 Remove the jammed paper. Note: If the paper is not easy to remove, then open the rear door and remove the paper from a hot component, allow the surface to light for extended periods. Warning-Potential Damage...: Do not leave the cartridge exposed to cool before touching. Warning-Potential Damage: The jammed paper may be hot. Clearing jams 83 4 Place the...
... might be covered with unfused toner which can stain garments and skin. 5 Remove the jammed paper. Note: If the paper is not easy to remove, then open the rear door and remove the paper from a hot component, allow the surface to light for extended periods. Warning-Potential Damage...: Do not leave the cartridge exposed to cool before touching. Warning-Potential Damage: The jammed paper may be hot. Clearing jams 83 4 Place the...
User's Guide
Page 84
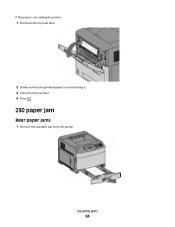
If the paper is not exiting the printer: 1 Pull down the top rear door. 2 Slowly remove the jammed paper to avoid tearing it. 3 Close the top rear door. 4 Press . 230 paper jam Rear paper jams 1 Remove the standard tray from the printer. Clearing jams 84
If the paper is not exiting the printer: 1 Pull down the top rear door. 2 Slowly remove the jammed paper to avoid tearing it. 3 Close the top rear door. 4 Press . 230 paper jam Rear paper jams 1 Remove the standard tray from the printer. Clearing jams 84

User's Guide
Page 85
2 Pull down the bottom rear door. 3 Push the tab down. 4 Remove the jammed paper. 5 Close the bottom rear door. 6 Insert the standard tray. 7 Press . Clearing jams 85
2 Pull down the bottom rear door. 3 Push the tab down. 4 Remove the jammed paper. 5 Close the bottom rear door. 6 Insert the standard tray. 7 Press . Clearing jams 85
User's Guide
Page 86
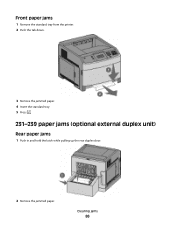
Front paper jams 1 Remove the standard tray from the printer. 2 Push the tab down. 3 Remove the jammed paper. 4 Insert the standard tray. 5 Press . 231-239 paper jams (optional external duplex unit) Rear paper jams 1 Push in and hold the latch while pulling up the rear duplex door. 2 Remove the jammed paper. Clearing jams 86
Front paper jams 1 Remove the standard tray from the printer. 2 Push the tab down. 3 Remove the jammed paper. 4 Insert the standard tray. 5 Press . 231-239 paper jams (optional external duplex unit) Rear paper jams 1 Push in and hold the latch while pulling up the rear duplex door. 2 Remove the jammed paper. Clearing jams 86
User's Guide
Page 87
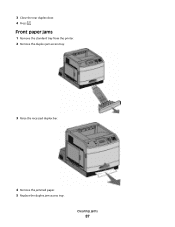
Clearing jams 87 Front paper jams 1 Remove the standard tray from the printer. 2 Remove the duplex jam access tray. 3 Raise the recessed duplex bar. 4 Remove the jammed paper. 5 Replace the duplex jam access tray. 3 Close the rear duplex door. 4 Press .
Clearing jams 87 Front paper jams 1 Remove the standard tray from the printer. 2 Remove the duplex jam access tray. 3 Raise the recessed duplex bar. 4 Remove the jammed paper. 5 Replace the duplex jam access tray. 3 Close the rear duplex door. 4 Press .


