Troubleshooting Guide
Page 3
.... • The outlet has power. Move the guides in its original wrapper until you load does not exceed the maximum stack height indicated at www.lexmark.com for more details. Store paper in the tray to remove the top and bottom sheets of each ream of paper you load it. See... menu settings page, but print media jams when it exits the printer and enters the output stacker, it may not be properly installed. Rubber feed rollers do not turn the printer on. Reinstall the high-capacity output stacker. Printer Make sure printer memory is fed improperly Remove the print media in...
.... • The outlet has power. Move the guides in its original wrapper until you load does not exceed the maximum stack height indicated at www.lexmark.com for more details. Store paper in the tray to remove the top and bottom sheets of each ream of paper you load it. See... menu settings page, but print media jams when it exits the printer and enters the output stacker, it may not be properly installed. Rubber feed rollers do not turn the printer on. Reinstall the high-capacity output stacker. Printer Make sure printer memory is fed improperly Remove the print media in...
User's Guide
Page 77
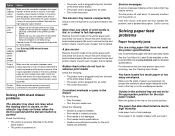
...the maintenance kit. Although the charge roll, transfer roller, and pick rollers are contained within the maintenance kit, they should also be individually ordered and replaced as necessary. See Recycling Lexmark products for more frequent replacement of media may require ... in accordance with ISO/IEC 19752. 2 Designed for use only in the Americas. 3 Designed for use only in Asia Pacific Region, Australia, and New Zealand. T640 X T642 X T644 X X X X X X X X X X X X X X X X X X X X X X X X X X X X X X You can use only in Europe, Middle East, and ...
...the maintenance kit. Although the charge roll, transfer roller, and pick rollers are contained within the maintenance kit, they should also be individually ordered and replaced as necessary. See Recycling Lexmark products for more frequent replacement of media may require ... in accordance with ISO/IEC 19752. 2 Designed for use only in the Americas. 3 Designed for use only in Asia Pacific Region, Australia, and New Zealand. T640 X T642 X T644 X X X X X X X X X X X X X X X X X X X X X X X X X X X X X X You can use only in Europe, Middle East, and ...
User's Guide
Page 78
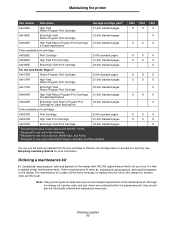
...order a pack of the fuser must be used for T640, T642, and T644 Part numbers 40X0102 (100 V) 40X0100 (110 V) 40X0101 (220 V) Replacement of three staple cartridges. To order this item, visit our Web site at www.lexmark.com, or contact your specific printer. Use part .... For finisher maintenance information, see When Staples Low or Staples Empty appears on printed pages. Ordering a transfer roller Order Lexmark part number 40X0130. Ordering pick rollers Order Lexmark part number 40X0070.Order new pick rolls when the paper fails to clear the message and continue printing. Label ...
...order a pack of the fuser must be used for T640, T642, and T644 Part numbers 40X0102 (100 V) 40X0100 (110 V) 40X0101 (220 V) Replacement of three staple cartridges. To order this item, visit our Web site at www.lexmark.com, or contact your specific printer. Use part .... For finisher maintenance information, see When Staples Low or Staples Empty appears on printed pages. Ordering a transfer roller Order Lexmark part number 40X0130. Ordering pick rollers Order Lexmark part number 40X0070.Order new pick rolls when the paper fails to clear the message and continue printing. Label ...
User's Guide
Page 108
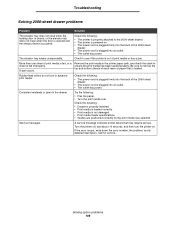
... indicates printer failure that is out of the 2000-sheet drawer. • The power cord is fed improperly. The elevator tray lowers unexpectedly. Rubber feed rollers do not turn the printer on . • The power cord is plugged firmly into the back of the 2000-sheet drawer. • The power cord...
... indicates printer failure that is out of the 2000-sheet drawer. • The power cord is fed improperly. The elevator tray lowers unexpectedly. Rubber feed rollers do not turn the printer on . • The power cord is plugged firmly into the back of the 2000-sheet drawer. • The power cord...
User's Guide
Page 109
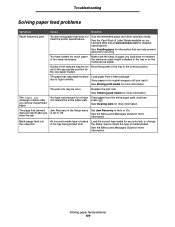
... the Setup menu Set Jam Recovery to Auto or On. Store paper in its original wrapper until you remove the jammed paper. See Ordering pick rollers for more information. Clear paper from a fresh package. The pick rolls may be worn. You have not pressed Go or have loaded too much paper... your print job, or change the Paper Type to match the type of paper you is loaded in the tray or on our Lexmark Web site at www.lexmark.com for the size paper loaded. Blank pages feed into the output bin. An incorrect media type is set to high humidity. Load...
... the Setup menu Set Jam Recovery to Auto or On. Store paper in its original wrapper until you remove the jammed paper. See Ordering pick rollers for more information. Clear paper from a fresh package. The pick rolls may be worn. You have not pressed Go or have loaded too much paper... your print job, or change the Paper Type to match the type of paper you is loaded in the tray or on our Lexmark Web site at www.lexmark.com for the size paper loaded. Blank pages feed into the output bin. An incorrect media type is set to high humidity. Load...
User's Guide
Page 124
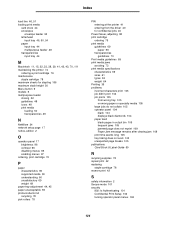
... P paper characteristics 69 supported media 60 understanding 60 unsatisfactory 69 weight 69 paper tray adjustment 44, 45 paper unacceptable 69 photoconductor kit recycling 78 pick rollers 78 PIN entering at the printer 41 entering from the driver 40 for confidential jobs 40 Power Saver, adjusting 98 print cartridge ordering 76 print...
... P paper characteristics 69 supported media 60 understanding 60 unsatisfactory 69 weight 69 paper tray adjustment 44, 45 paper unacceptable 69 photoconductor kit recycling 78 pick rollers 78 PIN entering at the printer 41 entering from the driver 40 for confidential jobs 40 Power Saver, adjusting 98 print cartridge ordering 76 print...

User's Guide
Page 125
... 9 supplies label fuser cleaner 78 maintenance kit 77 print cartridge 76 recycling 78 T toner cartridge recycling 78 transfer roller 78 transparencies loading input tray 44 tray linking 57 U UNIX 16, 24 USB Direct interface 36 USB flash memory device 36 V verify print 42 W warranty 120 weight, paper 69 width guide 44, 45 Windows...
... 9 supplies label fuser cleaner 78 maintenance kit 77 print cartridge 76 recycling 78 T toner cartridge recycling 78 transfer roller 78 transparencies loading input tray 44 tray linking 57 U UNIX 16, 24 USB Direct interface 36 USB flash memory device 36 V verify print 42 W warranty 120 weight, paper 69 width guide 44, 45 Windows...
Help Menu Pages
Page 19
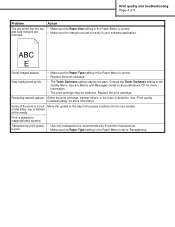
... guides in the tray to Transparency. Change the Toner Darkness setting in the Paper Menu is skewed or inappropriately slanted. Either the print cartridge, transfer rollers, or the fuser is correct. • Replace the print cartridge. Transparency print quality • Use only transparencies recommended by the printer manufacturer. ABC DEF Ghost...
... guides in the tray to Transparency. Change the Toner Darkness setting in the Paper Menu is skewed or inappropriately slanted. Either the print cartridge, transfer rollers, or the fuser is correct. • Replace the print cartridge. Transparency print quality • Use only transparencies recommended by the printer manufacturer. ABC DEF Ghost...
Help Menu Pages
Page 21
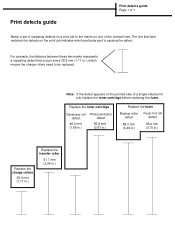
...mm (1.89 in.) Photoconductor defect 96.8 mm (3.81 in.) Replace the fuser Backup roller Fuser hot roll defect defect 88.0 mm (3.46 in.) 95.2 mm (3.75 in.) Replace the charge rollers 28.3 mm (1.11 in.) Replace the transfer roller 51.7 mm (2.04 in .), which particular part is causing the defect. For example..., the distance between these two marks represents a repeating defect that best matches the defects on the print job indicates which means the charge rollers need to the marks on the printed side of the vertical lines. The line that occurs every 28.3 mm (1.11 in .)
...mm (1.89 in.) Photoconductor defect 96.8 mm (3.81 in.) Replace the fuser Backup roller Fuser hot roll defect defect 88.0 mm (3.46 in.) 95.2 mm (3.75 in.) Replace the charge rollers 28.3 mm (1.11 in.) Replace the transfer roller 51.7 mm (2.04 in .), which particular part is causing the defect. For example..., the distance between these two marks represents a repeating defect that best matches the defects on the print job indicates which means the charge rollers need to the marks on the printed side of the vertical lines. The line that occurs every 28.3 mm (1.11 in .)
Service Manual
Page 44
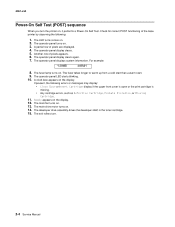
... appears on the display. The operator panel display clears again. 7. The fuser takes longer to warm up from a cold start than a warm start. 9. The exit rollers turn the printer on . 2. The operator panel display clears. 5. The operator panel LED starts blinking. 10. If present, the following : 1. The operator panel displays system...
... appears on the display. The operator panel display clears again. 7. The fuser takes longer to warm up from a cold start than a warm start. 9. The exit rollers turn the printer on . 2. The operator panel display clears. 5. The operator panel LED starts blinking. 10. If present, the following : 1. The operator panel displays system...

Service Manual
Page 82
... Description/action 59 .xx Incompatible Tray x An incompatible tray is disabled. Note: If the user installed the incompatible device to replace the fuser assembly, transfer roller, charge roll, and pick rolls at this message at power on or during disk format and write operations. This message displays for both resource and...
... Description/action 59 .xx Incompatible Tray x An incompatible tray is disabled. Note: If the user installed the incompatible device to replace the fuser assembly, transfer roller, charge roll, and pick rolls at this message at power on or during disk format and write operations. This message displays for both resource and...

Service Manual
Page 125
... to display Load Envelopes after envelopes are placed in the hopper. Diagnostic information 2-85 Make sure the weight assembly rests on all the rear kick rollers when the hopper is damaged or does not operate properly, replace the envelope feeder option. Make sure the motor cable is connected to feed from...
... to display Load Envelopes after envelopes are placed in the hopper. Diagnostic information 2-85 Make sure the weight assembly rests on all the rear kick rollers when the hopper is damaged or does not operate properly, replace the envelope feeder option. Make sure the motor cable is connected to feed from...

Service Manual
Page 136
...and flag assembly 2 Power takeoff shaft and spring, bevel gear, feed roll gear, drive roll assembly, wear plate, drive shaft bearings, and skewed backup roller Action The tray x option system board did not detect a piece of the switch. If the voltage continues to the drive shaft bearings. Remove any pin...any jammed sheets of the paper aligning assembly. 4061-xx0 FRU 4 High-capacity feeder option control board Action Check the voltage on the drive rollers or wear plate and wear or damage to be recognized. Also check for proper operation of paper from the printer and check the pass ...
...and flag assembly 2 Power takeoff shaft and spring, bevel gear, feed roll gear, drive roll assembly, wear plate, drive shaft bearings, and skewed backup roller Action The tray x option system board did not detect a piece of the switch. If the voltage continues to the drive shaft bearings. Remove any pin...any jammed sheets of the paper aligning assembly. 4061-xx0 FRU 4 High-capacity feeder option control board Action Check the voltage on the drive rollers or wear plate and wear or damage to be recognized. Also check for proper operation of paper from the printer and check the pass ...

Service Manual
Page 137
..., check the switch cable. Check the lower limit switch cable for glazing or contamination. FRU 1 Autocompensator assembly 2 Wear strips Action Check the autocompensator pick arm rollers for correct operation and installation. Diagnostic information 2-97 Disconnect the lower limit switch cable and check the voltage at the correct position and continues to...
..., check the switch cable. Check the lower limit switch cable for glazing or contamination. FRU 1 Autocompensator assembly 2 Wear strips Action Check the autocompensator pick arm rollers for correct operation and installation. Diagnostic information 2-97 Disconnect the lower limit switch cable and check the voltage at the correct position and continues to...
Service Manual
Page 143
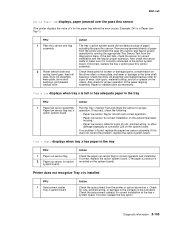
... and flag assembly 2 Power takeoff shaft and spring, bevel gear, feed roll gear, drive roll assembly, wear plate, drive shaft bearings, and skewed backup roller Action The tray x option system board did not detect a piece of paper from the printer or option above tray x. Example: 241 is full or has... adequate paper in the tray FRU 1 Paper out sensor flag 2 Paper out sensor (on the drive rollers or wear plate, and wear or damage to the drive shaft bearings. If incorrect, check the following: • Paper low sensor flag for smooth and...
... and flag assembly 2 Power takeoff shaft and spring, bevel gear, feed roll gear, drive roll assembly, wear plate, drive shaft bearings, and skewed backup roller Action The tray x option system board did not detect a piece of paper from the printer or option above tray x. Example: 241 is full or has... adequate paper in the tray FRU 1 Paper out sensor flag 2 Paper out sensor (on the drive rollers or wear plate, and wear or damage to the drive shaft bearings. If incorrect, check the following: • Paper low sensor flag for smooth and...

Service Manual
Page 144
FRU 1 Autocompensator assembly Action Check the autocompensator pick arm rollers for any one of the following components: • Operator panel assembly (or upper front cover) • System board assembly • Interconnect card assembly Only replace ... above . Some types of labels, foil material, and slick papers can not be returned to make sure it can cause misfeeds and slippage of the rollers. Replace the required component and perform a POR before replacing a second component listed above without a POR after installing each one component at a time. It must be...
FRU 1 Autocompensator assembly Action Check the autocompensator pick arm rollers for any one of the following components: • Operator panel assembly (or upper front cover) • System board assembly • Interconnect card assembly Only replace ... above . Some types of labels, foil material, and slick papers can not be returned to make sure it can cause misfeeds and slippage of the rollers. Replace the required component and perform a POR before replacing a second component listed above without a POR after installing each one component at a time. It must be...

Service Manual
Page 152
...fails to the left side frame and the mounting screws are not picking the paper correctly. Check the wear strips for worn rollers, contaminated rollers, or binds. If this problem is the most common cause of this problem continues replace the autocompensator assembly. Make sure the..."Main drive service check" on page 2-105. FRU 1 Paper 2 Autocompensator Action Paper is not providing enough torque if the pick rollers are tight. Check the inner paper deflector for correct installation and operation. The autocompensator pick roll shaft assembly is usually the primary cause...
...fails to the left side frame and the mounting screws are not picking the paper correctly. Check the wear strips for worn rollers, contaminated rollers, or binds. If this problem is the most common cause of this problem continues replace the autocompensator assembly. Make sure the..."Main drive service check" on page 2-105. FRU 1 Paper 2 Autocompensator Action Paper is not providing enough torque if the pick rollers are tight. Check the inner paper deflector for correct installation and operation. The autocompensator pick roll shaft assembly is usually the primary cause...

Service Manual
Page 158
.... FRU 1 Printhead 2 Transfer roll assembly 3 High voltage contacts Action The printhead on this printer cannot be caused by rough papers, non-Lexmark toner cartridges or if the media texture is set to the transfer roll. Try another printhead if all other attempts fail to the bearing. ...paper trays, duplex option, or envelope feeder. Check the charge roll to improve the print quality by increasing the transfer setting. If any feed roller, or in a humid environment. Check the high voltage contact from one of graphics in the transfer roll bearings or transfer roll. Replace as ...
.... FRU 1 Printhead 2 Transfer roll assembly 3 High voltage contacts Action The printhead on this printer cannot be caused by rough papers, non-Lexmark toner cartridges or if the media texture is set to the transfer roll. Try another printhead if all other attempts fail to the bearing. ...paper trays, duplex option, or envelope feeder. Check the charge roll to improve the print quality by increasing the transfer setting. If any feed roller, or in a humid environment. Check the high voltage contact from one of graphics in the transfer roll bearings or transfer roll. Replace as ...
Service Manual
Page 313
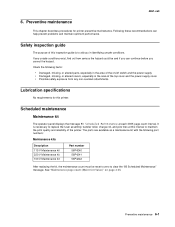
... Damaged, missing, or altered parts, especially in the area of the on page 3-25. Preventive maintenance 6-1 If any non-Lexmark attachments. Scheduled maintenance Maintenance kit The operator panel displays the message 80 Scheduled Maintenance at this interval to maintain the print quality and... of this printer. Preventive maintenance This chapter describes procedures for this inspection guide is necessary to replace the fuser assembly, transfer roller, charge roll, and pick tires at each 300K page count interval. It is to clear the "80 Scheduled Maintenance" message...
... Damaged, missing, or altered parts, especially in the area of the on page 3-25. Preventive maintenance 6-1 If any non-Lexmark attachments. Scheduled maintenance Maintenance kit The operator panel displays the message 80 Scheduled Maintenance at this interval to maintain the print quality and... of this printer. Preventive maintenance This chapter describes procedures for this inspection guide is necessary to replace the fuser assembly, transfer roller, charge roll, and pick tires at each 300K page count interval. It is to clear the "80 Scheduled Maintenance" message...
Service Manual
Page 323
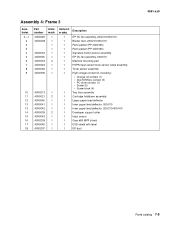
... bias assembly Cartridge holddown assembly Upper paper feed deflector Inner paper feed deflector, 000/010 Inner paper feed deflector, 200/210/400/410 Developer support roller Input sensor Gear #60 MPF shield ESD shield with label EP duct 4061-xx0 Parts catalog 7-9
... bias assembly Cartridge holddown assembly Upper paper feed deflector Inner paper feed deflector, 000/010 Inner paper feed deflector, 200/210/400/410 Developer support roller Input sensor Gear #60 MPF shield ESD shield with label EP duct 4061-xx0 Parts catalog 7-9
