Clearing Jams Guide
Page 1
... jam, reinsert the staples and staple holder, and then close the stapler door. * After clearing the jam, press printing. Warning: Do not touch the photoconductor drum on the printer, Open Rear and remove the jam. If jams do * 200 and 201 Paper jams Open the top front cover, remove the print... duplex deflector, and remove the jam. CAUTION: The inside of the printer may be hot. 3 Lift and pull the print cartridge out of print media. Lexmark™ T64x Clearing Jams Guide Avoiding jams The following hints can help you have cut or trimmed yourself. • Do not mix print media sizes...
... jam, reinsert the staples and staple holder, and then close the stapler door. * After clearing the jam, press printing. Warning: Do not touch the photoconductor drum on the printer, Open Rear and remove the jam. If jams do * 200 and 201 Paper jams Open the top front cover, remove the print... duplex deflector, and remove the jam. CAUTION: The inside of the printer may be hot. 3 Lift and pull the print cartridge out of print media. Lexmark™ T64x Clearing Jams Guide Avoiding jams The following hints can help you have cut or trimmed yourself. • Do not mix print media sizes...

User's Guide
Page 87
... feeder. 2 Push the release latch, and open the top front cover. Allow the printer to light for extended periods. Warning: Do not touch the photoconductor drum on the underside of the printer may be hot. Clearing printer jams 87 CAUTION: The inside of the cartridge. Note: Do not leave the cartridge...
... feeder. 2 Push the release latch, and open the top front cover. Allow the printer to light for extended periods. Warning: Do not touch the photoconductor drum on the underside of the printer may be hot. Clearing printer jams 87 CAUTION: The inside of the cartridge. Note: Do not leave the cartridge...
Service Manual
Page 156
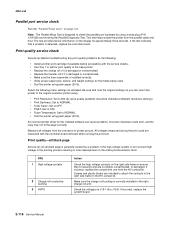
... "Parallel Wrap tests" on the display for approximately three seconds. Note: The Parallel Wrap Test is correctly installed in toner development on the entire photoconductor drum. Select the following : • Install another print cartridge if available before proceeding with the service checks. • Use Tray 1 to check the parallel port hardware...
... "Parallel Wrap tests" on the display for approximately three seconds. Note: The Parallel Wrap Test is correctly installed in toner development on the entire photoconductor drum. Select the following : • Install another print cartridge if available before proceeding with the service checks. • Use Tray 1 to check the parallel port hardware...
Service Manual
Page 157
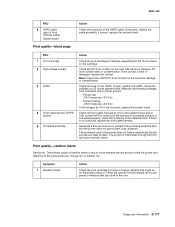
... the front cable harness. The printhead used in the printer does not have a mechanical shutter as previous laser printers. Check the transfer roll and charge roll for damage, PC drum contact wear or contamination. If incorrect, replace the cable assembly. Measure the following voltages from connector J22 ...section 5 Printhead assembly Action Check the print cartridge for loose or foreign material that are incorrect, replace the system board. Check the PC drum contact on the system board. If open, replace the HVPS. Check the voltages at J10-5 are stuck to make sure the harness ...
... the front cable harness. The printhead used in the printer does not have a mechanical shutter as previous laser printers. Check the transfer roll and charge roll for damage, PC drum contact wear or contamination. If incorrect, replace the cable assembly. Measure the following voltages from connector J22 ...section 5 Printhead assembly Action Check the print cartridge for loose or foreign material that are incorrect, replace the system board. Check the PC drum contact on the system board. If open, replace the HVPS. Check the voltages at J10-5 are stuck to make sure the harness ...
Service Manual
Page 209
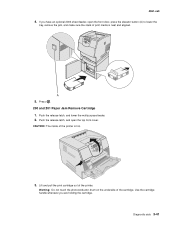
If you are holding the cartridge. Warning: Do not touch the photoconductor drum on the underside of the printer is neat and aligned. Press . 200 and 201 Paper Jam Remove Cartridge 1. Diagnostic aids 3-41 Push the release latch, ...
If you are holding the cartridge. Warning: Do not touch the photoconductor drum on the underside of the printer is neat and aligned. Press . 200 and 201 Paper Jam Remove Cartridge 1. Diagnostic aids 3-41 Push the release latch, ...
Service Manual
Page 323
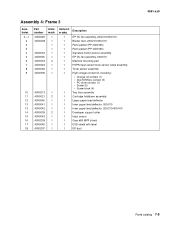
.../input sensor/toner sensor cable assembly Toner sensor assembly High voltage contact kit, including: • Charge roll contact (1) • Doc/TAR/Dev contact (3) • PC drum contact (1) • Screw (5) • Screw block (4) Tray bias assembly Cartridge holddown assembly Upper paper feed deflector Inner paper feed deflector, 000/010 Inner paper feed...
.../input sensor/toner sensor cable assembly Toner sensor assembly High voltage contact kit, including: • Charge roll contact (1) • Doc/TAR/Dev contact (3) • PC drum contact (1) • Screw (5) • Screw block (4) Tray bias assembly Cartridge holddown assembly Upper paper feed deflector Inner paper feed deflector, 000/010 Inner paper feed...