
Online Information
Page 1
All rights reserved. Printing Paper handling Maintenance Troubleshooting Administration Index Lexmark T620 and T622 Print as book Printer overview Notices Other resources Navigation Change your language www.lexmark.com Copyright © 2001 Lexmark International, Inc.
All rights reserved. Printing Paper handling Maintenance Troubleshooting Administration Index Lexmark T620 and T622 Print as book Printer overview Notices Other resources Navigation Change your language www.lexmark.com Copyright © 2001 Lexmark International, Inc.
Setup Guide
Page 3
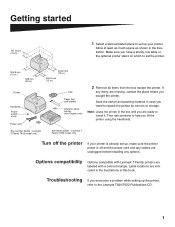
... printer using the handholds. Save the carton and packing material in this book. Tray number decals - Options compatibility Options compatible with Lexmark T Family printers are indicated in the illustrations in case you encounter a problem while setting up the printer, refer to set up...16 cm (4.5 ft) 1 Select a well-ventilated place to the Lexmark T620/T622 Publications CD. 1 Lexmark T Family T622 model only 500 sheet drawer - Lexmark T Family T622 model only Turn off the printer If your printer. Troubleshooting If you need to install it. Then ask someone to set up ...
... printer using the handholds. Save the carton and packing material in this book. Tray number decals - Options compatibility Options compatible with Lexmark T Family printers are indicated in the illustrations in case you encounter a problem while setting up the printer, refer to set up...16 cm (4.5 ft) 1 Select a well-ventilated place to the Lexmark T620/T622 Publications CD. 1 Lexmark T Family T622 model only 500 sheet drawer - Lexmark T Family T622 model only Turn off the printer If your printer. Troubleshooting If you need to install it. Then ask someone to set up ...
Finisher Quick Reference
Page 1
.... When not using the paper bail hook, snap it back into place. 9 Close the stapler access door. Discard the entire sheet. Troubleshooting If stapled print jobs do not bind together in the entry throat. 8 Push the cartridge holder firmly into the stapler until the cartridge ...holder clicks into the storage position. In other countries, contact the place where you may need to make sure no staples are in U.S.A. Lexmark™ T620 and T622 StapleSmart™ Finisher Quick Reference Attaching the stacking paper bail 1 Lift the finisher output bin cover until it locks into position...
.... When not using the paper bail hook, snap it back into place. 9 Close the stapler access door. Discard the entire sheet. Troubleshooting If stapled print jobs do not bind together in the entry throat. 8 Push the cartridge holder firmly into the stapler until the cartridge ...holder clicks into the storage position. In other countries, contact the place where you may need to make sure no staples are in U.S.A. Lexmark™ T620 and T622 StapleSmart™ Finisher Quick Reference Attaching the stacking paper bail 1 Lift the finisher output bin cover until it locks into position...

High-Capacity Output Stacker Installation Instructions
Page 12
Troubleshooting Problem Service Messages Action A service message indicates printer failure that may require service. If the error recurs, write down the error number, the problem, and a detailed description. Call service. 8 High-Capacity Output Stacker Installation Instructions Turn the printer off, wait about 10 seconds, and then turn the printer on.
Troubleshooting Problem Service Messages Action A service message indicates printer failure that may require service. If the error recurs, write down the error number, the problem, and a detailed description. Call service. 8 High-Capacity Output Stacker Installation Instructions Turn the printer off, wait about 10 seconds, and then turn the printer on.
2000-Sheet Drawer User's Guide (2.1 MB)
Page 5
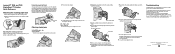
Table of Contents Introduction 1 Unpacking the 2000-Sheet Drawer 2 Attaching Stabilizer Feet 3 Installing the 2000-Sheet Drawer 6 Verifying Installation 10 Setting the Paper Type 11 Changing the Paper Size 12 Selecting Paper 15 Loading Paper 16 Troubleshooting 19 Clearing a Paper Jam 20 2000-Sheet Drawer User's Guide
Table of Contents Introduction 1 Unpacking the 2000-Sheet Drawer 2 Attaching Stabilizer Feet 3 Installing the 2000-Sheet Drawer 6 Verifying Installation 10 Setting the Paper Type 11 Changing the Paper Size 12 Selecting Paper 15 Loading Paper 16 Troubleshooting 19 Clearing a Paper Jam 20 2000-Sheet Drawer User's Guide

2000-Sheet Drawer User's Guide (2.1 MB)
Page 25
Troubleshooting Problem The elevator tray does not raise when the loading door is closed, or the elevator tray does not lower when the door is opened ...
Troubleshooting Problem The elevator tray does not raise when the loading door is closed, or the elevator tray does not lower when the door is opened ...
Service Manual
Page 36
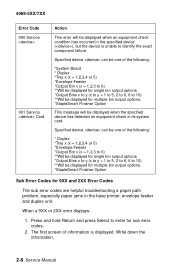
... output options. *Output Bins x to y (x to y = 1 to 5, 2 to 6, 6 to 10) **Will be displayed for 9XX and 2XX Error Codes The sub error codes are helpful troubleshooting a paper path problem, especially paper jams in the base printer, envelope feeder and duplex unit.
... output options. *Output Bins x to y (x to y = 1 to 5, 2 to 6, 6 to 10) **Will be displayed for 9XX and 2XX Error Codes The sub error codes are helpful troubleshooting a paper path problem, especially paper jams in the base printer, envelope feeder and duplex unit.
Service Manual
Page 38
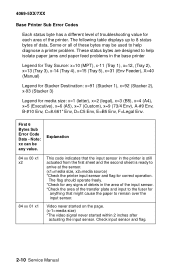
4069-5XX/7XX Base Printer Sub Error Codes Each status byte has a different level of troubleshooting value for each area of the transfer plate and input to the fuser for anything that the input sensor in the base printer Legend for ...
4069-5XX/7XX Base Printer Sub Error Codes Each status byte has a different level of troubleshooting value for each area of the transfer plate and input to the fuser for anything that the input sensor in the base printer Legend for ...
Service Manual
Page 137
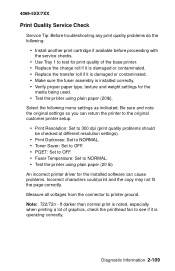
... damaged or contaminated. • Make sure the fuser assembly is operating correctly. Diagnostic Information 2-109 4069-5XX/7XX Print Quality Service Check Service Tip: Before troubleshooting any print quality problems do the following menu settings as indicated. Measure all voltages from the connector to NORMAL. • Test the printer using plain...
... damaged or contaminated. • Make sure the fuser assembly is operating correctly. Diagnostic Information 2-109 4069-5XX/7XX Print Quality Service Check Service Tip: Before troubleshooting any print quality problems do the following menu settings as indicated. Measure all voltages from the connector to NORMAL. • Test the printer using plain...

Service Manual
Page 149
... cartridge. Install another print cartridge before attempting to the system board. The voltage measures approximately +3.8 V dc when not writing data to troubleshoot the printer. Also check to make sure there is proper contact between the smart cartridge contacts in the printer. Check to make sure... a Lexmark T print cartridge is correctly installed in the printer and the smart chip. The cartridge is easily identified by poor contact between the...
... cartridge. Install another print cartridge before attempting to the system board. The voltage measures approximately +3.8 V dc when not writing data to troubleshoot the printer. Also check to make sure there is proper contact between the smart cartridge contacts in the printer. Check to make sure... a Lexmark T print cartridge is correctly installed in the printer and the smart chip. The cartridge is easily identified by poor contact between the...
