Setup Guide (1.4 MB)
Page 3
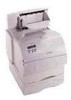
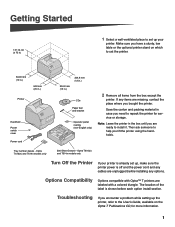
Make sure you have a sturdy, low table or the optional printer stand on the Optra T Publications CD, for service or storage. If any options. Then ask someone to repack the printer for more information. 1 Options Compatibility Options compatible with Optra™ T printers are ready to install it. Getting Started 137.16 cm (4... in case you need to help you are labeled with a colored triangle. Tray number decals - Optra T616(n) and T614n models only Turn Off the Printer If your printer. The location of the label is off and the power cord and any cables are unplugged before ...
Make sure you have a sturdy, low table or the optional printer stand on the Optra T Publications CD, for service or storage. If any options. Then ask someone to repack the printer for more information. 1 Options Compatibility Options compatible with Optra™ T printers are ready to install it. Getting Started 137.16 cm (4... in case you need to help you are labeled with a colored triangle. Tray number decals - Optra T616(n) and T614n models only Turn Off the Printer If your printer. The location of the label is off and the power cord and any cables are unplugged before ...
Setup Guide (1.4 MB)
Page 4
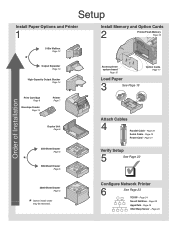
... Drawer Page 4 * Option install order may be reversed. Configure Network Printer 6 See Page 23 TCP/IP - Page 29 Page 20 Serial Cable - Setup Install Paper Options and Printer 1 Install Memory and Option Cards 2 Printer/Flash Memory Page 16 5-Bin Mailbox Page 12 * Output Expander Page ...10 High-Capacity Output Stacker Page 14 Print Cartridge Page 9 Envelope Feeder Page 14 Printer Page 7 Duplex Unit Page 6 250-Sheet Drawer Page 5 * 500-Sheet Drawer Page 5 Access printer system board Page 15 Load Paper 3 See Page 19 Option Cards Page 17 Attach Cables 4 ...
... Drawer Page 4 * Option install order may be reversed. Configure Network Printer 6 See Page 23 TCP/IP - Page 29 Page 20 Serial Cable - Setup Install Paper Options and Printer 1 Install Memory and Option Cards 2 Printer/Flash Memory Page 16 5-Bin Mailbox Page 12 * Output Expander Page ...10 High-Capacity Output Stacker Page 14 Print Cartridge Page 9 Envelope Feeder Page 14 Printer Page 7 Duplex Unit Page 6 250-Sheet Drawer Page 5 * 500-Sheet Drawer Page 5 Access printer system board Page 15 Load Paper 3 See Page 19 Option Cards Page 17 Attach Cables 4 ...
Setup Guide (1.4 MB)
Page 5
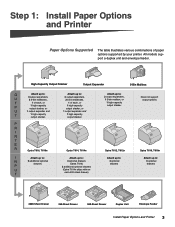
...bin mailbox, or 1 high-capacity output stacker. Optra T612, T612n Attach up to: 3 optional drawers Does not support output options Optra T610, T610n Attach up to : 3 output...or 1 output expander and 1 high-capacity output stacker. Optra T614, T614n Attach up to: 4 optional drawers (Optra T614) 3 additional optional drawers (Optra T614n ships with an extra 500-sheet drawer) Attach up...high-capacity output stacker. All models support a duplex unit and envelope feeder. P R I N T E R Optra T616, T616n I Attach up to: N 3 additional optional drawers P U T Attach up to : 3 ...
...bin mailbox, or 1 high-capacity output stacker. Optra T612, T612n Attach up to: 3 optional drawers Does not support output options Optra T610, T610n Attach up to : 3 output...or 1 output expander and 1 high-capacity output stacker. Optra T614, T614n Attach up to: 4 optional drawers (Optra T614) 3 additional optional drawers (Optra T614n ships with an extra 500-sheet drawer) Attach up...high-capacity output stacker. All models support a duplex unit and envelope feeder. P R I N T E R Optra T616, T616n I Attach up to: N 3 additional optional drawers P U T Attach up to : 3 ...
Setup Guide (1.4 MB)
Page 6
It gives your printer added capacity by letting you have purchased. 4 Install Paper Options and Printer The 2000-sheet drawer is packaged with a User's Guide that contains detailed instructions for installation, setup and use, including loading paper and removing paper jams. When you have finished installing the 2000-sheet drawer, install any drawers or a duplex unit that you load up to four reams (approximately 2,000 sheets) of 20 lb paper. Installing the 2000-Sheet Drawer Optra T label (colored triangle) Your printer supports one 2000-sheet drawer.
It gives your printer added capacity by letting you have purchased. 4 Install Paper Options and Printer The 2000-sheet drawer is packaged with a User's Guide that contains detailed instructions for installation, setup and use, including loading paper and removing paper jams. When you have finished installing the 2000-sheet drawer, install any drawers or a duplex unit that you load up to four reams (approximately 2,000 sheets) of 20 lb paper. Installing the 2000-Sheet Drawer Optra T label (colored triangle) Your printer supports one 2000-sheet drawer.
Setup Guide (1.4 MB)
Page 7
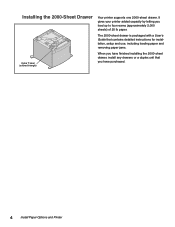
... on top of any drawer will help you plan to use the printer. Tray labels Installing a 250-Sheet or 500-Sheet Drawer Paper drawers attach under the printer and optional duplex unit. To attach the printer, see "Installing a Duplex Unit" on page 7. Optra T label (colored triangle) 1 Remove the tray from both the support unit...
... on top of any drawer will help you plan to use the printer. Tray labels Installing a 250-Sheet or 500-Sheet Drawer Paper drawers attach under the printer and optional duplex unit. To attach the printer, see "Installing a Duplex Unit" on page 7. Optra T label (colored triangle) 1 Remove the tray from both the support unit...
Setup Guide (1.4 MB)
Page 8
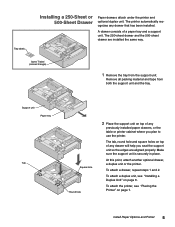
...properly. Installing a Duplex Unit Duplex unit for Optra T610(n) Back cover Duplex unit for information on top of any drawer will help you plan to the printer User's Guide, available on the Optra T Publications CD, for Optra T616(n), T614(n) and T612(n) (back cover curves inward) The duplex unit... attaches under the printer, below the standard input tray and above any paper drawers. The...
...properly. Installing a Duplex Unit Duplex unit for Optra T610(n) Back cover Duplex unit for information on top of any drawer will help you plan to the printer User's Guide, available on the Optra T Publications CD, for Optra T616(n), T614(n) and T612(n) (back cover curves inward) The duplex unit... attaches under the printer, below the standard input tray and above any paper drawers. The...
Setup Guide (1.4 MB)
Page 9
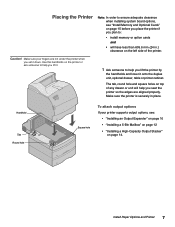
...To attach output options If your fingers are aligned properly. Caution! Make sure the printer is securely in .) clearance on page 14. Use the handholds on top of the printer. Make sure your printer supports output options, see "Install Memory and Optional Cards" on page 15 before ...to: • install memory or option cards and • will help you set it onto the duplex unit, optional drawer, table or printer cabinet. Placing the Printer Note: In order to ensure adequate clearance when installing system board options, see : • "Installing an Output Expander" on page 10 ...
...To attach output options If your fingers are aligned properly. Caution! Make sure the printer is securely in .) clearance on page 14. Use the handholds on top of the printer. Make sure your printer supports output options, see "Install Memory and Optional Cards" on page 15 before ...to: • install memory or option cards and • will help you set it onto the duplex unit, optional drawer, table or printer cabinet. Placing the Printer Note: In order to ensure adequate clearance when installing system board options, see : • "Installing an Output Expander" on page 10 ...
Setup Guide (1.4 MB)
Page 10
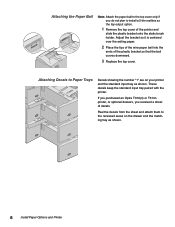
...them to Paper Trays Decals showing the number "1" are on the drawer and the matching tray as shown. 8 Install Paper Options and Printer If you purchased an Optra T616(n) or T614n printer, or optional drawers, you do not plan to install a 5-bin mailbox as the top output option. 1 Remove the top cover... of decals. Attaching the Paper Bail Note: Attach the paper bail to the top cover only if you received a sheet of the printer and ...
...them to Paper Trays Decals showing the number "1" are on the drawer and the matching tray as shown. 8 Install Paper Options and Printer If you purchased an Optra T616(n) or T614n printer, or optional drawers, you do not plan to install a 5-bin mailbox as the top output option. 1 Remove the top cover... of decals. Attaching the Paper Bail Note: Attach the paper bail to the top cover only if you received a sheet of the printer and ...
Setup Guide (1.4 MB)
Page 11
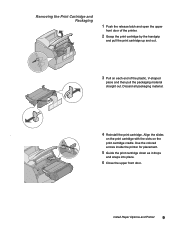
.... 6 Close the upper front door. Removing the Print Cartridge and Packaging 1 Push the release latch and open the upper front door of the printer. 2 Grasp the print cartridge by the handgrip and pull the print cartridge up and out. 3 Pull on the print cartridge cradle. Discard all... packaging material. . 4 Reinstall the print cartridge. Install Paper Options and Printer 9 Align the slides on the print cartridge with the slots on each end of the plastic, V-shaped piece and then pull the packaging material ...
.... 6 Close the upper front door. Removing the Print Cartridge and Packaging 1 Push the release latch and open the upper front door of the printer. 2 Grasp the print cartridge by the handgrip and pull the print cartridge up and out. 3 Pull on the print cartridge cradle. Discard all... packaging material. . 4 Reinstall the print cartridge. Install Paper Options and Printer 9 Align the slides on the print cartridge with the slots on each end of the plastic, V-shaped piece and then pull the packaging material ...
Setup Guide (1.4 MB)
Page 12
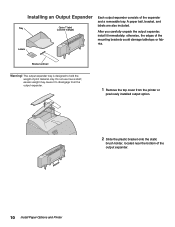
... expander and a removable tray. The output expander tray is designed to disengage from the output expander. 1 Remove the top cover from the printer or previously installed output option. 2 Slide the plastic bracket onto the static brush holder, located near the bottom of print material only. ... included. excess weight may cause it to hold the weight of the output expander. 10 Install Paper Options and Printer Installing an Output Expander Tray Optra T label (colored triangle) Labels Each output expander consists of the mounting brackets could damage tabletops or fabrics.
... expander and a removable tray. The output expander tray is designed to disengage from the output expander. 1 Remove the top cover from the printer or previously installed output option. 2 Slide the plastic bracket onto the static brush holder, located near the bottom of print material only. ... included. excess weight may cause it to hold the weight of the output expander. 10 Install Paper Options and Printer Installing an Output Expander Tray Optra T label (colored triangle) Labels Each output expander consists of the mounting brackets could damage tabletops or fabrics.
Setup Guide (1.4 MB)
Page 13
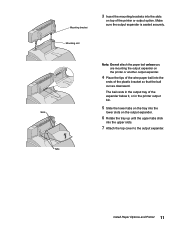
Install Paper Options and Printer 11 The bail rests in the output tray of the expander below it, or in the printer output bin. 5 Slide the lower tabs on the tray into the lower slots on the printer or another output expander. 4 Place the tips of the wire paper bail into the ends of... the printer or output option. Make sure the output expander is seated securely. Slots Tabs Note: Do not attach the paper...
Install Paper Options and Printer 11 The bail rests in the output tray of the expander below it, or in the printer output bin. 5 Slide the lower tabs on the tray into the lower slots on the printer or another output expander. 4 Place the tips of the wire paper bail into the ends of... the printer or output option. Make sure the output expander is seated securely. Slots Tabs Note: Do not attach the paper...
Setup Guide (1.4 MB)
Page 14
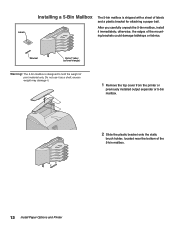
Bracket Optra T label (colored triangle) Warning! excess weight may damage it. 1 Remove the top cover from the printer or previously installed output expander or 5-bin mailbox. 2 Slide the plastic bracket onto the static brush holder, located near the bottom of the mounting... the 5-bin mailbox, install it as a shelf; Do not use it immediately; otherwise, the edges of the 5-bin mailbox. 12 Install Paper Options and Printer Labels Installing a 5-Bin Mailbox The 5-bin mailbox is designed to hold the weight of labels and a plastic bracket for attaching a paper bail. The 5-bin...
Bracket Optra T label (colored triangle) Warning! excess weight may damage it. 1 Remove the top cover from the printer or previously installed output expander or 5-bin mailbox. 2 Slide the plastic bracket onto the static brush holder, located near the bottom of the mounting... the 5-bin mailbox, install it as a shelf; Do not use it immediately; otherwise, the edges of the 5-bin mailbox. 12 Install Paper Options and Printer Labels Installing a 5-Bin Mailbox The 5-bin mailbox is designed to hold the weight of labels and a plastic bracket for attaching a paper bail. The 5-bin...
Setup Guide (1.4 MB)
Page 15
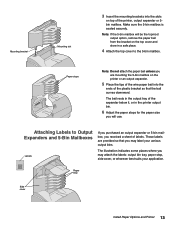
... the top cover to Output Expanders and 5-Bin Mailboxes Labels If you purchased an output expander or 5-bin mailbox, you received a sheet of the printer, output expander or 5bin mailbox. The illustration indicates some places where you may attach the labels: output bin tray, paper stop Side cover Install Paper... Options and Printer 13 These labels are mounting the 5-bin mailbox on the printer or an output expander. 5 Place the tips of the wire paper bail into the slots on the top ...
... the top cover to Output Expanders and 5-Bin Mailboxes Labels If you purchased an output expander or 5-bin mailbox, you received a sheet of the printer, output expander or 5bin mailbox. The illustration indicates some places where you may attach the labels: output bin tray, paper stop Side cover Install Paper... Options and Printer 13 These labels are mounting the 5-bin mailbox on the printer or an output expander. 5 Place the tips of the wire paper bail into the slots on the top ...

Setup Guide (1.4 MB)
Page 16
...open the lower front door of the printer. 2 Lift open the envelope feeder connector door. 3 Align the tabs on the envelope feeder with installation instructions. Installing a High-Capacity Output Stacker Optra T printer models T616(n), T614(n) and T612(n) support one high-capacity output stacker.... The high-capacity output stacker is installed properly. 14 Install Paper Options and Printer It can be removed when you are not ...
...open the lower front door of the printer. 2 Lift open the envelope feeder connector door. 3 Align the tabs on the envelope feeder with installation instructions. Installing a High-Capacity Output Stacker Optra T printer models T616(n), T614(n) and T612(n) support one high-capacity output stacker.... The high-capacity output stacker is installed properly. 14 Install Paper Options and Printer It can be removed when you are not ...

Setup Guide (1.4 MB)
Page 17
Screws 4 Loosen, but do not remove, the six screws as shown. Install Memory and Optional Cards 15 Step 2: Install Memory and Optional Cards Accessing the Printer System Board You must access the printer system board to install printer memory, flash memory, or an optional card. 1 Make sure the printer power is off, the printer power cord is unplugged, and all cables are disconnected from the back of the printer. 2 Press the release latches to open the upper and lower front doors. 3 Press down on the side door latches and open the side door.
Screws 4 Loosen, but do not remove, the six screws as shown. Install Memory and Optional Cards 15 Step 2: Install Memory and Optional Cards Accessing the Printer System Board You must access the printer system board to install printer memory, flash memory, or an optional card. 1 Make sure the printer power is off, the printer power cord is unplugged, and all cables are disconnected from the back of the printer. 2 Press the release latches to open the upper and lower front doors. 3 Press down on the side door latches and open the side door.

Setup Guide (1.4 MB)
Page 18
... or Flash Memory Memory connector 1 Memory connector 2 Memory connector 3 T616(n) and T614(n) models only 1 Follow the steps under "Accessing the Printer System Board" beginning on page 18 to slide the shield up until it off. Save the packaging materials. 3 Open both latches completely. Warning! Avoid touching ...
... or Flash Memory Memory connector 1 Memory connector 2 Memory connector 3 T616(n) and T614(n) models only 1 Follow the steps under "Accessing the Printer System Board" beginning on page 18 to slide the shield up until it off. Save the packaging materials. 3 Open both latches completely. Warning! Avoid touching ...
Setup Guide (1.4 MB)
Page 19
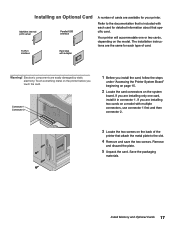
...that specific card. If you install the card, follow the steps under "Accessing the Printer System Board" beginning on page 15. 2 Locate the card connectors on the back of the printer that attach the metal plate to the documentation that is included with each type of cards... adapter A number of card. Install Memory and Optional Cards 17 Electronic components are installing only one or two cards, depending on the printer before you are easily damaged by static electricity. If you touch the card. Installing an Optional Card MarkNet internal print server Parallel/USB ...
...that specific card. If you install the card, follow the steps under "Accessing the Printer System Board" beginning on page 15. 2 Locate the card connectors on the back of the printer that attach the metal plate to the documentation that is included with each type of cards... adapter A number of card. Install Memory and Optional Cards 17 Electronic components are installing only one or two cards, depending on the printer before you are easily damaged by static electricity. If you touch the card. Installing an Optional Card MarkNet internal print server Parallel/USB ...

Setup Guide (1.4 MB)
Page 20
... the doors. 1 Grasp the shield by the tabs, slide it down. Tighten all six screws. Note: If you have not completed the section "Placing the Printer" beginning on the shield with the card) into the system board connector. 7 Insert the two screws saved from the metal plate (or the extra screws... three keyholes on page 7, do so now. 18 Install Memory and Optional Cards Reattach Shield and Close Doors After you have installed card(s) on the printer system board, follow these steps to secure the card.
... the doors. 1 Grasp the shield by the tabs, slide it down. Tighten all six screws. Note: If you have not completed the section "Placing the Printer" beginning on the shield with the card) into the system board connector. 7 Insert the two screws saved from the metal plate (or the extra screws... three keyholes on page 7, do so now. 18 Install Memory and Optional Cards Reattach Shield and Close Doors After you have installed card(s) on the printer system board, follow these steps to secure the card.
Setup Guide (1.4 MB)
Page 21
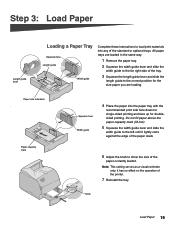
... the tray. 3 Squeeze the length guide lever and slide the length guide to the left until it has no effect on the operation of the printer. 7 Reinstall the tray.
... the tray. 3 Squeeze the length guide lever and slide the length guide to the left until it has no effect on the operation of the printer. 7 Reinstall the tray.
Setup Guide (1.4 MB)
Page 22
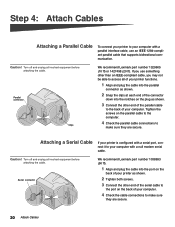
...1329605 (10 ft) or 1427498 (20 ft). Caution! Serial connector We recommend Lexmark part number 1038693 (50 ft). 1 Align and plug the cable into the notches... connections to make sure they are secure. If you may not be able to access all of your printer functions. 1 Align and plug the cable into the parallel connector as shown. 2 Snap the clips at...unplug all involved equipment before attaching the cable. Step 4: Attach Cables Attaching a Parallel Cable To connect your printer to your computer with a parallel interface cable, use something other than an IEEE-compliant cable, you use...
...1329605 (10 ft) or 1427498 (20 ft). Caution! Serial connector We recommend Lexmark part number 1038693 (50 ft). 1 Align and plug the cable into the notches... connections to make sure they are secure. If you may not be able to access all of your printer functions. 1 Align and plug the cable into the parallel connector as shown. 2 Snap the clips at...unplug all involved equipment before attaching the cable. Step 4: Attach Cables Attaching a Parallel Cable To connect your printer to your computer with a parallel interface cable, use something other than an IEEE-compliant cable, you use...


