User's Guide
Page 4
... drawer 44 Chapter 13: Storing paper 45 Chapter 14: Tray linking 46 Chapter 15: Tips for avoiding paper jams 47 Chapter 16: Replacing the print cartridge 48 Chapter 17: Replacing the charge roll 49 Chapter 18: Replacing the transfer roll 50 Chapter 19: Replacing the fuser assembly 51 ii
... drawer 44 Chapter 13: Storing paper 45 Chapter 14: Tray linking 46 Chapter 15: Tips for avoiding paper jams 47 Chapter 16: Replacing the print cartridge 48 Chapter 17: Replacing the charge roll 49 Chapter 18: Replacing the transfer roll 50 Chapter 19: Replacing the fuser assembly 51 ii

User's Guide
Page 5
... counter 52 Chapter 21: Ordering supplies 53 Maintenance kit 53 Print cartridges 53 Label fuser cleaner 53 Charge roll 53 Transfer roll 54 Fuser assembly 54 Chapter 22: Storing supplies 55 Chapter 23: Checking an unresponsive printer 56 Chapter 24: Clearing paper jams 57 Identifying paper jam areas ...57 Accessing paper jam areas 59 200 and 201 Paper Jam Remove Cartridge 59 202 Paper Jam Open Rear Door 60 Before reaching the output ...
... counter 52 Chapter 21: Ordering supplies 53 Maintenance kit 53 Print cartridges 53 Label fuser cleaner 53 Charge roll 53 Transfer roll 54 Fuser assembly 54 Chapter 22: Storing supplies 55 Chapter 23: Checking an unresponsive printer 56 Chapter 24: Clearing paper jams 57 Identifying paper jam areas ...57 Accessing paper jam areas 59 200 and 201 Paper Jam Remove Cartridge 59 202 Paper Jam Open Rear Door 60 Before reaching the output ...

User's Guide
Page 25
...See Paper Type for laser printers. this can all affect printing on card stock. Note: Labels are one of paper fibers, moisture content, thickness, and texture can cause labels to peel off during printing, jam, and contaminate your printer and your printer and cartridge warranties. • ... When printing on the Lexmark Web site at www.lexmark.com. The orientation of the most difficult print materials for detailed information about these settings.) • Be aware that preprinting, perforation, and creasing can also void your print cartridge with areas exposed by missing...
...See Paper Type for laser printers. this can all affect printing on card stock. Note: Labels are one of paper fibers, moisture content, thickness, and texture can cause labels to peel off during printing, jam, and contaminate your printer and your printer and cartridge warranties. • ... When printing on the Lexmark Web site at www.lexmark.com. The orientation of the most difficult print materials for detailed information about these settings.) • Be aware that preprinting, perforation, and creasing can also void your print cartridge with areas exposed by missing...

User's Guide
Page 29
...216 g/m2 (80 lb) 176 g/m2 (65 lb) N/A Transparencies Laser printer 138 to 146 g/m2 138 to 146 g/m2 N/A (37 to 39 lb bond) (37 to 39 lb bond) 1 Grain short is included with a special label cartridge for label applications. 250-sheet drawer Optional 500-sheet drawer Multipurpose tray ... fed from the multipurpose tray only. 27 See Ordering supplies for papers over 176 g/m2. 2 Printing label applications on the Lexmark T522 requires a special label fuser cleaner which prevents duplexing. The label fuser cleaner is preferred for more information on obtaining a label fuser cleaner.
...216 g/m2 (80 lb) 176 g/m2 (65 lb) N/A Transparencies Laser printer 138 to 146 g/m2 138 to 146 g/m2 N/A (37 to 39 lb bond) (37 to 39 lb bond) 1 Grain short is included with a special label cartridge for label applications. 250-sheet drawer Optional 500-sheet drawer Multipurpose tray ... fed from the multipurpose tray only. 27 See Ordering supplies for papers over 176 g/m2. 2 Printing label applications on the Lexmark T522 requires a special label fuser cleaner which prevents duplexing. The label fuser cleaner is preferred for more information on obtaining a label fuser cleaner.

User's Guide
Page 50
.... 2 Open the front doors and remove the used print cartridge to Lexmark for information on the underside of the print cartridge. With the cartridge arrows pointing downward, shake the print cartridge back and forth. WARNING: Never touch the photoconductor drum on ordering print cartridges. Print quality and printer reliability cannot be guaranteed if you . Refer to the...
.... 2 Open the front doors and remove the used print cartridge to Lexmark for information on the underside of the print cartridge. With the cartridge arrows pointing downward, shake the print cartridge back and forth. WARNING: Never touch the photoconductor drum on ordering print cartridges. Print quality and printer reliability cannot be guaranteed if you . Refer to the...

User's Guide
Page 51
... the documentation that comes with the charge roll for information on ordering a charge roll. See Ordering supplies for detailed installation information. 1 Turn the printer off and unplug the printer power cord. 2 Open the front doors and remove the print cartridge. 3 Remove the old charge roll. 4 Install the new charge roll. 5 Reinstall the print...
... the documentation that comes with the charge roll for information on ordering a charge roll. See Ordering supplies for detailed installation information. 1 Turn the printer off and unplug the printer power cord. 2 Open the front doors and remove the print cartridge. 3 Remove the old charge roll. 4 Install the new charge roll. 5 Reinstall the print...

User's Guide
Page 52
...roll when light print, toner fog, or background shading appears. See Ordering supplies for detailed installation information. 1 Turn the printer off and unplug the printer power cord. 2 Open the front doors and remove the print cartridge. 3 Remove the old transfer roll. 4 Install the new transfer roll. 5 Reinstall the print... cartridge and close the front doors. 6 Plug the printer power cord into a properly grounded electrical outlet. 7 Reset the maintenance counter. 50 Refer to replace the transfer roll. Complete ...
...roll when light print, toner fog, or background shading appears. See Ordering supplies for detailed installation information. 1 Turn the printer off and unplug the printer power cord. 2 Open the front doors and remove the print cartridge. 3 Remove the old transfer roll. 4 Install the new transfer roll. 5 Reinstall the print... cartridge and close the front doors. 6 Plug the printer power cord into a properly grounded electrical outlet. 7 Reset the maintenance counter. 50 Refer to replace the transfer roll. Complete ...

User's Guide
Page 55
... 99A1017. 53 20 Ordering supplies For best results, use Lexmark supplies with a 20,000 pages label fuser cleaner2) 1 Sold at www.lexmark.com. or Canada, call 1-800438-2468 for your printer. You also may order this item separately using part number 99A0725. For regular priced cartridges without these terms, order part number 12A6730 (7,500...
... 99A1017. 53 20 Ordering supplies For best results, use Lexmark supplies with a 20,000 pages label fuser cleaner2) 1 Sold at www.lexmark.com. or Canada, call 1-800438-2468 for your printer. You also may order this item separately using part number 99A0725. For regular priced cartridges without these terms, order part number 12A6730 (7,500...
User's Guide
Page 61
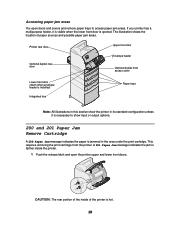
...when envelope feeder is installed) Integrated tray Paper trays Note: All illustrations in this section show the printer in the area under the print cartridge. CAUTION: The rear portion of the inside the printer. 1 Push the release latch and open doors and covers and remove paper trays to show input or... output options. 200 and 201 Paper Jam Remove Cartridge A 200 Paper Jam message indicates the paper is ...
...when envelope feeder is installed) Integrated tray Paper trays Note: All illustrations in this section show the printer in the area under the print cartridge. CAUTION: The rear portion of the inside the printer. 1 Push the release latch and open doors and covers and remove paper trays to show input or... output options. 200 and 201 Paper Jam Remove Cartridge A 200 Paper Jam message indicates the paper is ...

User's Guide
Page 62
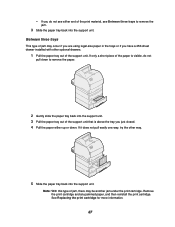
..., stop pulling. See Between the envelope feeder and the printer for more information. 4 Reinstall the print cartridge. 5 Close the upper and lower front doors. 202 Paper Jam Open Rear Door Jams that cause a 202 Paper Jam message require opening the printer rear door. Note: To resolve the message, you and... to the right. 2 While grasping the print cartridge by the hand grip, pull the print cartridge up and toward you must clear all paper from the rear door. You...
..., stop pulling. See Between the envelope feeder and the printer for more information. 4 Reinstall the print cartridge. 5 Close the upper and lower front doors. 202 Paper Jam Open Rear Door Jams that cause a 202 Paper Jam message require opening the printer rear door. Note: To resolve the message, you and... to the right. 2 While grasping the print cartridge by the hand grip, pull the print cartridge up and toward you must clear all paper from the rear door. You...

User's Guide
Page 63
If the end of paper is visible, grasp it on what part is visible. - If the paper does not move immediately when you pull, stop pulling. Remove the print cartridge, and then pull the paper out. Before reaching the output bin 1 Open the rear door. 2 Remove the paper based on both sides and gently pull it straight out. - If the middle section of the paper is still in the fuser area, open the upper front door and remove the paper. - If paper is visible, pull the paper straight out. See Replacing the print cartridge for more information. 3 Close the rear door. 61
If the end of paper is visible, grasp it on what part is visible. - If the paper does not move immediately when you pull, stop pulling. Remove the print cartridge, and then pull the paper out. Before reaching the output bin 1 Open the rear door. 2 Remove the paper based on both sides and gently pull it straight out. - If the middle section of the paper is still in the fuser area, open the upper front door and remove the paper. - If paper is visible, pull the paper straight out. See Replacing the print cartridge for more information. 3 Close the rear door. 61

User's Guide
Page 65
... Paper Jam Check Duplex Jams that cause a 230 Paper Jam message require opening the duplex front access cover. See 200 and 201 Paper Jam Remove Cartridge for the edge of the paper is jammed: - it may be easier to the inner wall, grasp it and pull it out. If most of... the paper to determine how the paper is visible, continue with the following. 3 Pull the paper up and out toward the rear of the printer, do not pull it , see step 6. - Note: To resolve the message, you cannot grasp it out; If you must clear all paper from inside the...
... Paper Jam Check Duplex Jams that cause a 230 Paper Jam message require opening the duplex front access cover. See 200 and 201 Paper Jam Remove Cartridge for the edge of the paper is jammed: - it may be easier to the inner wall, grasp it and pull it out. If most of... the paper to determine how the paper is visible, continue with the following. 3 Pull the paper up and out toward the rear of the printer, do not pull it , see step 6. - Note: To resolve the message, you cannot grasp it out; If you must clear all paper from inside the...
User's Guide
Page 69
... the paper tray back into the support unit. Note: With this type of the support unit. See Replacing the print cartridge for more information. 67 Remove the print cartridge and any jammed paper, and then reinstall the print cartridge. Between three trays This type of jam may be another jam under the print... cartridge. If only a short piece of the print material, see either up or down to remove the jam. 3 Slide the paper tray back into the support ...
... the paper tray back into the support unit. Note: With this type of the support unit. See Replacing the print cartridge for more information. 67 Remove the print cartridge and any jammed paper, and then reinstall the print cartridge. Between three trays This type of jam may be another jam under the print... cartridge. If only a short piece of the print material, see either up or down to remove the jam. 3 Slide the paper tray back into the support ...

User's Guide
Page 71
...access cover back into place. If you see the edge of the paper now. b Open the printer upper and lower front doors. If you do not see the edge of the printer. c Remove the print cartridge. 3 Pull the integrated tray out of the paper in the integrated tray: a Push the ...tray back into the printer. b Slide the tray all the way into the printer. See Replacing the print cartridge for more information. d Pull the paper out...
...access cover back into place. If you see the edge of the paper now. b Open the printer upper and lower front doors. If you do not see the edge of the printer. c Remove the print cartridge. 3 Pull the integrated tray out of the paper in the integrated tray: a Push the ...tray back into the printer. b Slide the tray all the way into the printer. See Replacing the print cartridge for more information. d Pull the paper out...
User's Guide
Page 72
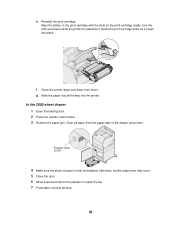
...Close the door. 6 Allow a few seconds for placement. e Reinstall the print cartridge. In the 2000-sheet drawer 1 Open the loading door. 2 Press the elevator down button 4 Make sure the stack of the drawer and printer. Elevator down button. 3 Remove the paper jam. Clear all the way into ...place. Guide the print cartridge down as it snaps into the printer. Align the slides on the print cartridge with the slots on the print cartridge cradle. f Close the printer upper and lower front doors. Use the colored arrows inside the printer for the elevator to reach the top...
...Close the door. 6 Allow a few seconds for placement. e Reinstall the print cartridge. In the 2000-sheet drawer 1 Open the loading door. 2 Press the elevator down button 4 Make sure the stack of the drawer and printer. Elevator down button. 3 Remove the paper jam. Clear all the way into ...place. Guide the print cartridge down as it snaps into the printer. Align the slides on the print cartridge with the slots on the print cartridge cradle. f Close the printer upper and lower front doors. Use the colored arrows inside the printer for the elevator to reach the top...

User's Guide
Page 75
Note: You may have to remove the print cartridge to the stack. 73 Make sure it aside. 7 Pull the envelope straight out of the printer. Set it snaps into place. 9 Close the printer upper front door. 10 Replace the stack of envelopes in the envelope feeder. 11 Adjust the envelope edge guide. 12 Lower the envelope weight to get the envelope out. See Replacing the print cartridge for instructions. 8 Reinstall the envelope feeder. 6 Pull the envelope feeder up slightly and straight out of the printer.
Note: You may have to remove the print cartridge to the stack. 73 Make sure it aside. 7 Pull the envelope straight out of the printer. Set it snaps into place. 9 Close the printer upper front door. 10 Replace the stack of envelopes in the envelope feeder. 11 Adjust the envelope edge guide. 12 Lower the envelope weight to get the envelope out. See Replacing the print cartridge for instructions. 8 Reinstall the envelope feeder. 6 Pull the envelope feeder up slightly and straight out of the printer.

User's Guide
Page 79
...for more details. • If the problem continues, call your service representative. Toner is on the back of the job to run the printer setup cycle and clean the transfer roll. 77 See Paper Type. • Verify that the correct print material is too light. Toner ...corrective action does not fix the problem, call the Lexmark Customer Support Center. Open and close the printer upper front door to be low. To utilize the remaining toner, remove the cartridge by gripping the handles with both hands. Reinstall the cartridge and then press Go. • Change the Toner...
...for more details. • If the problem continues, call your service representative. Toner is on the back of the job to run the printer setup cycle and clean the transfer roll. 77 See Paper Type. • Verify that the correct print material is too light. Toner ...corrective action does not fix the problem, call the Lexmark Customer Support Center. Open and close the printer upper front door to be low. To utilize the remaining toner, remove the cartridge by gripping the handles with both hands. Reinstall the cartridge and then press Go. • Change the Toner...

User's Guide
Page 80
...correctly. Printing is not set too high in the Quality Menu. With the cartridge arrows pointing downward, shake the print cartridge back and forth. To utilize the remaining toner, remove the cartridge by gripping the handles with both hands. Problem Action Toner fog or background ...• Check the print cartridge to be sure it is installed correctly. • The toner may be low. See Replacing the print cartridge for more details. • If the problem continues, change the charge roll...
...correctly. Printing is not set too high in the Quality Menu. With the cartridge arrows pointing downward, shake the print cartridge back and forth. To utilize the remaining toner, remove the cartridge by gripping the handles with both hands. Problem Action Toner fog or background ...• Check the print cartridge to be sure it is installed correctly. • The toner may be low. See Replacing the print cartridge for more details. • If the problem continues, change the charge roll...
User's Guide
Page 81
... Reduced. side margins are incorrect. • Make sure the margins are supported by the printer, the host computer, and the software application. Part or all of the print job or add additional printer memory. Image quality is correct. The job prints, but the top and • Make... sure the Paper Size setting in your software application. 79 Problem Characters have jagged or uneven edges. Reduce the complexity of the page is printed in black. • Check the print cartridge...
... Reduced. side margins are incorrect. • Make sure the margins are supported by the printer, the host computer, and the software application. Part or all of the print job or add additional printer memory. Image quality is correct. The job prints, but the top and • Make... sure the Paper Size setting in your software application. 79 Problem Characters have jagged or uneven edges. Reduce the complexity of the page is printed in black. • Check the print cartridge...
User's Guide
Page 87
Retry? A Activating Menu Changes B Busy C Canceling Job Check Connection Clearing Job Accounting Stat Close Door or Insert Cartridge D Defragmenting Delete All Jobs Go/Stop? Deleting Jobs Disabling Menus Disk Corrupted. Printing Directory List Printing Font List Printing Job... Prog Engine Code Prog System Code Program Flash Programming Disk Q Queuing and Deleting Jobs Queuing Jobs R Ready Ready Hex Reattach Res Reduced Resetting the Printer Resetting Maint Cnt Value Restoring Factory Defaults S Serial T Toner Low Tray Empty Tray Low Tray Missing U USB V W Waiting 85 I Infrared ...
Retry? A Activating Menu Changes B Busy C Canceling Job Check Connection Clearing Job Accounting Stat Close Door or Insert Cartridge D Defragmenting Delete All Jobs Go/Stop? Deleting Jobs Disabling Menus Disk Corrupted. Printing Directory List Printing Font List Printing Job... Prog Engine Code Prog System Code Program Flash Programming Disk Q Queuing and Deleting Jobs Queuing Jobs R Ready Ready Hex Reattach Res Reduced Resetting the Printer Resetting Maint Cnt Value Restoring Factory Defaults S Serial T Toner Low Tray Empty Tray Low Tray Missing U USB V W Waiting 85 I Infrared ...

