User's Guide
Page 4
... specifications 25 Chapter 8: Loading print material 29 Chapter 9: Loading a paper tray 30 Loading letterhead 31 Chapter 10: Loading the multipurpose feeder 32 Capacity ...32 Paper dimensions 32 Trouble-free printing 32 Loading paper and transparencies 36 Loading envelopes 36 Loading letterhead 37 Closing the multipurpose...Loading the envelope feeder 40 Chapter 12: Loading the 2000-sheet drawer 44 Chapter 13: Storing paper 45 Chapter 14: Tray linking 46 Chapter 15: Tips for avoiding paper jams 47 Chapter 16: Replacing the print cartridge 48 Chapter 17: Replacing the charge roll ...
... specifications 25 Chapter 8: Loading print material 29 Chapter 9: Loading a paper tray 30 Loading letterhead 31 Chapter 10: Loading the multipurpose feeder 32 Capacity ...32 Paper dimensions 32 Trouble-free printing 32 Loading paper and transparencies 36 Loading envelopes 36 Loading letterhead 37 Closing the multipurpose...Loading the envelope feeder 40 Chapter 12: Loading the 2000-sheet drawer 44 Chapter 13: Storing paper 45 Chapter 14: Tray linking 46 Chapter 15: Tips for avoiding paper jams 47 Chapter 16: Replacing the print cartridge 48 Chapter 17: Replacing the charge roll ...
User's Guide
Page 7
... 182 Chapter 49: Removing the envelope feeder 183 Chapter 50: Removing a paper tray or duplex unit 185 Chapter 51: Removing printer or flash memory 187 Chapter 52: Removing an option card 188 Chapter 53... Symbol sets for PCL 6 emulation 197 Downloadable fonts 198 Printing a font sample list 198 Chapter 54: Printer specifications 199 Dimensions ...199 Duty cycle ...199 Notices 200 Edition notice ...201 Trademarks ...201 Licensing notice 202...The United Kingdom Telecommunications Act 1984 205 Energy Star ...205 Laser notices ...206 Laser advisory label 206 Laser notice 206 Index 207 v
... 182 Chapter 49: Removing the envelope feeder 183 Chapter 50: Removing a paper tray or duplex unit 185 Chapter 51: Removing printer or flash memory 187 Chapter 52: Removing an option card 188 Chapter 53... Symbol sets for PCL 6 emulation 197 Downloadable fonts 198 Printing a font sample list 198 Chapter 54: Printer specifications 199 Dimensions ...199 Duty cycle ...199 Notices 200 Edition notice ...201 Trademarks ...201 Licensing notice 202...The United Kingdom Telecommunications Act 1984 205 Energy Star ...205 Laser notices ...206 Laser advisory label 206 Laser notice 206 Index 207 v
User's Guide
Page 21
..., fiber content, and color of paper to high temperatures of paper. Grain is preferred. Business papers designed for laser printers. 19 For the multipurpose feeder, papers heavier than 176 g/m2 (47 lb bond), grain short is too rough, the toner does not fuse to the paper properly, resulting in the paper tray, can cause paper feeding problems. Smoothness needs to...
..., fiber content, and color of paper to high temperatures of paper. Grain is preferred. Business papers designed for laser printers. 19 For the multipurpose feeder, papers heavier than 176 g/m2 (47 lb bond), grain short is too rough, the toner does not fuse to the paper properly, resulting in the paper tray, can cause paper feeding problems. Smoothness needs to...
User's Guide
Page 23
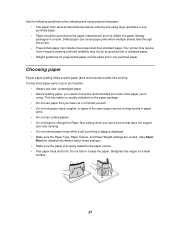
... paper: • Test paper from several manufacturers before ordering and using . Your printer may not be punched at the paper manufacturer and not drilled into paper already packaged in a ream. Choosing paper Proper paper loading helps prevent paper jams and ensures trouble-free printing. mixing results in paper ...auto size sensing. • Do not remove paper trays while a job is printing or Busy is displayed. • Make sure the Paper Type, Paper Texture, and Paper Weight settings are the same as that of prepunched paper. • Paper should be as good as for detailed information ...
... paper: • Test paper from several manufacturers before ordering and using . Your printer may not be punched at the paper manufacturer and not drilled into paper already packaged in a ream. Choosing paper Proper paper loading helps prevent paper jams and ensures trouble-free printing. mixing results in paper ...auto size sensing. • Do not remove paper trays while a job is printing or Busy is displayed. • Make sure the Paper Type, Paper Texture, and Paper Weight settings are the same as that of prepunched paper. • Paper should be as good as for detailed information ...
User's Guide
Page 24
... 75 g/m2 (20 lb bond) paper. You can cause feeding problems. 22 These labels are considering using, check with the envelope supplier. If you have any exposed adhesive when the flap is 25% or less. Use only envelopes that are designed for use with laser printers. The laser printing process heats envelopes to a temperature... achieve the best possible print quality, use only high-quality envelopes that are able to withstand these settings.) • Do not load labels together with paper or transparencies in the same paper tray;
... 75 g/m2 (20 lb bond) paper. You can cause feeding problems. 22 These labels are considering using, check with the envelope supplier. If you have any exposed adhesive when the flap is 25% or less. Use only envelopes that are designed for use with laser printers. The laser printing process heats envelopes to a temperature... achieve the best possible print quality, use only high-quality envelopes that are able to withstand these settings.) • Do not load labels together with paper or transparencies in the same paper tray;
User's Guide
Page 31
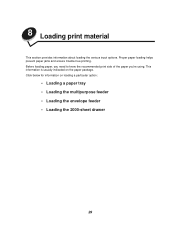
Before loading paper, you need to know the recommended print side of the paper you're using. 8 Loading print material This section provides information about loading the various input options. Proper paper loading helps prevent paper jams and ensure trouble-free printing. Click below for information on the paper package. This information is usually indicated on loading a particular option: • Loading a paper tray • Loading the multipurpose feeder • Loading the envelope feeder • Loading the 2000-sheet drawer 29
Before loading paper, you need to know the recommended print side of the paper you're using. 8 Loading print material This section provides information about loading the various input options. Proper paper loading helps prevent paper jams and ensure trouble-free printing. Click below for information on the paper package. This information is usually indicated on loading a particular option: • Loading a paper tray • Loading the multipurpose feeder • Loading the envelope feeder • Loading the 2000-sheet drawer 29
User's Guide
Page 32
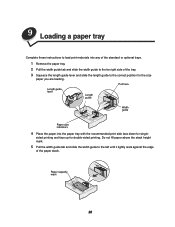
... these instructions to load print materials into the paper tray with the recommended print side face down for the size paper you are loading. Paper capacity mark 30 Do not fill paper above the stack height mark. 5 Pull the width guide tab and slide the width guide to the left until it...lever and slide the length guide to the far right side of the paper stack. Pull here Length guide lever Length guide Width guide Paper size indicators 4 Place the paper into any of the standard or optional trays. 1 Remove the paper tray. 2 Pull the width guide tab and slide the width guide to ...
... these instructions to load print materials into the paper tray with the recommended print side face down for the size paper you are loading. Paper capacity mark 30 Do not fill paper above the stack height mark. 5 Pull the width guide tab and slide the width guide to the left until it...lever and slide the length guide to the far right side of the paper stack. Pull here Length guide lever Length guide Width guide Paper size indicators 4 Place the paper into any of the standard or optional trays. 1 Remove the paper tray. 2 Pull the width guide tab and slide the width guide to ...

User's Guide
Page 35
... with the optional envelope feeder installed. The multipurpose feeder door drops open. 33 Note: The multipurpose feeder may cause a paper jam. For more information, see Paper Loading. • Do not place objects on letterhead (or other preprinted media) that has been loaded specifically for duplex .... The icons on the operator panel. Also, avoid pressing down or applying excessive force on it. • Do not remove any paper tray while a job is printing from the multipurpose feeder or Busy is displayed on the multipurpose feeder show you print simplex (singlesided) jobs ...
... with the optional envelope feeder installed. The multipurpose feeder door drops open. 33 Note: The multipurpose feeder may cause a paper jam. For more information, see Paper Loading. • Do not place objects on letterhead (or other preprinted media) that has been loaded specifically for duplex .... The icons on the operator panel. Also, avoid pressing down or applying excessive force on it. • Do not remove any paper tray while a job is printing from the multipurpose feeder or Busy is displayed on the multipurpose feeder show you print simplex (singlesided) jobs ...

User's Guide
Page 49
... mix paper types or paper sizes in one tray. • Do not add paper to existing paper in process. • Flex, fan, and straighten the paper before loading it. • Fan stacks of the paper tray. • Do not remove paper trays while print jobs are positioned correctly. • Do not overload the paper trays. Allow tray to load paper properly. See Recommended paper. •...
... mix paper types or paper sizes in one tray. • Do not add paper to existing paper in process. • Flex, fan, and straighten the paper before loading it. • Fan stacks of the paper tray. • Do not remove paper trays while print jobs are positioned correctly. • Do not overload the paper trays. Allow tray to load paper properly. See Recommended paper. •...

User's Guide
Page 60
... surface of the paper trays, including the 2000-sheet drawer. Both types of jams occur in the same way. 201 Paper Jam 200 Paper Jam 260 Paper Jam 250 Paper Jam 230 Paper Jam 24x Paper Jam Note: 24x Paper Jam may occur in any of a tray, or between a tray, the duplex unit, and the printer integrated tray. 202 Paper Jam 230 Paper Jam 58
... surface of the paper trays, including the 2000-sheet drawer. Both types of jams occur in the same way. 201 Paper Jam 200 Paper Jam 260 Paper Jam 250 Paper Jam 230 Paper Jam 24x Paper Jam Note: 24x Paper Jam may occur in any of a tray, or between a tray, the duplex unit, and the printer integrated tray. 202 Paper Jam 230 Paper Jam 58
User's Guide
Page 61
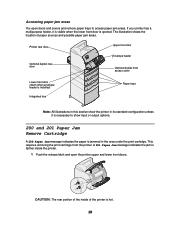
... access cover Lower front door (down when envelope feeder is installed) Integrated tray Paper trays Note: All illustrations in this section show the printer in its standard configuration unless it is visible when the lower front door is farther inside of paper sources and possible paper jam areas. CAUTION: The rear portion of the inside the...
... access cover Lower front door (down when envelope feeder is installed) Integrated tray Paper trays Note: All illustrations in this section show the printer in its standard configuration unless it is visible when the lower front door is farther inside of paper sources and possible paper jam areas. CAUTION: The rear portion of the inside the...

User's Guide
Page 68
...Paper Jam message, where x represents the tray number where the jam has occurred. Note: To resolve the message, you have an optional 250sheet drawer installed with other optional drawers.) • Between a tray, the duplex unit, and the integrated tray • Between the envelope feeder and the printer... • In the 2000-sheet drawer On the incline surface of the tray, pull the paper straight out. -
...Paper Jam message, where x represents the tray number where the jam has occurred. Note: To resolve the message, you have an optional 250sheet drawer installed with other optional drawers.) • Between a tray, the duplex unit, and the integrated tray • Between the envelope feeder and the printer... • In the 2000-sheet drawer On the incline surface of the tray, pull the paper straight out. -
User's Guide
Page 69
... you are using legal-size paper in the trays or if you just closed. 4 Pull the paper either end of the support unit that is visible, do not see Between three trays to remove the paper. 2 Gently slide the paper tray back into the support unit. 3 Pull the paper tray out of the print material,... see either up or down to remove the jam. 3 Slide the paper tray back into the support unit. If only a short...
... you are using legal-size paper in the trays or if you just closed. 4 Pull the paper either end of the support unit that is visible, do not see Between three trays to remove the paper. 2 Gently slide the paper tray back into the support unit. 3 Pull the paper tray out of the print material,... see either up or down to remove the jam. 3 Slide the paper tray back into the support unit. If only a short...
User's Guide
Page 70
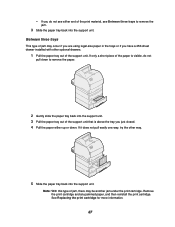
Between a tray, the duplex unit, and the integrated tray 1 Pull the paper tray out of the paper is visible, do not pull down to remove the paper. 2 Slowly pull the duplex front access cover straight out from the duplex unit. 68 If only a short piece of the support unit.
Between a tray, the duplex unit, and the integrated tray 1 Pull the paper tray out of the paper is visible, do not pull down to remove the paper. 2 Slowly pull the duplex front access cover straight out from the duplex unit. 68 If only a short piece of the support unit.
User's Guide
Page 72
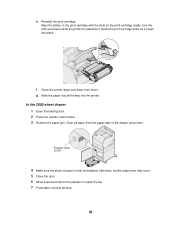
...few seconds for placement. Elevator down button. 3 Remove the paper jam. In the 2000-sheet drawer 1 Open the loading door. 2 Press the elevator down button 4 Make sure the stack of the drawer and printer. Use the colored arrows inside the printer for the elevator to reach the top. 7 Press Go.... 70 e Reinstall the print cartridge. Guide the print cartridge down as it snaps into the printer. Clear all the way into place. g Slide the paper tray all paper from the paper path of paper is neat and aligned; Align the slides on the print cartridge with the slots on the print...
...few seconds for placement. Elevator down button. 3 Remove the paper jam. In the 2000-sheet drawer 1 Open the loading door. 2 Press the elevator down button 4 Make sure the stack of the drawer and printer. Use the colored arrows inside the printer for the elevator to reach the top. 7 Press Go.... 70 e Reinstall the print cartridge. Guide the print cartridge down as it snaps into the printer. Clear all the way into place. g Slide the paper tray all paper from the paper path of paper is neat and aligned; Align the slides on the print cartridge with the slots on the print...

User's Guide
Page 143
... you need to define the paper loaded in the multipurpose feeder. Printer treats the multipurpose feeder like any other paper tray. Printer pulls paper from the multipurpose feeder for more details: • Configure MP • Custom Types • Envelope Enhance • Paper Loading • Paper Size • Paper Source • Paper Texture • Paper Type • Paper Weight • Substitute Size •...
... you need to define the paper loaded in the multipurpose feeder. Printer treats the multipurpose feeder like any other paper tray. Printer pulls paper from the multipurpose feeder for more details: • Configure MP • Custom Types • Envelope Enhance • Paper Loading • Paper Size • Paper Source • Paper Texture • Paper Type • Paper Weight • Substitute Size •...

User's Guide
Page 148
... Paper Type value list. Values: 1 Select a paper source: Tray Type Manual Pap Type Env Feeder Type Manual Env Type MP Feeder Type 2 Select a value: Plain Paper Card Stock Transparency Labels Bond Letterhead Preprinted Colored Paper Custom Type Envelope Preprinted Colored Paper The Paper Type default for the specified paper. • Select paper sources through your software application by the printer...
... Paper Type value list. Values: 1 Select a paper source: Tray Type Manual Pap Type Env Feeder Type Manual Env Type MP Feeder Type 2 Select a value: Plain Paper Card Stock Transparency Labels Bond Letterhead Preprinted Colored Paper Custom Type Envelope Preprinted Colored Paper The Paper Type default for the specified paper. • Select paper sources through your software application by the printer...
User's Guide
Page 155
.... See also: Font Name Tray Renumber Purpose: To configure your printer to a paper source. Only the symbol sets supported for a specified font name. Symbol Set Purpose: To choose a symbol set of alphabetic and numeric characters, punctuation, and special symbols used when printing with printer drivers or applications that use different source assignments for the paper trays.
.... See also: Font Name Tray Renumber Purpose: To configure your printer to a paper source. Only the symbol sets supported for a specified font name. Symbol Set Purpose: To choose a symbol set of alphabetic and numeric characters, punctuation, and special symbols used when printing with printer drivers or applications that use different source assignments for the paper trays.
User's Guide
Page 184
never attempt to remove two or more information, click a topic: • Removing the envelope feeder • Removing a paper tray or duplex unit • Removing printer or flash memory • Removing an option card 182 47 Removing options Keep the following guidelines in mind when removing any options: ... any option before removing any options installed above it from the printer. • To remove any input option, you must first remove the printer and any options. For more paper options at once. • Make sure the printer power is off and the power cord and any cables are ...
never attempt to remove two or more information, click a topic: • Removing the envelope feeder • Removing a paper tray or duplex unit • Removing printer or flash memory • Removing an option card 182 47 Removing options Keep the following guidelines in mind when removing any options: ... any option before removing any options installed above it from the printer. • To remove any input option, you must first remove the printer and any options. For more paper options at once. • Make sure the printer power is off and the power cord and any cables are ...

User's Guide
Page 187
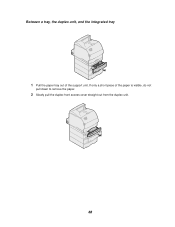
49 Removing a paper tray or duplex unit 1 Ask someone to help you set it down. 185 CAUTION: Make sure your fingers are not under the printer when you lift the printer by the handholds and set it aside.
49 Removing a paper tray or duplex unit 1 Ask someone to help you set it down. 185 CAUTION: Make sure your fingers are not under the printer when you lift the printer by the handholds and set it aside.


