Quick Reference
Page 15
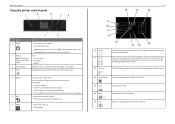
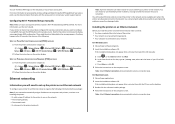
...printer control panel Use To 1 Power • Turn the printer on and off in Sleep mode. • Printer status • Messages • Menus 3 Arrow buttons Navigate to menu or submenu items that appear on the display. 4 Home Navigate from any level in a fax number to make. Press and hold for... only when you have already begun entering the number. 10 Dial tone Dial the telephone number manually using the keypad before sending the fax. 11 Address Book Access fax numbers from a saved list of copies or prints you want to wait for three seconds to turn off the printer. 2 Display...
...printer control panel Use To 1 Power • Turn the printer on and off in Sleep mode. • Printer status • Messages • Menus 3 Arrow buttons Navigate to menu or submenu items that appear on the display. 4 Home Navigate from any level in a fax number to make. Press and hold for... only when you have already begun entering the number. 10 Dial tone Dial the telephone number manually using the keypad before sending the fax. 11 Address Book Access fax numbers from a saved list of copies or prints you want to wait for three seconds to turn off the printer. 2 Display...
Quick Reference
Page 40
... 6: Create a contact list Using the printer control panel 1 From the printer control panel, navigate to: Touch‑screen models Arrow‑button models > Address Book > Setup > > Fax Setup > > Address Book > 2 Use the menus to 89 contacts and 10 fax groups. • To change a character, press the left arrow... button. • To add a space, press the number 0. 40 Note: In some models, entries 1-89 are for individual contacts and entries 90...
... 6: Create a contact list Using the printer control panel 1 From the printer control panel, navigate to: Touch‑screen models Arrow‑button models > Address Book > Setup > > Fax Setup > > Address Book > 2 Use the menus to 89 contacts and 10 fax groups. • To change a character, press the left arrow... button. • To add a space, press the number 0. 40 Note: In some models, entries 1-89 are for individual contacts and entries 90...
Quick Reference
Page 41
...using the printer control panel 1 From the printer control panel, navigate to: > Fax 2 Enter a fax number, or press Address Book to select a number from the Speed Dial or Group Dial list. 3 If you must use the fax feature during ...ADF to the width of numbers (broadcast fax), then press the left or right arrow button to start the fax job. You can send a broadcast fax to up this step to add more numbers.... 4 Press the Color/Black button to select a color or black‑and‑white fax. 5 Press to enter another number, and...
...using the printer control panel 1 From the printer control panel, navigate to: > Fax 2 Enter a fax number, or press Address Book to select a number from the Speed Dial or Group Dial list. 3 If you must use the fax feature during ...ADF to the width of numbers (broadcast fax), then press the left or right arrow button to start the fax job. You can send a broadcast fax to up this step to add more numbers.... 4 Press the Color/Black button to select a color or black‑and‑white fax. 5 Press to enter another number, and...
Quick Reference
Page 44
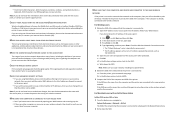
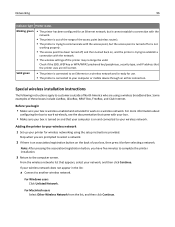
...control panel to display a message to begin : Note: If your network automatically assigns IP addresses to computers and printers, continue on to installing the printer. • A valid, unique IP address for the printer to use on the network • The network gateway • The... more information, see the documentation that came with the access point or contact your printer for an Ethernet network, organize the following : USE THE PUSH BUTTON CONFIGURATION (PBC) METHOD 1 From the printer control panel, navigate to: > Setup > > Network Setup > > Wireless 802.11b/g/n > > Network Connection ...
...control panel to display a message to begin : Note: If your network automatically assigns IP addresses to computers and printers, continue on to installing the printer. • A valid, unique IP address for the printer to use on the network • The network gateway • The... more information, see the documentation that came with the access point or contact your printer for an Ethernet network, organize the following : USE THE PUSH BUTTON CONFIGURATION (PBC) METHOD 1 From the printer control panel, navigate to: > Setup > > Network Setup > > Wireless 802.11b/g/n > > Network Connection ...
Quick Reference
Page 51
... more than 100 feet apart. If the signal quality is causing the problem. Note: Make sure you to press an association/registration button when adding the printer to your system support person. If the SSIDs are case‑sensitive. For Macintosh users with the access point...network setup page. Check the Wireless Network Connection section: • The "Default Gateway" entry is typically the access point . • The IP address appears as four sets of the network that the computer is connected to issue a limited number of the printer must change this information, then see...
... more than 100 feet apart. If the signal quality is causing the problem. Note: Make sure you to press an association/registration button when adding the printer to your system support person. If the SSIDs are case‑sensitive. For Macintosh users with the access point...network setup page. Check the Wireless Network Connection section: • The "Default Gateway" entry is typically the access point . • The IP address appears as four sets of the network that the computer is connected to issue a limited number of the printer must change this information, then see...
Quick Reference
Page 55
...Address Book 40 ADF exit tray location 13 ADF exit tray extension location 13 ADF paper guide location 14 ADF tray location 14 aligning the printhead 18 answering machine setting up 32 Automatic Document Feeder (ADF) location 13 B bidirectional communication enabling 52 broadcast fax, sending immediately 41 buttons...panel 41 faxing tips receiving faxes automatically 42 FCC notices 54 features, printer 6 finding information 5 publications 5 Web site 5 finding IP address of computer (Mac) 50 flash drive inserting 16 scanning to 29 55 G Group List 40 I incorrect language appears on display 45 ...
...Address Book 40 ADF exit tray location 13 ADF exit tray extension location 13 ADF paper guide location 14 ADF tray location 14 aligning the printhead 18 answering machine setting up 32 Automatic Document Feeder (ADF) location 13 B bidirectional communication enabling 52 broadcast fax, sending immediately 41 buttons...panel 41 faxing tips receiving faxes automatically 42 FCC notices 54 features, printer 6 finding information 5 publications 5 Web site 5 finding IP address of computer (Mac) 50 flash drive inserting 16 scanning to 29 55 G Group List 40 I incorrect language appears on display 45 ...
Quick Reference
Page 56
...minimum system requirements 22 models, printer 6 N network setup page printing 50 networking finding IP address of computer 50 finding IP address of computer (Mac) 50 finding IP address of printer 50 IP addresses 50 notices 2, 54 P page does not print 46 paper conserving 5 paper exit tray ...print job canceling 26 print troubleshooting cannot delete documents from print queue 47 printer features 6 models 6 setting up 6 printer control panel buttons 15 location 14 using 15 printer does not respond 47 printer features 6 printer models 6 printer printing blank pages 46 printer problems, basic...
...minimum system requirements 22 models, printer 6 N network setup page printing 50 networking finding IP address of computer 50 finding IP address of computer (Mac) 50 finding IP address of printer 50 IP addresses 50 notices 2, 54 P page does not print 46 paper conserving 5 paper exit tray ...print job canceling 26 print troubleshooting cannot delete documents from print queue 47 printer features 6 models 6 setting up 6 printer control panel buttons 15 location 14 using 15 printer does not respond 47 printer features 6 printer models 6 printer printing blank pages 46 printer problems, basic...

User's Guide
Page 19
.... • Exit from a saved list of copies or prints you have already begun entering the number. Press the left or right arrow button to wait for an outside line or get through an automated answering system. Dial the telephone number manually using the keypad before sending the fax.... 11 Address Book Access fax numbers from one menu level to make. Enter a pause only when you want to a higher one. • Select menu options. ...
.... • Exit from a saved list of copies or prints you have already begun entering the number. Press the left or right arrow button to wait for an outside line or get through an automated answering system. Dial the telephone number manually using the keypad before sending the fax.... 11 Address Book Access fax numbers from one menu level to make. Enter a pause only when you want to a higher one. • Select menu options. ...

User's Guide
Page 78
... reports let you know if the faxes that you choose in the fax software, unless you configure the fax settings in the menu: From here Address Book Reports You can configure the fax settings through the printer control panel or the fax software. Activity logs let you view the sent and... received fax history of your telephone number, and then press . Faxing 78 3 Press the arrow buttons to scroll to Fax Number, and then press . 4 Enter your fax number or your printer. • Print confirmation pages or transmission reports.
... reports let you know if the faxes that you choose in the fax software, unless you configure the fax settings in the menu: From here Address Book Reports You can configure the fax settings through the printer control panel or the fax software. Activity logs let you view the sent and... received fax history of your telephone number, and then press . Faxing 78 3 Press the arrow buttons to scroll to Fax Number, and then press . 4 Enter your fax number or your printer. • Print confirmation pages or transmission reports.

User's Guide
Page 80
... using the printer control panel 1 From the printer control panel, navigate to: > Setup > > Fax Setup > > Address Book > 2 To add a fax number to your Address Book: a Press the arrow buttons to scroll to the printer Address Book. c Press the arrow buttons to select whether you make a selection. Press when you want to add another entry, then...
... using the printer control panel 1 From the printer control panel, navigate to: > Setup > > Fax Setup > > Address Book > 2 To add a fax number to your Address Book: a Press the arrow buttons to scroll to the printer Address Book. c Press the arrow buttons to select whether you make a selection. Press when you want to add another entry, then...

User's Guide
Page 82
... of the original document. • When using the printer control panel 1 From the printer control panel, navigate to: > Fax 2 Enter a fax number, or press Address Book to select a number from the Speed Dial or Group Dial list. 3 If you want , press to enter another number, and then press . If you... magazine clippings) into the ADF. The line is working telephone, DSL, or VoIP line. Repeat this step to add more numbers. 4 Press the Color/Black button to select a color or black‑and‑white fax. 5 Press to a single recipient, then press . Note: The ADF is flipped out. •...
... of the original document. • When using the printer control panel 1 From the printer control panel, navigate to: > Fax 2 Enter a fax number, or press Address Book to select a number from the Speed Dial or Group Dial list. 3 If you want , press to enter another number, and then press . If you... magazine clippings) into the ADF. The line is working telephone, DSL, or VoIP line. Repeat this step to add more numbers. 4 Press the Color/Black button to select a color or black‑and‑white fax. 5 Press to a single recipient, then press . Note: The ADF is flipped out. •...

User's Guide
Page 88
...300 x 300 200 x 200 Ultrafine 300 x 300 (half‑toned) 200 x 200 When sending a fax, after entering the fax number, press the arrow buttons to Schedule Fax. Each telephone number has a designated ring pattern (All Rings, Single Ring Only, Double Ring Only, Triple Ring Only, Single or Double Rings... I send a fax at a scheduled time? 1 From the printer control panel, navigate to: > Fax 2 Enter the fax number of the recipient, or press Address Book to select a number from the Speed Dial or Group Dial list. 3 Press the arrow buttons to scroll to select a fax quality, and then press .
...300 x 300 200 x 200 Ultrafine 300 x 300 (half‑toned) 200 x 200 When sending a fax, after entering the fax number, press the arrow buttons to Schedule Fax. Each telephone number has a designated ring pattern (All Rings, Single Ring Only, Double Ring Only, Triple Ring Only, Single or Double Rings... I send a fax at a scheduled time? 1 From the printer control panel, navigate to: > Fax 2 Enter the fax number of the recipient, or press Address Book to select a number from the Speed Dial or Group Dial list. 3 Press the arrow buttons to scroll to select a fax quality, and then press .
User's Guide
Page 96
...Box, FreeBox, and Club Internet. Some examples of North America who are prompted to select a network. 2 If there is an association/registration button on the back of your box, then press it cannot establish a connection with the network. • The printer is wireless‑enabled ...list: a Connect to another wireless network. Check if the SSID, WEP key or WPA/WPA2 preshared key/passphrase, security type, and IP address that appears, select your printer for wireless networking using a wireless broadband box. Networking 96 Indicator light Printer status Blinking green • The...
...Box, FreeBox, and Club Internet. Some examples of North America who are prompted to select a network. 2 If there is an association/registration button on the back of your box, then press it cannot establish a connection with the network. • The printer is wireless‑enabled ...list: a Connect to another wireless network. Check if the SSID, WEP key or WPA/WPA2 preshared key/passphrase, security type, and IP address that appears, select your printer for wireless networking using a wireless broadband box. Networking 96 Indicator light Printer status Blinking green • The...

User's Guide
Page 160
... and symbols found on a keyboard. Note: If you are using MAC (Media Access Control) address filtering to limit access to your wireless network, then you to press an association/registration button when adding the printer to these boxes and need more than 100 feet apart. If you are ...and printer no more information, then see the documentation that the printer can be added. CHECK IF YOUR ACCESS POINT HAS AN ASSOCIATION/REGISTRATION BUTTON Wireless broadband boxes in a WPA passphrase are letters, numbers, and symbols found on a keyboard. If you do not know this so that...
... and symbols found on a keyboard. Note: If you are using MAC (Media Access Control) address filtering to limit access to your wireless network, then you to press an association/registration button when adding the printer to these boxes and need more than 100 feet apart. If you are ...and printer no more information, then see the documentation that the printer can be added. CHECK IF YOUR ACCESS POINT HAS AN ASSOCIATION/REGISTRATION BUTTON Wireless broadband boxes in a WPA passphrase are letters, numbers, and symbols found on a keyboard. If you do not know this so that...

User's Guide
Page 182
...153 cannot run fax software 154 cannot scan to computer over a network 150 cannot send faxes 152 cartridges, ink ordering 13 using genuine Lexmark 14 certificate request 108 Change to [Size] [Type] Paper 131 Change to [Size] Paper 131 changing default printing mode 48 changing ...available message 162 computer slows down when printing 148 configuring fax settings 78, 79 IP address 97 security 107 configuring e‑mail settings 64 configuring Wi‑Fi Protected Setup PBC, Push Button Configuration method 101 PIN, Personal Identification Number method 101 confirmation page, fax 89 connection...
...153 cannot run fax software 154 cannot scan to computer over a network 150 cannot send faxes 152 cartridges, ink ordering 13 using genuine Lexmark 14 certificate request 108 Change to [Size] [Type] Paper 131 Change to [Size] Paper 131 changing default printing mode 48 changing ...available message 162 computer slows down when printing 148 configuring fax settings 78, 79 IP address 97 security 107 configuring e‑mail settings 64 configuring Wi‑Fi Protected Setup PBC, Push Button Configuration method 101 PIN, Personal Identification Number method 101 confirmation page, fax 89 connection...

User's Guide
Page 183
..., ink, and paper 7 conserving paper 20 contact list setting up 80, 81 contact list, e‑mail creating 64 setting up 64 Continue button unavailable 156 copier or scanner does not respond 149 copies making 51 copy and scan troubleshooting cannot scan to computer over a network 150 copier or... port location 11 extending the duplex printing dry time 45 exterior of the printer cleaning 123 e‑mail function setting up 64 e‑mailing Address Book 64 canceling 66 configuring e‑mail settings 64 scanned documents 61 setting up e‑mail function 64 tips 66 F factory default settings ...
..., ink, and paper 7 conserving paper 20 contact list setting up 80, 81 contact list, e‑mail creating 64 setting up 64 Continue button unavailable 156 copier or scanner does not respond 149 copies making 51 copy and scan troubleshooting cannot scan to computer over a network 150 copier or... port location 11 extending the duplex printing dry time 45 exterior of the printer cleaning 123 e‑mail function setting up 64 e‑mailing Address Book 64 canceling 66 configuring e‑mail settings 64 scanned documents 61 setting up e‑mail function 64 tips 66 F factory default settings ...


