Quick Reference
Page 3
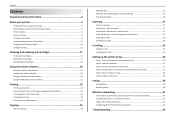
......17 Replacing ink cartridges...17 Maintaining ink cartridges 18 Using the printer software 20 Minimum system requirements 20 Installing the printer software 20 Using the Windows printer software 20 Using the Macintosh printer software 21 Printing 23 Printing a document...23 Printing on both sides of the paper (duplexing) automatically 23 Printing...
......17 Replacing ink cartridges...17 Maintaining ink cartridges 18 Using the printer software 20 Minimum system requirements 20 Installing the printer software 20 Using the Windows printer software 20 Using the Macintosh printer software 21 Printing 23 Printing a document...23 Printing on both sides of the paper (duplexing) automatically 23 Printing...
Quick Reference
Page 5
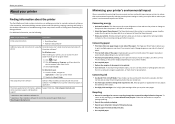
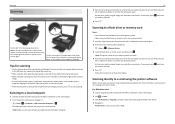
...Initial setup instructions • Quick Setup Sheet • Hardware Setup Wizard1 Additional setup and instructions for reuse or recycling through the Lexmark Cartridge Collection Program. Follow the instructions to request a postage‑paid bag. • Recycle the product packaging. • ...printer to reduce their environmental impact. Help using the printer software Software Help installed automatically with printer the printer software.2 For Windows users After installing your printer. To return an ink cartridge, go to 16 page images on one side of the colors...
...Initial setup instructions • Quick Setup Sheet • Hardware Setup Wizard1 Additional setup and instructions for reuse or recycling through the Lexmark Cartridge Collection Program. Follow the instructions to request a postage‑paid bag. • Recycle the product packaging. • ...printer to reduce their environmental impact. Help using the printer software Software Help installed automatically with printer the printer software.2 For Windows users After installing your printer. To return an ink cartridge, go to 16 page images on one side of the colors...

Quick Reference
Page 7
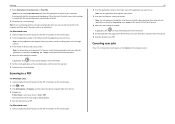
About your printer 7 With a CD or DVD drive (Windows/Macintosh) Without a CD or DVD drive or for Linux Download the printer driver from all areas of the printer. 5 Open the printer. Note: If the installation screen does not appear after a minute, then see "Installation screen did not appear during installation" on page 43. 3 Remove tape and packing material from www.lexmark.com. 4 Attach the paper support.
About your printer 7 With a CD or DVD drive (Windows/Macintosh) Without a CD or DVD drive or for Linux Download the printer driver from all areas of the printer. 5 Open the printer. Note: If the installation screen does not appear after a minute, then see "Installation screen did not appear during installation" on page 43. 3 Remove tape and packing material from www.lexmark.com. 4 Attach the paper support.
Quick Reference
Page 20
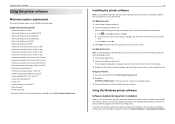
...* The printer driver for this computer before but need to : SUPPORT & DOWNLOADS > select your printer > select your CD or DVD drive. For Windows users 1 Close all open software programs. 2 Insert the installation software CD. b In the Start Search or Run box, type D:\setup.exe, where... D is available only at http://support.lexmark.com. 2 Navigate to reinstall the software, then uninstall the current software first. Using the printer software Using the printer software Minimum system ...
...* The printer driver for this computer before but need to : SUPPORT & DOWNLOADS > select your printer > select your CD or DVD drive. For Windows users 1 Close all open software programs. 2 Insert the installation software CD. b In the Start Search or Run box, type D:\setup.exe, where... D is available only at http://support.lexmark.com. 2 Navigate to reinstall the software, then uninstall the current software first. Using the printer software Using the printer software Minimum system ...

Quick Reference
Page 23
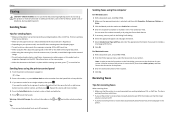
... paper (duplexing) automatically Notes: • The automatic duplex unit supports A4‑ and letter‑size paper. Printing Printing Printing a document For Windows users 1 With a document open, click File > Print. 2 Click Properties, Preferences, Options, or Setup. 3 Select the print quality, the number... 5 Click OK or Print. Printing on both sides of the page (top edge for portrait, left edge for portrait, top edge for landscape). For Windows users 1 With a document open, click File > Print. 2 Click Properties, Preferences, Options, or Setup. 23 3 Navigate to: Layout tab > ...
... paper (duplexing) automatically Notes: • The automatic duplex unit supports A4‑ and letter‑size paper. Printing Printing Printing a document For Windows users 1 With a document open, click File > Print. 2 Click Properties, Preferences, Options, or Setup. 3 Select the print quality, the number... 5 Click OK or Print. Printing on both sides of the page (top edge for portrait, left edge for portrait, top edge for landscape). For Windows users 1 With a document open, click File > Print. 2 Click Properties, Preferences, Options, or Setup. 23 3 Navigate to: Layout tab > ...

Quick Reference
Page 24
... you want to the same wireless network. LexPrint is LexPrint? Canceling print jobs To cancel a print job from the computer, do the following: For Windows users 1 Click , or click Start and then click Run. 2 In the Start Search or Run box, type control printers. 3 Press Enter, ... as long as Rendezvous in the queue, then click Printer > Cancel All Documents. It lets you recently captured using LexPrint Listener. Depending on your Lexmark printer model, you may need to download the LexPrint Listener application from a flash drive 1 Load photo paper. 2 Insert a flash drive or digital...
... you want to the same wireless network. LexPrint is LexPrint? Canceling print jobs To cancel a print job from the computer, do the following: For Windows users 1 Click , or click Start and then click Run. 2 In the Start Search or Run box, type control printers. 3 Press Enter, ... as long as Rendezvous in the queue, then click Printer > Cancel All Documents. It lets you recently captured using LexPrint Listener. Depending on your Lexmark printer model, you may need to download the LexPrint Listener application from a flash drive 1 Load photo paper. 2 Insert a flash drive or digital...
Quick Reference
Page 27
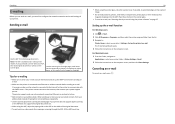
... computer 1 Load the original document faceup into the ADF or facedown on the scanner glass. 2 From the printer control panel, navigate to start scanning. For Windows users 1 Load an original document faceup into the ADF or facedown on the scanner glass. 2 Click or Start. 3 Click All Programs or Programs, and then...
... computer 1 Load the original document faceup into the ADF or facedown on the scanner glass. 2 From the printer control panel, navigate to start scanning. For Windows users 1 Load an original document faceup into the ADF or facedown on the scanner glass. 2 Click or Start. 3 Click All Programs or Programs, and then...
Quick Reference
Page 28
... information. 5 Set the e‑mail application as the scan destination, and then start the scan job. 6 Save the document as a PDF. Scanning to a PDF For Windows users 1 Load an original document faceup into the ADF or facedown on the scanner glass. 28 2 From the Applications folder in the Search field of...
... information. 5 Set the e‑mail application as the scan destination, and then start the scan job. 6 Save the document as a PDF. Scanning to a PDF For Windows users 1 Load an original document faceup into the ADF or facedown on the scanner glass. 28 2 From the Applications folder in the Search field of...
Quick Reference
Page 29
...;mail. Use the scanner glass for e‑mailing • Make sure to enter your e‑mail account information and set up the e-mail function For Windows users 1 Click or Start. 2 Click All Programs or Programs, and then select the printer program folder from your address book instead of typing their e‑...
...;mail. Use the scanner glass for e‑mailing • Make sure to enter your e‑mail account information and set up the e-mail function For Windows users 1 Click or Start. 2 Click All Programs or Programs, and then select the printer program folder from your address book instead of typing their e‑...

Quick Reference
Page 38
...;click Printer Settings. 3 Click the Contacts tab. • To add contacts, click the Individuals tab. • To add fax groups, click the Groups tab. ? For Windows users 1 Click or Start. 2 Click All Programs or Programs, and then select the printer program folder from the list. 3 Navigate to : Applications > select your telephone...
...;click Printer Settings. 3 Click the Contacts tab. • To add contacts, click the Individuals tab. • To add fax groups, click the Groups tab. ? For Windows users 1 Click or Start. 2 Click All Programs or Programs, and then select the printer program folder from the list. 3 Navigate to : Applications > select your telephone...
Quick Reference
Page 39
... extension is in place with the settings you set up menu, select the fax version of the original document. • When using the computer For Windows users 1 With a document open , choose File > Print. 2 From the Printer pop‑up this step to add more numbers. 4 Press the Color/Black button to...
... extension is in place with the settings you set up menu, select the fax version of the original document. • When using the computer For Windows users 1 With a document open , choose File > Print. 2 From the Printer pop‑up this step to add more numbers. 4 Press the Color/Black button to...
Quick Reference
Page 41
... 5 or 13 ASCII characters If your access point is connected to the same wireless network where you want to set up the printer. 41 For Windows users 1 Close all open software programs. 2 Insert the installation software CD. If you cannot find the WPA/WPA2 passphrase for the wireless network, see the...
... 5 or 13 ASCII characters If your access point is connected to the same wireless network where you want to set up the printer. 41 For Windows users 1 Close all open software programs. 2 Insert the installation software CD. If you cannot find the WPA/WPA2 passphrase for the wireless network, see the...

Quick Reference
Page 43
... to scroll to Yes, and then press OK . If Troubleshooting does not solve your problem Visit our Web site at http://support.lexmark.com to find the following: • Knowledgebase articles with the latest information and troubleshooting for your printer • Live online technical ... not solve the problem, then try the following : MAKE SURE THAT YOUR COMPUTER MEETS THE MINIMUM SYSTEM REQUIREMENTS TEMPORARILY DISABLE SECURITY PROGRAMS IN WINDOWS BEFORE INSTALLING THE SOFTWARE Software did not appear during installation" on page 43 • "Incorrect language appears on the display" on page...
... to scroll to Yes, and then press OK . If Troubleshooting does not solve your problem Visit our Web site at http://support.lexmark.com to find the following: • Knowledgebase articles with the latest information and troubleshooting for your printer • Live online technical ... not solve the problem, then try the following : MAKE SURE THAT YOUR COMPUTER MEETS THE MINIMUM SYSTEM REQUIREMENTS TEMPORARILY DISABLE SECURITY PROGRAMS IN WINDOWS BEFORE INSTALLING THE SOFTWARE Software did not appear during installation" on page 43 • "Incorrect language appears on the display" on page...
Quick Reference
Page 45
... USB cable into the USB port of the computer. If the cable is not in Sleep mode. MAKE SURE THE USB PORT IS ENABLED IN WINDOWS 1 Click , or click Start and then click Run. 2 In the Start Search or Run box, type devmgmt.msc. 3 Press Enter, or click OK. If USB...
... USB cable into the USB port of the computer. If the cable is not in Sleep mode. MAKE SURE THE USB PORT IS ENABLED IN WINDOWS 1 Click , or click Start and then click Run. 2 In the Start Search or Run box, type devmgmt.msc. 3 Press Enter, or click OK. If USB...
Quick Reference
Page 48
... 1 Load plain paper. 2 From the printer control panel, navigate to: > Setup > OK > Network Setup > OK > Print Network Setup Page > OK Locating IP addresses For Windows users 1 Click , or click Start and then click Run. 2 In the Start Search or Run box, type cmd. 3 Press Enter, or click OK. Locating the...Mode > OK > Off > OK CHECK YOUR WEP KEY OR WPA PASSPHRASE If your access point is using. See the User's Guide on . The Command Prompt window opens. 4 Type ipconfig, and then press Enter. or • Exactly 5 or 13 ASCII characters. Log on the same wireless network using WEP, WPA, ...
... 1 Load plain paper. 2 From the printer control panel, navigate to: > Setup > OK > Network Setup > OK > Print Network Setup Page > OK Locating IP addresses For Windows users 1 Click , or click Start and then click Run. 2 In the Start Search or Run box, type cmd. 3 Press Enter, or click OK. Locating the...Mode > OK > Off > OK CHECK YOUR WEP KEY OR WPA PASSPHRASE If your access point is using. See the User's Guide on . The Command Prompt window opens. 4 Type ipconfig, and then press Enter. or • Exactly 5 or 13 ASCII characters. Log on the same wireless network using WEP, WPA, ...
Quick Reference
Page 49
..., then run the utility again to make these boxes and need more than 100 feet apart. Make sure your access point and network adapters. For Windows users 1 Obtain the SSID of the network that the computer is displayed in the Network Name menu. 2 Write down the SSID. If the SSIDs are...
..., then run the utility again to make these boxes and need more than 100 feet apart. Make sure your access point and network adapters. For Windows users 1 Obtain the SSID of the network that the computer is displayed in the Network Name menu. 2 Write down the SSID. If the SSIDs are...
Quick Reference
Page 50
... four sets of 169.254.x.y (where x and y are using a laptop and have a valid IP address (the laptop, the printer, or both received IP addresses: For Windows users 1 Click , or click Start and then click Run. 2 In the Start Search or Run box, type cmd. 3 Press Enter, or click OK. 4 Type ipconfig...
... four sets of 169.254.x.y (where x and y are using a laptop and have a valid IP address (the laptop, the printer, or both received IP addresses: For Windows users 1 Click , or click Start and then click Run. 2 In the Start Search or Run box, type cmd. 3 Press Enter, or click OK. 4 Type ipconfig...
Quick Reference
Page 51
... the Port column. 6 If the Description column of the selected port indicates that it is not already checked. 7 Click Apply > OK, and then try to Windows users only. 1 Click , or click Start and then click Run. 2 In the Start Search or Run box, type control printers. 3 Press Enter, or.... MAKE SURE BIDIRECTIONAL COMMUNICATION IS ENABLED Note: This solution applies to print again. MAKE SURE THE WIRELESS PORT IS SELECTED Note: This solution applies to Windows users only. 1 Click , or click Start and then click Run. 2 In the Start Search or Run box, type control printers. 3 Press Enter, or ...
... the Port column. 6 If the Description column of the selected port indicates that it is not already checked. 7 Click Apply > OK, and then try to Windows users only. 1 Click , or click Start and then click Run. 2 In the Start Search or Run box, type control printers. 3 Press Enter, or.... MAKE SURE BIDIRECTIONAL COMMUNICATION IS ENABLED Note: This solution applies to print again. MAKE SURE THE WIRELESS PORT IS SELECTED Note: This solution applies to Windows users only. 1 Click , or click Start and then click Run. 2 In the Start Search or Run box, type control printers. 3 Press Enter, or ...
Quick Reference
Page 53
... removing 17 replacing 17 inserting a flash drive 16 installation screen did not appear automatically 43 installing printer on wireless network (Macintosh) 41 on wireless network (Windows) 41 installing printer software 20 J jam clearance cover 14 L language changing 43 LexPrint 24 line filter 32 LINE port 14 M Macintosh installing printer on wireless...
... removing 17 replacing 17 inserting a flash drive 16 installation screen did not appear automatically 43 installing printer on wireless network (Macintosh) 41 on wireless network (Windows) 41 installing printer software 20 J jam clearance cover 14 L language changing 43 LexPrint 24 line filter 32 LINE port 14 M Macintosh installing printer on wireless...
Quick Reference
Page 54
... connection 32 standard telephone line connection 30 VoIP connection 32 setting up printer 6 on wireless network (Macintosh) 41 on wireless network (Windows) 41 setup troubleshooting cannot print through USB 45 incorrect language appears on display 43 installation screen did not appear automatically 43 page does... over Internet Protocol (VoIP) fax setup 32 VoIP adapter 32 W Web Links accessing 21 Web site finding 5 Windows installing printer on wireless network 41 Windows software Abbyy Sprint OCR 20 Phone Book 20 Printer Home 20 Printer Setup Utility 20 Printing Preferences 20 Product Update ...
... connection 32 standard telephone line connection 30 VoIP connection 32 setting up printer 6 on wireless network (Macintosh) 41 on wireless network (Windows) 41 setup troubleshooting cannot print through USB 45 incorrect language appears on display 43 installation screen did not appear automatically 43 page does... over Internet Protocol (VoIP) fax setup 32 VoIP adapter 32 W Web Links accessing 21 Web site finding 5 Windows installing printer on wireless network 41 Windows software Abbyy Sprint OCR 20 Phone Book 20 Printer Home 20 Printer Setup Utility 20 Printing Preferences 20 Product Update ...


