
User Guide
Page 5
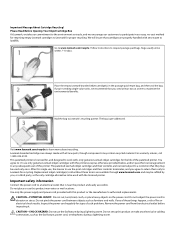
... INJURY: The area behind the duplex cover has protruding ribs as part of some parts may not always be obvious. Inspect the power cord regularly for the use of other than those described in the user documentation, to a professional service person. CAUTION-SHOCK HAZARD: Do... not use caution when accessing this product near the product and easily accessible. Do not pinch the power cord between objects such as the fax feature, power cord, or telephone, during a lightning storm. If any electrical or cabling connections, such as furniture and walls. Safety ...
... INJURY: The area behind the duplex cover has protruding ribs as part of some parts may not always be obvious. Inspect the power cord regularly for the use of other than those described in the user documentation, to a professional service person. CAUTION-SHOCK HAZARD: Do... not use caution when accessing this product near the product and easily accessible. Do not pinch the power cord between objects such as the fax feature, power cord, or telephone, during a lightning storm. If any electrical or cabling connections, such as furniture and walls. Safety ...

User Guide
Page 86
...-Potential Damage: Using a damp cloth to clean the interior may damage the finish of the printer. 4 Wipe only the outside of the printer, unplug the power cord from the wall outlet and disconnect all ink or corrective fluid on the paper exit tray. For Macintosh users 1 From the Finder desktop, double-click...
...-Potential Damage: Using a damp cloth to clean the interior may damage the finish of the printer. 4 Wipe only the outside of the printer, unplug the power cord from the wall outlet and disconnect all ink or corrective fluid on the paper exit tray. For Macintosh users 1 From the Finder desktop, double-click...

User Guide
Page 87
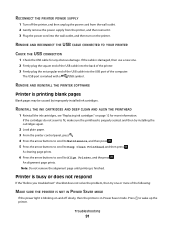
...: Method 1 If it appears on page 90 Troubleshooting 87 If Troubleshooting does not solve your problem Visit our Web site at support.lexmark.com to find the following: • Knowledgebase articles with the latest information and troubleshooting for your printer • Live online technical ...tasks and customer support. Troubleshooting Before you troubleshoot Use this checklist to solve most printer problems: • Make sure the power cord is plugged into the printer and into a working electrical outlet. • Make sure the printer is not plugged into any surge protectors...
...: Method 1 If it appears on page 90 Troubleshooting 87 If Troubleshooting does not solve your problem Visit our Web site at support.lexmark.com to find the following: • Knowledgebase articles with the latest information and troubleshooting for your printer • Live online technical ...tasks and customer support. Troubleshooting Before you troubleshoot Use this checklist to solve most printer problems: • Make sure the power cord is plugged into the printer and into a working electrical outlet. • Make sure the printer is not plugged into any surge protectors...

User Guide
Page 90
... problem, then try removing and reinstalling the software. RECONNECT THE PRINTER POWER SUPPLY 1 Turn off the printer, and then unplug the power cord from the wall outlet. 2 Gently remove the power supply from the printer, and then reinsert it. 3 Plug the power cord into the matching color slot of the printhead. 3 Close the printer. If the cable...
... problem, then try removing and reinstalling the software. RECONNECT THE PRINTER POWER SUPPLY 1 Turn off the printer, and then unplug the power cord from the wall outlet. 2 Gently remove the power supply from the printer, and then reinsert it. 3 Plug the power cord into the matching color slot of the printhead. 3 Close the printer. If the cable...
User Guide
Page 91
...to Deep Clean Printhead, and then press . RECONNECT THE PRINTER POWER SUPPLY 1 Turn off the printer, and then unplug the power cord from the wall outlet. 2 Gently remove the power supply from the printer, and then reinsert it. 3 Plug the power cord into the USB port of the following: MAKE SURE THE ...PRINTER IS NOT IN POWER SAVER MODE If the power light is blinking on and off...
...to Deep Clean Printhead, and then press . RECONNECT THE PRINTER POWER SUPPLY 1 Turn off the printer, and then unplug the power cord from the wall outlet. 2 Gently remove the power supply from the printer, and then reinsert it. 3 Plug the power cord into the USB port of the following: MAKE SURE THE ...PRINTER IS NOT IN POWER SAVER MODE If the power light is blinking on and off...
User Guide
Page 92
... (+) beside Universal Serial Bus controllers. If the printer will not come out of Power Saver mode, then reset the power: 1 Unplug the power cord from the wall outlet, and then wait 10 seconds. 2 Insert the power cord into the wall outlet, and then turn on the printer. If this problem persists...SOFTWARE Troubleshooting 92 If the cable is marked with a USB symbol. RECONNECT THE PRINTER POWER SUPPLY 1 Turn off the printer, and then unplug the power cord from the wall outlet. 2 Gently remove the power supply from the print queue If you troubleshoot" checklist does not solve the problem, ...
... (+) beside Universal Serial Bus controllers. If the printer will not come out of Power Saver mode, then reset the power: 1 Unplug the power cord from the wall outlet, and then wait 10 seconds. 2 Insert the power cord into the wall outlet, and then turn on the printer. If this problem persists...SOFTWARE Troubleshooting 92 If the cable is marked with a USB symbol. RECONNECT THE PRINTER POWER SUPPLY 1 Turn off the printer, and then unplug the power cord from the wall outlet. 2 Gently remove the power supply from the print queue If you troubleshoot" checklist does not solve the problem, ...

User Guide
Page 96
... more of the following: IF YOU ARE USING A USB CONNECTION, THEN TRY A DIFFERENT USB CABLE IF YOU ARE ON A NETWORK, THEN RESET THE POWER OF THE ACCESS POINT (ROUTER) 1 Unplug the power cord from the access point. 2 Wait ten seconds, and then insert the power cord. Computer slows down when printing These are possible solutions.
... more of the following: IF YOU ARE USING A USB CONNECTION, THEN TRY A DIFFERENT USB CABLE IF YOU ARE ON A NETWORK, THEN RESET THE POWER OF THE ACCESS POINT (ROUTER) 1 Unplug the power cord from the access point. 2 Wait ten seconds, and then insert the power cord. Computer slows down when printing These are possible solutions.

User Guide
Page 104
..., see if the button is not working . Troubleshooting 104 If the USB port on the computer is lit. RECONNECT THE POWER SUPPLY 1 Turn off the printer. 2 Unplug the power cord from the power outlet. 3 Remove the power supply from the port, then the port is unavailable Try the following solutions in . 4 Plug the... power cord back into the power outlet. 5 Turn on the printer, and then resume the installation on the printer. The Continue button is working , then try using a different USB cable...
..., see if the button is not working . Troubleshooting 104 If the USB port on the computer is lit. RECONNECT THE POWER SUPPLY 1 Turn off the printer. 2 Unplug the power cord from the power outlet. 3 Remove the power supply from the port, then the port is unavailable Try the following solutions in . 4 Plug the... power cord back into the power outlet. 5 Turn on the printer, and then resume the installation on the printer. The Continue button is working , then try using a different USB cable...

User Guide
Page 122
... may increase the response time of time, called Power Saver. See www.lexmark.com for a specified period of the product. The Power Saver Mode is sometimes helpful to a high value maintains a fast response, but the power switch is automatically engaged after this product has an...Timeout. Total energy usage It is equivalent to calculate energy usage. Values are provided in power units of power, then to completely stop product power consumption, disconnect the power supply cord from hard-copy original documents. 10.31 Scanning The product is scanning hard-copy documents...
... may increase the response time of time, called Power Saver. See www.lexmark.com for a specified period of the product. The Power Saver Mode is sometimes helpful to a high value maintains a fast response, but the power switch is automatically engaged after this product has an...Timeout. Total energy usage It is equivalent to calculate energy usage. Values are provided in power units of power, then to completely stop product power consumption, disconnect the power supply cord from hard-copy original documents. 10.31 Scanning The product is scanning hard-copy documents...
Quick Reference Guide
Page 2
...10 days. After this printer. Inspect the power cord regularly for the life of such problems. Remove the power cord from the electrical outlet before inspecting it. Please Read Before Opening Your Inkjet Cartridge Box At Lexmark, we take our commitment to maximize the environmental... Visit www.lexmark.com/recycle to Lexmark's recycling partner. Lexmark-branded cartridges are licensed subject to a restriction that you 're sending single-color tanks, we encourage our customers to any of these terms are properly handled with , only genuine Lexmark inkjet cartridges for signs...
...10 days. After this printer. Inspect the power cord regularly for the life of such problems. Remove the power cord from the electrical outlet before inspecting it. Please Read Before Opening Your Inkjet Cartridge Box At Lexmark, we take our commitment to maximize the environmental... Visit www.lexmark.com/recycle to Lexmark's recycling partner. Lexmark-branded cartridges are licensed subject to a restriction that you 're sending single-color tanks, we encourage our customers to any of these terms are properly handled with , only genuine Lexmark inkjet cartridges for signs...

Quick Reference Guide
Page 12
About your printer 12 Warning-Potential Damage: Read the safety information included with this product before connecting power or making any cabling connections. Installing the printhead without the CD 1 Open the printer, and then remove the packaged printhead from the printer. 2 Raise the printer control panel, and then remove the ink cartridges from the paper exit tray. 3 Connect the power cord, and then turn on the printer.
About your printer 12 Warning-Potential Damage: Read the safety information included with this product before connecting power or making any cabling connections. Installing the printhead without the CD 1 Open the printer, and then remove the packaged printhead from the printer. 2 Raise the printer control panel, and then remove the ink cartridges from the paper exit tray. 3 Connect the power cord, and then turn on the printer.

Quick Reference Guide
Page 30
...checklist to solve most printer problems: • Make sure the power cord is plugged into the printer and into a working electrical outlet. • Make sure the printer is not plugged into any surge protectors, uninterrupted power supplies, or extension cords. • Make sure the printer is turned on. •...wait about 10 seconds, and then turn the printer back on. If Troubleshooting does not solve your problem Visit our Web site at support.lexmark.com to printer maintenance tasks and customer support. Method 2 1 Click or Start. 2 Click All Programs or Programs, and then select the...
...checklist to solve most printer problems: • Make sure the power cord is plugged into the printer and into a working electrical outlet. • Make sure the printer is not plugged into any surge protectors, uninterrupted power supplies, or extension cords. • Make sure the printer is turned on. •...wait about 10 seconds, and then turn the printer back on. If Troubleshooting does not solve your problem Visit our Web site at support.lexmark.com to printer maintenance tasks and customer support. Method 2 1 Click or Start. 2 Click All Programs or Programs, and then select the...

Quick Reference Guide
Page 33
... cable into the USB port of the computer. RECONNECT THE PRINTER POWER SUPPLY 1 Turn off the printer, and then unplug the power cord from the wall outlet. 2 Gently remove the power supply from the printer, and then reinsert it. 3 Plug the power cord into the matching color slot of the following : MAKE SURE THAT YOUR COMPUTER MEETS...
... cable into the USB port of the computer. RECONNECT THE PRINTER POWER SUPPLY 1 Turn off the printer, and then unplug the power cord from the wall outlet. 2 Gently remove the power supply from the printer, and then reinsert it. 3 Plug the power cord into the matching color slot of the following : MAKE SURE THAT YOUR COMPUTER MEETS...

Quick Reference Guide
Page 34
... the USB cable into the wall outlet, and then turn on and off the printer, and then unplug the power cord from the wall outlet. 2 Gently remove the power supply from the printer, and then reinsert it. 3 Plug the power cord into the USB port of the following: MAKE SURE THE PRINTER IS NOT IN... POWER SAVER MODE If the power light is blinking on the printer. If the cable is damaged, then use a new one or more information. Troubleshooting 34 REMOVE AND ...
... the USB cable into the wall outlet, and then turn on and off the printer, and then unplug the power cord from the wall outlet. 2 Gently remove the power supply from the printer, and then reinsert it. 3 Plug the power cord into the USB port of the following: MAKE SURE THE PRINTER IS NOT IN... POWER SAVER MODE If the power light is blinking on the printer. If the cable is damaged, then use a new one or more information. Troubleshooting 34 REMOVE AND ...

Quick Reference Guide
Page 35
... and then wait 10 seconds. 2 Insert the power cord into the wall outlet, and then turn on the printer. RECONNECT THE PRINTER POWER SUPPLY 1 Turn off the printer, and then unplug the power cord from the wall outlet. 2 Gently remove the power supply from the printer, and then reinsert it.... 3 Plug the power cord into the USB port of Power Saver mode, then reset the power: 1 Unplug the power cord from the print...
... and then wait 10 seconds. 2 Insert the power cord into the wall outlet, and then turn on the printer. RECONNECT THE PRINTER POWER SUPPLY 1 Turn off the printer, and then unplug the power cord from the wall outlet. 2 Gently remove the power supply from the printer, and then reinsert it.... 3 Plug the power cord into the USB port of Power Saver mode, then reset the power: 1 Unplug the power cord from the print...

