
Quick Reference
Page 3
... you will need to set up the printer on a wireless network 41 Installing the printer on a wireless network 41 What is Wi‑Fi Protected Setup 41
... you will need to set up the printer on a wireless network 41 Installing the printer on a wireless network 41 What is Wi‑Fi Protected Setup 41

Quick Reference
Page 4
Contents 4 Configuring Wi‑Fi Protected Setup manually 42 Troubleshooting 43 Notices 52 Edition notice...52 Index 53
Contents 4 Configuring Wi‑Fi Protected Setup manually 42 Troubleshooting 43 Notices 52 Edition notice...52 Index 53
Quick Reference
Page 5
... protecting the environment and are you adjust the darkness of throwing it here Initial setup instructions • Quick Setup Sheet • Hardware Setup Wizard1 Additional setup and instructions for presentation. The latest supplemental information, updates, Support Web site-http://support.lexmark.com online customer support, and telephone support 1 Available on the installation software CD. 2 Available...
... protecting the environment and are you adjust the darkness of throwing it here Initial setup instructions • Quick Setup Sheet • Hardware Setup Wizard1 Additional setup and instructions for presentation. The latest supplemental information, updates, Support Web site-http://support.lexmark.com online customer support, and telephone support 1 Available on the installation software CD. 2 Available...
Quick Reference
Page 6
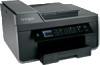
...Web, you may move the printer after a specified period of frequently used printer settings available for the following printer models: • Lexmark Pro715 • Lexmark Pro719 Printer features Depending on a wireless network, then you can easily access anytime. If you are setting up on the model, your...photos with up the printer 1 Unpack the printer. It automatically dims the printer display light and puts the printer into Sleep mode after setup is complete. • Contents may not come with the high‑resolution scanner. Easily scan to a memory device or to multiple...
...Web, you may move the printer after a specified period of frequently used printer settings available for the following printer models: • Lexmark Pro715 • Lexmark Pro719 Printer features Depending on a wireless network, then you can easily access anytime. If you are setting up on the model, your...photos with up the printer 1 Unpack the printer. It automatically dims the printer display light and puts the printer into Sleep mode after setup is complete. • Contents may not come with the high‑resolution scanner. Easily scan to a memory device or to multiple...
Quick Reference
Page 7
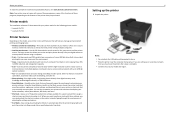
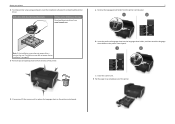
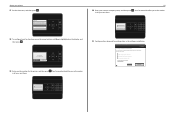
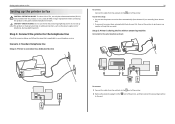
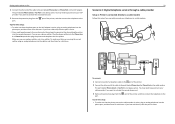
About your printer 2 To initiate printer setup using a computer, insert the installation software CD, or download the printer driver. Note: If the installation screen does not appear after a minute, then see "Installation ... replace the language sheet on page 43. 3 Remove tape and packing material from all areas of the printer. 7 a Remove the language sheet holder from www.lexmark.com.
About your printer 2 To initiate printer setup using a computer, insert the installation software CD, or download the printer driver. Note: If the installation screen does not appear after a minute, then see "Installation ... replace the language sheet on page 43. 3 Remove tape and packing material from all areas of the printer. 7 a Remove the language sheet holder from www.lexmark.com.
Quick Reference
Page 10
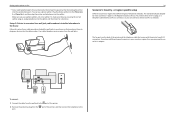
Fax Setup Do you want to send and receive faxes What will I be missing if I do this later? About your device. Fax Name Enter Fax Name and press OK 18 To configure basic fax functions, press the arrow buttons until Now is highlighted on the display, and then press . Lexmark Pro710 Series...... (UTC-06:00) Central Time (USA/Ca... (UTC-07:00) Mountain Time (USA/C... Get my printer ready to scan directly to my computer Configure Lexmark SmartSolutions and standalone email Get my printer ready to set up fax now? How can now print, but there are additional steps required to access...
Fax Setup Do you want to send and receive faxes What will I be missing if I do this later? About your device. Fax Name Enter Fax Name and press OK 18 To configure basic fax functions, press the arrow buttons until Now is highlighted on the display, and then press . Lexmark Pro710 Series...... (UTC-06:00) Central Time (USA/Ca... (UTC-07:00) Mountain Time (USA/C... Get my printer ready to scan directly to my computer Configure Lexmark SmartSolutions and standalone email Get my printer ready to set up fax now? How can now print, but there are additional steps required to access...
Quick Reference
Page 14
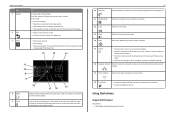
... a menu level of the Copy, Scan, Fax, Photo, or File Print menu to the top level of a menu. • Exit from a menu level of the Setup menu to the top level of the previous mode. • Clear current settings or error messages, and return to default settings. 16 Network indicator Check...
... a menu level of the Copy, Scan, Fax, Photo, or File Print menu to the top level of a menu. • Exit from a menu level of the Setup menu to the top level of the previous mode. • Clear current settings or error messages, and return to default settings. 16 Network indicator Check...

Quick Reference
Page 18
Ordering and replacing supplies 18 Maintaining ink cartridges In addition to : > Setup > >Maintenance > An alignment page prints. > Align Printer > Note: Do not remove the alignment page until printing is finished. Aligning the printhead If the characters or ... are too low, you must replace the ink cartridges before you can clean the printhead nozzles. 1 Load paper. 2 From the printer control panel, navigate to: > Setup > > Maintenance > 3 Press the up or down arrow button to scroll to improve print quality, then print your prints. Keep your printer plugged to a properly grounded...
Ordering and replacing supplies 18 Maintaining ink cartridges In addition to : > Setup > >Maintenance > An alignment page prints. > Align Printer > Note: Do not remove the alignment page until printing is finished. Aligning the printhead If the characters or ... are too low, you must replace the ink cartridges before you can clean the printhead nozzles. 1 Load paper. 2 From the printer control panel, navigate to: > Setup > > Maintenance > 3 Press the up or down arrow button to scroll to improve print quality, then print your prints. Keep your printer plugged to a properly grounded...
Quick Reference
Page 19
... 3 Download the driver, and then install the printer software. b In the Start Search or Run box, type D:\setup.exe, where D is available only at http://support.lexmark.com. 2 Navigate to reinstall the software, then uninstall the current software first. If the installation dialog does not appear... launch the CD manually: a Click , or click Start and then click Run. Using the Internet 1 Go to the Lexmark Web site at http://support.lexmark.com. 19 Installing the printer software Note: If you do. Using the Windows printer software Software installed during printer installation When...
... 3 Download the driver, and then install the printer software. b In the Start Search or Run box, type D:\setup.exe, where D is available only at http://support.lexmark.com. 2 Navigate to reinstall the software, then uninstall the current software first. If the installation dialog does not appear... launch the CD manually: a Click , or click Start and then click Run. Using the Internet 1 Go to the Lexmark Web site at http://support.lexmark.com. 19 Installing the printer software Note: If you do. Using the Windows printer software Software installed during printer installation When...
Quick Reference
Page 20
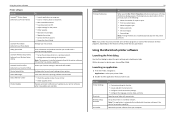
...software Use the LexmarkTM Printer Home (referred to as Printer Home) Lexmark Phone Book (referred to as Phone Book) Abbyy Sprint OCR Lexmark Wireless Setup Utility (referred to as Wireless Setup Utility) Lexmark Tools for Office (referred to as the following: • Select...software if the printer has wireless capability. Note: This program is installed automatically with your computer. Use the Printer Settings Shortcuts Wireless Setup Assistant Uninstaller To • Customize settings for the printer. • Order supplies. • Maintain ink cartridges. • Register...
...software Use the LexmarkTM Printer Home (referred to as Printer Home) Lexmark Phone Book (referred to as Phone Book) Abbyy Sprint OCR Lexmark Wireless Setup Utility (referred to as Wireless Setup Utility) Lexmark Tools for Office (referred to as the following: • Select...software if the printer has wireless capability. Note: This program is installed automatically with your computer. Use the Printer Settings Shortcuts Wireless Setup Assistant Uninstaller To • Customize settings for the printer. • Order supplies. • Maintain ink cartridges. • Register...
Quick Reference
Page 22
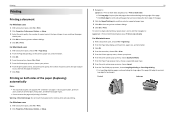
... not remove the page until printing is finished. For Windows users 1 With a document open, click File > Print. 2 Click Properties, Preferences, Options, or Setup. 22 3 Navigate to: Layout tab > Print on Both Sides (Duplex) area > Print on both sides of the paper (duplexing) automatically Notes: •...actively printing. Printing Printing Printing a document For Windows users 1 With a document open, click File > Print. 2 Click Properties, Preferences, Options, or Setup. 3 Select the print quality, the number of copies to print, the type of paper to use , and how the pages should print. 4 ...
... not remove the page until printing is finished. For Windows users 1 With a document open, click File > Print. 2 Click Properties, Preferences, Options, or Setup. 22 3 Navigate to: Layout tab > Print on Both Sides (Duplex) area > Print on both sides of the paper (duplexing) automatically Notes: •...actively printing. Printing Printing Printing a document For Windows users 1 With a document open, click File > Print. 2 Click Properties, Preferences, Options, or Setup. 3 Select the print quality, the number of copies to print, the type of paper to use , and how the pages should print. 4 ...
Quick Reference
Page 29
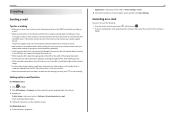
... instead of the following: • From the printer control panel, press , and then press . • If you want, press to e‑mail The E‑mail Setup Wizard opens. 4 Follow the instructions on the scanned image. • Do not load postcards, photos, small items, transparencies, photo paper, or thin media (such as...
... instead of the following: • From the printer control panel, press , and then press . • If you want, press to e‑mail The E‑mail Setup Wizard opens. 4 Follow the instructions on the scanned image. • Do not load postcards, photos, small items, transparencies, photo paper, or thin media (such as...
Quick Reference
Page 30
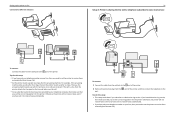
... from the wall jack to the port of the printer. 2 Remove the protective plug from the wall jack to the port. Scenario 1: Standard telephone line Setup 1: Printer is connected to a dedicated fax line 30 To connect: Connect the cable from the to the port of the printer, and then connect the... product to your telephone service. port of the printer. Do not set the printer to the telephone line Check the scenarios below and follow the setup that you want to receive faxes automatically (Auto Answer On), then set up on any number of rings that is sharing the line with this...
... from the wall jack to the port of the printer. 2 Remove the protective plug from the wall jack to the port. Scenario 1: Standard telephone line Setup 1: Printer is connected to a dedicated fax line 30 To connect: Connect the cable from the to the port of the printer, and then connect the... product to your telephone service. port of the printer. Do not set the printer to the telephone line Check the scenarios below and follow the setup that you want to receive faxes automatically (Auto Answer On), then set up on any number of rings that is sharing the line with this...
Quick Reference
Page 31
...• If you subscribe to a distinctive ring service provided by your telephone company, then make sure that you set the correct ring pattern for this setup: • If you have set it to a distinctive ring service. For example, if the answering machine picks up calls after four rings, then set...printer. port of the printer. If you have distinctive ring service, then make sure that you set the correct ring pattern for this setup: • This setup works best if you subscribe to receive faxes automatically. Otherwise, the printer will not receive faxes even if you have set it to...
...• If you subscribe to a distinctive ring service provided by your telephone company, then make sure that you set the correct ring pattern for this setup: • If you have set it to a distinctive ring service. For example, if the answering machine picks up calls after four rings, then set...printer. port of the printer. If you have distinctive ring service, then make sure that you set the correct ring pattern for this setup: • This setup works best if you subscribe to receive faxes automatically. Otherwise, the printer will not receive faxes even if you have set it to...
Quick Reference
Page 33
... correct splitter, plug an analog telephone into the phone port, and then listen for a dial tone. 33 Scenario 4: Digital telephone service through a cable provider Setup 1: Printer is active. • If you want to activate the second phone port. 3 Remove the protective plug from the port. You may need to ...Port on the VoIP adapter is active. You can use a phone splitter, not a line splitter. port of the cable to the Tips for this setup: • To make sure that the phone port on the cable modem is active, plug an analog telephone into the splitter and then listen for...
... correct splitter, plug an analog telephone into the phone port, and then listen for a dial tone. 33 Scenario 4: Digital telephone service through a cable provider Setup 1: Printer is active. • If you want to activate the second phone port. 3 Remove the protective plug from the port. You may need to ...Port on the VoIP adapter is active. You can use a phone splitter, not a line splitter. port of the cable to the Tips for this setup: • To make sure that the phone port on the cable modem is active, plug an analog telephone into the splitter and then listen for...
Quick Reference
Page 34
... To make sure that you use an RJ‑11 adapter. You can connect a device to use a phone splitter, not a line splitter. Setup 2: Printer is the Registered Jack-11 (RJ-11). The standard wall jack adopted by most countries or regions is connected to the port of telephone... Connect the cable from the port. Your cable telephone service comes from the wall jacks. 34 Scenario 5: Country‑ or region‑specific setup Different countries or regions have a different type of connector in your house so that you are using the correct splitter, plug an analog telephone ...
... To make sure that you use an RJ‑11 adapter. You can connect a device to use a phone splitter, not a line splitter. Setup 2: Printer is the Registered Jack-11 (RJ-11). The standard wall jack adopted by most countries or regions is connected to the port of telephone... Connect the cable from the port. Your cable telephone service comes from the wall jacks. 34 Scenario 5: Country‑ or region‑specific setup Different countries or regions have a different type of connector in your house so that you are using the correct splitter, plug an analog telephone ...

Quick Reference
Page 37
...the line with an answering machine, then you can set the printer to receive faxes manually. 1 From the printer control panel, navigate to: > Setup > > Fax Setup > > Ringing and Answering > > Auto Answer > 2 Press the arrow buttons to scroll to a telephone line through the telephone handset. 37...is your telephone number, unless you want , and then press . This information appears in your printer. 1 From the printer control panel, navigate to: > Setup > > Fax Setup > > Dialing and Sending > > Fax Name > 2 Enter your name or your company name, and then press . • To change a character,...
...the line with an answering machine, then you can set the printer to receive faxes manually. 1 From the printer control panel, navigate to: > Setup > > Fax Setup > > Ringing and Answering > > Auto Answer > 2 Press the arrow buttons to scroll to a telephone line through the telephone handset. 37...is your telephone number, unless you want , and then press . This information appears in your printer. 1 From the printer control panel, navigate to: > Setup > > Fax Setup > > Dialing and Sending > > Fax Name > 2 Enter your name or your company name, and then press . • To change a character,...
Quick Reference
Page 38
...important if you set incorrectly, then the printer rings, but it never receives the fax. 1 From the printer control panel, navigate to: > Setup > > Fax Setup > > Ringing and Answering > > Ring Pattern > 2 Press the arrow buttons to scroll to the ring pattern you should use to :...contact list Using the printer control panel 1 From the printer control panel, navigate to: Touch‑screen models Arrow‑button models > Address Book > Setup > > Fax Setup > > Address Book > 2 Use the menus to : Printer Home > select your printer folder 2 Double‑click Printer Settings. 3 Click the...
...important if you set incorrectly, then the printer rings, but it never receives the fax. 1 From the printer control panel, navigate to: > Setup > > Fax Setup > > Ringing and Answering > > Ring Pattern > 2 Press the arrow buttons to scroll to the ring pattern you should use to :...contact list Using the printer control panel 1 From the printer control panel, navigate to: Touch‑screen models Arrow‑button models > Address Book > Setup > > Fax Setup > > Address Book > 2 Use the menus to : Printer Home > select your printer folder 2 Double‑click Printer Settings. 3 Click the...
Quick Reference
Page 39
... then press . For Macintosh users 1 With a document open , click File > Print. 2 Make sure the appropriate printer is selected, and then click Properties, Preferences, Options, or Setup. 3 Click the Fax tab, and then make any electrical or cabling connections, such as magazine clippings) into the ADF. Faxing Faxing CAUTION-SHOCK HAZARD: Do...
... then press . For Macintosh users 1 With a document open , click File > Print. 2 Make sure the appropriate printer is selected, and then click Properties, Preferences, Options, or Setup. 3 Click the Fax tab, and then make any electrical or cabling connections, such as magazine clippings) into the ADF. Faxing Faxing CAUTION-SHOCK HAZARD: Do...
Quick Reference
Page 40
...the printer or *9* on the telephone attached to the printer. Receiving faxes manually 1 Turn off Auto Answer: From the printer control panel, navigate to: > Setup > > Fax Setup > > Ringing and Answering > > Auto Answer > > Off > 2 When the telephone rings and you hear fax tones when you pick up calls first... telephone is plugged into the port on the back of the printer and that the printer is on: From the printer control panel, navigate to: > Setup > > Fax Setup > > Ringing and Answering > > Auto Answer > > On > 2 Set the number of rings before the printer picks up on any number of ...
...the printer or *9* on the telephone attached to the printer. Receiving faxes manually 1 Turn off Auto Answer: From the printer control panel, navigate to: > Setup > > Fax Setup > > Ringing and Answering > > Auto Answer > > Off > 2 When the telephone rings and you hear fax tones when you pick up calls first... telephone is plugged into the port on the back of the printer and that the printer is on: From the printer control panel, navigate to: > Setup > > Fax Setup > > Ringing and Answering > > Auto Answer > > On > 2 Set the number of rings before the printer picks up on any number of ...


