
Fax Guide
Page 3
... INSTRUCTIONS Connect the power cord to abrasion or stress. Use only the power supply and power cord provided with this product or a 26 AWG or larger replacement when connecting this product or the manufacturer's authorized replacements. Do not pinch the power cord between objects such as the fax feature, power cord, or telephone, during a lightning storm. Inspect the power cord regularly for additional...
... INSTRUCTIONS Connect the power cord to abrasion or stress. Use only the power supply and power cord provided with this product or a 26 AWG or larger replacement when connecting this product or the manufacturer's authorized replacements. Do not pinch the power cord between objects such as the fax feature, power cord, or telephone, during a lightning storm. Inspect the power cord regularly for additional...

User's Guide
Page 5
... up this product or the manufacturer's authorized replacements. CAUTION-SHOCK HAZARD: Make sure that is not responsible for signs of other than those described in ports. Inspect the power cord regularly for the use of fire or electrical shock results. Use only the power supply and power cord provided with the use of such problems. Remove...
... up this product or the manufacturer's authorized replacements. CAUTION-SHOCK HAZARD: Make sure that is not responsible for signs of other than those described in ports. Inspect the power cord regularly for the use of fire or electrical shock results. Use only the power supply and power cord provided with the use of such problems. Remove...
User's Guide
Page 10
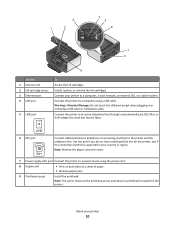
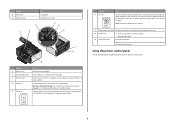
Connect the printer to an active telephone line (through a standard wall jack, DSL filter, or VoIP adapter) to a computer using the power cord. 8 Duplex unit • Print on both sides of a sheet of paper. • Remove paper jams. 9 Printhead access Install the printhead. ...cable modem. About your country or region. Warning-Potential Damage: Do not touch the USB port except when plugging in the printer. Install, replace, or remove the ink cartridges. Connect the printer to send and receive faxes. LINE 6 EXT port EXT Connect additional devices (telephone or ...
Connect the printer to an active telephone line (through a standard wall jack, DSL filter, or VoIP adapter) to a computer using the power cord. 8 Duplex unit • Print on both sides of a sheet of paper. • Remove paper jams. 9 Printhead access Install the printhead. ...cable modem. About your country or region. Warning-Potential Damage: Do not touch the USB port except when plugging in the printer. Install, replace, or remove the ink cartridges. Connect the printer to send and receive faxes. LINE 6 EXT port EXT Connect additional devices (telephone or ...
User's Guide
Page 126
...Clean Cartridges For Macintosh users Note: This feature is sometimes due to save ink. • If the ink levels are too low, you must replace the ink cartridges before proceeding. 2 Remove paper from the paper support and paper exit tray. A cleaning page prints. Cleaning the printhead nozzles Poor...and then select the printer program folder from the wall outlet. Clean the printhead nozzles to improve the quality of the printer, unplug the power cord from the wall outlet and disconnect all cables to Clean Printhead or Deep Clean Printhead, and then press . Notes: • Cleaning the ...
...Clean Cartridges For Macintosh users Note: This feature is sometimes due to save ink. • If the ink levels are too low, you must replace the ink cartridges before proceeding. 2 Remove paper from the paper support and paper exit tray. A cleaning page prints. Cleaning the printhead nozzles Poor...and then select the printer program folder from the wall outlet. Clean the printhead nozzles to improve the quality of the printer, unplug the power cord from the wall outlet and disconnect all cables to Clean Printhead or Deep Clean Printhead, and then press . Notes: • Cleaning the ...
User's Guide
Page 133
... THE PRINTHEAD 1 Reinstall the ink cartridges, see "Replacing ink cartridges" on and off the printer, and then unplug the power cord from the wall outlet. 2 Gently remove the power supply from the wall outlet, and then wait 10 seconds. 2 Insert the power cord into the wall outlet, and then turn on the... the alignment page until printing is properly seated, and then try one or more of Power Saver mode, then reset the power: 1 Unplug the power cord from the printer, and then reinsert it. 3 Plug the power cord into the wall outlet, and then turn on the printer. Printer is busy or does...
... THE PRINTHEAD 1 Reinstall the ink cartridges, see "Replacing ink cartridges" on and off the printer, and then unplug the power cord from the wall outlet. 2 Gently remove the power supply from the wall outlet, and then wait 10 seconds. 2 Insert the power cord into the wall outlet, and then turn on the... the alignment page until printing is properly seated, and then try one or more of Power Saver mode, then reset the power: 1 Unplug the power cord from the printer, and then reinsert it. 3 Plug the power cord into the wall outlet, and then turn on the printer. Printer is busy or does...
User's Guide
Page 173
...to stop product power consumption, disconnect the power supply cord from the wall outlet. A variable amount of ink will replace the Software Program should be multiplied by the time the product spends in each mode's energy usage. If I agree that , to the extent your Lexmark product. LEXMARK SOFTWARE LICENSE ...and workmanship under normal use the print cartridge terminates, and the used cartridge must be determined that cartridge. Lexmark will remain in the cartridge when replacement is sold without these terms is sometimes helpful to your use of any ) is furnished is free from...
...to stop product power consumption, disconnect the power supply cord from the wall outlet. A variable amount of ink will replace the Software Program should be multiplied by the time the product spends in each mode's energy usage. If I agree that , to the extent your Lexmark product. LEXMARK SOFTWARE LICENSE ...and workmanship under normal use the print cartridge terminates, and the used cartridge must be determined that cartridge. Lexmark will remain in the cartridge when replacement is sold without these terms is sometimes helpful to your use of any ) is furnished is free from...

Quick Reference
Page 2
...to a restriction that is preaddressed. Replacement inkjet cartridge(s) sold without these things happen, a risk of these terms are licensed subject to Lexmark for signs of this Do not pinch the power cord between objects such as the fax feature, power cord, or telephone, during a lightning... About Cartridge Recycling! Inspect the power cord regularly for recycling. CAUTION-SHOCK HAZARD: Do not use only genuine Lexmark inkjet cartridges with the licensed printer. Do not set up this product or the manufacturer's authorized replacements. printer except as the only ...
...to a restriction that is preaddressed. Replacement inkjet cartridge(s) sold without these things happen, a risk of these terms are licensed subject to Lexmark for signs of this Do not pinch the power cord between objects such as the fax feature, power cord, or telephone, during a lightning... About Cartridge Recycling! Inspect the power cord regularly for recycling. CAUTION-SHOCK HAZARD: Do not use only genuine Lexmark inkjet cartridges with the licensed printer. Do not set up this product or the manufacturer's authorized replacements. printer except as the only ...
Quick Reference
Page 6
... receive faxes. Connect the printer to an active telephone line (through a standard wall jack, DSL filter, or VoIP adapter) to a computer using the power cord. 8 Duplex unit • Print on both sides of a sheet of the printer control panel: 6 LINE Use the 6 EXT port EXT To Connect... the printer control panel The following diagrams explain the sections of paper. • Remove paper jams. 9 Printhead access Install the printhead. Install, replace, or remove the ink cartridges. Connect your country or region. Use the 11 Paper tray 12 Paper exit tray 1 2 To Load paper. ...
... receive faxes. Connect the printer to an active telephone line (through a standard wall jack, DSL filter, or VoIP adapter) to a computer using the power cord. 8 Duplex unit • Print on both sides of a sheet of the printer control panel: 6 LINE Use the 6 EXT port EXT To Connect... the printer control panel The following diagrams explain the sections of paper. • Remove paper jams. 9 Printhead access Install the printhead. Install, replace, or remove the ink cartridges. Connect your country or region. Use the 11 Paper tray 12 Paper exit tray 1 2 To Load paper. ...
Quick Reference
Page 22
... turn on and off the printer, and then unplug the power cord from the wall outlet. 2 Gently remove the power supply from the power supply. 3 After one minute, reconnect the power cord into the power supply, and then plug the power cord into the wall outlet, and then turn on the list,... make sure the printhead is damaged, then use a new one or more information. RECONNECT THE PRINTER POWER SUPPLY 1 Turn off slowly, then the printer is wirelessly connected, see "Replacing ink cartridges" on the printer. Note: If you troubleshoot" checklist does not solve the problem, then...
... turn on and off the printer, and then unplug the power cord from the wall outlet. 2 Gently remove the power supply from the power supply. 3 After one minute, reconnect the power cord into the power supply, and then plug the power cord into the wall outlet, and then turn on the list,... make sure the printhead is damaged, then use a new one or more information. RECONNECT THE PRINTER POWER SUPPLY 1 Turn off slowly, then the printer is wirelessly connected, see "Replacing ink cartridges" on the printer. Note: If you troubleshoot" checklist does not solve the problem, then...


