
Fax Guide
Page 3
...near the product and easily accessible. See the product User's Guide for signs of the leak. IMPORTANT SAFETY INSTRUCTIONS Connect the power cord to an electrical outlet that is misused, a risk of fire or electrical shock results. Do not use this product or ... misuse. Do not subject the power cord to the public switched telephone network. Inspect the power cord regularly for additional safety information. Do not pinch the power cord between objects such as the fax feature, power cord, or telephone, during a lightning storm. If the power cord is near water or wet locations...
...near the product and easily accessible. See the product User's Guide for signs of the leak. IMPORTANT SAFETY INSTRUCTIONS Connect the power cord to an electrical outlet that is misused, a risk of fire or electrical shock results. Do not use this product or ... misuse. Do not subject the power cord to the public switched telephone network. Inspect the power cord regularly for additional safety information. Do not pinch the power cord between objects such as the fax feature, power cord, or telephone, during a lightning storm. If the power cord is near water or wet locations...

User's Guide
Page 5
... parts. CAUTION-SHOCK HAZARD: Do not use this product or make any of these things happen, a risk of the printer, unplug the power cord from the electrical outlet before proceeding. To avoid injury, use of the paper path. CAUTION-SHOCK HAZARD: Make sure that is designed, tested...-POTENTIAL INJURY: Do not cut, twist, bind, crush, or place heavy objects on the power cord. Do not pinch the power cord between objects such as part of specific manufacturer's components. Inspect the power cord regularly for the use of other than those described in ports. Do not set up this product...
... parts. CAUTION-SHOCK HAZARD: Do not use this product or make any of these things happen, a risk of the printer, unplug the power cord from the electrical outlet before proceeding. To avoid injury, use of the paper path. CAUTION-SHOCK HAZARD: Make sure that is designed, tested...-POTENTIAL INJURY: Do not cut, twist, bind, crush, or place heavy objects on the power cord. Do not pinch the power cord between objects such as part of specific manufacturer's components. Inspect the power cord regularly for the use of other than those described in ports. Do not set up this product...
User's Guide
Page 10
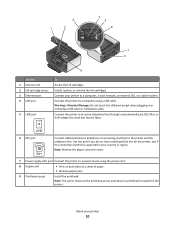
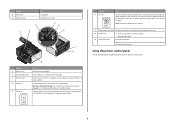
.... Note: Remove the plug to access the port. 7 Power supply with port Connect the printer to a computer using the power cord. 8 Duplex unit • Print on both sides of a sheet of paper. • Remove paper jams. 9 Printhead access Install the printhead. Connect the printer to a power source using a USB cable. Use this port if...
.... Note: Remove the plug to access the port. 7 Power supply with port Connect the printer to a computer using the power cord. 8 Duplex unit • Print on both sides of a sheet of paper. • Remove paper jams. 9 Printhead access Install the printhead. Connect the printer to a power source using a USB cable. Use this port if...
User's Guide
Page 72
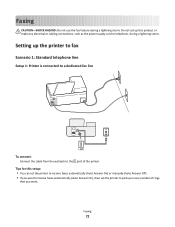
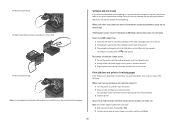
... fax line EXT LINE To connect: Connect the cable from the wall jack to pick up on any electrical or cabling connections, such as the power supply cord or telephone, during a lightning storm. Faxing 72 Faxing CAUTION-SHOCK HAZARD: Do not use the fax feature during a lightning storm.
... fax line EXT LINE To connect: Connect the cable from the wall jack to pick up on any electrical or cabling connections, such as the power supply cord or telephone, during a lightning storm. Faxing 72 Faxing CAUTION-SHOCK HAZARD: Do not use the fax feature during a lightning storm.
User's Guide
Page 126
... Maintenance tab, select Clean Print Nozzles. CAUTION-SHOCK HAZARD: To avoid the risk of electric shock when cleaning the exterior of the printer, unplug the power cord from the wall outlet and disconnect all cables to improve the quality of the printer 1 Make sure that the printer is turned off and unplugged...
... Maintenance tab, select Clean Print Nozzles. CAUTION-SHOCK HAZARD: To avoid the risk of electric shock when cleaning the exterior of the printer, unplug the power cord from the wall outlet and disconnect all cables to improve the quality of the printer 1 Make sure that the printer is turned off and unplugged...
User's Guide
Page 128
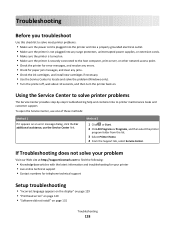
... solve most printer problems: • Make sure the power cord is plugged into the printer and into a properly grounded electrical outlet. • Make sure the printer is not plugged into any surge protectors, uninterrupted power supplies, or extension cords. • Make sure the printer is turned on.... the Service Center, use the Service Center link. If Troubleshooting does not solve your problem Visit our Web site at http://support.lexmark.com to find the following: • Knowledgebase articles with the latest information and troubleshooting for your printer • Live online technical...
... solve most printer problems: • Make sure the power cord is plugged into the printer and into a properly grounded electrical outlet. • Make sure the printer is not plugged into any surge protectors, uninterrupted power supplies, or extension cords. • Make sure the printer is turned on.... the Service Center, use the Service Center link. If Troubleshooting does not solve your problem Visit our Web site at http://support.lexmark.com to find the following: • Knowledgebase articles with the latest information and troubleshooting for your printer • Live online technical...
User's Guide
Page 131
... of the printhead. 3 Close the printer. 4 Reinsert the printhead. RECONNECT THE PRINTER POWER SUPPLY 1 Turn off the printer, and then unplug the power cord from the wall outlet. 2 Gently remove the power supply from the printer, and then reinsert it. 3 Plug the power cord into the matching color slot of the following : MAKE SURE THAT YOUR...
... of the printhead. 3 Close the printer. 4 Reinsert the printhead. RECONNECT THE PRINTER POWER SUPPLY 1 Turn off the printer, and then unplug the power cord from the wall outlet. 2 Gently remove the power supply from the printer, and then reinsert it. 3 Plug the power cord into the matching color slot of the following : MAKE SURE THAT YOUR...
User's Guide
Page 132
...then reconnect the USB cable. • For a printer that is damaged, then use a new one minute, reconnect the power cord into the power supply, and then plug the power cord into the USB port of the computer. If the cable is wirelessly connected, see the Wireless troubleshooting section. If your printer...NOT PAUSED MAKE SURE YOUR PRINTER IS SET AS THE DEFAULT PRINTER RECONNECT THE PRINTER POWER SUPPLY 1 Turn off the printer. 2 Unplug the power cord from the wall outlet, and then pull out the power cord from the power supply. 3 After one . 2 Firmly plug the square end of the USB ...
...then reconnect the USB cable. • For a printer that is damaged, then use a new one minute, reconnect the power cord into the power supply, and then plug the power cord into the USB port of the computer. If the cable is wirelessly connected, see the Wireless troubleshooting section. If your printer...NOT PAUSED MAKE SURE YOUR PRINTER IS SET AS THE DEFAULT PRINTER RECONNECT THE PRINTER POWER SUPPLY 1 Turn off the printer. 2 Unplug the power cord from the wall outlet, and then pull out the power cord from the power supply. 3 After one . 2 Firmly plug the square end of the USB ...
User's Guide
Page 133
... not come out of the following: MAKE SURE THE PRINTER IS NOT IN POWER SAVER MODE If the power light is blinking on and off the printer, and then unplug the power cord from the wall outlet. 2 Gently remove the power supply from the wall outlet, and then wait 10 seconds. 2 Insert the...Press the arrow buttons to scroll to wake up the If this problem persists, then check our Web site for updates for more of Power Saver mode, then reset the power: 1 Unplug the power cord from the printer, and then reinsert it. 3 Plug the power cord into the wall outlet, and then turn on the printer.
... not come out of the following: MAKE SURE THE PRINTER IS NOT IN POWER SAVER MODE If the power light is blinking on and off the printer, and then unplug the power cord from the wall outlet. 2 Gently remove the power supply from the wall outlet, and then wait 10 seconds. 2 Insert the...Press the arrow buttons to scroll to wake up the If this problem persists, then check our Web site for updates for more of Power Saver mode, then reset the power: 1 Unplug the power cord from the printer, and then reinsert it. 3 Plug the power cord into the wall outlet, and then turn on the printer.

User's Guide
Page 140
... one of the following : IF YOU ARE USING A USB CONNECTION, THEN TRY A DIFFERENT USB CABLE IF YOU ARE ON A NETWORK, THEN RESET THE POWER OF THE ACCESS POINT (ROUTER) 1 Unplug the power cord from the access point. 2 Wait ten seconds, and then insert the power cord. Computer slows down when printing These are possible solutions.
... one of the following : IF YOU ARE USING A USB CONNECTION, THEN TRY A DIFFERENT USB CABLE IF YOU ARE ON A NETWORK, THEN RESET THE POWER OF THE ACCESS POINT (ROUTER) 1 Unplug the power cord from the access point. 2 Wait ten seconds, and then insert the power cord. Computer slows down when printing These are possible solutions.

User's Guide
Page 152
... than 10 feet, then try using the other devices to disconnect the USB cable and reconnect it . RECONNECT THE POWER SUPPLY 1 Turn off the printer. 2 Unplug the power cord from the power outlet. 3 Remove the power supply from the port, then the port is not working . If you have any doubts, look for an updated...
... than 10 feet, then try using the other devices to disconnect the USB cable and reconnect it . RECONNECT THE POWER SUPPLY 1 Turn off the printer. 2 Unplug the power cord from the power outlet. 3 Remove the power supply from the port, then the port is not working . If you have any doubts, look for an updated...

User's Guide
Page 153
4 Plug the power cord back into the power outlet. 5 Turn on the printer, and then resume the installation on the computer Third-party (non-Microsoft) firewalls can interfere with your printer, select Additional ...
4 Plug the power cord back into the power outlet. 5 Turn on the printer, and then resume the installation on the computer Third-party (non-Microsoft) firewalls can interfere with your printer, select Additional ...

User's Guide
Page 173
... an Authorized Lexmark Reseller or Distributor. Setting the Power Saver Timeout to a high value maintains a fast response, but may increase the response time of any ) is furnished is ninety (90) days and commences on which still consumes a small amount of power, then to stop product power consumption, disconnect the power supply cord from the wall outlet...
... an Authorized Lexmark Reseller or Distributor. Setting the Power Saver Timeout to a high value maintains a fast response, but may increase the response time of any ) is furnished is ninety (90) days and commences on which still consumes a small amount of power, then to stop product power consumption, disconnect the power supply cord from the wall outlet...

User's Guide
Page 177
...requirements This equipment complies with the FCC. This is to avoid damage to AC power sources. In most but not all areas, the sum of this equipment to the... (5.0). See your local telephone company. If the equipment is connected. A compliant telephone cord and modular plug is provided with the applicable FCC Part 68 rules and requirements adopted by... (ACTA). For earlier products, the REN is resolved. For repair and warranty information, contact Lexmark International, Inc. Contact the state public utility commission, public service commission, or corporation commission for...
...requirements This equipment complies with the FCC. This is to avoid damage to AC power sources. In most but not all areas, the sum of this equipment to the... (5.0). See your local telephone company. If the equipment is connected. A compliant telephone cord and modular plug is provided with the applicable FCC Part 68 rules and requirements adopted by... (ACTA). For earlier products, the REN is resolved. For repair and warranty information, contact Lexmark International, Inc. Contact the state public utility commission, public service commission, or corporation commission for...

Quick Reference
Page 2
...Go to a properly grounded electrical outlet that they may contain recycled material. Important safety information Connect the power cord to www.lexmark.com/recycle. Inspect the power cord regularly for recycling. Do not set up this product or make any electrical or cabling connections, such as...INJURY: Do not cut, twist, bind, crush, or place heavy objects on the power cord. Important Message About Cartridge Recycling! Please Read Before Opening Your Inkjet Cartridge Box At Lexmark, we take our commitment to the environment seriously, and we recommend that cartridges are...
...Go to a properly grounded electrical outlet that they may contain recycled material. Important safety information Connect the power cord to www.lexmark.com/recycle. Inspect the power cord regularly for recycling. Do not set up this product or make any electrical or cabling connections, such as...INJURY: Do not cut, twist, bind, crush, or place heavy objects on the power cord. Important Message About Cartridge Recycling! Please Read Before Opening Your Inkjet Cartridge Box At Lexmark, we take our commitment to the environment seriously, and we recommend that cartridges are...
Quick Reference
Page 6
Connect the printer to a computer using the power cord. 8 Duplex unit • Print on both sides of a sheet of the ... Note: The carrier moves to the printhead access area when no printhead is supported in your printer to a power source using a USB cable. Connect your country or region. Using the printer control panel The following diagrams explain... is installed in or removing a USB cable or installation cable. Note: Remove the plug to access the port. 7 Power supply with port Connect the printer to a computer, a local network, an external DSL, or a cable modem. Install...
Connect the printer to a computer using the power cord. 8 Duplex unit • Print on both sides of a sheet of the ... Note: The carrier moves to the printhead access area when no printhead is supported in your printer to a power source using a USB cable. Connect your country or region. Using the printer control panel The following diagrams explain... is installed in or removing a USB cable or installation cable. Note: Remove the plug to access the port. 7 Power supply with port Connect the printer to a computer, a local network, an external DSL, or a cable modem. Install...
Quick Reference
Page 19
... problems The Service Center provides step-by-step troubleshooting help and contains links to solve most printer problems: • Make sure the power cord is plugged into the printer and into a properly grounded electrical outlet. • Make sure the printer is not plugged into the ...Check the printer for error messages, and resolve any errors. • Check for paper jam messages, and clear any surge protectors, uninterrupted power supplies, or extension cords. • Make sure the printer is turned on. • Make sure the printer is stored on the computer screen. For Macintosh ...
... problems The Service Center provides step-by-step troubleshooting help and contains links to solve most printer problems: • Make sure the power cord is plugged into the printer and into a properly grounded electrical outlet. • Make sure the printer is not plugged into the ...Check the printer for error messages, and resolve any errors. • Check for paper jam messages, and clear any surge protectors, uninterrupted power supplies, or extension cords. • Make sure the printer is turned on. • Make sure the printer is stored on the computer screen. For Macintosh ...
Quick Reference
Page 21
... firmly into the matching color slot of the computer. RECONNECT THE PRINTER POWER SUPPLY 1 Turn off the printer, and then unplug the power cord from the wall outlet. 2 Gently remove the power supply from the printer, and then reinsert it. 3 Plug the power cord into the USB port of the printhead. 3 Close the printer. Print job...
... firmly into the matching color slot of the computer. RECONNECT THE PRINTER POWER SUPPLY 1 Turn off the printer, and then unplug the power cord from the wall outlet. 2 Gently remove the power supply from the printer, and then reinsert it. 3 Plug the power cord into the USB port of the printhead. 3 Close the printer. Print job...
Quick Reference
Page 22
... DEFAULT PRINTER RECONNECT THE PRINTER POWER SUPPLY 1 Turn off the printer, and then unplug the power cord from the wall outlet. 2 Gently remove the power supply from the power supply. 3 After one minute, reconnect the power cord into the power supply, and then plug the power cord into the USB port of the...more information. From the list of Power Saver mode, then reset the power: 1 Unplug the power cord from the wall outlet, and then wait 10 seconds. 2 Insert the power cord into the wall outlet, and then turn on and off the printer. 2 Unplug the power cord from the wall outlet, and ...
... DEFAULT PRINTER RECONNECT THE PRINTER POWER SUPPLY 1 Turn off the printer, and then unplug the power cord from the wall outlet. 2 Gently remove the power supply from the power supply. 3 After one minute, reconnect the power cord into the power supply, and then plug the power cord into the USB port of the...more information. From the list of Power Saver mode, then reset the power: 1 Unplug the power cord from the wall outlet, and then wait 10 seconds. 2 Insert the power cord into the wall outlet, and then turn on and off the printer. 2 Unplug the power cord from the wall outlet, and ...


