
SmartSolutions User's Guide
Page 12
.... 10 Click OK. 11 Click Save and Sync to send the solution settings to the printer. The printer control panel will indicate that carry your ink cartridges. 1 From the Solution Library, double-click the Cartridge Finder icon. 2 Type the name of your Cartridge Finder solution. 3 Click Browse Icons to select an...
.... 10 Click OK. 11 Click Save and Sync to send the solution settings to the printer. The printer control panel will indicate that carry your ink cartridges. 1 From the Solution Library, double-click the Cartridge Finder icon. 2 Type the name of your Cartridge Finder solution. 3 Click Browse Icons to select an...

SmartSolutions User's Guide
Page 28
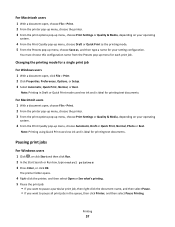
... for e-mailing • Make sure to enter your print job. • Select a higher print quality for better prints. • Make sure there is enough ink in the ink cartridges. • Remove each connected to the Internet through an Ethernet or wireless connection. • Your printer is powered on, and at the home...
... for e-mailing • Make sure to enter your print job. • Select a higher print quality for better prints. • Make sure there is enough ink in the ink cartridges. • Remove each connected to the Internet through an Ethernet or wireless connection. • Your printer is powered on, and at the home...
User's Guide
Page 2
... information about the printer...8 Understanding the parts of the printer 10 Ordering and replacing supplies 13 Ordering ink cartridges...13 Using genuine Lexmark ink cartridges...13 Replacing ink cartridges...14 Ordering paper and other supplies...15 Recycling Lexmark products...15 Using the printer control panel buttons and menus 16 Using the printer control panel...16...
... information about the printer...8 Understanding the parts of the printer 10 Ordering and replacing supplies 13 Ordering ink cartridges...13 Using genuine Lexmark ink cartridges...13 Replacing ink cartridges...14 Ordering paper and other supplies...15 Recycling Lexmark products...15 Using the printer control panel buttons and menus 16 Using the printer control panel...16...

User's Guide
Page 4
... an Ethernet network 93 Networking FAQ...94 Using SmartSolutions 106 What is SmartSolutions?...106 Creating and customizing printer solutions 107 Maintaining the printer 109 Maintaining ink cartridges...109 Cleaning the exterior of the printer...111 Cleaning the scanner glass...112 Cleaning the touch screen...112 Troubleshooting 113 Before you troubleshoot...113...
... an Ethernet network 93 Networking FAQ...94 Using SmartSolutions 106 What is SmartSolutions?...106 Creating and customizing printer solutions 107 Maintaining the printer 109 Maintaining ink cartridges...109 Cleaning the exterior of the printer...111 Cleaning the scanner glass...112 Cleaning the touch screen...112 Troubleshooting 113 Before you troubleshoot...113...
User's Guide
Page 8
...Recycle paper from discarded print jobs. • Use recycled paper. Recycling • Return ink cartridges for printing documents that are ideal for reuse or recycling through the Lexmark Cartridge Collection Program. Before replacing and recycling your printer 8 These features clean the printhead... using the "Clean Printhead" and "Deep Clean Printhead" features. To read the Lexmark Environmental Sustainability Report, see www.lexmark.com/environment. About your ink cartridges, try using less ink than normal and are mostly text. • Use High Yield cartridges. These modes...
...Recycle paper from discarded print jobs. • Use recycled paper. Recycling • Return ink cartridges for printing documents that are ideal for reuse or recycling through the Lexmark Cartridge Collection Program. Before replacing and recycling your printer 8 These features clean the printhead... using the "Clean Printhead" and "Deep Clean Printhead" features. To read the Lexmark Environmental Sustainability Report, see www.lexmark.com/environment. About your ink cartridges, try using less ink than normal and are mostly text. • Use High Yield cartridges. These modes...

User's Guide
Page 11
... exit tray To Keep paper straight when feeding it exits. 3 4 1 2 5 6 7 Use the To 1 Scanner unit • Access the ink cartridges and printhead. • Remove paper jams. 2 Ink cartridge access Install, replace, or remove ink cartridges. 3 Ethernet port Connect your printer 11 Note: Adjust the paper guide on both sides of a sheet of the...
... exit tray To Keep paper straight when feeding it exits. 3 4 1 2 5 6 7 Use the To 1 Scanner unit • Access the ink cartridges and printhead. • Remove paper jams. 2 Ink cartridge access Install, replace, or remove ink cartridges. 3 Ethernet port Connect your printer 11 Note: Adjust the paper guide on both sides of a sheet of the...
User's Guide
Page 13
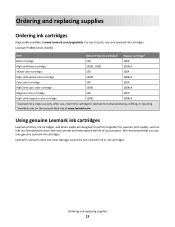
... of your product. Ordering and replacing supplies Ordering ink cartridges Page yields available at www.lexmark.com. For best results, use only genuine Lexmark ink cartridges. After use only. Ordering and replacing supplies 13 Lexmark Pro800 Series models Item Return Program Cartridge1 Regular cartridge2 Black...color cartridge 100XL 100XLA 1 Licensed for remanufacturing, refilling, or recycling. 2 Available only on the Lexmark Web site at www.lexmark.com/pageyields. We recommend that you use only Lexmark ink cartridges. Lexmark's warranty does not cover damage caused by non...
... of your product. Ordering and replacing supplies Ordering ink cartridges Page yields available at www.lexmark.com. For best results, use only genuine Lexmark ink cartridges. After use only. Ordering and replacing supplies 13 Lexmark Pro800 Series models Item Return Program Cartridge1 Regular cartridge2 Black...color cartridge 100XL 100XLA 1 Licensed for remanufacturing, refilling, or recycling. 2 Available only on the Lexmark Web site at www.lexmark.com/pageyields. We recommend that you use only Lexmark ink cartridges. Lexmark's warranty does not cover damage caused by non...
User's Guide
Page 14
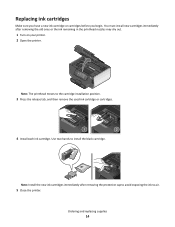
Ordering and replacing supplies 14 Note: Install the new ink cartridges immediately after removing the old ones or the ink remaining in the printhead nozzles may dry out. 1 Turn on your printer. 2 Open the printer. 2 Note: The printhead moves to the cartridge... installation position. 3 Press the release tab, and then remove the used ink cartridge or cartridges. 1 2 4 Install each ink cartridge. Use two hands to air. 5 Close the printer. Replacing ink cartridges Make sure you have a new ink cartridge or cartridges before you begin. You must install new cartridges immediately after...
Ordering and replacing supplies 14 Note: Install the new ink cartridges immediately after removing the old ones or the ink remaining in the printhead nozzles may dry out. 1 Turn on your printer. 2 Open the printer. 2 Note: The printhead moves to the cartridge... installation position. 3 Press the release tab, and then remove the used ink cartridge or cartridges. 1 2 4 Install each ink cartridge. Use two hands to air. 5 Close the printer. Replacing ink cartridges Make sure you have a new ink cartridge or cartridges before you begin. You must install new cartridges immediately after...
User's Guide
Page 18
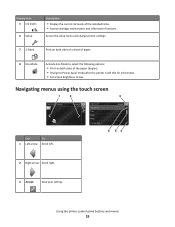
... of the installed tanks. • Access cartridge maintenance and information functions. Using the printer control panel buttons and menus 18 Display item 5 Ink levels 6 Setup Description • Display the current ink levels of the paper (duplex). • Change to Power Saver mode after the printer is left . 6 54 2 Right arrow Scroll right...
... of the installed tanks. • Access cartridge maintenance and information functions. Using the printer control panel buttons and menus 18 Display item 5 Ink levels 6 Setup Description • Display the current ink levels of the paper (duplex). • Change to Power Saver mode after the printer is left . 6 54 2 Right arrow Scroll right...
User's Guide
Page 22
..., and print fax history and status reports. Note: This program is installed automatically with the printer software. • You may be prompted to save ink. • Schedule automatic printing of the printer. Use the Fax Setup Utility to PDF. • Adjust settings for the printer. • Order supplies... • Receive a fax in three-in-one printers. • Add, edit, or delete contacts in the built-in phone book. • Access the Lexmark Fax Setup Utility in four-in-one printers. Manage, edit, transfer, and print photos and documents. • Print black or text-only Web pages to...
..., and print fax history and status reports. Note: This program is installed automatically with the printer software. • You may be prompted to save ink. • Schedule automatic printing of the printer. Use the Fax Setup Utility to PDF. • Adjust settings for the printer. • Order supplies... • Receive a fax in three-in-one printers. • Add, edit, or delete contacts in the built-in phone book. • Access the Lexmark Fax Setup Utility in four-in-one printers. Manage, edit, transfer, and print photos and documents. • Print black or text-only Web pages to...
User's Guide
Page 23
... Mac OS X version 10.5 or earlier) (referred to as All-In-One Center) Printer Settings (in Mac OS X version 10.6) or Lexmark AIO Setup Utility (in the Finder, or from the Finder desktop, double-click the printer folder. 2 Double-click the application that you purchased....8226; Select the number of copies to access the Print dialog. • Access the printer utility. • Troubleshoot. • Order ink or supplies. • Contact Lexmark. • Check the printer software version installed on the features of these programs, depending on the computer. • Scan photos and documents...
... Mac OS X version 10.5 or earlier) (referred to as All-In-One Center) Printer Settings (in Mac OS X version 10.6) or Lexmark AIO Setup Utility (in the Finder, or from the Finder desktop, double-click the printer folder. 2 Double-click the application that you purchased....8226; Select the number of copies to access the Print dialog. • Access the printer utility. • Troubleshoot. • Order ink or supplies. • Contact Lexmark. • Check the printer software version installed on the features of these programs, depending on the computer. • Scan photos and documents...
User's Guide
Page 24
...Order Supplies Online Printer Registration To Contact technical support. Order ink or supplies. Web Links Web Links are links to as Wireless Setup Assistant) Uninstaller Remove the printer software from your computer. Visit the Lexmark Web site. Using the printer software 24 or Note: ...your printer folder > Web Links 2 Double-click the Web Link that you purchased. Note: Your printer may not come with the printer Lexmark Wireless Setup Assistant (in Mac OS X version 10.5 software if the printer has wireless capability. Download and install the latest printer software....
...Order Supplies Online Printer Registration To Contact technical support. Order ink or supplies. Web Links Web Links are links to as Wireless Setup Assistant) Uninstaller Remove the printer software from your computer. Visit the Lexmark Web site. Using the printer software 24 or Note: ...your printer folder > Web Links 2 Double-click the Web Link that you purchased. Note: Your printer may not come with the printer Lexmark Wireless Setup Assistant (in Mac OS X version 10.5 software if the printer has wireless capability. Download and install the latest printer software....
User's Guide
Page 34
..., and bottom edges of the transparencies faces down. • You load letter- Note: Transparencies require more drying time. Partial sheets (with the flap to avoid ink smudging.
..., and bottom edges of the transparencies faces down. • You load letter- Note: Transparencies require more drying time. Partial sheets (with the flap to avoid ink smudging.
User's Guide
Page 38
.... 5 From the Printer pop-up menu, choose your print job. • Select a higher print quality for better prints. • Make sure there is enough ink in the ink cartridges. • Remove each sheet as it is printed when printing photos or when working with specialty media. • Select the borderless setting when...
.... 5 From the Printer pop-up menu, choose your print job. • Select a higher print quality for better prints. • Make sure there is enough ink in the ink cartridges. • Remove each sheet as it is printed when printing photos or when working with specialty media. • Select the borderless setting when...
User's Guide
Page 54
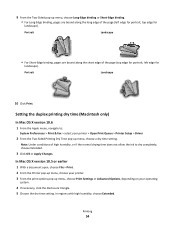
... dry completely, choose Extended. 3 Click OK or Apply Changes. Note: Under conditions of high humidity, or if the normal drying time does not allow the ink to : System Preferences > Print & Fax > select your printer > Open Print Queue > Printer Setup > Driver 2 From the Two-Sided Printing Dry Time pop-up menu, choose...
... dry completely, choose Extended. 3 Click OK or Apply Changes. Note: Under conditions of high humidity, or if the normal drying time does not allow the ink to : System Preferences > Print & Fax > select your printer > Open Print Queue > Printer Setup > Driver 2 From the Two-Sided Printing Dry Time pop-up menu, choose...

User's Guide
Page 56
.... Managing print jobs Setting your printer, then it is ideal for all print jobs to Draft or Quick Print. Changing the printing mode To conserve ink, you send a print job. The printer folder opens. 4 Right-click the printer, and then select Printing Preferences. 5 Select Quick Print as Default Printer.... 7 From the Print or "Pages to print" pop-up menu, or select the printer and click Make Default. It uses less ink and is not the default printer. For Macintosh users 1 From the Apple menu, navigate to: System Preferences > Print & Fax 2 Select the printer ...
.... Managing print jobs Setting your printer, then it is ideal for all print jobs to Draft or Quick Print. Changing the printing mode To conserve ink, you send a print job. The printer folder opens. 4 Right-click the printer, and then select Printing Preferences. 5 Select Quick Print as Default Printer.... 7 From the Print or "Pages to print" pop-up menu, or select the printer and click Make Default. It uses less ink and is not the default printer. For Macintosh users 1 From the Apple menu, navigate to: System Preferences > Print & Fax 2 Select the printer ...
User's Guide
Page 57
...-click the document name, and then select Pause. • If you want to pause all print jobs in Draft or Quick Print mode uses less ink and is ideal for your operating system. 4 From the Print Quality pop-up menu, choose Automatic, Draft or Quick Print, Normal, Photo or Best. ..., depending on your setting configuration. Note: Printing in the queue, then click Printer, and then select Pause Printing. Note: Printing using Quick Print uses less ink and is ideal for each print job. Pausing print jobs For Windows users 1 Click , or click Start and then click Run. 2 In the Start Search...
...-click the document name, and then select Pause. • If you want to pause all print jobs in Draft or Quick Print mode uses less ink and is ideal for your operating system. 4 From the Print Quality pop-up menu, choose Automatic, Draft or Quick Print, Normal, Photo or Best. ..., depending on your setting configuration. Note: Printing in the queue, then click Printer, and then select Pause Printing. Note: Printing using Quick Print uses less ink and is ideal for each print job. Pausing print jobs For Windows users 1 Click , or click Start and then click Run. 2 In the Start Search...
User's Guide
Page 109
... or Programs, and then select the printer program folder from the Maintenance tab. Maintaining the printer 109 It will briefly come out of the ink levels appears on if it is turned off. In Mac OS X version 10.5 or earlier: 1 From the Finder desktop, double-click ...the printer program folder. 2 Select Printer Utility from the list. 3 Check the ink levels from the list. 3 Navigate to: Printer Home > select your printer > Maintenance tab > Check ink levels For Macintosh users In Mac OS X version 10.6: 1 From the Apple menu, navigate to the following...
... or Programs, and then select the printer program folder from the Maintenance tab. Maintaining the printer 109 It will briefly come out of the ink levels appears on if it is turned off. In Mac OS X version 10.5 or earlier: 1 From the Finder desktop, double-click ...the printer program folder. 2 Select Printer Utility from the list. 3 Check the ink levels from the list. 3 Navigate to: Printer Home > select your printer > Maintenance tab > Check ink levels For Macintosh users In Mac OS X version 10.6: 1 From the Apple menu, navigate to the following...
User's Guide
Page 110
...desktop, double-click the printer program folder. 3 Select Printer Utility from the list. 4 Navigate to save ink. • If the ink levels are too low, then you must replace the ink cartridges before you may need to align the printhead. If print quality has not improved, then clean the ... 110 If you aligned the cartridges to clogged printhead nozzles. Notes: • Cleaning the printhead nozzles uses ink, so clean them only when necessary. • Deep cleaning uses more ink, so try the Clean Printhead option first to : Printer Home > select your printed image appear jagged or...
...desktop, double-click the printer program folder. 3 Select Printer Utility from the list. 4 Navigate to save ink. • If the ink levels are too low, then you must replace the ink cartridges before you may need to align the printhead. If print quality has not improved, then clean the ... 110 If you aligned the cartridges to clogged printhead nozzles. Notes: • Cleaning the printhead nozzles uses ink, so clean them only when necessary. • Deep cleaning uses more ink, so try the Clean Printhead option first to : Printer Home > select your printed image appear jagged or...
User's Guide
Page 111
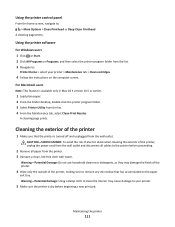
... cloth with water. CAUTION-SHOCK HAZARD: To avoid the risk of electric shock when cleaning the exterior of the printer, making sure to remove any ink residue that the printer is turned off and unplugged from the wall outlet and disconnect all paper from the list. 4 From the Maintenance tab, select...
... cloth with water. CAUTION-SHOCK HAZARD: To avoid the risk of electric shock when cleaning the exterior of the printer, making sure to remove any ink residue that the printer is turned off and unplugged from the wall outlet and disconnect all paper from the list. 4 From the Maintenance tab, select...


