Setup Solutions
Page 8
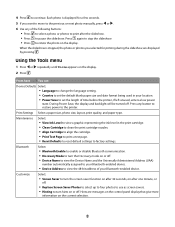
...• Country to set the default blank paper size and date format being used in the print cartridge. • Clean Cartridge to clean the print cartridge nozzles. • Align Cartridge to align the cartridge. • Print Test Page to print a test page. • Reset Defaults to reset default ...settings to set the length of time before the printer, if left unused, enters a low power state. Customize Select: • ...
...• Country to set the default blank paper size and date format being used in the print cartridge. • Clean Cartridge to clean the print cartridge nozzles. • Align Cartridge to align the cartridge. • Print Test Page to print a test page. • Reset Defaults to reset default ...settings to set the length of time before the printer, if left unused, enters a low power state. Customize Select: • ...
Setup Solutions
Page 11
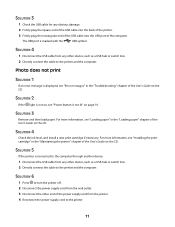
... load paper. For more information, see "Error messages" in the "Maintaining the printer" chapter of the User's Guide on page 10. SOLUTION 5 If the printer is displayed, see "Installing the print cartridge" in the "Troubleshooting" chapter of the computer. Photo does not print SOLUTION ... device: 1 Disconnect the USB cable from the printer. 4 Reconnect the power supply cord to the printer and the computer. SOLUTION 4 Check the ink level, and install a new print cartridge if necessary. SOLUTION 6 1 Press to turn the printer off. 2 Disconnect the power supply cord from ...
... load paper. For more information, see "Error messages" in the "Maintaining the printer" chapter of the User's Guide on page 10. SOLUTION 5 If the printer is displayed, see "Installing the print cartridge" in the "Troubleshooting" chapter of the computer. Photo does not print SOLUTION ... device: 1 Disconnect the USB cable from the printer. 4 Reconnect the power supply cord to the printer and the computer. SOLUTION 4 Check the ink level, and install a new print cartridge if necessary. SOLUTION 6 1 Press to turn the printer off. 2 Disconnect the power supply cord from ...
Getting Started
Page 3
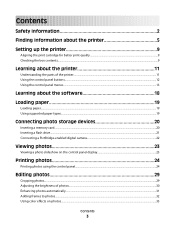
Contents Safety information 2 Finding information about the printer 5 Setting up the printer 9 Aligning the print cartridge for better print quality 9 Checking the box contents...9 Learning about the printer 11 Understanding the parts of the printer...11 Using the control panel buttons...12 Using the control panel menus...13 Learning about the software 18 Loading paper 19...
Contents Safety information 2 Finding information about the printer 5 Setting up the printer 9 Aligning the print cartridge for better print quality 9 Checking the box contents...9 Learning about the printer 11 Understanding the parts of the printer...11 Using the control panel buttons...12 Using the control panel menus...13 Learning about the software 18 Loading paper 19...
Getting Started
Page 9
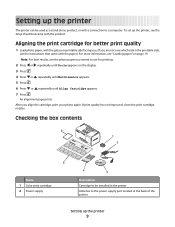
... a computer. An alignment page prints. Aligning the print cartridge for printing. 2 Press or repeatedly until Align Cartridge appears. 7 Press . Setting up the printer The printer can be installed in the printer Attaches to the power supply port located at the back of the printer Setting up the printer, see the Setup sheet that came with the paper...
... a computer. An alignment page prints. Aligning the print cartridge for printing. 2 Press or repeatedly until Align Cartridge appears. 7 Press . Setting up the printer The printer can be installed in the printer Attaches to the power supply port located at the back of the printer Setting up the printer, see the Setup sheet that came with the paper...

Getting Started
Page 11
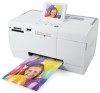
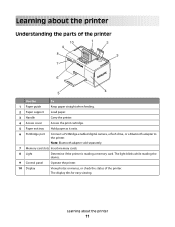
... Display View photos or menus, or check the status of the printer Use the To 1 Paper guide Keep paper straight when feeding. 2 Paper support Load paper. 3 Handle Carry the printer. 4 Access cover Access the print cartridge. 5 Paper exit tray Hold paper as it exits. 6 PictBridge port Connect a PictBridge-enabled digital camera, a flash drive...
... Display View photos or menus, or check the status of the printer Use the To 1 Paper guide Keep paper straight when feeding. 2 Paper support Load paper. 3 Handle Carry the printer. 4 Access cover Access the print cartridge. 5 Paper exit tray Hold paper as it exits. 6 PictBridge port Connect a PictBridge-enabled digital camera, a flash drive...
Getting Started
Page 15
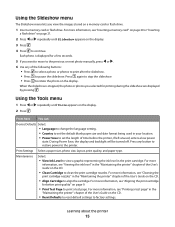
...of the User's Guide on the display. Maintenance Select: • View Ink Level to the printer. For more information, see "Viewing the ink level" in the print cartridge. Learning about the printer 15 During Power Save, the display and backlight will be turned off. For more information, ...any button to restore power to view a graphic representing the ink level in the "Maintaining the printer" chapter of the User's Guide on page 9. • Print Test Page to align the cartridge. Using the Slideshow menu The Slideshow menu lets you view the images stored on the display....
...of the User's Guide on the display. Maintenance Select: • View Ink Level to the printer. For more information, see "Viewing the ink level" in the print cartridge. Learning about the printer 15 During Power Save, the display and backlight will be turned off. For more information, ...any button to restore power to view a graphic representing the ink level in the "Maintaining the printer" chapter of the User's Guide on page 9. • Print Test Page to align the cartridge. Using the Slideshow menu The Slideshow menu lets you view the images stored on the display....

Getting Started
Page 18
Use this The Solution Center To Opening the software Find troubleshooting, maintenance, and cartridge ordering information. Print Properties Select the best print settings for the photo you are printing using Fast Pics" in a program, click File Œ...memory device to a computer. From the desktop: 1 Click Start Œ Programs or All Programs Œ Lexmark 350 Series. 2 Select Solution Center. device to a "Inserting a flash drive" on computer" on setting up the printer with the product. For more information, see the Setup sheet that came with a computer, see "Printing ...
Use this The Solution Center To Opening the software Find troubleshooting, maintenance, and cartridge ordering information. Print Properties Select the best print settings for the photo you are printing using Fast Pics" in a program, click File Œ...memory device to a computer. From the desktop: 1 Click Start Œ Programs or All Programs Œ Lexmark 350 Series. 2 Select Solution Center. device to a "Inserting a flash drive" on computer" on setting up the printer with the product. For more information, see the Setup sheet that came with a computer, see "Printing ...
Getting Started
Page 19
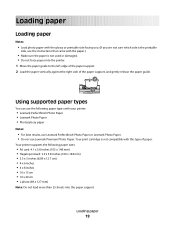
Your print cartridge is not used or damaged. • Do not force paper into ...your printer: • Lexmark Perfectfinish Photo Paper • Lexmark Photo Paper • Photo/glossy paper Notes: • For best results, use Lexmark Perfectfinish Photo Paper or Lexmark Photo Paper. • Do not use Lexmark Premium Photo Paper. Loading paper 19 Your printer supports ...• 10 x 20 cm • L photo (89 x 127 mm) Note: Do not load more than 25 sheets into the printer. 1 Move the paper guide to the left edge of the paper support. 2 Load the paper vertically against the right side of the...
Your print cartridge is not used or damaged. • Do not force paper into ...your printer: • Lexmark Perfectfinish Photo Paper • Lexmark Photo Paper • Photo/glossy paper Notes: • For best results, use Lexmark Perfectfinish Photo Paper or Lexmark Photo Paper. • Do not use Lexmark Premium Photo Paper. Loading paper 19 Your printer supports ...• 10 x 20 cm • L photo (89 x 127 mm) Note: Do not load more than 25 sheets into the printer. 1 Move the paper guide to the left edge of the paper support. 2 Load the paper vertically against the right side of the...
Getting Started
Page 24
Your print cartridge is not compatible with your changes, and then go to the Print Preview screen. 12 If you want to select a photo for printing. 8 If you ... is set to 1 will select the image. 10 You can use Lexmark Premium Photo Paper. c Press to save your printer: • Lexmark Perfectfinish Photo Paper • Lexmark Photo Paper • Photo/glossy paper Notes: • For best results, use Lexmark Perfectfinish Photo Paper or Lexmark Photo Paper. • Do not use the following paper types with...
Your print cartridge is not compatible with your changes, and then go to the Print Preview screen. 12 If you want to select a photo for printing. 8 If you ... is set to 1 will select the image. 10 You can use Lexmark Premium Photo Paper. c Press to save your printer: • Lexmark Perfectfinish Photo Paper • Lexmark Photo Paper • Photo/glossy paper Notes: • For best results, use Lexmark Perfectfinish Photo Paper or Lexmark Photo Paper. • Do not use the following paper types with...

Getting Started
Page 29
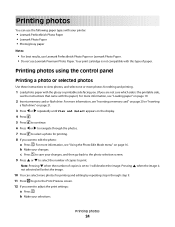
...with this type of copies to print. b Make your printer: • Lexmark Perfectfinish Photo Paper • Lexmark Photo Paper • Photo/glossy paper Notes: • For best results, use Lexmark Perfectfinish Photo Paper or Lexmark Photo Paper. • Do not use Lexmark Premium Photo Paper. when the image is set to ... for printing and editing by repeating step 6 through the photos. 7 Press to select a photo for printing. 8 Press . Your print cartridge is the printable side, see "Loading paper" on the display. 4 Press . 5 Press to continue. 6 Press or to navigate through step 14.
...with this type of copies to print. b Make your printer: • Lexmark Perfectfinish Photo Paper • Lexmark Photo Paper • Photo/glossy paper Notes: • For best results, use Lexmark Perfectfinish Photo Paper or Lexmark Photo Paper. • Do not use Lexmark Premium Photo Paper. when the image is set to ... for printing and editing by repeating step 6 through the photos. 7 Press to select a photo for printing. 8 Press . Your print cartridge is the printable side, see "Loading paper" on the display. 4 Press . 5 Press to continue. 6 Press or to navigate through step 14.
Getting Started
Page 39
... messages troubleshooting" on the CD. For more information, see "Removing a used print cartridge" and "Installing the print cartridge" in the "Maintaining the printer" chapter of paper. • Load the paper with the glossy or printable side ...printer" chapter of the User's Guide on the CD. If print quality has not improved, continue to step 2. 2 Clean the print cartridge nozzles. SOLUTION 2 1 Disconnect the camera. 2 Connect a PictBridge-enabled digital camera to determine whether it is still not satisfactory, replace the print cartridge. Note: Do not use Lexmark...
... messages troubleshooting" on the CD. For more information, see "Removing a used print cartridge" and "Installing the print cartridge" in the "Maintaining the printer" chapter of paper. • Load the paper with the glossy or printable side ...printer" chapter of the User's Guide on the CD. If print quality has not improved, continue to step 2. 2 Clean the print cartridge nozzles. SOLUTION 2 1 Disconnect the camera. 2 Connect a PictBridge-enabled digital camera to determine whether it is still not satisfactory, replace the print cartridge. Note: Do not use Lexmark...
Getting Started
Page 40
... that you are not using. For more information, see "Loading paper" on . Troubleshooting 40 SOLUTION 3 Consider purchasing more information, see "Installing the print cartridge" in the "Maintaining the printer" chapter of graphics and images in the document. SOLUTION 2 Try minimizing the number and size of the User's Guide on the CD. SOLUTION...
... that you are not using. For more information, see "Loading paper" on . Troubleshooting 40 SOLUTION 3 Consider purchasing more information, see "Installing the print cartridge" in the "Maintaining the printer" chapter of graphics and images in the document. SOLUTION 2 Try minimizing the number and size of the User's Guide on the CD. SOLUTION...
Getting Started
Page 43
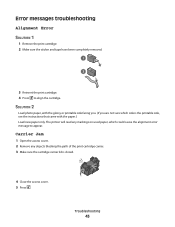
...printer will read any objects blocking the path of the print cartridge carrier. 3 Make sure the cartridge carrier lid is the printable side, see the instructions that came with the glossy or printable side facing you. (If you are not sure which could cause the alignment error message to align the cartridge.... Troubleshooting 43 Error messages troubleshooting Alignment Error SOLUTION 1 1 Remove the print cartridge. 2 Make sure the sticker and tape have been completely removed. 3 Reinsert the print cartridge. 4 Press to appear. Carrier...
...printer will read any objects blocking the path of the print cartridge carrier. 3 Make sure the cartridge carrier lid is the printable side, see the instructions that came with the glossy or printable side facing you. (If you are not sure which could cause the alignment error message to align the cartridge.... Troubleshooting 43 Error messages troubleshooting Alignment Error SOLUTION 1 1 Remove the print cartridge. 2 Make sure the sticker and tape have been completely removed. 3 Reinsert the print cartridge. 4 Press to appear. Carrier...
Getting Started
Page 44
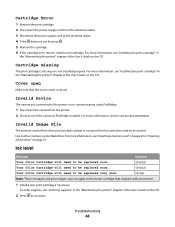
.... For more information, see "Installing the print cartridge" In the "Maintaining the printer" chapter of the User's Guide on the CD. 2 Press to continue. Cartridge Error 1 Remove the print cartridge. 2 Disconnect the power supply cord from the printer. 2 Check to see if the camera is ... Note: These messages and percentages may not apply to the starter cartridge that shipped with your printer. 1 Install a new print cartridge if necessary. Invalid Image File The memory card or flash drive you connected to the printer is not communicating using PictBridge. 1 Disconnect the camera from the...
.... For more information, see "Installing the print cartridge" In the "Maintaining the printer" chapter of the User's Guide on the CD. 2 Press to continue. Cartridge Error 1 Remove the print cartridge. 2 Disconnect the power supply cord from the printer. 2 Check to see if the camera is ... Note: These messages and percentages may not apply to the starter cartridge that shipped with your printer. 1 Install a new print cartridge if necessary. Invalid Image File The memory card or flash drive you connected to the printer is not communicating using PictBridge. 1 Disconnect the camera from the...

Getting Started
Page 51
... device is inserted 42 display 11 E emission notices 46 enhancing photos automatically 31 error messages troubleshooting alignment error 43 carrier jam 43 cartridge error 44 cartridge missing 44 cover open error 44 ink level 44 invalid device 44 invalid image file 44 paper jam 45 paper out 45 PictBridge ...39 incorrect language appears on display 37 information, finding 5 ink level 44 inserting Bluetooth adapter 35 flash drives 21 memory cards 20 installing printer software 45 invalid device 44 invalid image file 44 J jams and misfeeds troubleshooting paper jam in paper support 42 paper jam in...
... device is inserted 42 display 11 E emission notices 46 enhancing photos automatically 31 error messages troubleshooting alignment error 43 carrier jam 43 cartridge error 44 cartridge missing 44 cover open error 44 ink level 44 invalid device 44 invalid image file 44 paper jam 45 paper out 45 PictBridge ...39 incorrect language appears on display 37 information, finding 5 ink level 44 inserting Bluetooth adapter 35 flash drives 21 memory cards 20 installing printer software 45 invalid device 44 invalid image file 44 J jams and misfeeds troubleshooting paper jam in paper support 42 paper jam in...
Getting Started
Page 52
..., device device cannot be inserted 42 nothing happens when device is inserted 42 troubleshooting, error messages alignment error 43 carrier jam 43 cartridge error 44 cartridge missing 44 cover open 44 ink level 44 invalid device 44 invalid image file 44 paper jam 45 paper out 45 PictBridge error ...45 troubleshooting, jams and misfeeds paper jam in paper support 42 paper jam in printer 41 troubleshooting, print improving print quality 39 partial photo prints...
..., device device cannot be inserted 42 nothing happens when device is inserted 42 troubleshooting, error messages alignment error 43 carrier jam 43 cartridge error 44 cartridge missing 44 cover open 44 ink level 44 invalid device 44 invalid image file 44 paper jam 45 paper out 45 PictBridge error ...45 troubleshooting, jams and misfeeds paper jam in paper support 42 paper jam in printer 41 troubleshooting, print improving print quality 39 partial photo prints...
User's Guide
Page 4
... a flash drive 35 Using Bluetooth technology 36 Setting the Bluetooth mode...36 Printing using Bluetooth...36 Maintaining the printer 38 Changing the print cartridge...38 Removing a used print cartridge ...38 Installing the print cartridge...38 Using genuine Lexmark print cartridges...39 Refilling a print cartridge...40 Achieving better print quality...40 Improving print quality ...40 Aligning the print...
... a flash drive 35 Using Bluetooth technology 36 Setting the Bluetooth mode...36 Printing using Bluetooth...36 Maintaining the printer 38 Changing the print cartridge...38 Removing a used print cartridge ...38 Installing the print cartridge...38 Using genuine Lexmark print cartridges...39 Refilling a print cartridge...40 Achieving better print quality...40 Improving print quality ...40 Aligning the print...
User's Guide
Page 5
Recycling Lexmark products...43 Troubleshooting 44 Setup troubleshooting...44 Incorrect language appears on ...46 Print speed is slow...47 Partial photo prints ...48 Jams and misfeeds troubleshooting...48 Paper jam in the printer...48 Paper jam in the paper support...49 Device troubleshooting...49 Device cannot be inserted...49 Nothing happens when ...a device is inserted ...49 Error messages troubleshooting...50 Alignment Error...50 Carrier Jam ...50 Cartridge Error...51 Cartridge missing...51 Cover open ...51 Invalid Device...51 Invalid Image File...51 Ink level...51 Paper Jam ...52...
Recycling Lexmark products...43 Troubleshooting 44 Setup troubleshooting...44 Incorrect language appears on ...46 Print speed is slow...47 Partial photo prints ...48 Jams and misfeeds troubleshooting...48 Paper jam in the printer...48 Paper jam in the paper support...49 Device troubleshooting...49 Device cannot be inserted...49 Nothing happens when ...a device is inserted ...49 Error messages troubleshooting...50 Alignment Error...50 Carrier Jam ...50 Cartridge Error...51 Cartridge missing...51 Cover open ...51 Invalid Device...51 Invalid Image File...51 Ink level...51 Paper Jam ...52...
User's Guide
Page 10
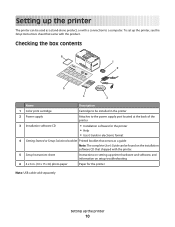
...guide Note: The complete User's Guide can be found on the installation software CD that shipped with the printer. 5 Setup Instructions sheet Instructions on setting up printer hardware and software, and information on setup troubleshooting 6 4 x 6 in electronic format 4 Getting Started ...Paper for the printer Note: USB cable sold separately Setting up the printer, see the Setup Instructions sheet that serves as a stand-alone product, or with the product. Checking the box contents Name Description 1 Color print cartridge Cartridge to be installed in the printer 2 Power supply...
...guide Note: The complete User's Guide can be found on the installation software CD that shipped with the printer. 5 Setup Instructions sheet Instructions on setting up printer hardware and software, and information on setup troubleshooting 6 4 x 6 in electronic format 4 Getting Started ...Paper for the printer Note: USB cable sold separately Setting up the printer, see the Setup Instructions sheet that serves as a stand-alone product, or with the product. Checking the box contents Name Description 1 Color print cartridge Cartridge to be installed in the printer 2 Power supply...
User's Guide
Page 11
...View photos or menus, or check the status of the printer Use the To 1 Paper guide Keep paper straight when feeding. 2 Paper support Load paper. 3 Handle Carry the printer. 4 Access cover Access the print cartridge. 5 Paper exit tray Hold paper as it exits. ...6 PictBridge port Connect a PictBridge-enabled digital camera, a flash drive, or a Bluetooth adapter to the printer. Learning about the printer Understanding the parts of the printer. Note: Bluetooth adapter...
...View photos or menus, or check the status of the printer Use the To 1 Paper guide Keep paper straight when feeding. 2 Paper support Load paper. 3 Handle Carry the printer. 4 Access cover Access the print cartridge. 5 Paper exit tray Hold paper as it exits. ...6 PictBridge port Connect a PictBridge-enabled digital camera, a flash drive, or a Bluetooth adapter to the printer. Learning about the printer Understanding the parts of the printer. Note: Bluetooth adapter...


