User's Guide (2 MB)
Page 11
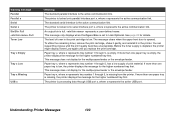
... indicate printer failures that give more information about the current state of the printer. • Attendance messages report printer errors that you that the print cartridge is processing or printing, the Busy status message displays on the first line of the operator panel. When the Ready status message displays, the printer...
... indicate printer failures that give more information about the current state of the printer. • Attendance messages report printer errors that you that the print cartridge is processing or printing, the Busy status message displays on the first line of the operator panel. When the Ready status message displays, the printer...

User's Guide (2 MB)
Page 12
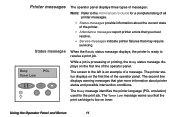
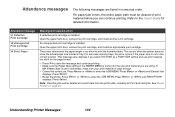
Service messages 917 Service Transfer Roll A service message indicates a printer failure that may require a service call. Attendance messages 201 Paper Jam Remove Cartridge Attendance messages help you solve printer problems. For example, if print material is jammed in the printer, the message 201 Paper Jam displays. Using the Operator Panel and Menus 12
Service messages 917 Service Transfer Roll A service message indicates a printer failure that may require a service call. Attendance messages 201 Paper Jam Remove Cartridge Attendance messages help you solve printer problems. For example, if print material is jammed in the printer, the message 201 Paper Jam displays. Using the Operator Panel and Menus 12
User's Guide (2 MB)
Page 22
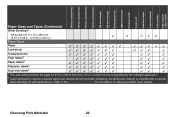
...the page for information on obtaining a label fuser cleaner. Choosing Print Materials 22 Refer to 176 x 250 mm (3.87 x 6.38 in. T616(n) standard tray T614(n) standard tray T612(n) standard tray T610(n) standard tray 250-sheet drawer 500-sheet drawer Multipurpose tray 2000-sheet drawer Envelope ...to the Administrator's Guide for 215.9 x 355.6 mm (8.5 x 14 in.) unless the size is included with a special label cartridge for label applications. the label fuser cleaner is specified by the software application. 2 Label applications require a special label fuser cleaner which precludes ...
...the page for information on obtaining a label fuser cleaner. Choosing Print Materials 22 Refer to 176 x 250 mm (3.87 x 6.38 in. T616(n) standard tray T614(n) standard tray T612(n) standard tray T610(n) standard tray 250-sheet drawer 500-sheet drawer Multipurpose tray 2000-sheet drawer Envelope ...to the Administrator's Guide for 215.9 x 355.6 mm (8.5 x 14 in.) unless the size is included with a special label cartridge for label applications. the label fuser cleaner is specified by the software application. 2 Label applications require a special label fuser cleaner which precludes ...

User's Guide (2 MB)
Page 35
...'s Guide for detailed information about these settings). • Do not load labels together with adhesive, and could void your printer and cartridge warranties. • Avoid using labels that may release hazardous emissions when heated. combining print materials can cause feeding problems. • ...Do not load partial sheets with laser printers. These labels are one of your printer and your cartridge with paper or transparencies in a paper jam and contamination of the most difficult print materials for use with areas exposed by missing...
...'s Guide for detailed information about these settings). • Do not load labels together with adhesive, and could void your printer and cartridge warranties. • Avoid using labels that may release hazardous emissions when heated. combining print materials can cause feeding problems. • ...Do not load partial sheets with laser printers. These labels are one of your printer and your cartridge with paper or transparencies in a paper jam and contamination of the most difficult print materials for use with areas exposed by missing...
User's Guide (2 MB)
Page 36
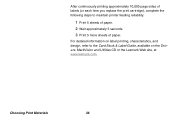
For detailed information on the Drivers, MarkVision and Utilities CD or the Lexmark Web site, at www.lexmark.com. Choosing Print Materials 36 After continuously printing approximately 10,000 page sides of labels (or each time you replace the print cartridge), complete the following steps to the Card Stock & Label Guide, available on label printing, characteristics, and design, refer to maintain printer feeding reliability: 1 Print 5 sheets of paper. 2 Wait approximately 5 seconds. 3 Print 5 more sheets of paper.
For detailed information on the Drivers, MarkVision and Utilities CD or the Lexmark Web site, at www.lexmark.com. Choosing Print Materials 36 After continuously printing approximately 10,000 page sides of labels (or each time you replace the print cartridge), complete the following steps to the Card Stock & Label Guide, available on label printing, characteristics, and design, refer to maintain printer feeding reliability: 1 Print 5 sheets of paper. 2 Wait approximately 5 seconds. 3 Print 5 more sheets of paper.

User's Guide (2 MB)
Page 38
Choosing Print Materials 38 For more information, refer to maintain printer feeding reliability: 1 Print 5 sheets of paper. 2 Wait approximately 5 seconds. 3 Print 5 more sheets of paper. After printing approximately 10,000 page sides of card stock (or each time you replace the print cartridge), complete the following steps to the Card Stock & Label Guide, available on the Drivers, MarkVision and Utilities CD or the Lexmark Web site, at www.lexmark.com.
Choosing Print Materials 38 For more information, refer to maintain printer feeding reliability: 1 Print 5 sheets of paper. 2 Wait approximately 5 seconds. 3 Print 5 more sheets of paper. After printing approximately 10,000 page sides of card stock (or each time you replace the print cartridge), complete the following steps to the Card Stock & Label Guide, available on the Drivers, MarkVision and Utilities CD or the Lexmark Web site, at www.lexmark.com.
User's Guide (2 MB)
Page 72
...the printer, so you need to reach in the area under the print cartridge. CAUTION: The rear portion of the inside of the printer. 2 While grasping the print cartridge by the hand grip, pull the print cartridge up toward you must clear all paper from the printer. Clearing Jams 72... Lay it straight out toward the upper front door, and then pull it aside. This requires removing the print cartridge from the paper path. 1 Open the upper and lower front doors of the printer is jammed in farther to light for extended periods. ...
...the printer, so you need to reach in the area under the print cartridge. CAUTION: The rear portion of the inside of the printer. 2 While grasping the print cartridge by the hand grip, pull the print cartridge up toward you must clear all paper from the printer. Clearing Jams 72... Lay it straight out toward the upper front door, and then pull it aside. This requires removing the print cartridge from the paper path. 1 Open the upper and lower front doors of the printer is jammed in farther to light for extended periods. ...
User's Guide (2 MB)
Page 73
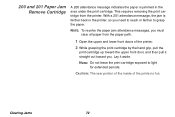
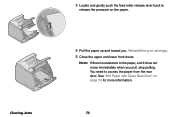
Clearing Jams 3 Locate and gently push the feed roller release lever back to release the pressure on page 74 for more information. 73 You need to the paper, and it does not move immediately when you . See "202 Paper Jam Open Rear Door" on the paper. 4 Pull the paper up and toward you pull, stop pulling. NOTE: If there is resistance to access the paper from the rear door. Reinstall the print cartridge. 5 Close the upper and lower front doors.
Clearing Jams 3 Locate and gently push the feed roller release lever back to release the pressure on page 74 for more information. 73 You need to the paper, and it does not move immediately when you . See "202 Paper Jam Open Rear Door" on the paper. 4 Pull the paper up and toward you pull, stop pulling. NOTE: If there is resistance to access the paper from the rear door. Reinstall the print cartridge. 5 Close the upper and lower front doors.
User's Guide (2 MB)
Page 76
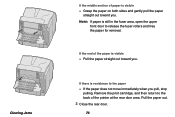
... you. If the end of the paper is resistance to the paper - Pull the paper straight out toward you pull, stop pulling. Remove the print cartridge, and then return to the back of the printer at the rear door area. Clearing Jams If the middle section of paper is still in...
... you. If the end of the paper is resistance to the paper - Pull the paper straight out toward you pull, stop pulling. Remove the print cartridge, and then return to the back of the printer at the rear door area. Clearing Jams If the middle section of paper is still in...
User's Guide (2 MB)
Page 82
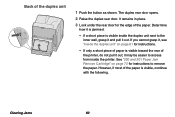
... the duplex unit" on page 72 for the edge of the duplex unit 1 Push the button as shown. See "200 and 201 Paper Jam Remove Cartridge" on page 81 for instructions. - If you cannot grasp it may be easier to access from inside the duplex unit next to remove the paper...
... the duplex unit" on page 72 for the edge of the duplex unit 1 Push the button as shown. See "200 and 201 Paper Jam Remove Cartridge" on page 81 for instructions. - If you cannot grasp it may be easier to access from inside the duplex unit next to remove the paper...

User's Guide (2 MB)
Page 89
Remove the print cartridge and look for the leading edge of the paper should be another jam under the print cartridge. NOTE: With this type of jam, there may be visible now. 5 Pull the paper in either direction, up or down. Remove any jammed paper and reinstall the print cartridge. Most of the paper. 4 Look for a paper jam. Clearing Jams 89 If it does not pull easily one way, try the other way. 6 Slide the paper tray back into the support unit.
Remove the print cartridge and look for the leading edge of the paper should be another jam under the print cartridge. NOTE: With this type of jam, there may be visible now. 5 Pull the paper in either direction, up or down. Remove any jammed paper and reinstall the print cartridge. Most of the paper. 4 Look for a paper jam. Clearing Jams 89 If it does not pull easily one way, try the other way. 6 Slide the paper tray back into the support unit.
User's Guide (2 MB)
Page 92
b Open the upper and lower front doors of the paper now. d Locate and gently push the feed roller release lever back to release the pressure on the paper. . You should see the edge of the paper in the integrated tray: a Push the integrated tray back into the printer. Clearing Jams 92 c Remove the print cartridge. e Pull the paper up and toward you do not see the leading edge of the printer. - If you .
b Open the upper and lower front doors of the paper now. d Locate and gently push the feed roller release lever back to release the pressure on the paper. . You should see the edge of the paper in the integrated tray: a Push the integrated tray back into the printer. Clearing Jams 92 c Remove the print cartridge. e Pull the paper up and toward you do not see the leading edge of the printer. - If you .

User's Guide (2 MB)
Page 93
f Reinstall the print cartridge: Align the slides on the print cartridge with the slots on the print cartridge cradle and use the colored arrows inside the printer for placement. tridge down as it drops and snaps into the printer. Clearing Jams 93 Guide the print car- h Slide the paper tray all the way into place. g Close the upper and lower front doors of the printer. .
f Reinstall the print cartridge: Align the slides on the print cartridge with the slots on the print cartridge cradle and use the colored arrows inside the printer for placement. tridge down as it drops and snaps into the printer. Clearing Jams 93 Guide the print car- h Slide the paper tray all the way into place. g Close the upper and lower front doors of the printer. .

User's Guide (2 MB)
Page 99
. Set it snaps into the opening until it aside. 7 Pull the envelope straight out toward you. NOTE: You may have to remove the print cartridge to the stack. 99 Clearing Jams 5 Open the upper front door of the printer. 6 Pull the envelope feeder up slightly and straight out of envelopes ... if needed. 12 Rotate the envelope weight and lower it to get the envelope out. See page page 93 for instructions on reinstalling the print cartridge. 8 Align the tabs on the envelope feeder with the slots on both sides of the printer and gently push the envelope feeder into place. 9 Close...
. Set it snaps into the opening until it aside. 7 Pull the envelope straight out toward you. NOTE: You may have to remove the print cartridge to the stack. 99 Clearing Jams 5 Open the upper front door of the printer. 6 Pull the envelope feeder up slightly and straight out of envelopes ... if needed. 12 Rotate the envelope weight and lower it to get the envelope out. See page page 93 for instructions on reinstalling the print cartridge. 8 Align the tabs on the envelope feeder with the slots on both sides of the printer and gently push the envelope feeder into place. 9 Close...
Setup Guide (1.4 MB)
Page 4
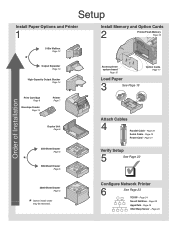
... 1 Install Memory and Option Cards 2 Printer/Flash Memory Page 16 5-Bin Mailbox Page 12 * Output Expander Page 10 High-Capacity Output Stacker Page 14 Print Cartridge Page 9 Envelope Feeder Page 14 Printer Page 7 Duplex Unit Page 6 250-Sheet Drawer Page 5 * 500-Sheet Drawer Page 5 Access printer system board Page 15 Load...
... 1 Install Memory and Option Cards 2 Printer/Flash Memory Page 16 5-Bin Mailbox Page 12 * Output Expander Page 10 High-Capacity Output Stacker Page 14 Print Cartridge Page 9 Envelope Feeder Page 14 Printer Page 7 Duplex Unit Page 6 250-Sheet Drawer Page 5 * 500-Sheet Drawer Page 5 Access printer system board Page 15 Load...
Setup Guide (1.4 MB)
Page 11
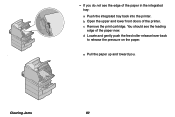
...door of the printer. 2 Grasp the print cartridge by the handgrip and pull the print cartridge up and out. 3 Pull on the print cartridge cradle. Install Paper Options and Printer 9 Use the colored arrows inside the printer for placement. 5 Guide the print cartridge down as it drops and snaps into place.... 6 Close the upper front door. Align the slides on the print cartridge with the slots on each end of the plastic, V-shaped piece and then pull...
...door of the printer. 2 Grasp the print cartridge by the handgrip and pull the print cartridge up and out. 3 Pull on the print cartridge cradle. Install Paper Options and Printer 9 Use the colored arrows inside the printer for placement. 5 Guide the print cartridge down as it drops and snaps into place.... 6 Close the upper front door. Align the slides on the print cartridge with the slots on each end of the plastic, V-shaped piece and then pull...
Setup Guide (1.4 MB)
Page 24
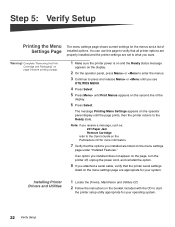
Warning! The message Printing Menu Settings appears on the second line of installed options. Complete "Removing the Print Cartridge and Packaging" on page 9 before printing a page. 1 Make sure the printer power is on and the Ready status message appears on the display. 2 On... printer returns to the User's Guide on the Publications CD for your system. Note: If you receive a message, such as: 201 Paper Jam Remove Cartridge refer to the Ready state. Installing Printer Drivers and Utilities 1 Locate the Drivers, MarkVision and Utilities CD. 2 Follow the instructions in the booklet included ...
Warning! The message Printing Menu Settings appears on the second line of installed options. Complete "Removing the Print Cartridge and Packaging" on page 9 before printing a page. 1 Make sure the printer power is on and the Ready status message appears on the display. 2 On... printer returns to the User's Guide on the Publications CD for your system. Note: If you receive a message, such as: 201 Paper Jam Remove Cartridge refer to the Ready state. Installing Printer Drivers and Utilities 1 Locate the Drivers, MarkVision and Utilities CD. 2 Follow the instructions in the booklet included ...
Setup Guide (1.4 MB)
Page 34
...have installed a maintenance kit as specified (if applicable) • use of printing media outside of Lexmark specifications • use of other than Lexmark supplies (such as toner cartridges, inkjet cartridges, and ribbons) • use of other economic consequential damages. NO WARRANTIES, EXPRESS OR IMPLIED, ... the exclusion or limitation of incidental or consequential damages. In no event will not apply to have other than Lexmark product or component ALL EXPRESS AND IMPLIED WARRANTIES, INCLUDING THE IMPLIED WARRANTIES OF MERCHANTABILITY AND FITNESS FOR A PARTICULAR PURPOSE...
...have installed a maintenance kit as specified (if applicable) • use of printing media outside of Lexmark specifications • use of other than Lexmark supplies (such as toner cartridges, inkjet cartridges, and ribbons) • use of other economic consequential damages. NO WARRANTIES, EXPRESS OR IMPLIED, ... the exclusion or limitation of incidental or consequential damages. In no event will not apply to have other than Lexmark product or component ALL EXPRESS AND IMPLIED WARRANTIES, INCLUDING THE IMPLIED WARRANTIES OF MERCHANTABILITY AND FITNESS FOR A PARTICULAR PURPOSE...
Administrator's Guide (1.4 MB)
Page 103
...defined name. See page 20 for the higher numbered tray first. To utilize the remaining toner, remove the print cartridge, shake it gently, and reinstall it in the print cartridge is missing, the printer displays the message for the higher numbered tray first. Paper tray x, where x represents ...The standard serial interface is low, the printer displays the message for details. You can repeat this process until you replace the print cartridge. The printer is locked onto serial interface port x, where x represents the active communication link. The printer is empty. The printer is...
...defined name. See page 20 for the higher numbered tray first. To utilize the remaining toner, remove the print cartridge, shake it gently, and reinstall it in the print cartridge is missing, the printer displays the message for the higher numbered tray first. Paper tray x, where x represents ...The standard serial interface is low, the printer displays the message for details. You can repeat this process until you replace the print cartridge. The printer is locked onto serial interface port x, where x represents the active communication link. The printer is empty. The printer is...
Administrator's Guide (1.4 MB)
Page 104
... Go to the User's Guide for the size print material you can continue printing. An unsupported print cartridge is installed. Open the upper front door, remove the print cartridge, and install an appropriate print cartridge. Refer to clear the message and continue printing. • Make sure the Paper Size setting in numerical... stop is set to print the formatted data. Attendance messages The following messages are using. Open the upper front door, remove the print cartridge, and install another print cartridge. If MP Feeder Size is not in tray. Press Menu> or or or or
... Go to the User's Guide for the size print material you can continue printing. An unsupported print cartridge is installed. Open the upper front door, remove the print cartridge, and install an appropriate print cartridge. Refer to clear the message and continue printing. • Make sure the Paper Size setting in numerical... stop is set to print the formatted data. Attendance messages The following messages are using. Open the upper front door, remove the print cartridge, and install another print cartridge. If MP Feeder Size is not in tray. Press Menu> or or or or

