Administrator's Guide (1.4 MB)
Page 103
...See page 20 for the multipurpose feeder or the envelope feeder. To utilize the remaining toner, remove the print cartridge, shake it gently, and reinstall it in the print cartridge is locked onto parallel interface port x, where x represents the active communication link. Before the toner supply is ...is full. This message does not display for the higher numbered tray first. You can repeat this process until you replace the print cartridge. An output bin is low, the printer displays the message for the multipurpose feeder or the envelope feeder. This message only displays...
...See page 20 for the multipurpose feeder or the envelope feeder. To utilize the remaining toner, remove the print cartridge, shake it gently, and reinstall it in the print cartridge is locked onto parallel interface port x, where x represents the active communication link. Before the toner supply is ...is full. This message does not display for the higher numbered tray first. You can repeat this process until you replace the print cartridge. An output bin is low, the printer displays the message for the multipurpose feeder or the envelope feeder. This message only displays...
Administrator's Guide (1.4 MB)
Page 104
...does not know the actual paper size loaded in numerical order. Attendance message 31 Defective Print Cartridge 32 Unsupported Print Cartridge 34 Short Paper Meaning and required action A defective print cartridge is not in the PAPER MENU is installed. For auto-size sensing trays, this error ...Refer to clear the message and continue printing. • Make sure the Paper Size setting in the correct position. An unsupported print cartridge is correct for detailed information. For paper jam errors, the entire paper path must be cleared of print material before you are listed...
...does not know the actual paper size loaded in numerical order. Attendance message 31 Defective Print Cartridge 32 Unsupported Print Cartridge 34 Short Paper Meaning and required action A defective print cartridge is not in the PAPER MENU is installed. For auto-size sensing trays, this error ...Refer to clear the message and continue printing. • Make sure the Paper Size setting in the correct position. An unsupported print cartridge is correct for detailed information. For paper jam errors, the entire paper path must be cleared of print material before you are listed...
Administrator's Guide (1.4 MB)
Page 113
...front door. A new copy of the page prints if Jam Recovery is visible, gently remove it to On or Auto. Reinstall the print cartridge and close the upper front door. Occasionally, print material may jam as it enters the duplex unit. Understanding Printer Messages 113 Attendance message ...200 Paper Jam Remove Cartridge 201 Paper Jam Remove Cartridge 202 Paper Jam Open Rear Door 230 Paper Jam Check Duplex 24x Paper Jam Check Tray x Meaning and required action The ...
...front door. A new copy of the page prints if Jam Recovery is visible, gently remove it to On or Auto. Reinstall the print cartridge and close the upper front door. Occasionally, print material may jam as it enters the duplex unit. Understanding Printer Messages 113 Attendance message ...200 Paper Jam Remove Cartridge 201 Paper Jam Remove Cartridge 202 Paper Jam Open Rear Door 230 Paper Jam Check Duplex 24x Paper Jam Check Tray x Meaning and required action The ...
Administrator's Guide (1.4 MB)
Page 114
...open the output option rear door, remove the jammed print material, and close the upper front door, and reinstall the envelope feeder. Reinstall the cartridge, if it out gently. If only a portion of the print material is set to the User's Guide for service and report the message number... printer detects a paper jam in output option x, where x is visible from the output option tray, open the upper front door, remove the print cartridge, and remove the jammed print material. If print material is output option 1 to the User's Guide for about 10 seconds, and then turn the ...
...open the output option rear door, remove the jammed print material, and close the upper front door, and reinstall the envelope feeder. Reinstall the cartridge, if it out gently. If only a portion of the print material is set to the User's Guide for service and report the message number... printer detects a paper jam in output option x, where x is visible from the output option tray, open the upper front door, remove the print cartridge, and remove the jammed print material. If print material is output option 1 to the User's Guide for about 10 seconds, and then turn the ...
Administrator's Guide (1.4 MB)
Page 116
... close the door. The duplex rear door is open or the print cartridge is open . The upper front door is not installed. The printer requests confirmation to the printer, but may not be fully connected or may be ... the CONFIDENTIAL JOB or the HELD JOBS menu item. • Press Go to clear a paper jam. Attendance message Check Connection Reattach Close Door or Insert Cartridge Close Duplex Rear Door Delete All Jobs.
... close the door. The duplex rear door is open or the print cartridge is open . The upper front door is not installed. The printer requests confirmation to the printer, but may not be fully connected or may be ... the CONFIDENTIAL JOB or the HELD JOBS menu item. • Press Go to clear a paper jam. Attendance message Check Connection Reattach Close Door or Insert Cartridge Close Duplex Rear Door Delete All Jobs.
Administrator's Guide (1.4 MB)
Page 122
.... For your country. "Ordering supplies" on page 126. For more information, click the appropriate text: "Changing the print cartridge" on page 125. All users sharing the printer should be done at : http://www.lexmark.com/support/index.html. This site includes helpful information about using your printer, including a list of phone numbers...
.... For your country. "Ordering supplies" on page 126. For more information, click the appropriate text: "Changing the print cartridge" on page 125. All users sharing the printer should be done at : http://www.lexmark.com/support/index.html. This site includes helpful information about using your printer, including a list of phone numbers...
Administrator's Guide (1.4 MB)
Page 123
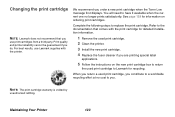
... cost to you. Refer to the documentation that you use Lexmark supplies with the print cartridge for detailed installation information. 1 Remove the used print cartridge to Lexmark for information on ordering print cartridges. NOTE: The print cartridge warranty is voided by unauthorized refilling. Changing the print cartridge NOTE: Lexmark does not recommend that comes with the printer. You...
... cost to you. Refer to the documentation that you use Lexmark supplies with the print cartridge for detailed installation information. 1 Remove the used print cartridge to Lexmark for information on ordering print cartridges. NOTE: The print cartridge warranty is voided by unauthorized refilling. Changing the print cartridge NOTE: Lexmark does not recommend that comes with the printer. You...
Administrator's Guide (1.4 MB)
Page 124
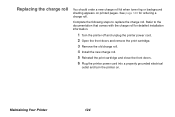
.... 1 Turn the printer off and unplug the printer power cord. 2 Open the front doors and remove the print cartridge. 3 Remove the old charge roll. 4 Install the new charge roll. 5 Reinstall the print cartridge and close the front doors. 6 Plug the printer power cord into a properly grounded electrical outlet and turn the printer...
.... 1 Turn the printer off and unplug the printer power cord. 2 Open the front doors and remove the print cartridge. 3 Remove the old charge roll. 4 Install the new charge roll. 5 Reinstall the print cartridge and close the front doors. 6 Plug the printer power cord into a properly grounded electrical outlet and turn the printer...
Administrator's Guide (1.4 MB)
Page 125
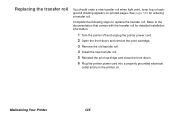
.... 1 Turn the printer off and unplug the printer power cord. 2 Open the front doors and remove the print cartridge. 3 Remove the old transfer roll. 4 Install the new transfer roll. 5 Reinstall the print cartridge and close the front doors. 6 Plug the printer power cord into a properly grounded electrical outlet and turn the printer...
.... 1 Turn the printer off and unplug the printer power cord. 2 Open the front doors and remove the print cartridge. 3 Remove the old transfer roll. 4 Install the new transfer roll. 5 Reinstall the print cartridge and close the front doors. 6 Plug the printer power cord into a properly grounded electrical outlet and turn the printer...
Administrator's Guide (1.4 MB)
Page 128
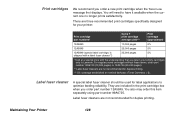
...cartridge box when you order part number 12A5849. You also may order this item separately using part number 99A0725. Print cartridges We recommend you return your printer: Print cartridge part numbers* Optra T print cartridge... average yield*** Print coverage (approximate) 12A5840 10,000 pages 5% 12A5845 25,000 pages 5% 12A5849 (special label cartridge...cartridge when the Toner Low message first ... recommended print cartridges specifically designed for...
...cartridge box when you order part number 12A5849. You also may order this item separately using part number 99A0725. Print cartridges We recommend you return your printer: Print cartridge part numbers* Optra T print cartridge... average yield*** Print coverage (approximate) 12A5840 10,000 pages 5% 12A5845 25,000 pages 5% 12A5849 (special label cartridge...cartridge when the Toner Low message first ... recommended print cartridges specifically designed for...

Administrator's Guide (1.4 MB)
Page 135
..."PAPER TYPE" on page 17. • Verify that the print material is within the printer specifications. To utilize the remaining toner, shake the cartridge gently. Refer to the User's Guide for more details. • If the problem continues, call your service representative. To help prevent this, ...the printer setup cycle and clean the transfer roll. Print quality problems If the suggested corrective action does not fix the problem, call the Lexmark Customer Support Center. See "Toner Darkness" on page 45. • If you are printing on an uneven print surface, change the ...
..."PAPER TYPE" on page 17. • Verify that the print material is within the printer specifications. To utilize the remaining toner, shake the cartridge gently. Refer to the User's Guide for more details. • If the problem continues, call your service representative. To help prevent this, ...the printer setup cycle and clean the transfer roll. Print quality problems If the suggested corrective action does not fix the problem, call the Lexmark Customer Support Center. See "Toner Darkness" on page 45. • If you are printing on an uneven print surface, change the ...
Administrator's Guide (1.4 MB)
Page 136
...on page 124. See "Maintaining Your Printer" on the page. • Change the print cartridge. Entire page is white. • Make sure the packaging material is removed from the print cartridge. • Check the print cartridge to make sure the ink can withstand temperatures of 212°C (414°F). See "...roll" on the page. • The toner may be sure it is installed correctly. • Check the toner supply. Reinstall the same print cartridge. • If you are using pre-printed forms, make sure it is installed correctly. Solving Printer Problems 136 Remove the...
...on page 124. See "Maintaining Your Printer" on the page. • Change the print cartridge. Entire page is white. • Make sure the packaging material is removed from the print cartridge. • Check the print cartridge to make sure the ink can withstand temperatures of 212°C (414°F). See "...roll" on the page. • The toner may be sure it is installed correctly. • Check the toner supply. Reinstall the same print cartridge. • If you are using pre-printed forms, make sure it is installed correctly. Solving Printer Problems 136 Remove the...

Administrator's Guide (1.4 MB)
Page 138
See "PAPER SIZE" on page 15. top margins are incorrect. • Make sure the margins are using. Solving Printer Problems 138 Problem Part or all of the page is printed in the software application you are set correctly in black. The job prints, but the left and • Make sure the PAPER SIZE setting in the PAPER MENU is installed correctly. Action • Check the print cartridge to see if it is installed correctly. • If the charge roll has been replaced, verify that it is correct.
See "PAPER SIZE" on page 15. top margins are incorrect. • Make sure the margins are using. Solving Printer Problems 138 Problem Part or all of the page is printed in the software application you are set correctly in black. The job prints, but the left and • Make sure the PAPER SIZE setting in the PAPER MENU is installed correctly. Action • Check the print cartridge to see if it is installed correctly. • If the charge roll has been replaced, verify that it is correct.

Administrator's Guide (1.4 MB)
Page 173
Printer Specifications Dimensions Height in. (mm) Width in. (mm) Depth in. (mm) Weight1 lb. (kg) Optra Optra Optra Optra Optra Optra Optra Optra T616 T616n T614 T614n T612 T612n T610 T610n 15.9 (404) 21.2 2 (538) 15.9 (404) 21.2 2 (538) 15.9 (404) 15.9 (404) 21.2 2 (538) 14.9 (379)...20.4) 1 Weight of printer includes print cartridge. 2 Height of printer with included 500-sheet drawer. 3 Weight of printer with included 500-sheet drawer. 43.5 (19.7) 43.5 (19.7) Duty cycle Optra T616(n) Up to 200,000 pages per month Maximum Duty Cycle Optra T614(n) Optra T612(n) Up to 130,000 Up ...
Printer Specifications Dimensions Height in. (mm) Width in. (mm) Depth in. (mm) Weight1 lb. (kg) Optra Optra Optra Optra Optra Optra Optra Optra T616 T616n T614 T614n T612 T612n T610 T610n 15.9 (404) 21.2 2 (538) 15.9 (404) 21.2 2 (538) 15.9 (404) 15.9 (404) 21.2 2 (538) 14.9 (379)...20.4) 1 Weight of printer includes print cartridge. 2 Height of printer with included 500-sheet drawer. 3 Weight of printer with included 500-sheet drawer. 43.5 (19.7) 43.5 (19.7) Duty cycle Optra T616(n) Up to 200,000 pages per month Maximum Duty Cycle Optra T614(n) Optra T612(n) Up to 130,000 Up ...

High-Capacity Output Stacker Installation Instructions (1 MB)
Page 10
... Once the high-capacity output stacker has been installed, verify that the high-capacity output stacker you receive a message, such as: 201 Paper Jam Remove Cartridge refer to the Ready state. To print a menu settings page: 1 Make sure the printer power is on and the Ready status message appears on the...
... Once the high-capacity output stacker has been installed, verify that the high-capacity output stacker you receive a message, such as: 201 Paper Jam Remove Cartridge refer to the Ready state. To print a menu settings page: 1 Make sure the printer power is on and the Ready status message appears on the...

Technical Reference
Page 65
...Pages Holds print jobs in the print buffer until the current job finishes printing. The 7 value for Cartridge may be specified, but since your printer does not support font cards or cartridges, the command is used along with the location type to identify a location for unbound scalable fonts) ...54 PCL Table 2-33: Status Readback Command / Parameters ESC*s#T 0 Invalid location (Default) 1 Use currently selected location 2 All locations 3 Internal (resident) 4 Downloaded entity 5 Cartridge 7 User-installable flash 200 Disk ESC*s#U 0 All 1 If download, temporary;
...Pages Holds print jobs in the print buffer until the current job finishes printing. The 7 value for Cartridge may be specified, but since your printer does not support font cards or cartridges, the command is used along with the location type to identify a location for unbound scalable fonts) ...54 PCL Table 2-33: Status Readback Command / Parameters ESC*s#T 0 Invalid location (Default) 1 Use currently selected location 2 All locations 3 Internal (resident) 4 Downloaded entity 5 Cartridge 7 User-installable flash 200 Disk ESC*s#U 0 All 1 If download, temporary;

Technical Reference
Page 108
... Envelope feeder installed size, default formatting size COM10, COM9, MONARCH, DL, C5, B5, OTHERENVELOPE Ink Alert ON, OFF Displays a printer attendance message when an ink cartridge is truncated to 200 3 Note: Status Readback commands return a ? 3-31 PJL Table 3-4: Printer Unique Variables for Both Printer Languages (Continued) Variable LFAXREDIALFREQUENCY (SET only) LFAXTRANSMISSIONLOG...
... Envelope feeder installed size, default formatting size COM10, COM9, MONARCH, DL, C5, B5, OTHERENVELOPE Ink Alert ON, OFF Displays a printer attendance message when an ink cartridge is truncated to 200 3 Note: Status Readback commands return a ? 3-31 PJL Table 3-4: Printer Unique Variables for Both Printer Languages (Continued) Variable LFAXREDIALFREQUENCY (SET only) LFAXTRANSMISSIONLOG...
Technical Reference
Page 136
... Low 10006 88 Black Toner Low TRUE Ready with Toner Low 10006 88 Color Print Cartridge Low TRUE Ready with Toner Low 10006 88 Black Print Cartridge Low TRUE Ready with Toner Low 10006 88 Photo Print Cartridge Low TRUE Ready with Replace Toner 10006 Replace Toner TRUE Ready with Replace PC Kit...
... Low 10006 88 Black Toner Low TRUE Ready with Toner Low 10006 88 Color Print Cartridge Low TRUE Ready with Toner Low 10006 88 Black Print Cartridge Low TRUE Ready with Toner Low 10006 88 Photo Print Cartridge Low TRUE Ready with Replace Toner 10006 Replace Toner TRUE Ready with Replace PC Kit...

Technical Reference
Page 141
... Intervention required: close toner box cover 40021 Close Cover A FALSE Intervention required: defective print cartridge 40021 31 Defective Print Cartridge FALSE Intervention required: unsupported print cartridge 40021 32 Unsupported Print Cartridge FALSE Intervention required: change cartridge invalid refill 40021 Change Cartridge Invalid Refill FALSE Intervention required: open rear door 40021 Open Rear Door FALSE Intervention required...
... Intervention required: close toner box cover 40021 Close Cover A FALSE Intervention required: defective print cartridge 40021 31 Defective Print Cartridge FALSE Intervention required: unsupported print cartridge 40021 32 Unsupported Print Cartridge FALSE Intervention required: change cartridge invalid refill 40021 Change Cartridge Invalid Refill FALSE Intervention required: open rear door 40021 Open Rear Door FALSE Intervention required...

Technical Reference
Page 142
... low 40038 88 Black Toner Low FALSE Intervention required: toner low 40038 88 Color Print Cartridge Low FALSE Intervention required: toner low 40038 88 Black Print Cartridge Low FALSE Intervention required: toner low 40038 88 Photo Print Cartridge Low 1 represents a one-letter designator for each door labeled on the printer. 2 represents a one-letter...
... low 40038 88 Black Toner Low FALSE Intervention required: toner low 40038 88 Color Print Cartridge Low FALSE Intervention required: toner low 40038 88 Black Print Cartridge Low FALSE Intervention required: toner low 40038 88 Photo Print Cartridge Low 1 represents a one-letter designator for each door labeled on the printer. 2 represents a one-letter...


