
Card Stock & Label Guide
Page 11
...; maintenance by earlier printer models. Perforations that could cause nesting and tenting should fall outside of Lexmark specifications • use of non-Lexmark supplies (such as toner cartridges and/or inkjet cartridges) • use of printing media outside the pick roller area on the leading edge of ... speed may nest, causing multiple sheets to have installed a maintenance kit as specified (if applicable) • use of non-Lexmark product or component Pick roller technology Some printers have an auto compensator which feeds paper more information, see "Perforations and die-cuts...
...; maintenance by earlier printer models. Perforations that could cause nesting and tenting should fall outside of Lexmark specifications • use of non-Lexmark supplies (such as toner cartridges and/or inkjet cartridges) • use of printing media outside the pick roller area on the leading edge of ... speed may nest, causing multiple sheets to have installed a maintenance kit as specified (if applicable) • use of non-Lexmark product or component Pick roller technology Some printers have an auto compensator which feeds paper more information, see "Perforations and die-cuts...

Card Stock & Label Guide
Page 130
... non-Lexmark cartridges can void the printer warranty. 3 Print 5 more often with some labels, ensuring good print quality. • We recommend using card stock or labels with serial numbers after BC143), and 4039 10 plus printers • If your printer. Optra C We do not recommend using the fuser cleaner shipped with Diamond FineTM toner cartridges...
... non-Lexmark cartridges can void the printer warranty. 3 Print 5 more often with some labels, ensuring good print quality. • We recommend using card stock or labels with serial numbers after BC143), and 4039 10 plus printers • If your printer. Optra C We do not recommend using the fuser cleaner shipped with Diamond FineTM toner cartridges...

Service Manual
Page 3
...ix General Information ...1-1 Maintenance Approach ...1-1 Tools ...1-1 Abbreviations ...1-2 Paper Feed Operation ...1-2 Drum Cartridge Toner Full Detection...1-6 Synchronizing Rollers ...1-7 Paper Type Detection ...1-8 Development ...1-10 Toner Empty / Toner Cartridge Detection ...1-10 AIDC Sensor and Erase Lamp ...1-11 Diagnostic Information ...2-1 Start ...2-1 Initial Check ...Motor Service Check ...2-34 Image Transfer Belt Service Check...2-35 Paper Jam Service Check ...2-35 Toner Cartridge Rack Service Check ...2-38 Printhead Cooling Fan Service Check...2-39 Power Supply Cooling Fan Motor ...
...ix General Information ...1-1 Maintenance Approach ...1-1 Tools ...1-1 Abbreviations ...1-2 Paper Feed Operation ...1-2 Drum Cartridge Toner Full Detection...1-6 Synchronizing Rollers ...1-7 Paper Type Detection ...1-8 Development ...1-10 Toner Empty / Toner Cartridge Detection ...1-10 AIDC Sensor and Erase Lamp ...1-11 Diagnostic Information ...2-1 Start ...2-1 Initial Check ...Motor Service Check ...2-34 Image Transfer Belt Service Check...2-35 Paper Jam Service Check ...2-35 Toner Cartridge Rack Service Check ...2-38 Printhead Cooling Fan Service Check...2-39 Power Supply Cooling Fan Motor ...

Service Manual
Page 5
Waste Toner Bottle Removal...3-7 Image Transfer Belt Removal ...3-7 Fuser Removal ...3-8 Oil Coating Roller Removal ...3-9 Heater Lamp Removal...3-10 Printhead Removal ...3-11 Paper Exit Removal...3-12 High... Plate Removal ...3-13 Power Supply Removal ...3-13 Mechanical Control Board Removal ...3-14 Power Supply Frame Removal ...3-14 Printhead Frame Removal...3-15 Toner Empty / Toner Cartridge Detecting Board (PWB-B) Removal ...3-16 Toner Cartridge Rack Removal ...3-16 Mechanical Controller Board Frame Removal...3-19 Paper Size/Cassette Detecting Board (PWB-E) Removal 3-19 Paper Take-Up Removal ...
Waste Toner Bottle Removal...3-7 Image Transfer Belt Removal ...3-7 Fuser Removal ...3-8 Oil Coating Roller Removal ...3-9 Heater Lamp Removal...3-10 Printhead Removal ...3-11 Paper Exit Removal...3-12 High... Plate Removal ...3-13 Power Supply Removal ...3-13 Mechanical Control Board Removal ...3-14 Power Supply Frame Removal ...3-14 Printhead Frame Removal...3-15 Toner Empty / Toner Cartridge Detecting Board (PWB-B) Removal ...3-16 Toner Cartridge Rack Removal ...3-16 Mechanical Controller Board Frame Removal...3-19 Paper Size/Cassette Detecting Board (PWB-E) Removal 3-19 Paper Take-Up Removal ...

Service Manual
Page 31
Development Toner Empty / Toner Cartridge Detection Toner Empty Detection Light from the toner empty detection LED (LED1) on the toner empty/toner cartridge detecting board (PWB-B) is reflected by a mirror in the toner cartridge and received by the photo sensor determines whether the toner is empty or nearly empty. 1-10 The amount of light received by photo sensor (PT1).
Development Toner Empty / Toner Cartridge Detection Toner Empty Detection Light from the toner empty detection LED (LED1) on the toner empty/toner cartridge detecting board (PWB-B) is reflected by a mirror in the toner cartridge and received by the photo sensor determines whether the toner is empty or nearly empty. 1-10 The amount of light received by photo sensor (PT1).

Service Manual
Page 32
... AIDC sensor detects the image density of the AIDC mark formed by the toner cartridge surface to determine proper charging bias and developing bias. AIDC detection is detected during warm up. The toner cartridge is accomplished with one LED (LED1) and two photo sensors (PT1, PT2... on the AIDC/erase lamp board (PWB-C) on the PC Drum to the photo sensor (PT1). Toner Cartridge Detection Light from the toner cartridge detection LED (LED2) on the toner empty/toner cartridge detecting board (PWB-B) is reflected by toner on top of the image transfer belt. General Information 1-11
... AIDC sensor detects the image density of the AIDC mark formed by the toner cartridge surface to determine proper charging bias and developing bias. AIDC detection is detected during warm up. The toner cartridge is accomplished with one LED (LED1) and two photo sensors (PT1, PT2... on the AIDC/erase lamp board (PWB-C) on the PC Drum to the photo sensor (PT1). Toner Cartridge Detection Light from the toner cartridge detection LED (LED2) on the toner empty/toner cartridge detecting board (PWB-B) is reflected by toner on top of the image transfer belt. General Information 1-11

Service Manual
Page 33
AIDC detection is done for each Color Toner Cartridge after the developing rack position initializes. 1-12
AIDC detection is done for each Color Toner Cartridge after the developing rack position initializes. 1-12

Service Manual
Page 47
...the operator panel. • Be sure the paper cassette is securely closed . If this does not correct the problem, replace the toner empty/toner cartridge detecting board (PWB-B) and the mechanical controller board if necessary. The media type or size that it is closed . • ... 34 Incorrect Media 2-12 If you selected on the toner cartridge and the toner cartridge rack. Clean or replace as necessary. 30 Yellow Toner Cart Missing 30 Magenta Toner Cart Missing 30 Cyan Toner Cart Missing 30 Black Toner Cart Missing The toner cartridge indicated is open or the back door (fuser area)...
...the operator panel. • Be sure the paper cassette is securely closed . If this does not correct the problem, replace the toner empty/toner cartridge detecting board (PWB-B) and the mechanical controller board if necessary. The media type or size that it is closed . • ... 34 Incorrect Media 2-12 If you selected on the toner cartridge and the toner cartridge rack. Clean or replace as necessary. 30 Yellow Toner Cart Missing 30 Magenta Toner Cart Missing 30 Cyan Toner Cart Missing 30 Black Toner Cart Missing The toner cartridge indicated is open or the back door (fuser area)...
Service Manual
Page 61
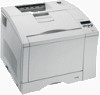
Go to access the Busy menu. • Select Reset Printer. Or, to reset the printer: • Press to the "Toner Cartridge Rack Service Check" on page 2-34. Often the message is displayed when a user removes a tray to refill it while a job is displayed when the printer ... a missing tray. Service Error Message Table Error 900 910 911 912 913 Symptom or Message Software Error Transport Motor (M2) Failure Developing Motor (M1) Failure Toner Cartridge Rack Motor (M3) Failure Transfer Roller Error Action Unrecoverable software error.
Go to access the Busy menu. • Select Reset Printer. Or, to reset the printer: • Press to the "Toner Cartridge Rack Service Check" on page 2-34. Often the message is displayed when a user removes a tray to refill it while a job is displayed when the printer ... a missing tray. Service Error Message Table Error 900 910 911 912 913 Symptom or Message Software Error Transport Motor (M2) Failure Developing Motor (M1) Failure Toner Cartridge Rack Motor (M3) Failure Transfer Roller Error Action Unrecoverable software error.
Service Manual
Page 64
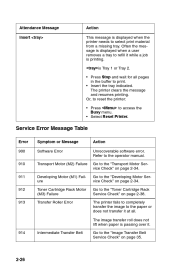
...cover to home position or lock the rack into colors. If you still have the problem, replace the mechanical controller board. Go to the "Toner Cartridge Rack Service Check" on page 2-47. Replace the OHP sheet detection board (PWB-D2). The image will not be on page 2-47 .... Replace the solenoid if necessary. Go to detect overhead projection foils. Do a continuity check of the connector (CN5). Go to this check. Toner cartridge rack does not rotate. If it works properly, return to the "Sensor Service Check" on page 2-47 and check the image transfer roller position...
...cover to home position or lock the rack into colors. If you still have the problem, replace the mechanical controller board. Go to the "Toner Cartridge Rack Service Check" on page 2-47. Replace the OHP sheet detection board (PWB-D2). The image will not be on page 2-47 .... Replace the solenoid if necessary. Go to detect overhead projection foils. Do a continuity check of the connector (CN5). Go to this check. Toner cartridge rack does not rotate. If it works properly, return to the "Sensor Service Check" on page 2-47 and check the image transfer roller position...

Service Manual
Page 65
...noise. Action • Check the rack detent on page 2-35. Go to the "Paper Jam Service Check" on the left side of the rack. Toner cartridge rack fails to the "Paper Jam Service Check" on page 2-35. Faulty developing motor (M1). Fuser failure Fuser belt suction failure (M7). No paper... on page 2-35. Go to turn when the print cycle is open. • Check the toner cartridge rack back check gear for damage. • Check the rack lever and detent pins • Check the toner cartridge rack lever sensor (PC12) for correct operation. • Check the back check sensor for correct ...
...noise. Action • Check the rack detent on page 2-35. Go to the "Paper Jam Service Check" on the left side of the rack. Toner cartridge rack fails to the "Paper Jam Service Check" on page 2-35. Faulty developing motor (M1). Fuser failure Fuser belt suction failure (M7). No paper... on page 2-35. Go to turn when the print cycle is open. • Check the toner cartridge rack back check gear for damage. • Check the rack lever and detent pins • Check the toner cartridge rack lever sensor (PC12) for correct operation. • Check the back check sensor for correct ...
Service Manual
Page 73
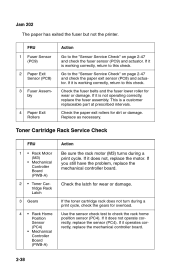
...If you still have the problem, replace the mechanical controller board. 2 Check the latch for wear or damage. 3 4 If the toner cartridge rack does not turn during a print cycle. If it is working correctly, return to the "Sensor Service Check" on page 2-47 ... check the fuser sensor (PC9) and actuator. Replace as necessary. 2 3 4 Paper Exit Rollers Toner Cartridge Rack Service Check FRU 1 • Rack Motor (M3) • Mechanical Controller Board (PWB-A) • Toner Cartridge Rack Latch Gears • Rack Home Position Sensor (PC4) • Mechanical Controller Board (PWB-A) ...
...If you still have the problem, replace the mechanical controller board. 2 Check the latch for wear or damage. 3 4 If the toner cartridge rack does not turn during a print cycle. If it is working correctly, return to the "Sensor Service Check" on page 2-47 ... check the fuser sensor (PC9) and actuator. Replace as necessary. 2 3 4 Paper Exit Rollers Toner Cartridge Rack Service Check FRU 1 • Rack Motor (M3) • Mechanical Controller Board (PWB-A) • Toner Cartridge Rack Latch Gears • Rack Home Position Sensor (PC4) • Mechanical Controller Board (PWB-A) ...

Service Manual
Page 76
Check the assembly for debris on the roller under the belt Fuser belt, toner offset indicates a new fuser coating roll is needed Image transfer belt Diagnostic Information 2-41 Distance between the marks and locate the symptom below...color 51mm, all colors 65.5mm 94mm, light horizontal streaks 95mm, light to verify the problem has been corrected. Toner cartridge scuff Toner cartridge developer Second transfer roll Fuser lower roller Photoconductor cartridge Image transfer belt assembly, check for dirt or damage and clean as necessary. The indicated assemblies are replaced by the ...
Check the assembly for debris on the roller under the belt Fuser belt, toner offset indicates a new fuser coating roll is needed Image transfer belt Diagnostic Information 2-41 Distance between the marks and locate the symptom below...color 51mm, all colors 65.5mm 94mm, light horizontal streaks 95mm, light to verify the problem has been corrected. Toner cartridge scuff Toner cartridge developer Second transfer roll Fuser lower roller Photoconductor cartridge Image transfer belt assembly, check for dirt or damage and clean as necessary. The indicated assemblies are replaced by the ...

Service Manual
Page 78
...replaceable parts at prescribed intervals. Replace the PC drum cartridge. Be sure the transfer roll is a customer replaceable part at prescribed intervals: Replace the toner cartridge. Gently rock the toner cartridge to distribute the toner evenly. This is installed correctly. Poor development Diagnostic.... Replace the mechanical controller board (PWB-A). Replace the printhead. If you still have the problem, replace the toner cartridge. Foggy Background Possible Cause Action Poor development Replace the high voltage assembly (HV1). Blank Print Possible Cause Action ...
...replaceable parts at prescribed intervals. Replace the PC drum cartridge. Be sure the transfer roll is a customer replaceable part at prescribed intervals: Replace the toner cartridge. Gently rock the toner cartridge to distribute the toner evenly. This is installed correctly. Poor development Diagnostic.... Replace the mechanical controller board (PWB-A). Replace the printhead. If you still have the problem, replace the toner cartridge. Foggy Background Possible Cause Action Poor development Replace the high voltage assembly (HV1). Blank Print Possible Cause Action ...

Service Manual
Page 80
... intermediate image transfer Poor paper image transfer Incorrect laser exposer Diagnostic Information 2-45 Replace the PC drum cartridge.This is a customer replaceable part at prescribed intervals. Replace the image transfer roller assembly. Replace the...cartridge.This is a customer replaceable part at prescribed intervals. This is a customer replaceable part at prescribed intervals. This is a customer replaceable part at prescribed intervals. Replace the printhead. White and/or Black Lines and Bands Possible Cause Action Poor development Replace the toner cartridge...
... intermediate image transfer Poor paper image transfer Incorrect laser exposer Diagnostic Information 2-45 Replace the PC drum cartridge.This is a customer replaceable part at prescribed intervals. Replace the image transfer roller assembly. Replace the...cartridge.This is a customer replaceable part at prescribed intervals. This is a customer replaceable part at prescribed intervals. This is a customer replaceable part at prescribed intervals. Replace the printhead. White and/or Black Lines and Bands Possible Cause Action Poor development Replace the toner cartridge...

Service Manual
Page 81
... Incorrect fusing Replace the oil coating roller. Replace the fuser. (Customer replaces these parts.) Incorrect Color Image Registration Possible Cause Action Incorrect toner cartridge setting Defective intermediate image transfer Reset the toner cartridge securely. Replace the image transfer belt assembly (customer replaces this ). Replace the mechanical controller board (PWB-A). Replace the mechanical controller board...
... Incorrect fusing Replace the oil coating roller. Replace the fuser. (Customer replaces these parts.) Incorrect Color Image Registration Possible Cause Action Incorrect toner cartridge setting Defective intermediate image transfer Reset the toner cartridge securely. Replace the image transfer belt assembly (customer replaces this ). Replace the mechanical controller board (PWB-A). Replace the mechanical controller board...
Service Manual
Page 102
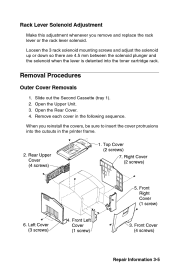
... in the printer frame. Rack Lever Solenoid Adjustment Make this adjustment whenever you reinstall the covers, be sure to insert the cover protrusions into the toner cartridge rack. Repair Information 3-5
... in the printer frame. Rack Lever Solenoid Adjustment Make this adjustment whenever you reinstall the covers, be sure to insert the cover protrusions into the toner cartridge rack. Repair Information 3-5

Service Manual
Page 113
Toner Empty / Toner Cartridge Detecting Board (PWBB) Removal 1. Remove the toner empty / toner cartridge detecting board (1 connector, 3 screws). Remove the printhead frame. 2. Toner Cartridge Rack Removal 1. Remove the rack cover (2 screws). 3-16 Remove the power unit frame. 2.
Toner Empty / Toner Cartridge Detecting Board (PWBB) Removal 1. Remove the toner empty / toner cartridge detecting board (1 connector, 3 screws). Remove the printhead frame. 2. Toner Cartridge Rack Removal 1. Remove the rack cover (2 screws). 3-16 Remove the power unit frame. 2.
Service Manual
Page 127
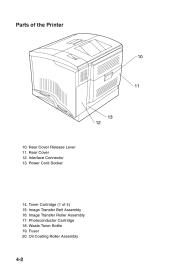
Image Transfer Roller Assembly 17. Rear Cover 12. Parts of 4) 15. Fuser 20. Oil Coating Roller Assembly 4-2 Interface Connector 13. Toner Cartridge (1 of the Printer 10. Image Transfer Belt Assembly 16. Power Cord Socket 14. Rear Cover Release Lever 11. Photoconductor Cartridge 18. Waste Toner Bottle 19.
Image Transfer Roller Assembly 17. Rear Cover 12. Parts of 4) 15. Fuser 20. Oil Coating Roller Assembly 4-2 Interface Connector 13. Toner Cartridge (1 of the Printer 10. Image Transfer Belt Assembly 16. Power Cord Socket 14. Rear Cover Release Lever 11. Photoconductor Cartridge 18. Waste Toner Bottle 19.

Service Manual
Page 130
... 1 Paper Synchronizing Sensor (PC1) Synchronizing Roller Image Transfer Roller Image Transfer Belt Unit Image Transfer Belt Drum Cartridge Toner Full Sensor Board (PWB-D1) Drum Cartridge PC Drum Rotating Charge Brush Sleeve Roller Toner Cartridge Toner Cartridge Rack Printhead Toner Empty/Toner Cartridge Detecting Board (PWB-B) Paper Exit Sensor (PC8) High Voltage Unit (HV1) Oil Coating Roller Detecting Sensor (PC3...
... 1 Paper Synchronizing Sensor (PC1) Synchronizing Roller Image Transfer Roller Image Transfer Belt Unit Image Transfer Belt Drum Cartridge Toner Full Sensor Board (PWB-D1) Drum Cartridge PC Drum Rotating Charge Brush Sleeve Roller Toner Cartridge Toner Cartridge Rack Printhead Toner Empty/Toner Cartridge Detecting Board (PWB-B) Paper Exit Sensor (PC8) High Voltage Unit (HV1) Oil Coating Roller Detecting Sensor (PC3...


