
User's Guide (7.1 MB)
Page 3
Table of Contents Table of Contents Introduction xi Trademarks xiii Getting Started Setting Up Your Printer 1 Identifying Your Printer, Features, and Options 1 Optra S 1255 and Optra S 1625 2 Optra S 1855 3 Optra S 2455 4 Unpacking the Printer 5 Determining What to Install Next 7 Installing the Dual 500-Sheet Drawer 7 Attaching the Decals 11 Removing the Print Cartridge Packaging 12 ...
Table of Contents Table of Contents Introduction xi Trademarks xiii Getting Started Setting Up Your Printer 1 Identifying Your Printer, Features, and Options 1 Optra S 1255 and Optra S 1625 2 Optra S 1855 3 Optra S 2455 4 Unpacking the Printer 5 Determining What to Install Next 7 Installing the Dual 500-Sheet Drawer 7 Attaching the Decals 11 Removing the Print Cartridge Packaging 12 ...
User's Guide (7.1 MB)
Page 5
... Guidelines 128 Envelope Guidelines 130 Label Guidelines 131 Card Stock Guidelines 138 Transparency Guidelines 139 Paper Sources 140 Standard Trays 140 Multipurpose Feeder 141 Optional Drawers 141 Optional Envelope Feeder 142 Paper Source Specifications 143 Paper Size Specifications 144 Envelope Size Specifications 145 Tray Linking 145 Paper Loading 146 Loading a Paper Tray...
... Guidelines 128 Envelope Guidelines 130 Label Guidelines 131 Card Stock Guidelines 138 Transparency Guidelines 139 Paper Sources 140 Standard Trays 140 Multipurpose Feeder 141 Optional Drawers 141 Optional Envelope Feeder 142 Paper Source Specifications 143 Paper Size Specifications 144 Envelope Size Specifications 145 Tray Linking 145 Paper Loading 146 Loading a Paper Tray...
User's Guide (7.1 MB)
Page 6
... Messages 177 Line 1 Messages 178 Line 2 Messages 182 Attendance Messages 184 Solving Printer Problems 199 Display Problems 200 Printing Problems 200 Print Quality Problems 201 Option Problems 204 Network Printing Problems 207 Other Problems and Questions 208 Clearing Jams 209 Possible Paper Jam Areas 209 Accessing Paper Jam Areas 211 200...
... Messages 177 Line 1 Messages 178 Line 2 Messages 182 Attendance Messages 184 Solving Printer Problems 199 Display Problems 200 Printing Problems 200 Print Quality Problems 201 Option Problems 204 Network Printing Problems 207 Other Problems and Questions 208 Clearing Jams 209 Possible Paper Jam Areas 209 Accessing Paper Jam Areas 211 200...
User's Guide (7.1 MB)
Page 7
... the Envelope Feeder 270 Removing the Envelope Feeder 271 Duplex Option 273 Installing the Duplex Option 273 Changing Duplex Settings 278 Duplex 278 Duplex Bind 278 Selecting Paper 280 Output Expanders 281 Installing an Optional Output Expander 282 Removing an Output Expander Tray 289 Changing ...Output Bin Settings 291 Output Bin Linking 291 Memory and Option Cards 293 Accessing the Printer System Board 293 Closing the Printer ...
... the Envelope Feeder 270 Removing the Envelope Feeder 271 Duplex Option 273 Installing the Duplex Option 273 Changing Duplex Settings 278 Duplex 278 Duplex Bind 278 Selecting Paper 280 Output Expanders 281 Installing an Optional Output Expander 282 Removing an Output Expander Tray 289 Changing ...Output Bin Settings 291 Output Bin Linking 291 Memory and Option Cards 293 Accessing the Printer System Board 293 Closing the Printer ...

User's Guide (7.1 MB)
Page 8
Table of Contents Removing a Flash Memory Option 307 Option Cards 308 Internal Network Adapter (INA) Option Card 309 Tri-Port Interface Option Card 310 Parallel 1284-C Adapter Option Card 311 Hard Disk with Adapter Option Card 312 Installing an Option Card 315 Removing an Option Card 319 Infrared Adapter 321 Connecting the Cable and Using ...the Infrared Adapter . . 321 Verifying the Installation of Options 325 Appendixes Understanding Fonts 329 Typefaces and Fonts 329 Weight and Style 330 Pitch and Point Size 331 Symbol ...
Table of Contents Removing a Flash Memory Option 307 Option Cards 308 Internal Network Adapter (INA) Option Card 309 Tri-Port Interface Option Card 310 Parallel 1284-C Adapter Option Card 311 Hard Disk with Adapter Option Card 312 Installing an Option Card 315 Removing an Option Card 319 Infrared Adapter 321 Connecting the Cable and Using ...the Infrared Adapter . . 321 Verifying the Installation of Options 325 Appendixes Understanding Fonts 329 Typefaces and Fonts 329 Weight and Style 330 Pitch and Point Size 331 Symbol ...
User's Guide (7.1 MB)
Page 11
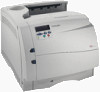
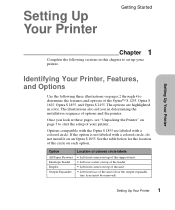
... This section helps you have a question about the Optra S laser printer family (Optra S 2455, Optra S 1855, Optra S 1625 and Optra S 1255). The User's Guide is divided into the following sections: Getting Started This section begins with its available options highlighted. Introduction xi Keep this book in a handy...for Your Printer This section explains how to set up your printer. Note: The illustrations represent the Optra S 2455 unless indicated otherwise. This information includes printer menus and settings, printer messages, paper handling features, and print material ...
... This section helps you have a question about the Optra S laser printer family (Optra S 2455, Optra S 1855, Optra S 1625 and Optra S 1255). The User's Guide is divided into the following sections: Getting Started This section begins with its available options highlighted. Introduction xi Keep this book in a handy...for Your Printer This section explains how to set up your printer. Note: The illustrations represent the Optra S 2455 unless indicated otherwise. This information includes printer menus and settings, printer messages, paper handling features, and print material ...
User's Guide (7.1 MB)
Page 12
xii Introduction Appendixes This section provides information on fonts, print quality, printer specifications, features, and options. The Technical Reference is available from Lexmark. Simply complete the order form included with the printer registration card to install options available for your printer. If you need more technical information about printer languages and commands, interface specification...
xii Introduction Appendixes This section provides information on fonts, print quality, printer specifications, features, and options. The Technical Reference is available from Lexmark. Simply complete the order form included with the printer registration card to install options available for your printer. If you need more technical information about printer languages and commands, interface specification...
User's Guide (7.1 MB)
Page 17
... front face of the Optra™ S 1255, Optra S 1625, Optra S 1855, and Optra S 2455. The illustrations also aid you look at these pages, see "Unpacking the Printer" on an Optra S 1855. Once you in determining the installation sequence of the feeder • Left front corner on each option. Identifying Your Printer, Features, and Options Use the following sections...
... front face of the Optra™ S 1255, Optra S 1625, Optra S 1855, and Optra S 2455. The illustrations also aid you look at these pages, see "Unpacking the Printer" on an Optra S 1855. Once you in determining the installation sequence of the feeder • Left front corner on each option. Identifying Your Printer, Features, and Options Use the following sections...
User's Guide (7.1 MB)
Page 18
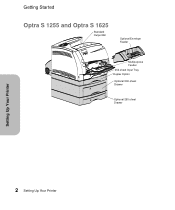
Getting Started Optra S 1255 and Optra S 1625 Standard Output Bin Optional Envelope Feeder Multipurpose Feeder 250-sheet Input Tray Duplex Option Optional 500-sheet Drawer Optional 250-sheet Drawer Setting Up Your Printer 2 Setting Up Your Printer
Getting Started Optra S 1255 and Optra S 1625 Standard Output Bin Optional Envelope Feeder Multipurpose Feeder 250-sheet Input Tray Duplex Option Optional 500-sheet Drawer Optional 250-sheet Drawer Setting Up Your Printer 2 Setting Up Your Printer

User's Guide (7.1 MB)
Page 19
See the table on an Optra S 1855. Setting Up Your Printer 3 Optra S 1855 Optional Envelope Feeder Getting Started Optional Output Expanders Standard Output Bin Setting Up Your Printer Multipurpose Feeder Optional 500-sheet Drawer Optional 500-sheet Drawer Optional 500-sheet Drawer 250-sheet Input Tray Duplex Option Note: Options compatible with the Optra S 1855 are labeled with a colored circle, do not install it on page 1 for the location of the label. If the option is not labeled with a colored circle.
See the table on an Optra S 1855. Setting Up Your Printer 3 Optra S 1855 Optional Envelope Feeder Getting Started Optional Output Expanders Standard Output Bin Setting Up Your Printer Multipurpose Feeder Optional 500-sheet Drawer Optional 500-sheet Drawer Optional 500-sheet Drawer 250-sheet Input Tray Duplex Option Note: Options compatible with the Optra S 1855 are labeled with a colored circle, do not install it on page 1 for the location of the label. If the option is not labeled with a colored circle.
User's Guide (7.1 MB)
Page 21
Since you have a sturdy, low table or the optional printer cabinet on all sides of clearance on which to set up your printer. Allow at least 304.8 mm (12 in .) Setting Up Your Printer ... Printer 1 Select a well-ventilated area as the location to set the printer. Make sure you may want to install more printer options or the standard dual 500-sheet drawer for the Optra S 2455, leave 137.16 cm (4 ½ ft) clearance above the printer. 137.16 cm (4 ½ ft) 304.8 mm (12 in...
Since you have a sturdy, low table or the optional printer cabinet on all sides of clearance on which to set up your printer. Allow at least 304.8 mm (12 in .) Setting Up Your Printer ... Printer 1 Select a well-ventilated area as the location to set the printer. Make sure you may want to install more printer options or the standard dual 500-sheet drawer for the Optra S 2455, leave 137.16 cm (4 ½ ft) clearance above the printer. 137.16 cm (4 ½ ft) 304.8 mm (12 in...
User's Guide (7.1 MB)
Page 23
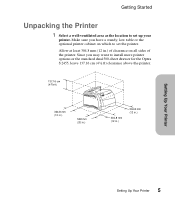
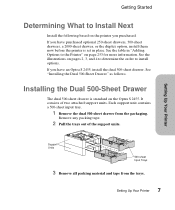
... What to Install Next Install the following based on the printer you have an Optra S 2455, install the dual 500-sheet drawer. If you have purchased optional 250-sheet drawers, 500-sheet drawers, a 2000-sheet drawer, or the duplex option, install them now before the printer is standard on page 253 for more...
... What to Install Next Install the following based on the printer you have an Optra S 2455, install the dual 500-sheet drawer. If you have purchased optional 250-sheet drawers, 500-sheet drawers, a 2000-sheet drawer, or the duplex option, install them now before the printer is standard on page 253 for more...
User's Guide (7.1 MB)
Page 24
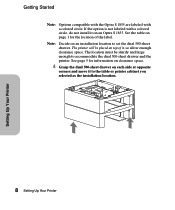
...printer. See page 5 for the location of it, so allow enough clearance space. Getting Started Note: Options compatible with the Optra S 1855 are labeled with a colored circle, do not install it on an Optra S 1855. Note: Decide on top of the label. Setting Up Your Printer 8 Setting Up Your ...Printer The location must be placed on an installation location to the table or printer cabinet you selected as the installation location. If the option is not labeled with ...
...printer. See page 5 for the location of it, so allow enough clearance space. Getting Started Note: Options compatible with the Optra S 1855 are labeled with a colored circle, do not install it on an Optra S 1855. Note: Decide on top of the label. Setting Up Your Printer 8 Setting Up Your ...Printer The location must be placed on an installation location to the table or printer cabinet you selected as the installation location. If the option is not labeled with ...
User's Guide (7.1 MB)
Page 25
... or ask someone to help you lift it down. CAUTION: Make sure your fingers are not under the printer when you have purchased optional drawers or the duplex option, install them now before the printer is set it . Square Hole Tab Round Hole Note: If you set in place. Use the hand...
... or ask someone to help you lift it down. CAUTION: Make sure your fingers are not under the printer when you have purchased optional drawers or the duplex option, install them now before the printer is set it . Square Hole Tab Round Hole Note: If you set in place. Use the hand...

User's Guide (7.1 MB)
Page 26
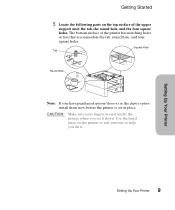
Setting Up Your Printer Getting Started 6 Lift and place the printer on top of the printer and the support unit are aligned so all the parts fit. Be sure the edges of the support unit. The right side of the printer is aligned with the option. Hand Grip Support Unit 10 Setting Up Your Printer
Setting Up Your Printer Getting Started 6 Lift and place the printer on top of the printer and the support unit are aligned so all the parts fit. Be sure the edges of the support unit. The right side of the printer is aligned with the option. Hand Grip Support Unit 10 Setting Up Your Printer
User's Guide (7.1 MB)
Page 27
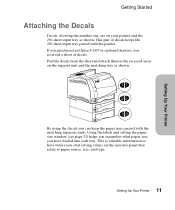
... window (see page 23) helps you remember what paper size you can keep the paper trays paired with the printer. If you purchased an Optra S 2455 or optional drawers, you start setting values on the operator panel that relate to have loaded into each tray. Setting Up Your Printer Getting Started Attaching...
... window (see page 23) helps you remember what paper size you can keep the paper trays paired with the printer. If you purchased an Optra S 2455 or optional drawers, you start setting values on the operator panel that relate to have loaded into each tray. Setting Up Your Printer Getting Started Attaching...
User's Guide (7.1 MB)
Page 40
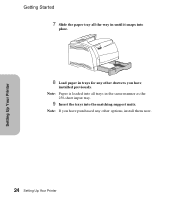
Note: If you have purchased any other options, install them now. 24 Setting Up Your Printer Setting Up Your Printer Getting Started 7 Slide the paper tray all trays in the same manner as the 250-sheet input tray. 9 Insert the trays into place. 8 Load paper in until it snaps into the matching support units. Note: Paper is loaded into all the way in trays for any other drawers you have installed previously.
Note: If you have purchased any other options, install them now. 24 Setting Up Your Printer Setting Up Your Printer Getting Started 7 Slide the paper tray all trays in the same manner as the 250-sheet input tray. 9 Insert the trays into place. 8 Load paper in until it snaps into the matching support units. Note: Paper is loaded into all the way in trays for any other drawers you have installed previously.

User's Guide (7.1 MB)
Page 45
...The page prints to select Print Menus. However, if an error message appears, see TESTS MENU. 4 Press Select to show the list of installed options. The page shows current settings for the menus and a list of menu items for more information. The printer returns to what you see "Understanding Printer... See "Using the Operator Panel and Menus" on the display until you want. You can use this page to verify that all the printer options are properly installed and the printer settings are set to the Ready status message when the page or pages finish printing. 29 Setting Up Your...
...The page prints to select Print Menus. However, if an error message appears, see TESTS MENU. 4 Press Select to show the list of installed options. The page shows current settings for the menus and a list of menu items for more information. The printer returns to what you see "Understanding Printer... See "Using the Operator Panel and Menus" on the display until you want. You can use this page to verify that all the printer options are properly installed and the printer settings are set to the Ready status message when the page or pages finish printing. 29 Setting Up Your...
User's Guide (7.1 MB)
Page 52
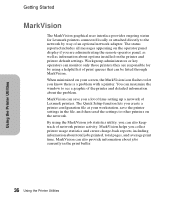
...the MarkVision job statistics utility, you a lot of time setting up a network of Lexmark printers. By using a helpful list of print queues that can also provide information about options installed on the network. Using the Printer Utilities Getting Started MarkVision The MarkVision graphical ... Setup function lets you create a printer configuration file at your screen, the MarkVision icon flashes to let you are responsible for Lexmark printers connected locally or attached directly to see a graphic of the printer and detailed information about total jobs printed, total pages...
...the MarkVision job statistics utility, you a lot of time setting up a network of Lexmark printers. By using a helpful list of print queues that can also provide information about options installed on the network. Using the Printer Utilities Getting Started MarkVision The MarkVision graphical ... Setup function lets you create a printer configuration file at your screen, the MarkVision icon flashes to let you are responsible for Lexmark printers connected locally or attached directly to see a graphic of the printer and detailed information about total jobs printed, total pages...
User's Guide (7.1 MB)
Page 56
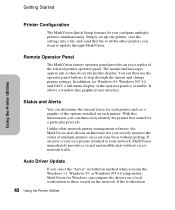
... Started Printer Configuration The MarkVision Quick Setup features let you actively monitor the status of multiple printers on each printer and see a graphic of the options installed on a real-time basis without excess network traffic. You can then use the operator panel buttons to update through the menus and change printer...
... Started Printer Configuration The MarkVision Quick Setup features let you actively monitor the status of multiple printers on each printer and see a graphic of the options installed on a real-time basis without excess network traffic. You can then use the operator panel buttons to update through the menus and change printer...


